こんにちは。プログラミングスクールHappiness Chainでメンターをしているryoです。
今回、Pyton on Django + Next.jsのアプリにて、ChatGPTを機能として盛り込むため、serverless framework + AWS Lambdaにて、ChatGPT APIを作成しましたのでそちらの手順を紹介します。
serveless frameworkのプロジェクトを作成
※Node.jsとServerless Frameworkをインストールしていない場合はインストールします。
sls create --template aws-python3 --name chatgpt-api --path chatgpt-api
言語はpythonのため、テンプレートはaws-python3を使用します。
上記実行にて、handler.pyとserverless.ymlが含まれたディレクトリが作成されます。
serverless.ymlを編集
最終的な内容は以下の通りです。
service: chatgpt-api
frameworkVersion: "3"

provider:
  name: aws
  runtime: python3.9
  stage: ${opt:stage, 'prod'}
  region: ${opt:region, "ap-northeast-1"}
  timeout: 180
  layers:
    - Ref: PythonRequirementsLambdaLayer

functions:
  get_text:
    handler: handler.chatgpt
    url:
      authorizer: aws_iam
      cors:
        allowCredentials: true
        allowedHeaders:
          - Content-Type
          - Authorization
        allowedMethods:
          - POST
        allowedOrigins:
          - http://localhost:3000
          - https://xxxxxx.com
        exposedResponseHeaders:
          - Special-Response-Header
        maxAge: 6000
custom:
  pythonRequirements:
    dockerizePip: true
    zip: true
    layer: true
plugins:
  - serverless-python-requirements
ChatGPTに利用するoepnaiのライブラリは重いため、serverless-python-requirementsというプラグインを使用します。
こちらを使用することで、外部ライブラリを関数に含めずデプロイできます。
custom:
  pythonRequirements:
        # docker上にライブラリをインストールする、LambdaサーバのOSに依存しなくなる
    dockerizePip: true
    # ライブラリの圧縮
    zip: true
    # 依存ライブラリのレイヤー化
    layer: true
関数を外部から呼び出すために、選択肢として、以下の通りです。
-
API Gateway
- メリット
- 複数関数ある(REST API)の場合、ひとつのhostnameから各関数にpathを割り振れる
- ドメインをカスタマイズできる
- デメリット
- timeoutがmax30秒(stepfnuctionsを使えば回避できるが、構築するのにやや面倒。リクエストを2回送る必要あり、front側も一工夫必要。)
- メリット
-
Funtion URL
- メリット
- タイムアウトがmax3000秒
- 構築が楽
- デメリット
- ドメインをカスタマイズできない
- メリット
今回chatgptへのinput、outputの文量が1000文字以上見込まれ、処理が30秒を超えるため、Function URLを採用。
認証として、IAMを使用。
corsも設定。
functions:
  chatgpt:
    handler: handler.chatgpt
    url:
      authorizer: aws_iam
      cors:
        allowCredentials: true
        allowedHeaders:
          - Content-Type
          - Authorization
        allowedMethods:
          - POST
        allowedOrigins:
          - http://localhost:3000
          - https://xxxxxxxx.jp
        exposedResponseHeaders:
          - Special-Response-Header
        maxAge: 6000
pluginをインストール
serverless-python-requirementsを使用するためpluginをインストールします。
serverless plugin install -n serverless-python-requirements
requirements.txtを作成
openai
handler.pyを編集
import json
import os

import openai

openai.api_key = os.environ["OPENAI_API_KEY"]


def chatgpt(event, context):
    body = json.loads(event["body"])
    if "user" not in body:
        return {
            'statusCode': 400,
            'headers': {
                "Access-Control-Allow-Headers": "Content-Type",
            },
            'body': "Arguments Error: user is required"
        }
    messages = []
    messages.append({"role": "user", "content": body["user"]})

    if "system" in body:
        messages.append({"role": "system", "content": body["system"]})

    if "assistant" in body:
        messages.append({"role": "assistant", "content": body["assistant"]})

    response = openai.ChatCompletion.create(
        model="gpt-4",
        messages=messages,
    )

    return {
        'statusCode': 200,
        'headers': {
            "Access-Control-Allow-Headers": "Content-Type",
        },
        'body': json.dumps({"text": response["choices"][0]["message"]["content"]})
    }
AWS Configureの設定
aws configure
AWS Access Key ID:
AWS Secret Access Key:
Default region name:
Default output format:
deploy
sls deploy
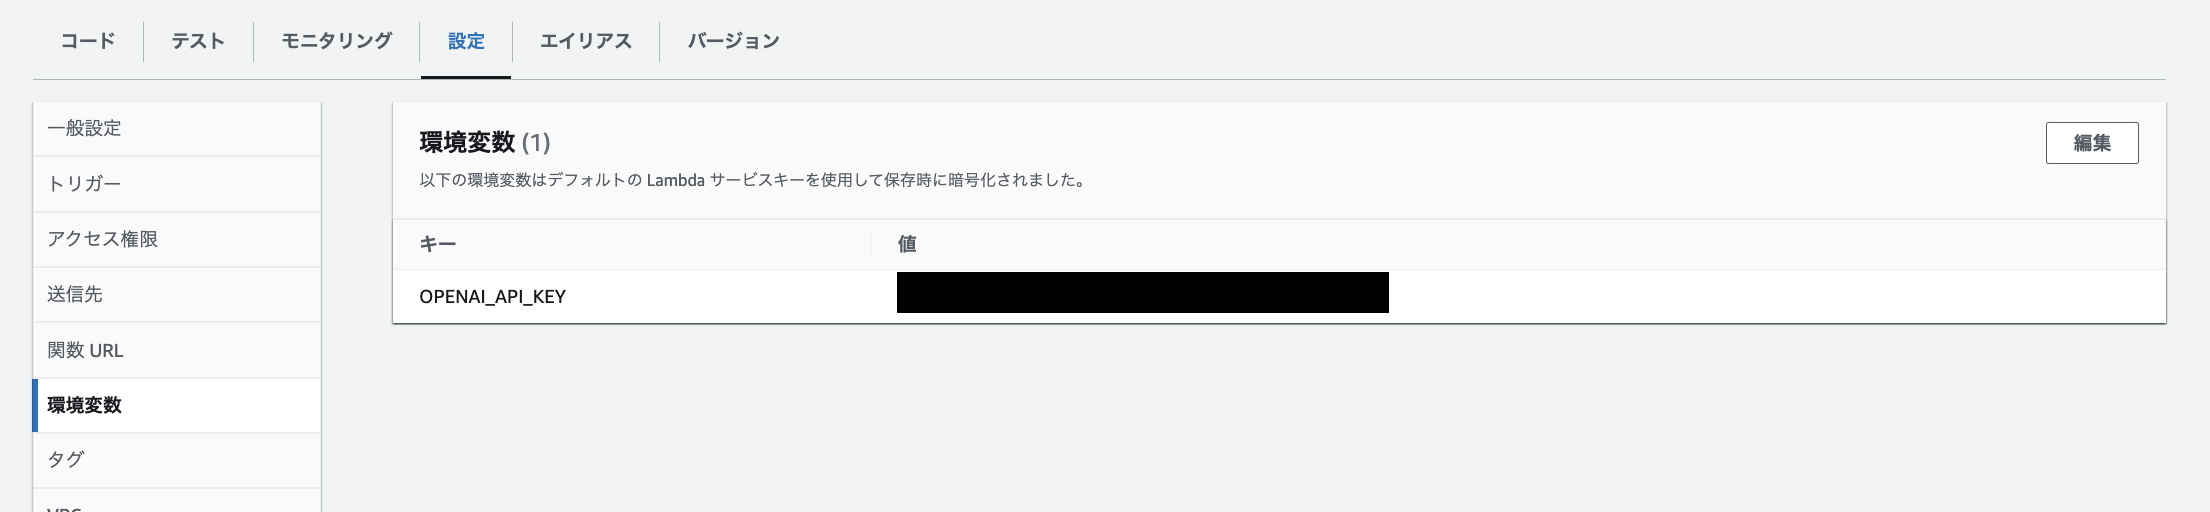
環境変数の設定
上記コマンドにてAWS Lambdaに関数が作成されるので、
そちらに環境変数を設定します。
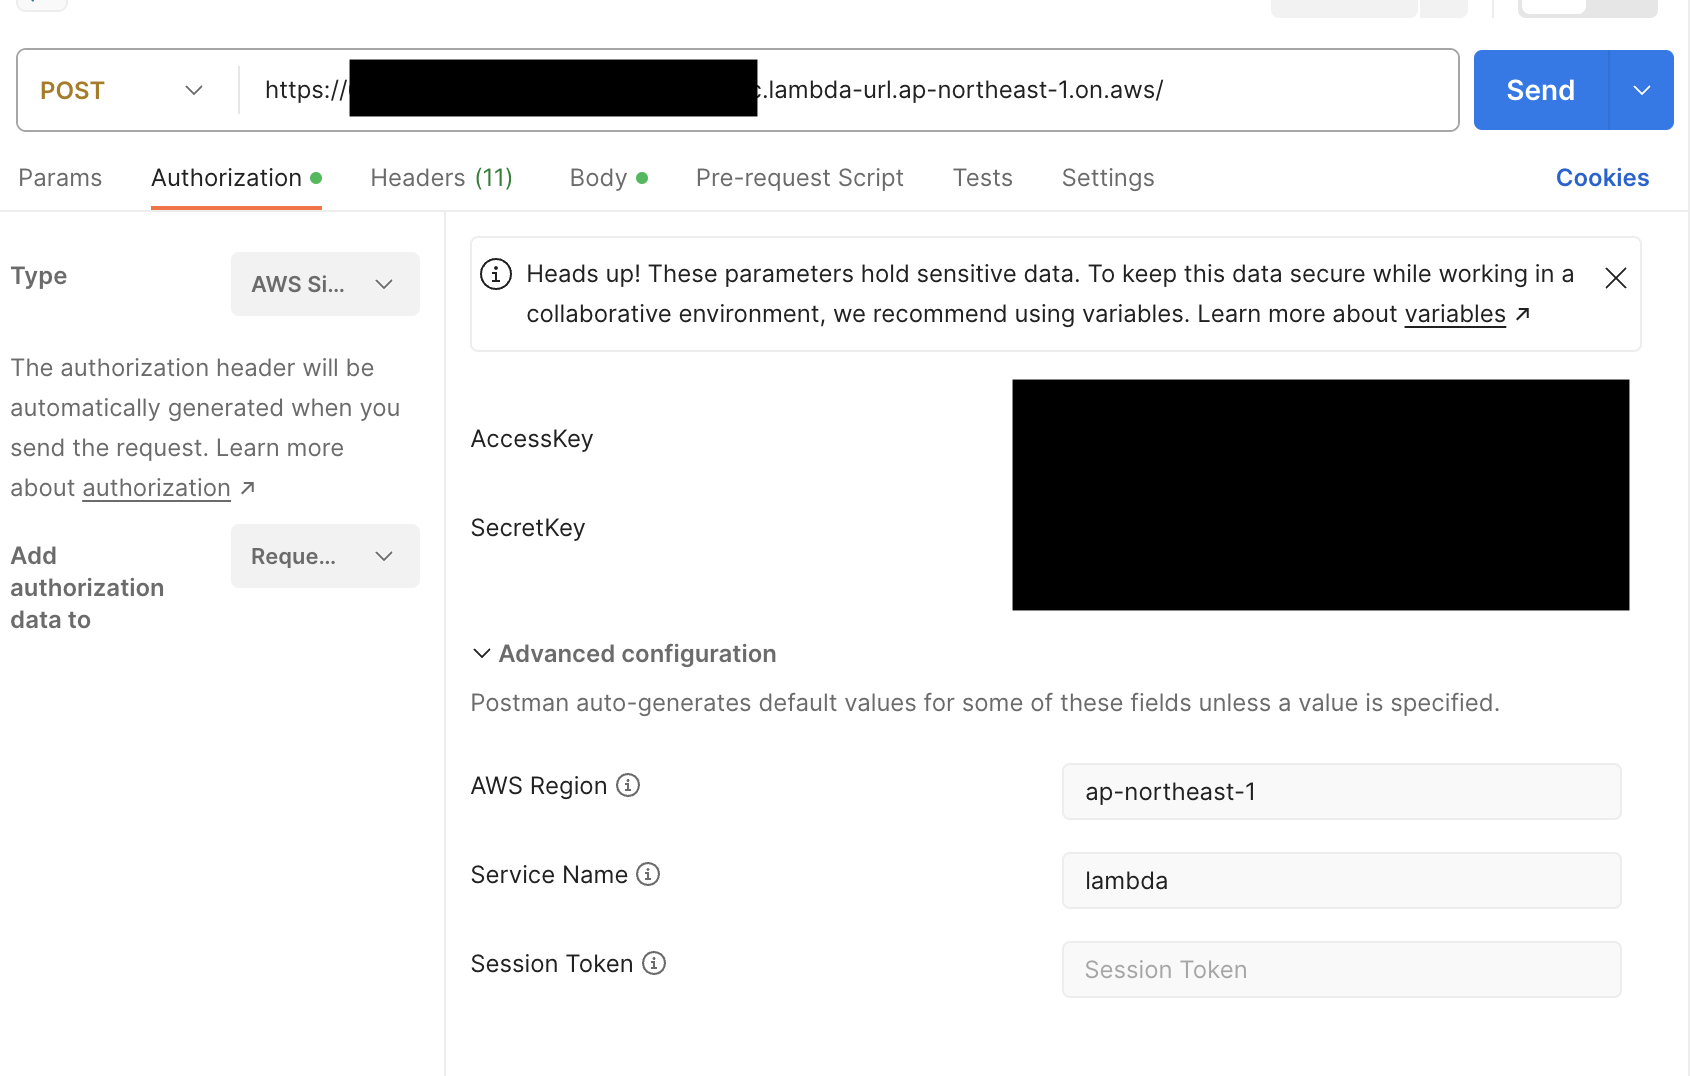
Postmanで動作確認
Authoriztion TypeとしてAWS Signatureを選択。
AccessKeyとSecretKeyはLambdaアクセス用に作成したIAMを設定。
AWS RegionとSevice Nameを設定。
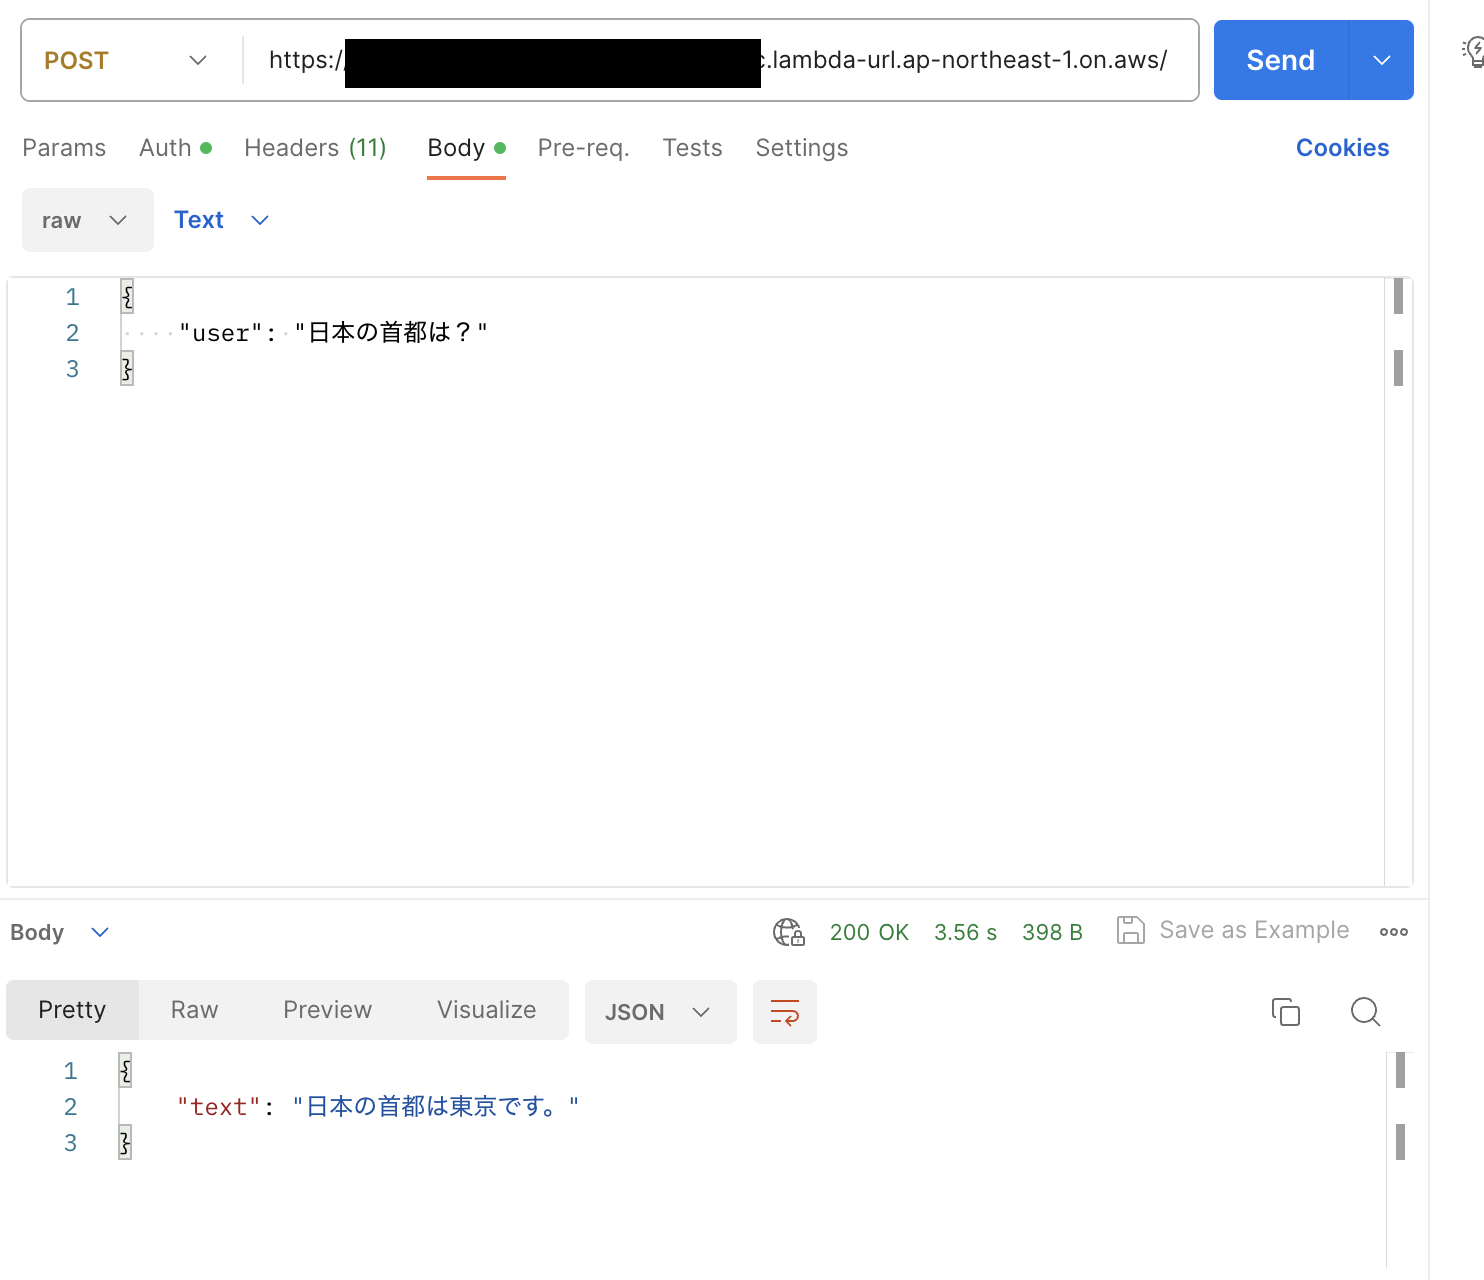
bodyとして以下のように記述することで、以下のようなレスポンスを得られます。
github actionsでの自動deploy
serverless/github-action使用でのdeployにて不明なエラーがあったため、
github actions内でserverlessをインストールしてデプロイするようにしています。
デプロイ前に、AWSの認証をしており、githubのsecretsに設定する必要があります。
また、pluginを使用しているので、pluginのインストールもする必要があります。
name: Deploy main branch

on:
  push:
    branches:
      - main

jobs:
  deploy:
    name: deploy
    runs-on: ubuntu-latest
    permissions:
      id-token: write
      contents: read
    strategy:
      matrix:
        node-version: [16.x]
    steps:
      - uses: actions/checkout@v3
      - name: Use Node.js ${{ matrix.node-version }}
        uses: actions/setup-node@v3
        with:
          node-version: ${{ matrix.node-version }}
      - name: Configure AWS Credentials
        uses: aws-actions/configure-aws-credentials@v1
        with:
          aws-region: ap-northeast-1
          aws-access-key-id: ${{ secrets.AWS_ACCESS_KEY_ID }}
          aws-secret-access-key: ${{ secrets.AWS_SECRET_ACCESS_KEY }}
      - name: serverless config
        run: npx serverless config credentials --provider aws --key ${{ secrets.AWS_ACCESS_KEY_ID }} --secret ${{ secrets.AWS_SECRET_ACCESS_KEY }}
      - name: serverless install
        run: npm i -g serverless
      - name: serverless python requirements install
        run: serverless plugin install -n serverless-python-requirements
      - name: serverless deploy
        run: serverless deploy