viviONグループでは、DLsiteやcomipoなど、二次元コンテンツを世の中に届けるためのサービスを運営しています。
ともに働く仲間を募集していますので、興味のある方はこちらまで。
🔰はじめに
ReactNativeで開発しているアプリで、Youtubeのクリップ機能のような範囲選択できるスライダーを実装する必要があったのですが、これといったライブラリが存在していなかったので、自作してみました!
🚀今回のゴール
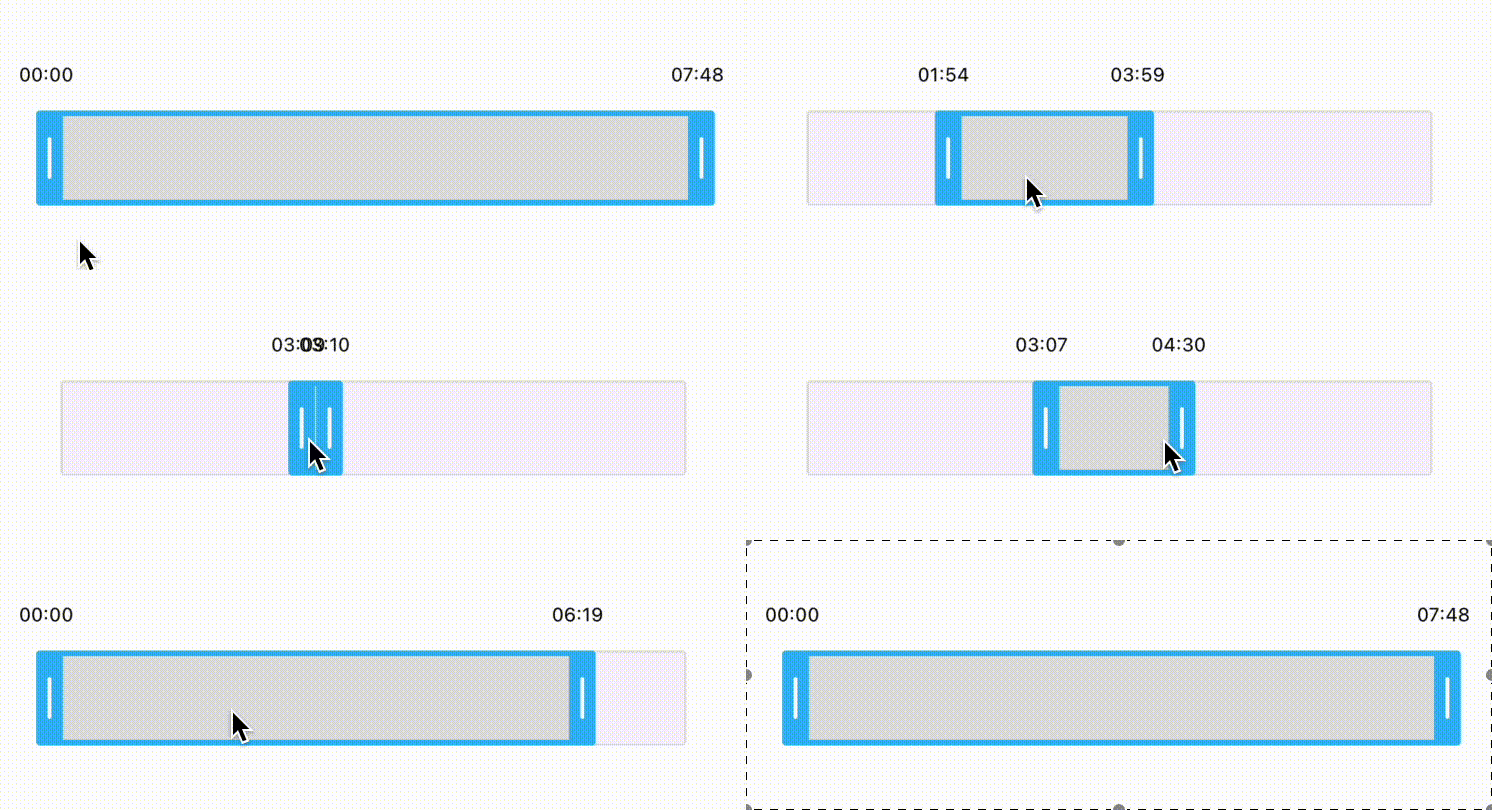
🔽 ReactNativeで以下のような範囲選択が可能なスライダーを作ってみます 🔽
🔬実装方針
まず、今回作成するスライダーの基本要件をまとめてみます。
- 左右のつまみをドラッグすることで、範囲と位置を変えることができる
- 左右のつまみの間をドラッグすることで、範囲を保ったまま位置を変更することができる
- つまみの開始位置は終了位置を追い越すことで位置の切り替えができる(逆も可能)
- 開始位置、終了位置の上部に開始時間・終了時間をそれぞれ表示する
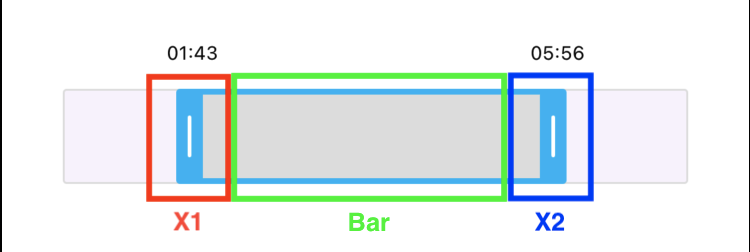
各要素について名前があった方が把握しやすいので、画像でまとめてみました。
左右のつまみをX1, X2とし、その間の部分をBarと定義いたします。

💻実装方法
STEP1 : モックUIの作成
上記の画像を参考に、まずはモックUIを作ってみます!
📌モックUIコード
// デバイスの横幅
const DEVICE_WIDTH = Dimensions.get('window').width;

// スライダーの横幅
const sliderWidth = DEVICE_WIDTH - SLIDER_PADDING * 2;

// スライダーの左右padding
const SLIDER_PADDING = 32;

// 範囲スライダーつまみの幅
const RANGE_THUMB_WIDTH = 14;

// スライダーのつまみを除いたpadding
const SLIDER_PADDING_INNER = 20;

// 範囲スライダーつまみのグリップ可能幅
const RANGE_THUMB_GRIP_AREA_WIDTH = 50;

return (
  <View
    style={{
      backgroundColor: '#ffffff',
      flex: 1,
      display: 'flex',
      justifyContent: 'center',
      marginHorizontal: SLIDER_PADDING,
    }}>
    {/* グレーの背景部分 */}
    <View
      style={{
        position: 'relative',
        display: 'flex',
        flexDirection: 'row',
        height: 50,
        backgroundColor: '#C387E81A',
        borderRadius: 2,
        borderWidth: 1,
        borderColor: '#e0e0e0',
      }}>
      {/* X1 */}
      <Animated.View
        style={{
          zIndex: 999,
        }}
      >
        <TouchableWithoutFeedback>
          <View
            style={{
              position: 'absolute',
              top: -11,
              left: -RANGE_THUMB_WIDTH - SLIDER_PADDING_INNER,
              width: RANGE_THUMB_GRIP_AREA_WIDTH,
              height: 70,
              display: 'flex',
              justifyContent: 'center',
              alignItems: 'center',
              zIndex: 999,
            }}>
            <View>
              <Text
                style={{
                  position: 'absolute',
                  top: -50,
                  left: -14,
                  fontSize: 10,
                }}>
                00:00
              </Text>
            </View>
            <View
              style={{
                position: 'absolute',
                left: SLIDER_PADDING_INNER,
                width: RANGE_THUMB_WIDTH,
                height: 50,
                backgroundColor: '#35baf6',
                borderWidth: 0,
                borderTopLeftRadius: 2,
                borderBottomLeftRadius: 2,
                display: 'flex',
                justifyContent: 'center',
                alignItems: 'center',
              }}>
              <View
                style={{
                  width: 2,
                  height: 22,
                  backgroundColor: '#ffffff',
                  borderRadius: 4,
                }}
              />
            </View>
          </View>
        </TouchableWithoutFeedback>
      </Animated.View>
      {/* X2 */}
      <Animated.View
        style={{
          transform: [{translateX: sliderWidth}],
          zIndex: 999,
        }}
      >
        <TouchableWithoutFeedback>
          <View
            style={{
              position: 'absolute',
              top: -11,
              left: -SLIDER_PADDING_INNER,
              width: RANGE_THUMB_GRIP_AREA_WIDTH,
              height: 70,
              display: 'flex',
              justifyContent: 'center',
              alignItems: 'center',
              zIndex: 999,
            }}>
            <View>
              <Text
                style={{
                  position: 'absolute',
                  top: -50,
                  left: -14,
                  fontSize: 10,
                }}>
                07:48
              </Text>
            </View>
            <View
              style={{
                position: 'absolute',
                left: SLIDER_PADDING_INNER,
                width: RANGE_THUMB_WIDTH,
                height: 50,
                backgroundColor: '#35baf6',
                borderWidth: 0,
                borderTopRightRadius: 2,
                borderBottomRightRadius: 2,
                display: 'flex',
                justifyContent: 'center',
                alignItems: 'center',
              }}>
              <View
                style={{
                  width: 2,
                  height: 22,
                  backgroundColor: '#ffffff',
                  borderRadius: 4,
                }}
              />
            </View>
          </View>
        </TouchableWithoutFeedback>
      </Animated.View>
      {/* Bar */}
      <Animated.View
        style={{
          zIndex: 998,
        }}
      >
        <TouchableWithoutFeedback>
          <Animated.View
            style={{
              position: 'absolute',
              top: -1,
              width: sliderWidth,
              height: 50,
              backgroundColor: '#35baf6',
            }}>
            <View
              style={{
                flex: 1,
                backgroundColor: '#e0e0e0',
                marginVertical: 3,
              }} />
          </Animated.View>
        </TouchableWithoutFeedback>
      </Animated.View>
    </View>
  </View>
)
詳細な説明は省きますが、左右にmarginを設定しつつ、各要素の位置を調整しております。
つまみの幅などは定数化しておりますが、モックなので各要素の値は固定で置いてしまっております。
上記のようなコードを実行すると、以下のようなUIが表示されるかと思います!

ここから、各要素に対してイベントや値の設定をしていきます。
STEP2 : Responderの作成
今回はPanResponderを使用し、画面上のドラッグイベントを拾っていきます。
今回動かせる要素はX1, X2, Barの部分となっておりますので、各要素に対してPanResponderを設定していきます。
まずは、X1とX2の初期位置を定義していきます。
  // X1, X2の位置を定義
  const x1Position = useRef(new Animated.Value(0)).current;
  const x2Position = useRef(new Animated.Value(sliderWidth)).current;
次にX1のPanResponderを作ります。
やっていることは簡単で、ドラッグ中の位置座標に合わせてx1Positionの値を変更しています。
  // X1
  const panResponderX1 = useRef(
    PanResponder.create({
      onMoveShouldSetPanResponder: () => true,
      onPanResponderGrant: () => {
        // タップした箇所から変更する
        x1Position.setOffset(x1Position._value);
        x1Position.setValue(0);
      },
      onPanResponderMove: (e, gestureState) => {
        const {dx} = gestureState;
        x1Position.setValue(dx);
      },
      onPanResponderRelease: () => {
        x1Position.flattenOffset();
      },
    }),
  ).current;
同様に、X2のPanResponderも作ります。
  // X2
  const panResponderX2 = useRef(
    PanResponder.create({
      onMoveShouldSetPanResponder: () => true,
      onPanResponderGrant: () => {
        // タップした箇所から変更する
        x2Position.setOffset(x2Position._value);
        x2Position.setValue(0);
      },
      onPanResponderMove: (e, gestureState) => {
        const {dx} = gestureState;
        x2Position.setValue(dx);
      },
      onPanResponderRelease: () => {
        x2Position.flattenOffset();
      },
    }),
  ).current;
X1とX2の間のBarもドラッグできるようにしたいので、こちらもPanResponderを作っていきます。
中身の処理は、ドラッグした際にX1とX2の両方の位置座標を変更するようにしています。
// Bar
const panResponderBar = useRef(
PanResponder.create({
  onMoveShouldSetPanResponder: () => true,
  onPanResponderGrant: () => {
    // タップした箇所から変更する
    x1Position.setOffset(x1Position._value);
    x1Position.setValue(0);
    x2Position.setOffset(x2Position._value);
    x2Position.setValue(0);
  },
  onPanResponderMove: (e, gestureState) => {
    const {dx} = gestureState;

    // 開始・終了位置を更新
    x1Position.setValue(dx);
    x2Position.setValue(dx);
  },
  onPanResponderRelease: () => {
    x1Position.flattenOffset();
    x2Position.flattenOffset();
  },
}),
).current;
スライダーの横幅に合わせて値を補完したいので、以下のように定義します。
const interpolatedX1Position = x1Position.interpolate({
  inputRange: [0, sliderWidth],
  outputRange: [0, sliderWidth],
  extrapolate: 'clamp',
});

const interpolatedX2Position = x2Position.interpolate({
  inputRange: [0, sliderWidth],
  outputRange: [0, sliderWidth],
  extrapolate: 'clamp',
});
そして、X2位置 - X1位置をすることでBarの横幅を計算していきます。
また、Barの開始位置はX1の開始位置と同じにします。
// x1, x2の差分を取得
const valueDifference = Animated.subtract(
  interpolatedX2Position,
  interpolatedX1Position,
);
// Barの開始位置
const barStart = interpolatedX1Position;
これでイベントと値の準備はできました!
次にUIの方に作成したものを組み込んでいきます。
STEP3 : UIの調整
スライダーの位置を動的に変更するため、UIに作成したイベントや値を組み込んでいきます!
X1, X2, Barに対して以下のように値を設定します。
各Animated.Viewに作成したPanResponderを追加し、transformやwidthで位置や幅を調整します。
📌X1変更後コード
{/* x1 */}
<Animated.View
  style={{
+   transform: [{translateX: interpolatedX1Position}],
    zIndex: 999,
  }}
+ {...panResponderX1.panHandlers} // 変更
>
  <TouchableWithoutFeedback>
    <View
      style={{
        position: 'absolute',
        top: -11,
        left: -RANGE_THUMB_WIDTH - SLIDER_PADDING_INNER,
        width: RANGE_THUMB_GRIP_AREA_WIDTH,
        height: 70,
        display: 'flex',
        justifyContent: 'center',
        alignItems: 'center',
        zIndex: 999,
      }}>
      <View>
        <Text
          style={{
            position: 'absolute',
            top: -50,
            left: -14,
            fontSize: 10,
          }}>
          00:00
        </Text>
      </View>
      <View
        style={{
          position: 'absolute',
          left: SLIDER_PADDING_INNER,
          width: RANGE_THUMB_WIDTH,
          height: 50,
          backgroundColor: '#35baf6',
          borderWidth: 0,
          borderTopLeftRadius: 2,
          borderBottomLeftRadius: 2,
          display: 'flex',
          justifyContent: 'center',
          alignItems: 'center',
        }}>
        <View
          style={{
            width: 2,
            height: 22,
            backgroundColor: '#ffffff',
            borderRadius: 4,
          }}
        />
      </View>
    </View>
  </TouchableWithoutFeedback>
</Animated.View>
📌X2変更後コード
{/* x2 */}
<Animated.View
  style={{
-   transform: [{translateX: sliderWidth}],
+   transform: [{translateX: interpolatedX2Position}],
    zIndex: 999,
  }}
+ {...panResponderX2.panHandlers}
>
  <TouchableWithoutFeedback>
    <View
      style={{
        position: 'absolute',
        top: -11,
        left: -SLIDER_PADDING_INNER,
        width: RANGE_THUMB_GRIP_AREA_WIDTH,
        height: 70,
        display: 'flex',
        justifyContent: 'center',
        alignItems: 'center',
        zIndex: 999,
      }}>
      <View>
        <Text
          style={{
            position: 'absolute',
            top: -50,
            left: -14,
            fontSize: 10,
          }}>
          07:48
        </Text>
      </View>
      <View
        style={{
          position: 'absolute',
          left: SLIDER_PADDING_INNER,
          width: RANGE_THUMB_WIDTH,
          height: 50,
          backgroundColor: '#35baf6',
          borderWidth: 0,
          borderTopRightRadius: 2,
          borderBottomRightRadius: 2,
          display: 'flex',
          justifyContent: 'center',
          alignItems: 'center',
        }}>
        <View
          style={{
            width: 2,
            height: 22,
            backgroundColor: '#ffffff',
            borderRadius: 4,
          }}
        />
      </View>
    </View>
  </TouchableWithoutFeedback>
</Animated.View>
📌Bar変更後コード
{/* Bar */}
<Animated.View
  style={{
+   transform: [{translateX: barStart}],
    zIndex: 998,
  }}
+ {...panResponderBar.panHandlers}>
  <TouchableWithoutFeedback>
    <Animated.View
      style={{
        position: 'absolute',
        top: -1,
-       width: sliderWidth,
+       width: valueDifference,
        height: 50,
        backgroundColor: '#35baf6',
      }}>
      <View
        style={{
          flex: 1,
          backgroundColor: '#e0e0e0',
          marginVertical: 3,
        }}
        />
    </Animated.View>
  </TouchableWithoutFeedback>
</Animated.View>
上記のように修正すると、以下のようにスライダーが動くようになります!

STEP4 : 開始時間・終了時間を反映させる
次は、現状モックになっている再生時間・終了時間を動的に変更できるようにしていきます!
まず、現在の位置を0~1に正規化するための関数を用意します。
(スライダーの一番左側が0、一番右側が1となるように調整)
// 正規化
export function normalize(value: number, min: number, max: number) {
  return (value - min) / (max - min);
}
次に開始位置と、終了位置の時間を保持するための状態を作成します。
durationは実際には引数として渡すようにしております!
// 総再生時間(実際にはコンポーネントの引数等で渡す)
const duration = 1000;
// 開始時間
const [startValue, setStartValue] = useState(0);
// 終了時間
const [endValue, setEndValue] = useState(duration);
そして、X1とX2の位置が変更された時に発火するリスナーを定義します。
X1またはX2の位置を動かした際に、addListenerのイベントが発火するようになっております。
durationと正規化した0~1の値を乗算することで、位置に対する時間を計算することができます。
useEffect(() => {
  const listener1 = x1Position.addListener(({value}) => {
    let position;
    position = Math.min(value, sliderWidth);
    position = Math.max(0, position);
    const normalizePosition = normalize(position, 0, sliderWidth);

    setStartValue(duration * normalizePosition);
  });

  const listener2 = x2Position.addListener(({value}) => {
    let position;
    position = Math.min(value, sliderWidth);
    position = Math.max(0, position);
    const normalizePosition = normalize(position, 0, sliderWidth);

    setEndValue(duration * normalizePosition);
  });

  return () => {
    x1Position.removeListener(listener1);
    x2Position.removeListener(listener2);
  };
}, [x1Position, x2Position, duration]);
ここまでやると、以下のように開始時間と終了時間が動的に変わるようになります!

STEP5 : 開始位置と終了位置が切り替わった時の対応を入れる
現状だと、開始位置が終了位置を超えてしまった場合、表示がバグってしまいます。
なので、両者の位置を切り替えた際に違和感なく動かす方法を実装していきます!
いくつか方法はあると思うのですが、今回は右側にある要素がX1とX2どちらに該当しているかを状態として持つ方法を解説していきます。
スライダーの右側にX1とX2どちらがあるかを判断するフラグと、後の対応で必要なBar部分をドラッグ中か判断するフラグを用意します。
// スライダーの右側にある要素(x1とx2がスワップするケースもあるのでそれを判断するために)
const [rightSide, setRightSide] = useState<'x1' | 'x2'>('x2');
// Barをドラッグ中か
const [isDraggingRangeBar, setIsDraggingRangeBar] = useState(false);
そして、STEP4で作成したListenerの中身を以下のように修正します。
やっていることは、開始位置と終了位置が切り替わった時にrightSideフラグを更新しているのと、開始時間・終了時間を調整している感じです!
📌Listener変更後コード
useEffect(() => {
  const listener1 = x1Position.addListener(({value}) => {
    let position;
    position = Math.min(value, sliderWidth);
    position = Math.max(0, position);
    const normalizePosition = normalize(position, 0, sliderWidth);

-   setStartValue(duration * normalizePosition);
+   // 範囲バーをドラッグ中の処理
+   if (isDraggingRangeBar) {
+     if (rightSide === 'x1') {
+       setEndValue(duration * normalizePosition);
+     } else {
+       setStartValue(duration * normalizePosition);
+     }
+     return;
+   }
+   // x2の位置は固定
+   const normalizeX2Position = Math.max(
+     0,
+     Math.min(normalize(x2Position._value, 0, sliderWidth), 1),
+   );
+   if (value > x2Position._value) {
+     setRightSide('x1');
+     setStartValue(duration * normalizeX2Position);
+     setEndValue(duration * normalizePosition);
+   } else {
+     setRightSide('x2');
+     setStartValue(duration * normalizePosition);
+     setEndValue(duration * normalizeX2Position);
+   }
  });

  const listener2 = x2Position.addListener(({value}) => {
    let position;
    position = Math.min(value, sliderWidth);
    position = Math.max(0, position);
    const normalizePosition = normalize(position, 0, sliderWidth);

-   setEndValue(duration * normalizePosition);
+   // 範囲バーをドラッグ中の処理
+   if (isDraggingRangeBar) {
+     if (rightSide === 'x1') {
+       setStartValue(duration * normalizePosition);
+     } else {
+       setEndValue(duration * normalizePosition);
+     }
+     return;
+   }
+   // x1の位置は固定
+   const normalizeX1Position = Math.max(
+     0,
+     Math.min(normalize(x1Position._value, 0, sliderWidth), 1),
+   );
+   if (value < x1Position._value) {
+     setRightSide('x1');
+     setStartValue(duration * normalizePosition);
+     setEndValue(duration * normalizeX1Position);
+   } else {
+     setRightSide('x2');
+     setStartValue(duration * normalizeX1Position);
+     setEndValue(duration * normalizePosition);
+   }
  });

  return () => {
    x1Position.removeListener(listener1);
    x2Position.removeListener(listener2);
  };
-}, [x1Position, x2Position, duration]);
+}, [x1Position, x2Position, duration, isDraggingRangeBar, rightSide]);
また、Barの横幅と開始位置の取得方法も変わるので以下のように修正します。
📌Barの横幅及び開始位置の変更後コード
// x1, x2の差分を取得
- const valueDifference = Animated.subtract(
-   interpolatedX2Position,
-   interpolatedX1Position,
- );
+ // x1, x2の差分を取得
+ let valueDifference;
+ if (rightSide === 'x2') {
+   valueDifference = Animated.subtract(
+     interpolatedX2Position,
+     interpolatedX1Position,
+   );
+ } else {
+   valueDifference = Animated.subtract(
+     interpolatedX1Position,
+     interpolatedX2Position,
+   );
+ }

// Barの開始位置
- const barStart = interpolatedX1Position;
+ const barStart =
    rightSide === 'x2' ? interpolatedX1Position : interpolatedX2Position;
UIの方も少し修正が必要なので、合わせて対応します。
📌X1変更後コード
{/* X1 */}
<Animated.View
  style={{
    transform: [{translateX: interpolatedX1Position}],
    zIndex: 999,
  }}
  {...panResponderX1.panHandlers}>
  <TouchableWithoutFeedback>
    <View
      style={{
        position: 'absolute',
        top: -11,
-       left: -RANGE_THUMB_WIDTH - SLIDER_PADDING_INNER,
+       left:
+         rightSide === 'x2'
+           ? -RANGE_THUMB_WIDTH - SLIDER_PADDING_INNER
+           : -SLIDER_PADDING_INNER,
        width: RANGE_THUMB_GRIP_AREA_WIDTH,
        height: 70,
        display: 'flex',
        justifyContent: 'center',
        alignItems: 'center',
        zIndex: 999,
      }}>
      <View>
        <Text
          style={{
            position: 'absolute',
            top: -50,
            left: -14,
            fontSize: 10,
          }}>
-         {durationToTime(startValue)}
+         {rightSide === 'x1'
+           ? durationToTime(endValue)
+           : durationToTime(startValue)}
        </Text>
      </View>
      <View
        style={{
          position: 'absolute',
          left: SLIDER_PADDING_INNER,
          width: RANGE_THUMB_WIDTH,
          height: 50,
          backgroundColor: '#35baf6',
          borderWidth: 0,
-         borderTopLeftRadius: 2,
-         borderBottomLeftRadius: 2,
+         borderTopRightRadius: rightSide === 'x1' ? 2 : 0,
+         borderBottomRightRadius: rightSide === 'x1' ? 2 : 0,
+         borderTopLeftRadius: rightSide === 'x2' ? 2 : 0,
+         borderBottomLeftRadius: rightSide === 'x2' ? 2 : 0,
          display: 'flex',
          justifyContent: 'center',
          alignItems: 'center',
        }}>
        <View
          style={{
            width: 2,
            height: 22,
            backgroundColor: '#ffffff',
            borderRadius: 4,
          }}
        />
      </View>
    </View>
  </TouchableWithoutFeedback>
</Animated.View>
📌X2変更後コード
{/* X2 */}
<Animated.View
  style={{
    transform: [{translateX: interpolatedX2Position}],
    zIndex: 999,
  }}
  {...panResponderX2.panHandlers}>
  <TouchableWithoutFeedback>
    <View
      style={{
        position: 'absolute',
        top: -11,
-       left: -SLIDER_PADDING_INNER,
+       left:
+         rightSide === 'x2'
+           ? -SLIDER_PADDING_INNER
+           : -RANGE_THUMB_WIDTH - SLIDER_PADDING_INNER,
        width: RANGE_THUMB_GRIP_AREA_WIDTH,
        height: 70,
        display: 'flex',
        justifyContent: 'center',
        alignItems: 'center',
        zIndex: 999,
      }}>
      <View>
        <Text
          style={{
            position: 'absolute',
            top: -50,
            left: -14,
            fontSize: 10,
          }}>
-         {durationToTime(endValue)}
+         {rightSide === 'x2'
+           ? durationToTime(endValue)
+           : durationToTime(startValue)}
        </Text>
      </View>
      <View
        style={{
          position: 'absolute',
          left: SLIDER_PADDING_INNER,
          width: RANGE_THUMB_WIDTH,
          height: 50,
          backgroundColor: '#35baf6',
          borderWidth: 0,
-         borderTopRightRadius: 2,
-         borderBottomRightRadius: 2,
+         borderTopRightRadius: rightSide === 'x2' ? 2 : 0,
+         borderBottomRightRadius: rightSide === 'x2' ? 2 : 0,
+         borderTopLeftRadius: rightSide === 'x1' ? 2 : 0,
+         borderBottomLeftRadius: rightSide === 'x1' ? 2 : 0,
          display: 'flex',
          justifyContent: 'center',
          alignItems: 'center',
        }}>
        <View
          style={{
            width: 2,
            height: 22,
            backgroundColor: '#ffffff',
            borderRadius: 4,
          }}
        />
      </View>
    </View>
  </TouchableWithoutFeedback>
</Animated.View>
📌Bar変更後コード
{/* Bar */}
<Animated.View
+ onTouchStart={() => {
+   // onPanResponderGrantだと更新が間に合わないのでonTouchStartで宣言
+   // 範囲バーをドラッグ中
+   setIsDraggingRangeBar(true);
+ }}
+ onTouchEnd={() => {
+   setIsDraggingRangeBar(false);
+ }}
  style={{
    transform: [{translateX: barStart}],
    zIndex: 998,
  }}
  {...panResponderBar.panHandlers}>
  <TouchableWithoutFeedback>
    <Animated.View
      style={{
        position: 'absolute',
        top: -1,
        width: valueDifference,
        height: 50,
        backgroundColor: '#35baf6',
      }}>
      <View
        style={{
          flex: 1,
          backgroundColor: '#e0e0e0',
          marginVertical: 3,
        }}
      />
    </Animated.View>
  </TouchableWithoutFeedback>
</Animated.View>
上記の通り修正すると、開始位置が終了位置を追い越しても崩れることなく切り替わるはずです!

💬最後に
以上、ReactNativeで作る、Youtube風の範囲選択スライダーの実装方法を解説してみました!
UIを自作するという手段を持っておくと、自分の武器になりますし、表現の幅を広げられるのでおすすめです!
🌈一緒に二次元業界を盛り上げていきませんか?
株式会社viviONでは、フロントエンドエンジニアを募集しています。
また、フロントエンドエンジニアに限らず、バックエンド・SRE・スマホアプリなど様々なエンジニア職を募集していますので、ぜひ採用情報をご覧ください。
