はじめに
この記事では、UbuntuにKubernetes環境を設定し、簡易的にAPI Connect v10.0.5.4を導入する手順を紹介します。以下のような方針で簡易的に導入しています。
- Ubuntuは単一Nodeで構成
- Ubuntuのファイルシステムを使用してAPICを導入
- APICのエンドポイントの名前解決はwildcard dnsを使用
- default namespaceのみで設定(namespaceを分けて導入することが推奨となります)
今回の検証では、以下のTechZone環境のUbuntu 20.04を使用しています。
IBM社員やBusiness Partner様であればIBM IDを使用してご利用可能です。
申請例
0. 事前準備
0.1 Ubuntu環境
上記の環境を払い出すと以下のようにSSH鍵でアクセスできます。
$ ssh itzuser@*.*.*.* -p 2223 -i pem_ibmcloudvsi_download.pem

* 「*.*.*.*」はUbuntuのパブリックIPアドレス
環境払い出し時に追加ディスクを割り当てていますので使用可能な設定をしていきます。
具体的な手順については、様々な解説サイトがありますが、例えば、こちらをご参照ください。
以下の例のように、1TBの追加ディスクが/dataにマウントされていれば大丈夫です。
$ df -h
Filesystem      Size  Used Avail Use% Mounted on
udev             32G     0   32G   0% /dev
tmpfs           6.3G  2.2M  6.3G   1% /run
/dev/xvda2       98G   13G   81G  14% /
tmpfs            32G     0   32G   0% /dev/shm
tmpfs           5.0M     0  5.0M   0% /run/lock
tmpfs            32G     0   32G   0% /sys/fs/cgroup
/dev/xvda1      975M   52M  873M   6% /boot
/dev/loop0       64M   64M     0 100% /snap/core20/2015
/dev/loop2       41M   41M     0 100% /snap/snapd/20092
/dev/loop1       92M   92M     0 100% /snap/lxd/24061
tmpfs           6.3G     0  6.3G   0% /run/user/1000
/dev/xvde       984G   28K  934G   1% /data
0.2 Docker/Kubernetesの導入
こちらの記事を参考にdocker/k8sを導入していきます。詳細な流れや説明は、この記事をご参照ください。
今回は以下のようなバージョンを使用しています。
- Docker導入
$ docker --version
Docker version 24.0.6, build ed223bc
- Kubernetes導入
$ kubectl get nodes
NAME                  STATUS   ROLES           AGE     VERSION
itz-2700025h88-49id   Ready    control-plane   2m28s   v1.28.2
1 API Connect導入
こちらのマニュアルをもとに導入準備を進めていきます。
1.1 Ingress Controller導入
こちらのマニュアルに基づいてIngress Controllerを導入していきます。
導入に使用する以下のようなyamlファイルを作成します。
controller:
  watchIngressWithoutClass: true
  admissionWebhooks:
    enabled: false
  config:
    hsts-max-age: "31536000"
    keepalive: "32"
    log-format: '{ "@timestamp": "$time_iso8601", "@version": "1", "clientip": "$remote_addr",
      "tag": "ingress", "remote_user": "$remote_user", "bytes": $bytes_sent, "duration":
      $request_time, "status": $status, "request": "$request_uri", "urlpath": "$uri",
      "urlquery": "$args", "method": "$request_method", "referer": "$http_referer",
      "useragent": "$http_user_agent", "software": "nginx", "version": "$nginx_version",
      "host": "$host", "upstream": "$upstream_addr", "upstream-status": "$upstream_status"
      }'
    main-snippets: load_module "modules/ngx_stream_module.so"
    proxy-body-size: "0"
    proxy-buffering: "off"
    server-name-hash-bucket-size: "128"
    server-name-hash-max-size: "1024"
    server-tokens: "False"
    ssl-ciphers: HIGH:!aNULL:!MD5
    ssl-prefer-server-ciphers: "True"
    ssl-protocols: "TLSv1.2 TLSv1.3"
    use-http2: "true"
    worker-connections: "10240"
    worker-cpu-affinity: auto
    worker-processes: "1"
    worker-rlimit-nofile: "65536"
    worker-shutdown-timeout: 5m
  daemonset:
    useHostPort: false
  extraArgs:
    annotations-prefix: ingress.kubernetes.io
    enable-ssl-passthrough: true
  hostNetwork: true
  kind: DaemonSet
  name: controller
rbac:
  create: "true"
こちらのファイルをもとにhelmを使用して導入します。
以下のようなメッセージが出力されれば大丈夫です。
$ sudo snap install helm --classic
helm 3.10.1 from Snapcrafters✪ installed

$ helm repo add ingress-nginx https://kubernetes.github.io/ingress-nginx
$ helm repo update
$ helm install ingress-controller ingress-nginx/ingress-nginx --namespace kube-system --values ingress-config.yaml
/home/itzuser/.kube/config
NAME: ingress-controller
LAST DEPLOYED: Thu Oct  5 02:30:14 2023
NAMESPACE: kube-system
STATUS: deployed
REVISION: 1
TEST SUITE: None
NOTES:
The ingress-nginx controller has been installed.
It may take a few minutes for the LoadBalancer IP to be available.
You can watch the status by running 'kubectl --namespace kube-system get services -o wide -w ingress-controller-ingress-nginx-controller'
Knowledge Centerではhelm3での手順が記載されていますが、は以下のような権限エラーが出たため、今回はhelmで実施しました。
$ sudo helm3 install ingress-controller ingress-nginx/ingress-nginx --namespace kube-system --values ingress-config.yaml
Error: INSTALLATION FAILED: open ingress-config.yaml: permission denied
1.2 導入ファイルの準備
こちらの手順をもとに進めていきます。
まずは、Fixcentralから導入ファイルを取得します。
今回は、v10.0.5.4の以下のファイルを取得しています。1つ目は、APIC導入用のイメージで、2つ目は、導入に使用するカスタムリソースのテンプレートが含まれるファイルです。2つ目については、zipファイル内で今回導入で使用する一部のyamlファイルを使用します。
- apiconnect-image-tool_10.0.5.4.tar.gz
- apiconnect-operator-release-files_10.0.5.4.zip
以下のようにPC端末からUbuntu環境に転送します。
scp -P 2223 -i pem_ibmcloudvsi_download.pem apiconnect-image-tool_10.0.5.4.tar.gz itzuser@*.*.*.*:/home/itzuser
apiconnect-image-tool_10.0.5.4.tar.gz         100% 9298MB  23.7MB/s   06:32

scp -P 2223 -i pem_ibmcloudvsi_download.pem *.yaml itzuser@*.*.*.*:/home/itzuser
apigateway_cr.yaml                                                                                                      100% 2332   131.0KB/s   00:00
cert-manager-1.7.1.yaml                                                                                                 100%  384KB   6.4MB/s   00:00
ibm-apiconnect-crds.yaml                                                                                                100% 2574KB  24.1MB/s   00:00
ibm-apiconnect.yaml                                                                                                     100%   31KB   3.2MB/s   00:00
ibm-datapower.yaml                                                                                                      100%   12KB   1.3MB/s   00:00
ingress-issuer-v1.yaml                                                                                                  100% 5663   506.1KB/s   00:00
management_cr.yaml                                                                                                      100% 2241   268.6KB/s   00:00
1つ目のAPIC導入イメージをdockerにロードし、ローカルのDocker Registry Serverとして起動します。
$ docker load < apiconnect-image-tool-10.0.5.4.tar.gz
e0bac91f0f10: Loading layer [==================================================>]  94.51MB/94.51MB
acfd3f74ae1d: Loading layer [==================================================>]  2.418MB/2.418MB
9882599a7e91: Loading layer [==================================================>]   7.68kB/7.68kB
709498afd394: Loading layer [==================================================>]   2.56kB/2.56kB
fb0e66e08b19: Loading layer [==================================================>]  132.9MB/132.9MB
539115979860: Loading layer [==================================================>]  105.9MB/105.9MB
9bd69eb69d69: Loading layer [==================================================>]  9.693GB/9.693GB
Loaded image: apiconnect-image-tool-10.0.5.4:latest

$ docker run --rm apiconnect-image-tool-10.0.5.4 version  --images

$ docker run -d -p 5000:5000 --name registry registry:2
$ docker run --rm --network host apiconnect-image-tool-10.0.5.4 upload localhost:5000 --tls-verify=false
導入イメージをロードする際に、以下のようなエラーが出る場合があります。
こちらの記事を参考に問題になっているモジュールに権限を付与することで解消できました。
$ docker load < apiconnect-image-tool_10.0.5.4.tar.gz
permission denied while trying to connect to the Docker daemon socket at unix:///var/run/docker.sock: Post "http://%2Fvar%2Frun%2Fdocker.sock/v1.24/images/load?quiet=0": dial unix /var/run/docker.sock: connect: permission denied

$ sudo chmod 666 /var/run/docker.sock
1.3 Cert Manager/Operatorの導入
こちらの手順に従って進めていきます。
はじめにcert-managerを導入します。
$ export KUBECONFIG=/home/itzuser/.kube/config
$ kubectl apply -f cert-manager-1.7.1.yaml

$ kubectl get po -n cert-manager
NAME                                       READY   STATUS    RESTARTS   AGE
cert-manager-557c8c599f-r2rh6              1/1     Running   0          5m10s
cert-manager-cainjector-587fd9f888-c8cgj   1/1     Running   0          5m10s
cert-manager-webhook-6784457987-kf6d8      1/1     Running   0          5m10s
以下のような状況でPodが開始しないことがありました。詳細を見るとPodがスケジュールできない状況に見えたため、Nodeにtaint属性を除去して解消しました。
$ kubectl get po -n cert-manager
NAME READY STATUS RESTARTS AGE
cert-manager-557c8c599f-r2rh6 0/1 Pending 0 3m17s
cert-manager-cainjector-587fd9f888-c8cgj 0/1 Pending 0 3m17s
cert-manager-webhook-6784457987-kf6d8 0/1 Pending 0 3m17s
$ kubectl describe -n cert-manager cert-manager-557c8c599f-r2rh6
~
Events:
Type Reason Age From Message
~ ---- ------ ---- ---- -------
Warning FailedScheduling 2m44s default-scheduler 0/1 nodes are available: 1 node(s) had untolerated taint {node-role.kubernetes.io/control-plane: }. preemption: 0/1 nodes are available: 1 Preemption is not helpful for scheduling..
$ kubectl get node
NAME STATUS ROLES AGE VERSION
itz-2700025h88-49id Ready control-plane 58m v1.28.2
$ kubectl taint nodes itz-2700025h88-49id node-role.kubernetes.io/control-plane:NoSchedule-
node/itz-2700025h88-49id untainted
転送したカスタムリソースのテンプレートを使用して各Operatorを導入します。
APIC用のテンプレート(ibm-apiconnect.yaml)の中で、imageの参照先を以下のように3か所修正します。今回は、最初に設定したローカルのDocker Registry Serverを使用しますので「localhost:5000」を指定します。
        image: localhost:5000/ibm-apiconnect-operator@sha256:14b364c926edd696ceec8be69cce5820c45aa244748ef982022e4fe557edb8ab
        name: ibm-apiconnect

        image: localhost:5000/ibm-apiconnect-operator-init@sha256:fe2daf972d24703fb42a258e573681f1a279fc26b7fbc5605ce9a81ff507b610
        name: webhook

        image: localhost:5000/ibm-apiconnect-webhook-delete@sha256:b22a0fb83bb15c3b0bef641065bce180e5728c98441f3c7444215e0320f17a4b
        name: webhook-delete
DataPoewr用のテンプレート(ibm-datapower.yaml)の中で、volumeの参照先を以下のように2か所修正します。こちらも最初に設定したローカルのDocker Registry Serverを使用しますので「localhost:5000」を指定します。
            - name: IBM_ENTITLED_REGISTRY
              value: "localhost:5000"
            - name: IBM_FREE_REGISTRY_DATAPOWER
              value: "localhost:5000"
これで準備は完了です。
各、カスタムリソースを作成していきます。
# APIC用のリソース
$ kubectl apply -f ibm-apiconnect-crds.yaml
$ kubectl apply -f ibm-apiconnect.yaml

# DataPower用のリソース
$ kubectl create secret generic datapower-admin-credentials --from-literal=password=admin
$ kubectl apply -f ibm-datapower.yaml

# 結果確認
$ kubectl get pod
NAME                                                     READY   STATUS    RESTARTS   AGE
datapower-operator-67cfc5c89b-qc6k2                      1/1     Running   0          66s
datapower-operator-conversion-webhook-7df4cfb5f6-sffpq   1/1     Running   0          56s
ibm-apiconnect-68dcfb4476-58f44                          1/1     Running   0          7m21s
上記の3つのPodが起動していれば大丈夫です。
Cert Managerが使用するingress-caのIssuerを登録します。
$ kubectl apply -f ingress-issuer-v1.yaml
$ kubectl get certificates
NAME                         READY   SECRET                       AGE
analytics-ingestion-client   True    analytics-ingestion-client   8s
gateway-client-client        True    gateway-client-client        8s
gateway-peering              True    gateway-peering              7s
gateway-service              True    gateway-service              7s
ingress-ca                   True    ingress-ca                   8s
portal-admin-client          True    portal-admin-client          8s
1.4 API Connectの導入
こちらの手順に従って進めていきます。
1.4.0 ストレージ・クラス作成
APICが使用するストレージ・クラスを以下のように設定ファイルを作成します。
kind: StorageClass
apiVersion: storage.k8s.io/v1
metadata:
  name: local-storage
  annotations:
    storageclass.kubernetes.io/is-default-class: "true"
provisioner: kubernetes.io/no-provisioner
volumeBindingMode: WaitForFirstConsumer
このファイルを使用してリソースを作成します。
$ kubectl apply -f local-storage.yaml
storageclass.storage.k8s.io/local-storage created

$ kubectl get sc
NAME                      PROVISIONER                    RECLAIMPOLICY   VOLUMEBINDINGMODE      ALLOWVOLUMEEXPANSION   AGE
local-storage (default)   kubernetes.io/no-provisioner   Delete          WaitForFirstConsumer   false                  46h
1.4.1 API Managerのデプロイ
事前に転送していたカスタムリソースファイル(management_cr.yaml)を修正します。
修正内容はマニュアルを参考にお使いの環境に合わせて設定してください。
- imageRegistry : 手順1.2で作成したローカルのDocker Registry Serverを指定しています
- 各Endpointのhosts/name : 今回はwildcard dnsを使用してUbuntu ServerのIPアドレスを紐づけてFQDNを設定しています
- storageClassName : 手順1.4.0で作成した「local-storage」を指定しています
以降の「*.*.*.*」はUbuntuのパブリックIPアドレスを指定します。
#
# Licensed under the Apache License, Version 2.0 (the "License");
# you may not use this file except in compliance with the License.
# You may obtain a copy of the License at
#
#     http://www.apache.org/licenses/LICENSE-2.0
#
# Unless required by applicable law or agreed to in writing, software
# distributed under the License is distributed on an "AS IS" BASIS,
# WITHOUT WARRANTIES OR CONDITIONS OF ANY KIND, either express or implied.
# See the License for the specific language governing permissions and
# limitations under the License.
#


apiVersion: management.apiconnect.ibm.com/v1beta1
kind: ManagementCluster
metadata:
  name: management
  labels: {
    app.kubernetes.io/instance: "management",
    app.kubernetes.io/managed-by: "ibm-apiconnect",
    app.kubernetes.io/name: "management"
  }
spec:
  version: 10.0.5.4
    #imagePullSecrets:
    #- apic-registry-secret
  imageRegistry: localhost:5000
  profile: n1xc4.m16
  portal:
    admin:
      secretName: portal-admin-client
  analytics:
    ingestion:
      secretName: analytics-ingestion-client
  gateway:
    client:
      secretName: gateway-client-client
  cloudManagerEndpoint:
    #ingressClassName: $INGRESS_CLASS
    annotations:
      cert-manager.io/issuer: ingress-issuer
    hosts:
    - name: admin.*.*.*.*.nip.io
      secretName: cm-endpoint
  apiManagerEndpoint:
    #ingressClassName: $INGRESS_CLASS
    annotations:
      cert-manager.io/issuer: ingress-issuer
    hosts:
    - name: manager.*.*.*.*.nip.io
      secretName: apim-endpoint
  platformAPIEndpoint:
    #ingressClassName: $INGRESS_CLASS
    annotations:
      cert-manager.io/issuer: ingress-issuer
    hosts:
    - name: api.*.*.*.*.nip.io
      secretName: api-endpoint
  consumerAPIEndpoint:
    #ingressClassName: $INGRESS_CLASS
    annotations:
      cert-manager.io/issuer: ingress-issuer
    hosts:
    - name: consumer.*.*.*.*.nip.io
      secretName: consumer-endpoint
  databaseVolumeClaimTemplate:
    storageClassName: local-storage
  microServiceSecurity: certManager
  certManagerIssuer:
    name: selfsigning-issuer
    kind: Issuer
  license:
    accept: true
    metric: PROCESSOR_VALUE_UNIT
    use: production
    license: L-VQYA-YNM22H
このファイルをもとにカスタムリソース(ManagementCluster)を作成します。
$ kubectl apply -f management_cr.yaml
managementcluster.management.apiconnect.ibm.com/management created

$ kubectl get ManagementCluster
NAME         READY   STATUS    VERSION    RECONCILED VERSION   MESSAGE                                                                  AGE
management   1/15    Pending   10.0.5.4                        Management installation in progress - see status condition for details   21s
インストールが開始されています。APICはPVCを作成しますが、今回のStorage Classの設定では、PVは自動で作成されず、以下のようにPendingとなります。Storage Classによっては自動で作成されますが、今回は手動での作成が必要です。
itzuser@itz-2700025h88-49id:~$ kubectl get pvc
NAME                                     STATUS    VOLUME   CAPACITY   ACCESS MODES   STORAGECLASS    AGE
management-4185cc2e-postgres             Pending                                      local-storage   49s
management-4185cc2e-postgres-pgbr-repo   Pending                                      local-storage   49s
management-4185cc2e-postgres-wal         Pending                                      local-storage   49s
各、PVCで必要としているPVを確認します。
$ kubectl get pvc management-4185cc2e-postgres -o yaml
apiVersion: v1
kind: PersistentVolumeClaim
metadata:
  creationTimestamp: "2023-10-05T04:29:07Z"
  finalizers:
  - kubernetes.io/pvc-protection
  labels:
    app.kubernetes.io/instance: management
    app.kubernetes.io/managed-by: ibm-apiconnect
    app.kubernetes.io/name: management-4185cc2e-postgres
    com.ibm.apiconnect/creation-time: "1696480147"
    pg-cluster: management-4185cc2e-postgres
    vendor: crunchydata
  name: management-4185cc2e-postgres
  namespace: default
  resourceVersion: "14726"
  uid: 1fe7731c-47a4-4ede-a84f-d431d44b9a07
spec:
  accessModes:
  - ReadWriteOnce
  resources:
    requests:
      storage: 120G
  storageClassName: local-storage
  volumeMode: Filesystem
status:
  phase: Pending
このPVCではこのように120Gのディスクを要求しています。以下のようにPV登録用のファイルを作成します。
apiVersion: v1
kind: PersistentVolume
metadata:
  name: local-pv1
spec:
  capacity:
    storage: 120G
  accessModes:
  - ReadWriteOnce
  persistentVolumeReclaimPolicy: Retain
  storageClassName: local-storage
  local:
    path: /data
  nodeAffinity:
    required:
      nodeSelectorTerms:
      - matchExpressions:
        - key: kubernetes.io/hostname
          operator: In
          values:
          - itz-2700025h88-49id
$ kubectl apply -f local-pv.yaml
persistentvolume/local-pv1 created
各PVCの設定をもとに、名前とサイズを変えてPVを3つ作成します。
作成後は、自動でPVCにアサインされ、以下のようにSTATUSがBoundとなります。
$ kubectl get pvc
NAME                                     STATUS   VOLUME      CAPACITY   ACCESS MODES   STORAGECLASS    AGE
management-4185cc2e-postgres             Bound    local-pv2   120G       RWO            local-storage   11m
management-4185cc2e-postgres-pgbr-repo   Bound    local-pv1   120G       RWO            local-storage   11m
management-4185cc2e-postgres-wal         Bound    local-pv3   30G        RWO            local-storage   11m
これでインストールが進んでいきます。
以下のようにManagementClusterで状態を確認し、ReadyになっていればOKです。
$ kubectl get managementcluster
NAME         READY   STATUS    VERSION    RECONCILED VERSION   MESSAGE               AGE
management   17/17   Running   10.0.5.4   10.0.5.4-5472        Management is ready   18m
これでAPI Managerのインストールは完了です。
1.4.2 DataPowerのデプロイ
次にDataPowerをインストールします。
こちらも同様に事前に転送したカスタムリソースファイル(apigateway_cr.yaml)を以下のような点を修正します。
- imageRegistry : 手順1.2で作成したローカルのDocker Registry Serverを指定しています
- 各Endpointのhosts/name : 今回はwildcard dnsを使用してUbuntu ServerのIPアドレスを紐づけてFQDNを設定しています
- storageClassName : 手順1.4.0で作成した「local-storage」を指定しています
今回は、簡易的にすべてをdefaultのnamespaceに導入していますが、通常は推奨されず、インストール時のチェックでエラーとなります。defaultに導入する場合は、このチェックを回避するため、以下のアノテーションの追記が必要となります。
- operator.ibm.com/namespace-webhook-check: "false"
#
# Licensed under the Apache License, Version 2.0 (the "License");
# you may not use this file except in compliance with the License.
# You may obtain a copy of the License at
#
#     http://www.apache.org/licenses/LICENSE-2.0
#
# Unless required by applicable law or agreed to in writing, software
# distributed under the License is distributed on an "AS IS" BASIS,
# WITHOUT WARRANTIES OR CONDITIONS OF ANY KIND, either express or implied.
# See the License for the specific language governing permissions and
# limitations under the License.
#


apiVersion: gateway.apiconnect.ibm.com/v1beta1
kind: GatewayCluster
metadata:
  name: gwv6
  labels: {
    app.kubernetes.io/instance: "gateway",
    app.kubernetes.io/managed-by: "ibm-apiconnect",
    app.kubernetes.io/name: "gwv6"
  }
  annotations: {
    operator.ibm.com/namespace-webhook-check: "false"
  }
spec:
  version: 10.0.5.4
  profile: n1xc4.m8
  #imagePullSecrets:
          #- apic-registry-secret
  imageRegistry: localhost:5000
  apicGatewayServiceV5CompatibilityMode: false
  gatewayEndpoint:
    #ingressClassName: $INGRESS_CLASS
    annotations:
      cert-manager.io/issuer: ingress-issuer
    hosts:
    - name: rgw.*.*.*.*.nip.io
      secretName: gwv6-endpoint
  gatewayManagerEndpoint:
    #ingressClassName: $INGRESS_CLASS
    annotations:
      cert-manager.io/issuer: ingress-issuer
    hosts:
    - name: rgwd.*.*.*.*.nip.io
      secretName: gwv6-manager-endpoint
  apicGatewayServiceTLS:
    secretName: gateway-service
  apicGatewayPeeringTLS:
    secretName: gateway-peering
  mgmtPlatformEndpointCASecret:
    secretName: ingress-ca # Usually ingress-ca
  #mgmtPlatformEndpointSvcCASecret:
  #  secretName:  # Usually management-ca
  datapowerLogLevel: 3
  license:
    accept: true
    metric: PROCESSOR_VALUE_UNIT
    use: production
    license: L-VQYA-YNM22H
  tokenManagementService:
    enabled: true
    storage:
      storageClassName: local-storage
      volumeSize: 30Gi
  adminUser:
    secretName: datapower-admin-credentials
  mtlsValidateClient: false
  # syslogConfig:
  #   enabled: false # if true, provide below details
  #   remoteHost: $DATAPOWER_SYSLOG_TCP_REMOTE_HOST # must be a string
  #   remotePort: $DATAPOWER_SYSLOG_TCP_REMOTE_PORT # must be an int
  #   secretName: $DATAPOWER_SYSLOG_TCP_TLS_SECRET # mus
このファイルをもとにカスタムリソースを作成します。
$ kubectl apply -f apigateway_cr.yaml
gatewaycluster.gateway.apiconnect.ibm.com/gwv6 created
こちらもAPI Managerと同様にPVの手動作成が必要となります。
$ kubectl get pvc
NAME                                     STATUS    VOLUME      CAPACITY   ACCESS MODES   STORAGECLASS    AGE
gwv6-raid-volume-raid0-local-gwv6-0      Pending                                         local-storage   18s
management-4185cc2e-postgres             Bound     local-pv2   120G       RWO            local-storage   21m
management-4185cc2e-postgres-pgbr-repo   Bound     local-pv1   120G       RWO            local-storage   21m
management-4185cc2e-postgres-wal         Bound     local-pv3   30G        RWO            local-storage   21m

$ kubectl get pvc gwv6-raid-volume-raid0-local-gwv6-0 -o yaml
apiVersion: v1
kind: PersistentVolumeClaim
metadata:
  creationTimestamp: "2023-10-05T04:50:41Z"
  finalizers:
  - kubernetes.io/pvc-protection
  labels:
    app.kubernetes.io/instance: default-gwv6
    app.kubernetes.io/name: datapower
  name: gwv6-raid-volume-raid0-local-gwv6-0
  namespace: default
  resourceVersion: "17983"
  uid: 2e497229-ff73-41f9-bac6-4b44bbe99ce4
spec:
  accessModes:
  - ReadWriteOnce
  resources:
    requests:
      storage: 30Gi
  storageClassName: local-storage
  volumeMode: Filesystem
status:
  phase: Pending

$ kubectl apply -f local-pv.yaml
persistentvolume/local-pv4 created

$ kubectl get pvc
NAME                                     STATUS   VOLUME      CAPACITY   ACCESS MODES   STORAGECLASS    AGE
gwv6-raid-volume-raid0-local-gwv6-0      Bound    local-pv4   30Gi       RWO            local-storage   99s
management-4185cc2e-postgres             Bound    local-pv2   120G       RWO            local-storage   23m
management-4185cc2e-postgres-pgbr-repo   Bound    local-pv1   120G       RWO            local-storage   23m
management-4185cc2e-postgres-wal         Bound    local-pv3   30G        RWO            local-storage   23m


kubectl get GatewayCluster
NAME   READY   STATUS    VERSION    RECONCILED VERSION   AGE
gwv6   2/2     Running   10.0.5.4   10.0.5.4-5472        4m44s
これでDataPowerのインストールは完了です。
2 API Connect導入後設定
こちらの手順をもとに導入後の設定を実施していきます。
各Endpointのアドレスを確認します。
今回はwildcard DNSを使用していますので、そのままブラウザーからアクセスできます。
$ kubectl get ingress
NAME                      CLASS   HOSTS                            ADDRESS   PORTS     AGE
gwv6-gateway              nginx   rgw.*.*.*.*.nip.io                  80, 443   7m28s
gwv6-gateway-manager      nginx   rgwd.*.*.*.*.nip.io                 80, 443   7m28s
management-admin          nginx   admin.*.*.*.*.nip.io                80, 443   29m
management-api-manager    nginx   manager.*.*.*.*.nip.io              80, 443   29m
management-consumer-api   nginx   consumer.*.*.*.*.nip.io             80, 443   29m
management-platform-api   nginx   api.*.*.*.*.nip.io                  80, 443   29m
2.1 Cloud Managerログイン
ブラウザーからIngressの「management-admin」のアドレスにアクセスします。
adminユーザーが作成されており、デフォルトのパスワードは「7iron-hide」となっています。
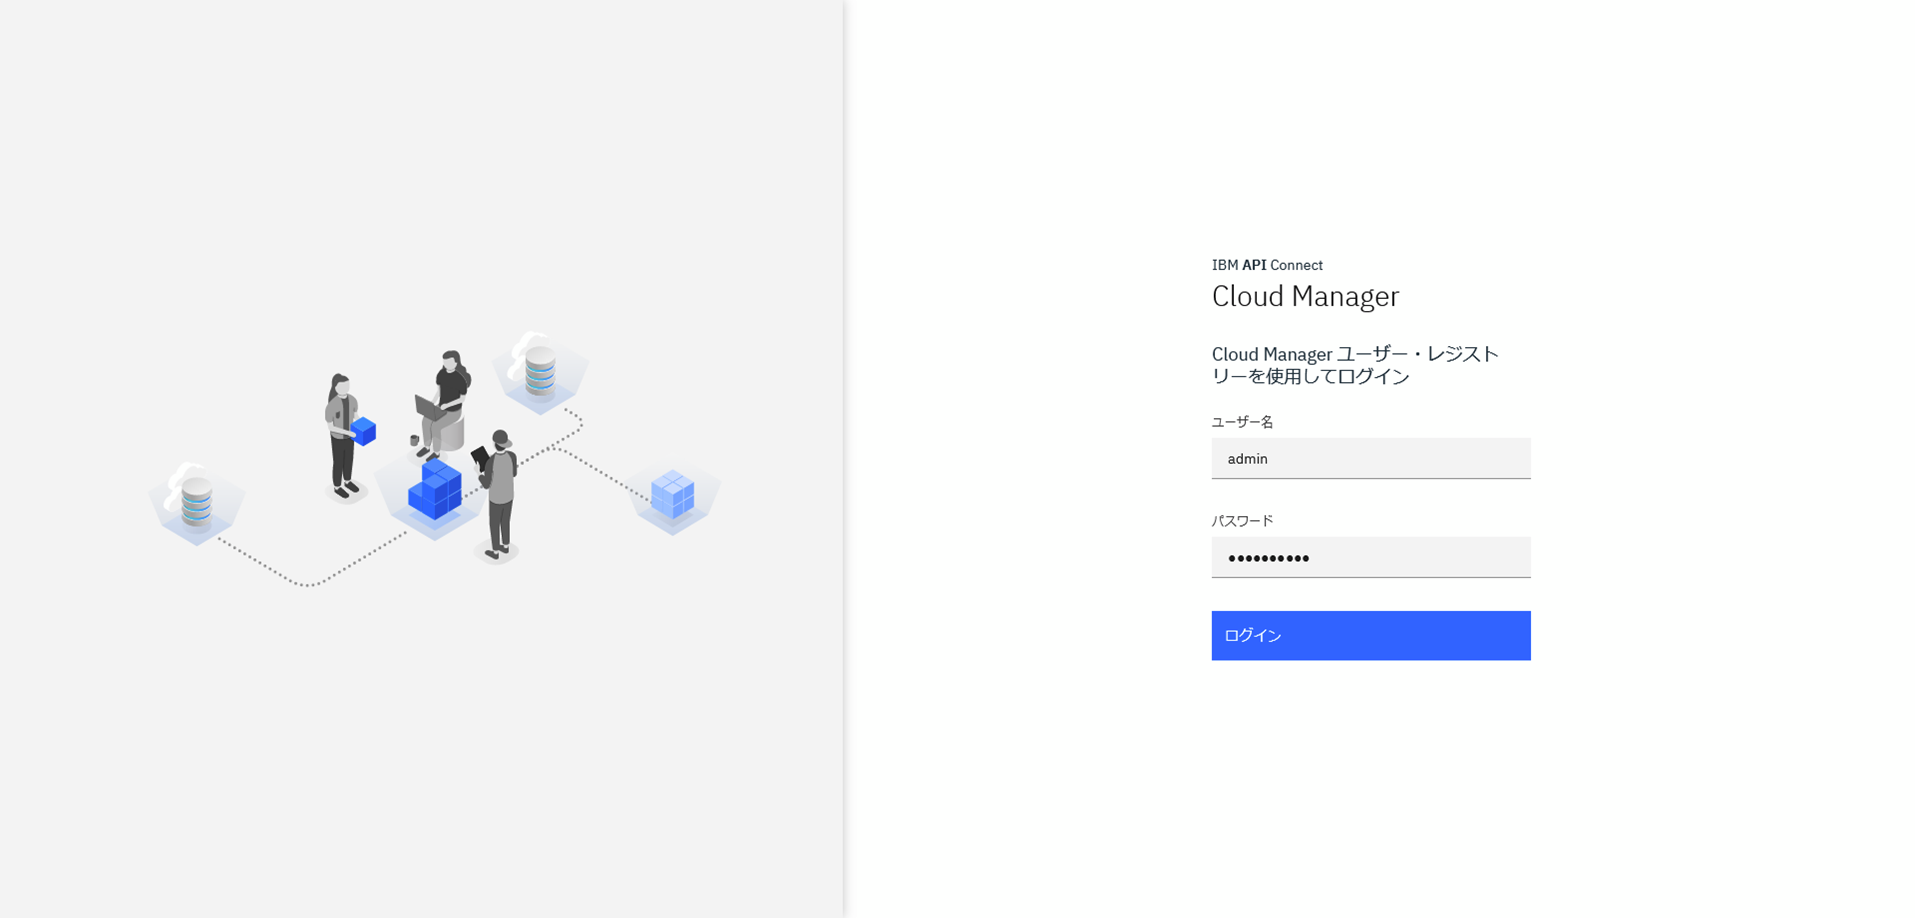
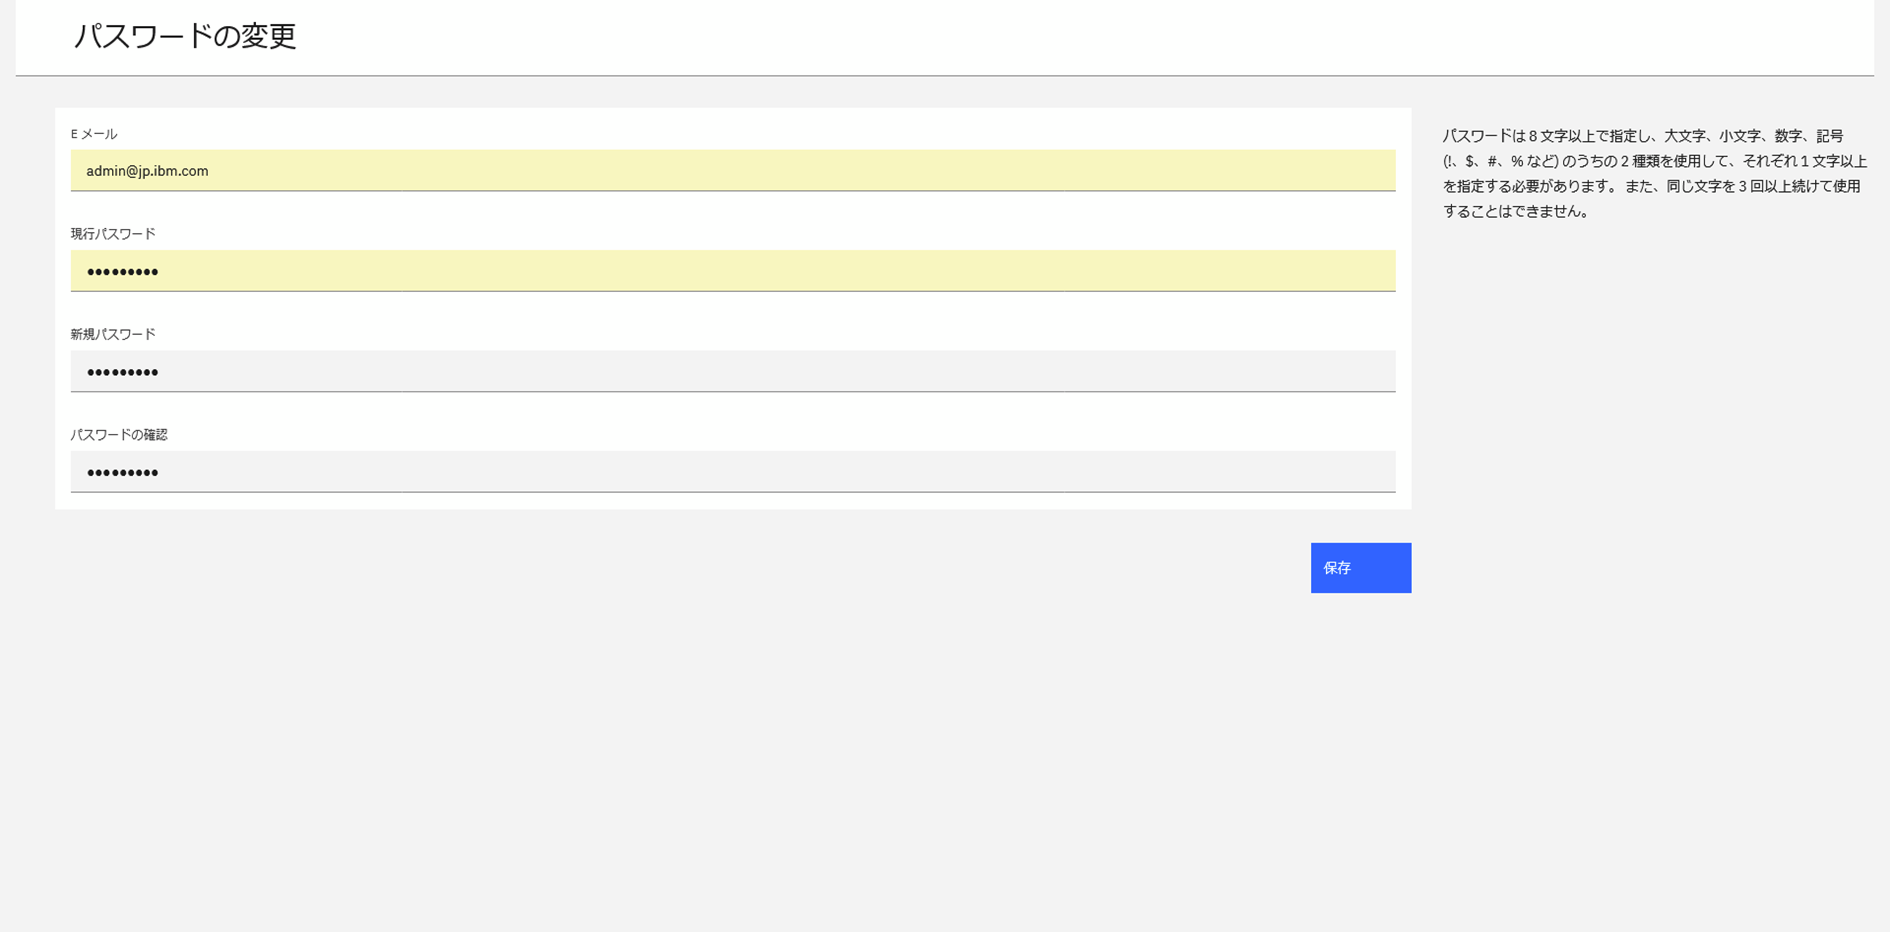
ログイン後にパスワードを変更します。
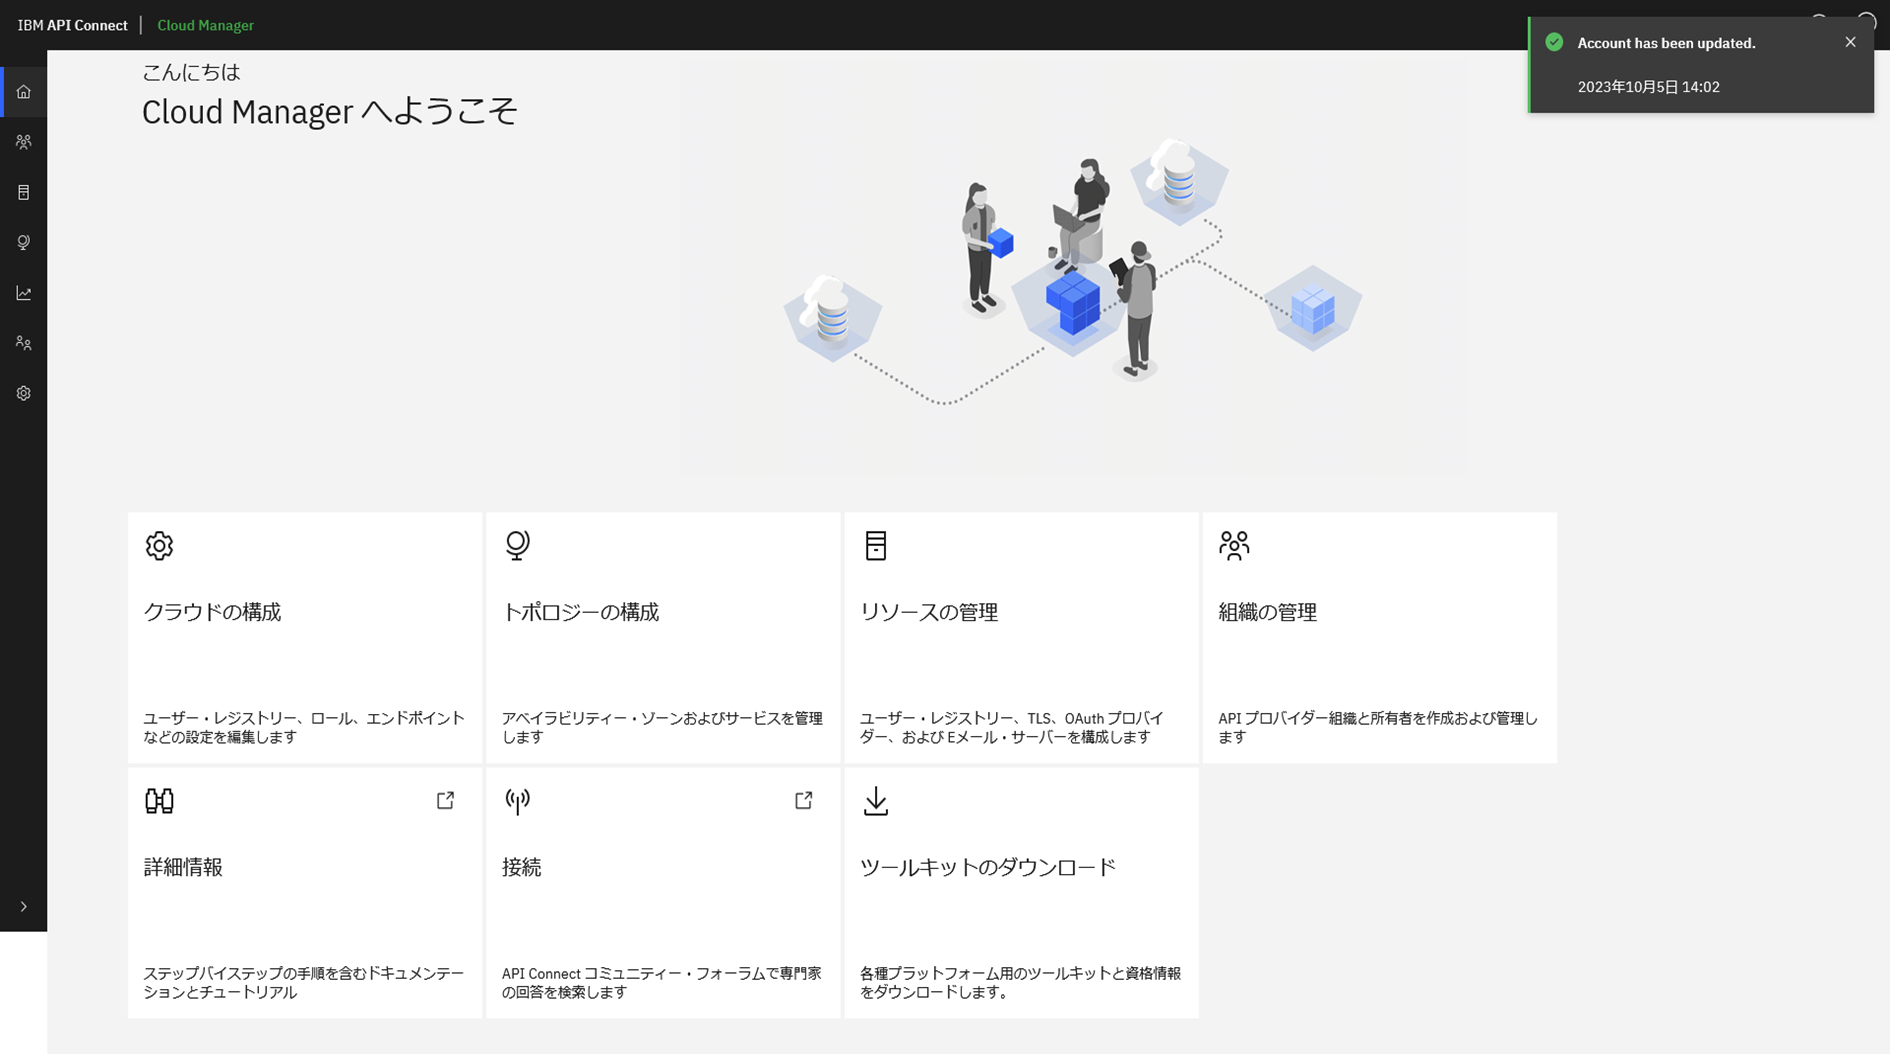
Cloud Managerのコンソールに接続できました。
2.2 ゲートウェイ設定
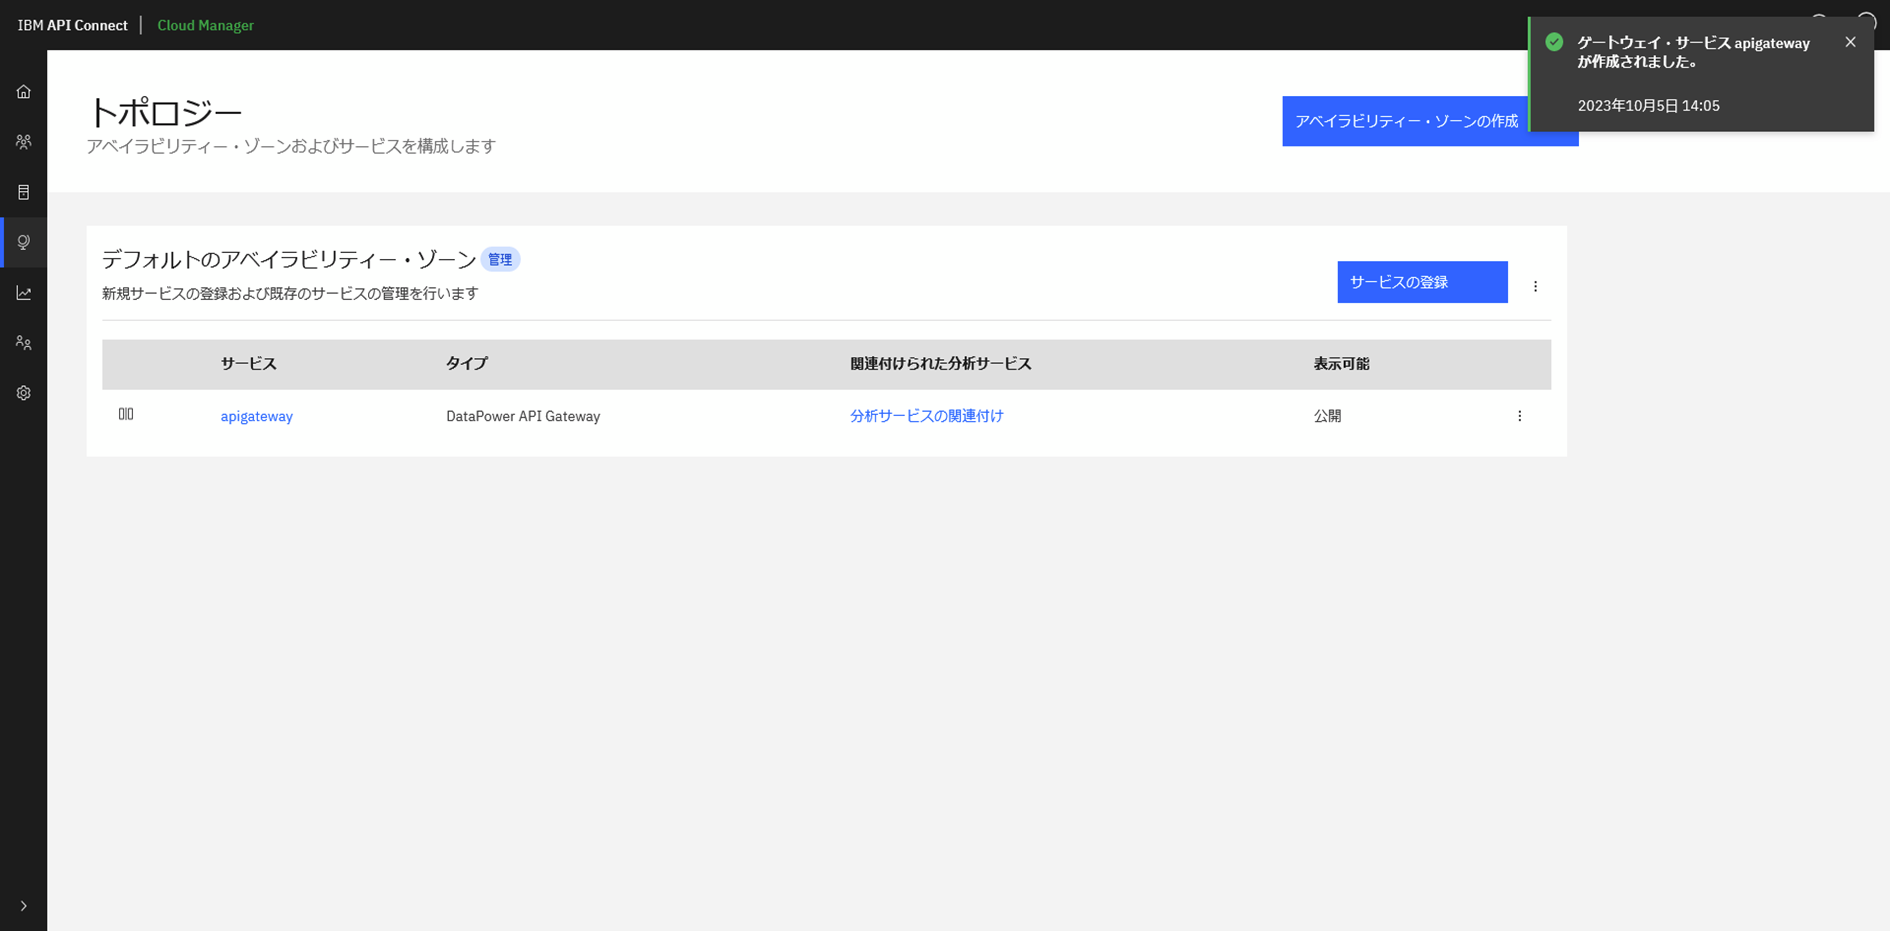
左側のメニューリストのトポロジーからサービスの登録を行います。
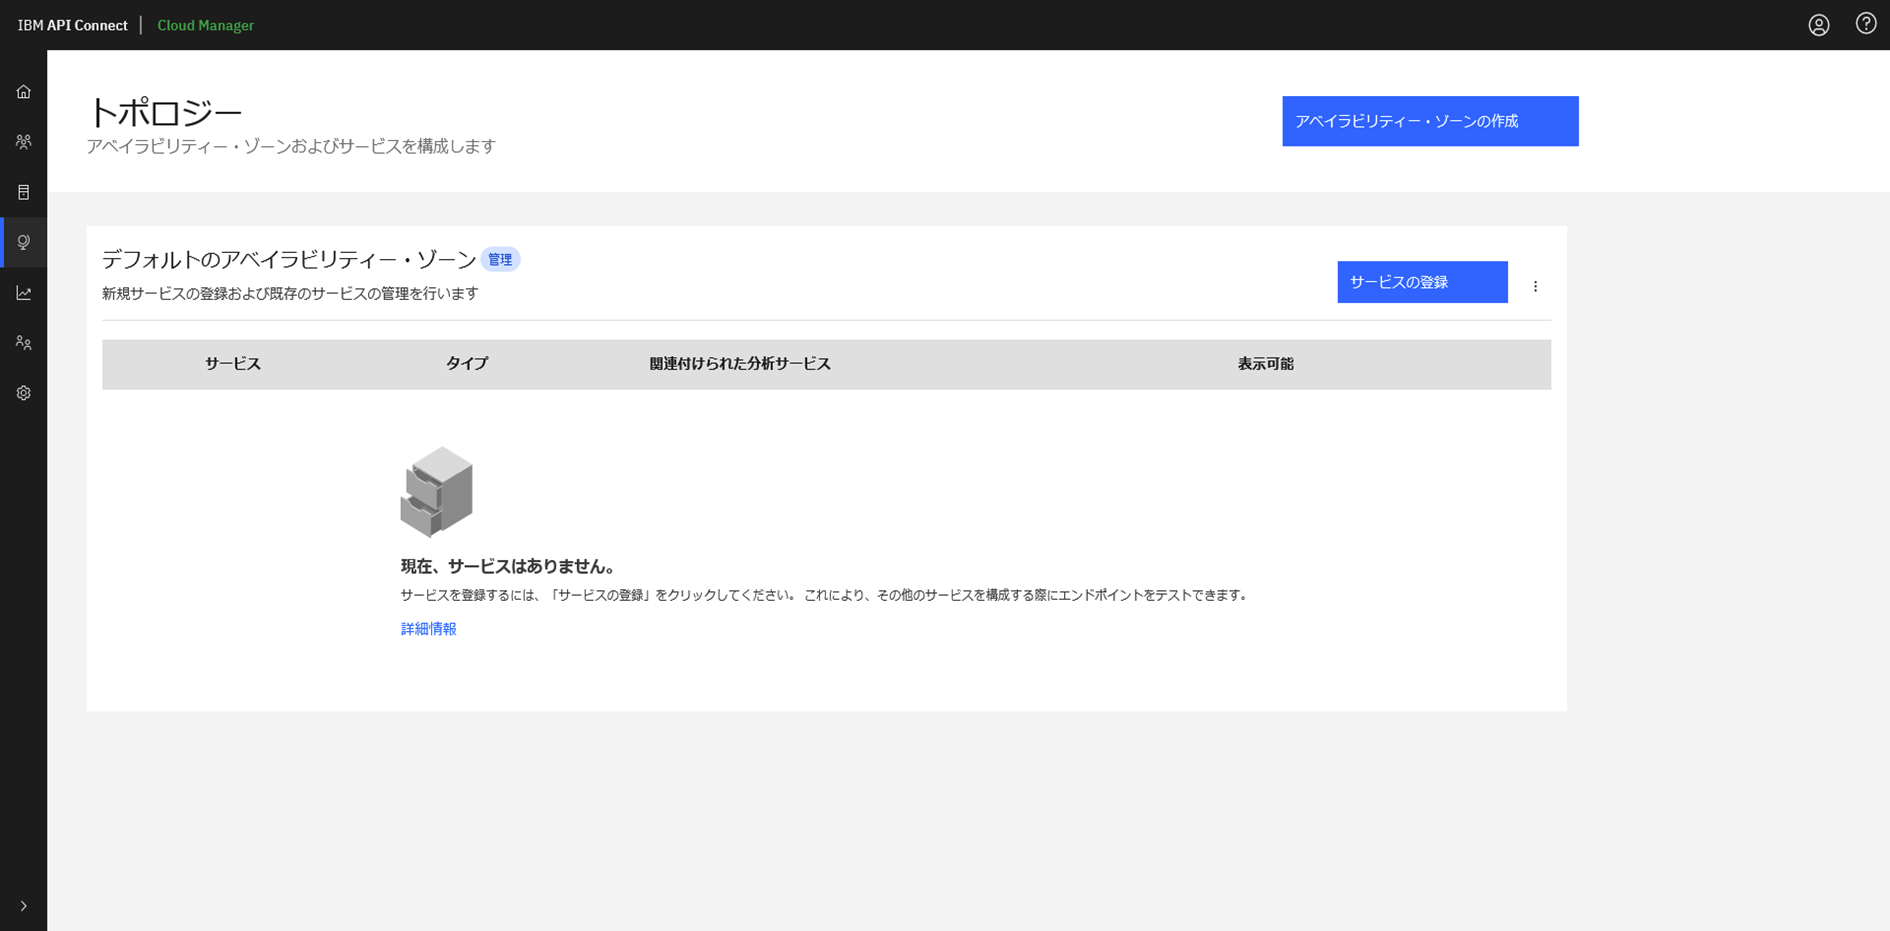
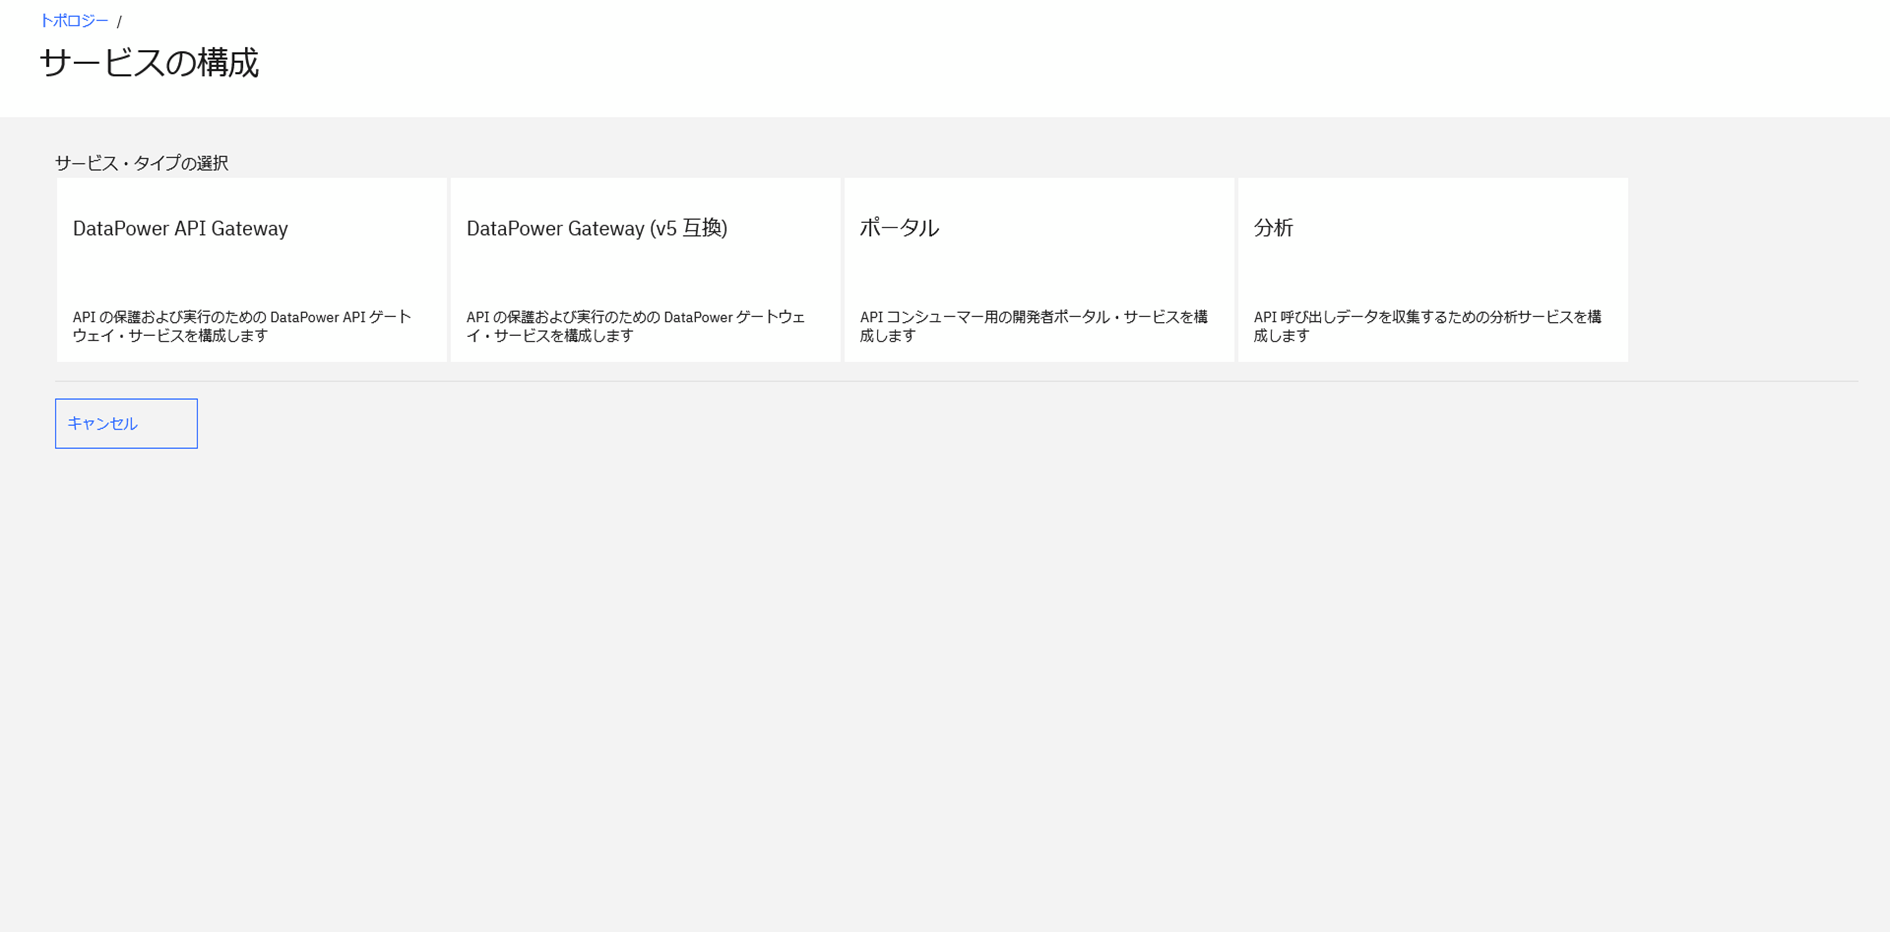
サービスタイプとして「DataPower API Gateway」を選択します。
ゲートウェイ・サービスの設定を入力します。
- ゲートウェイ・サービスの管理エンドポイントでは、Ingressの「gwv6-gateway-manager」のHOSTSを指定します。
- APIエンドポイント・ベースでは、Ingressの「gwv6-gateway」のHOSTSを指定します
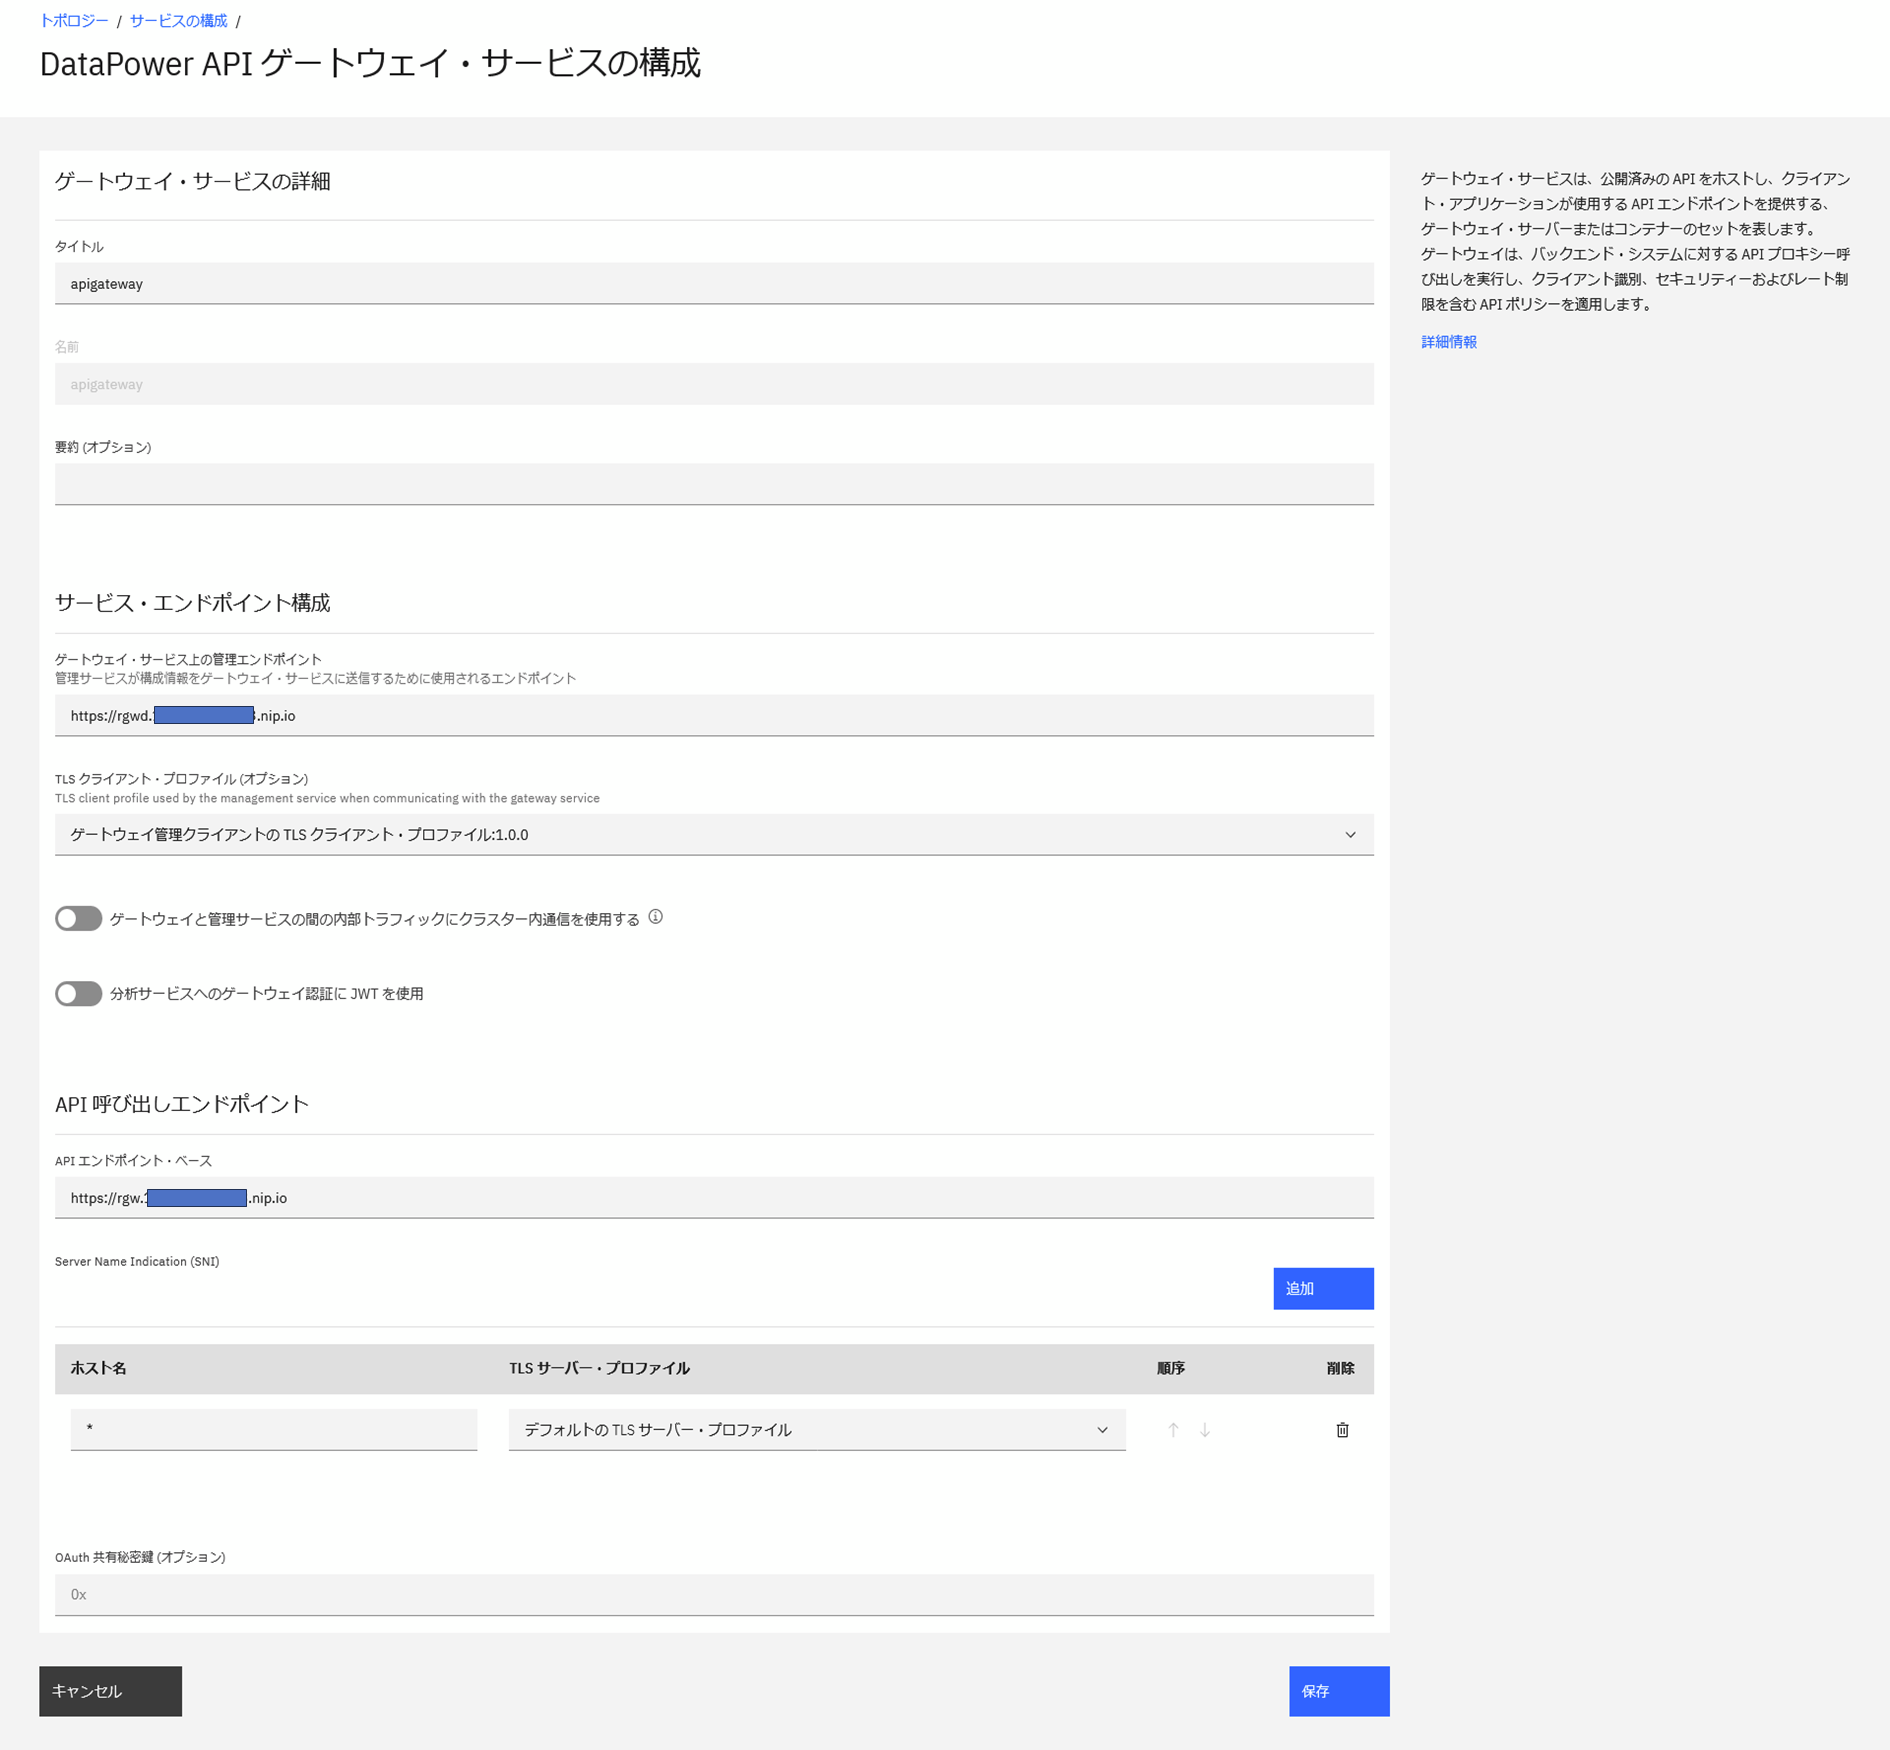
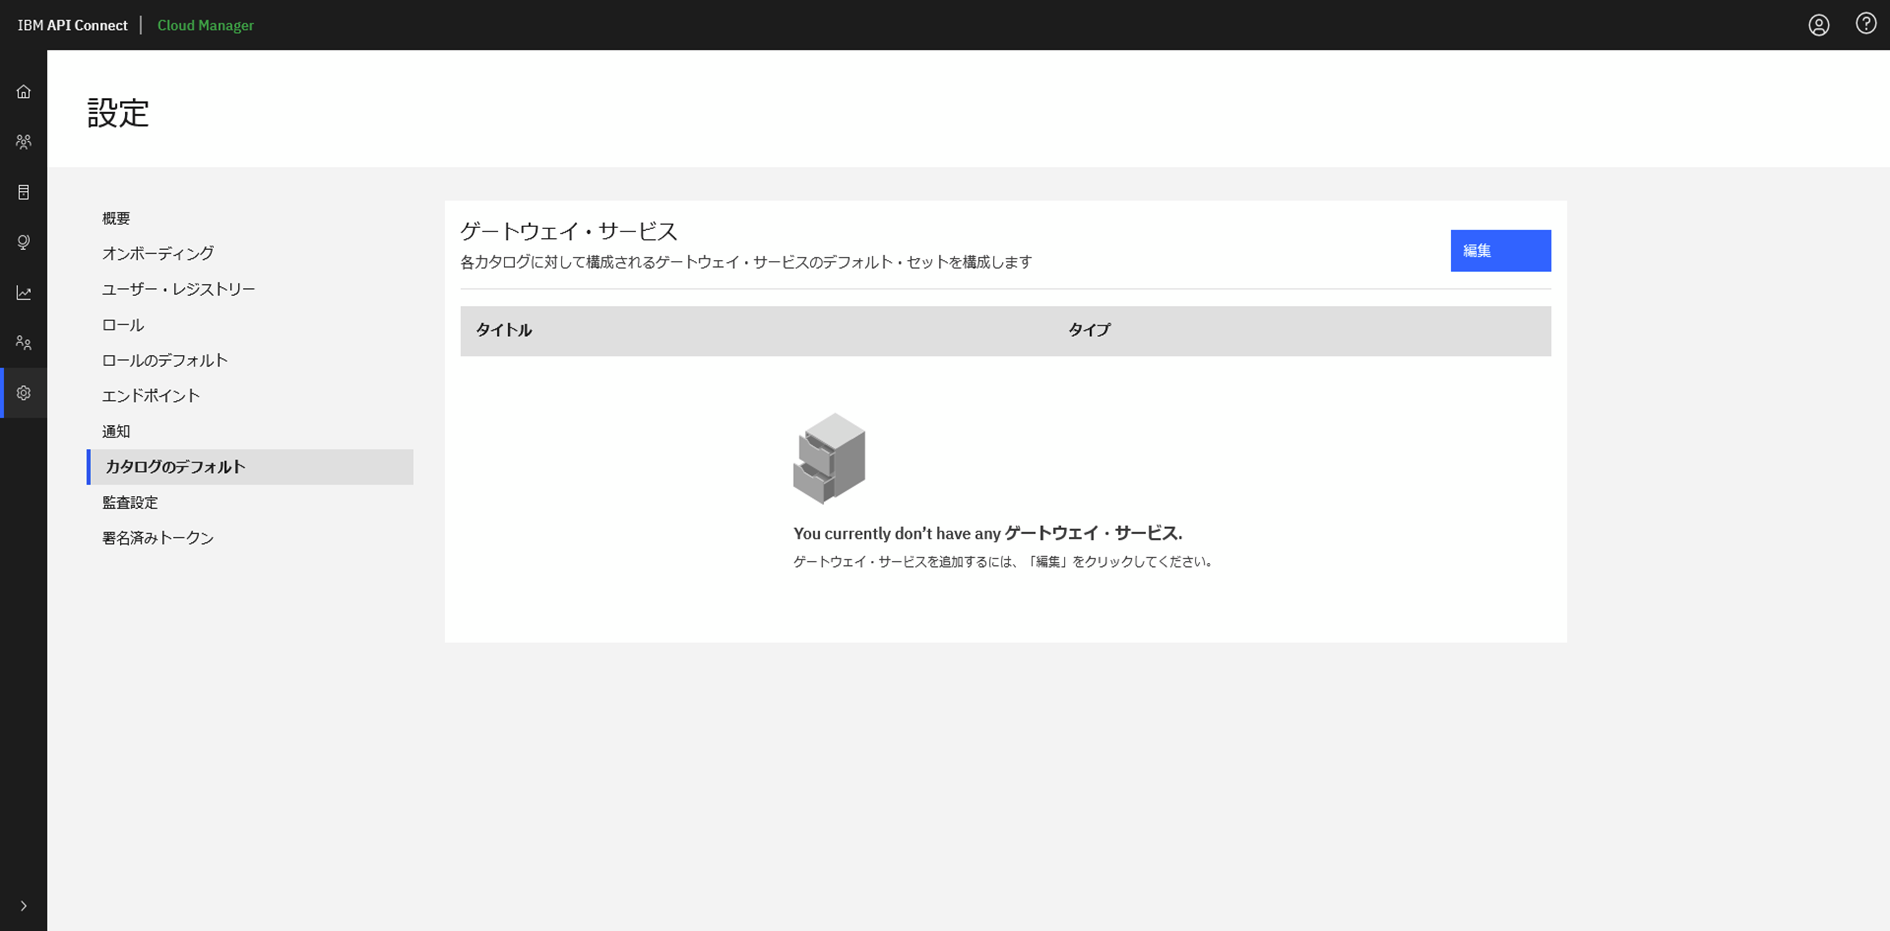
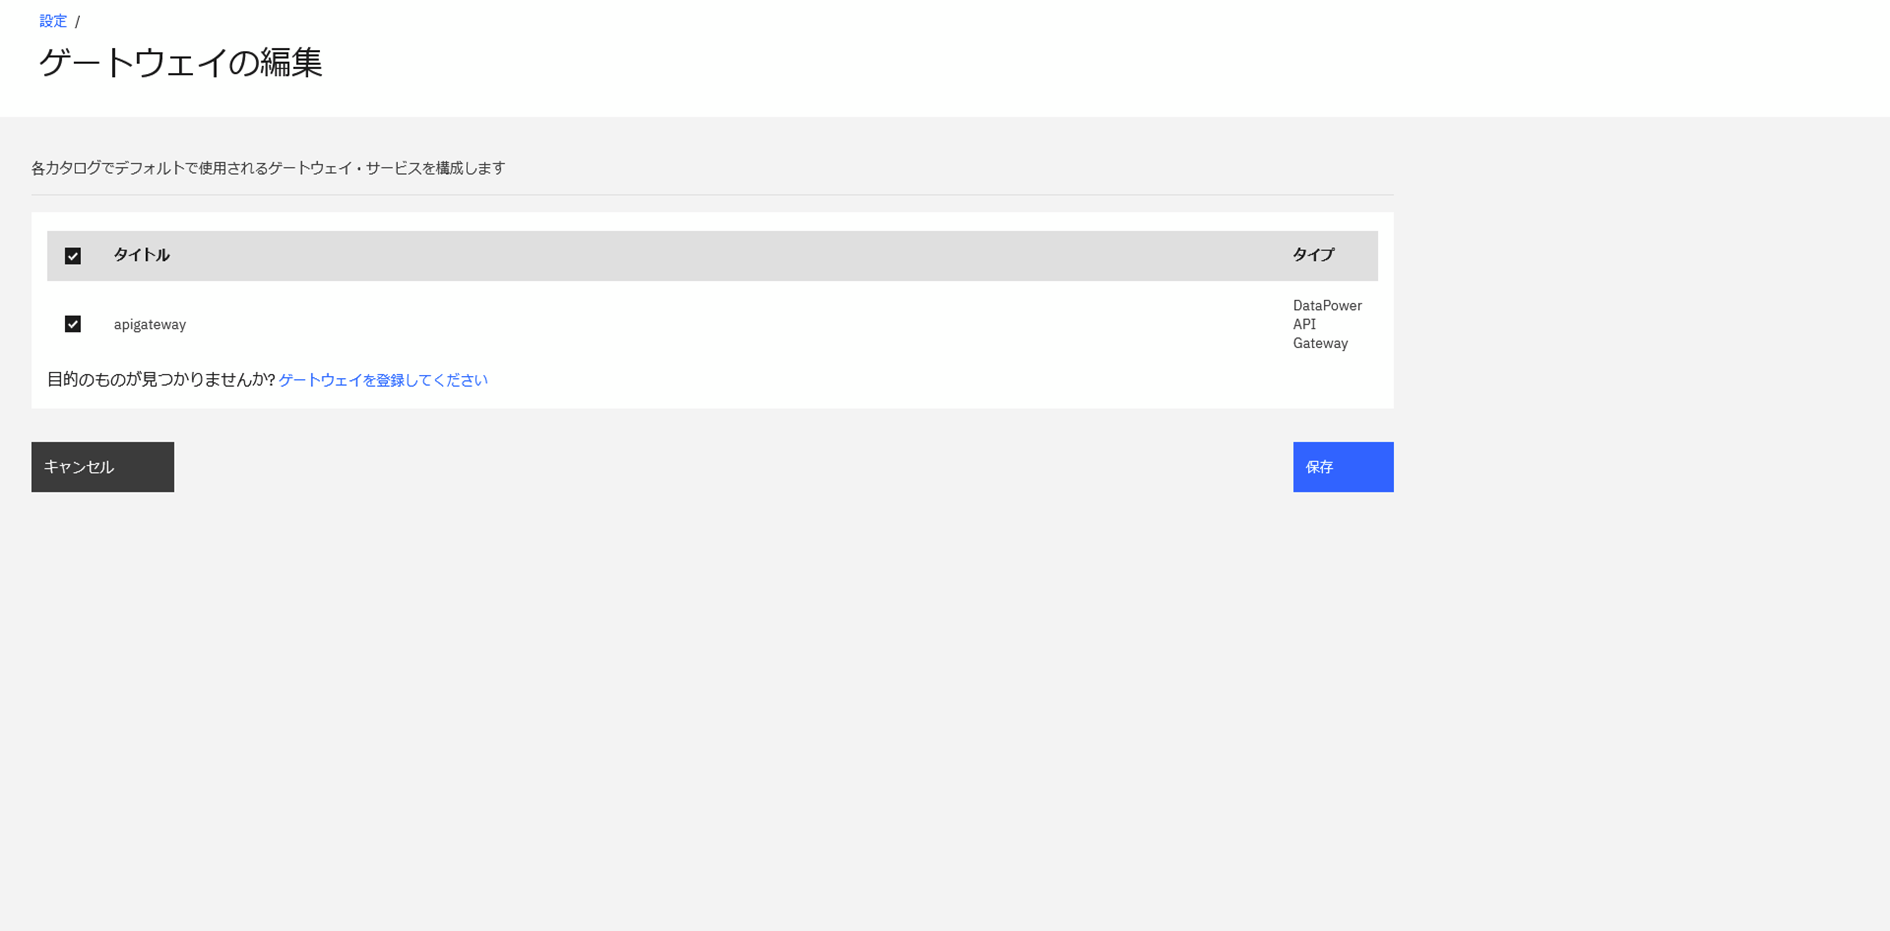
設定メニューからカタログのデフォルトで使用されるゲートウェイ・サービスを登録しておきます。
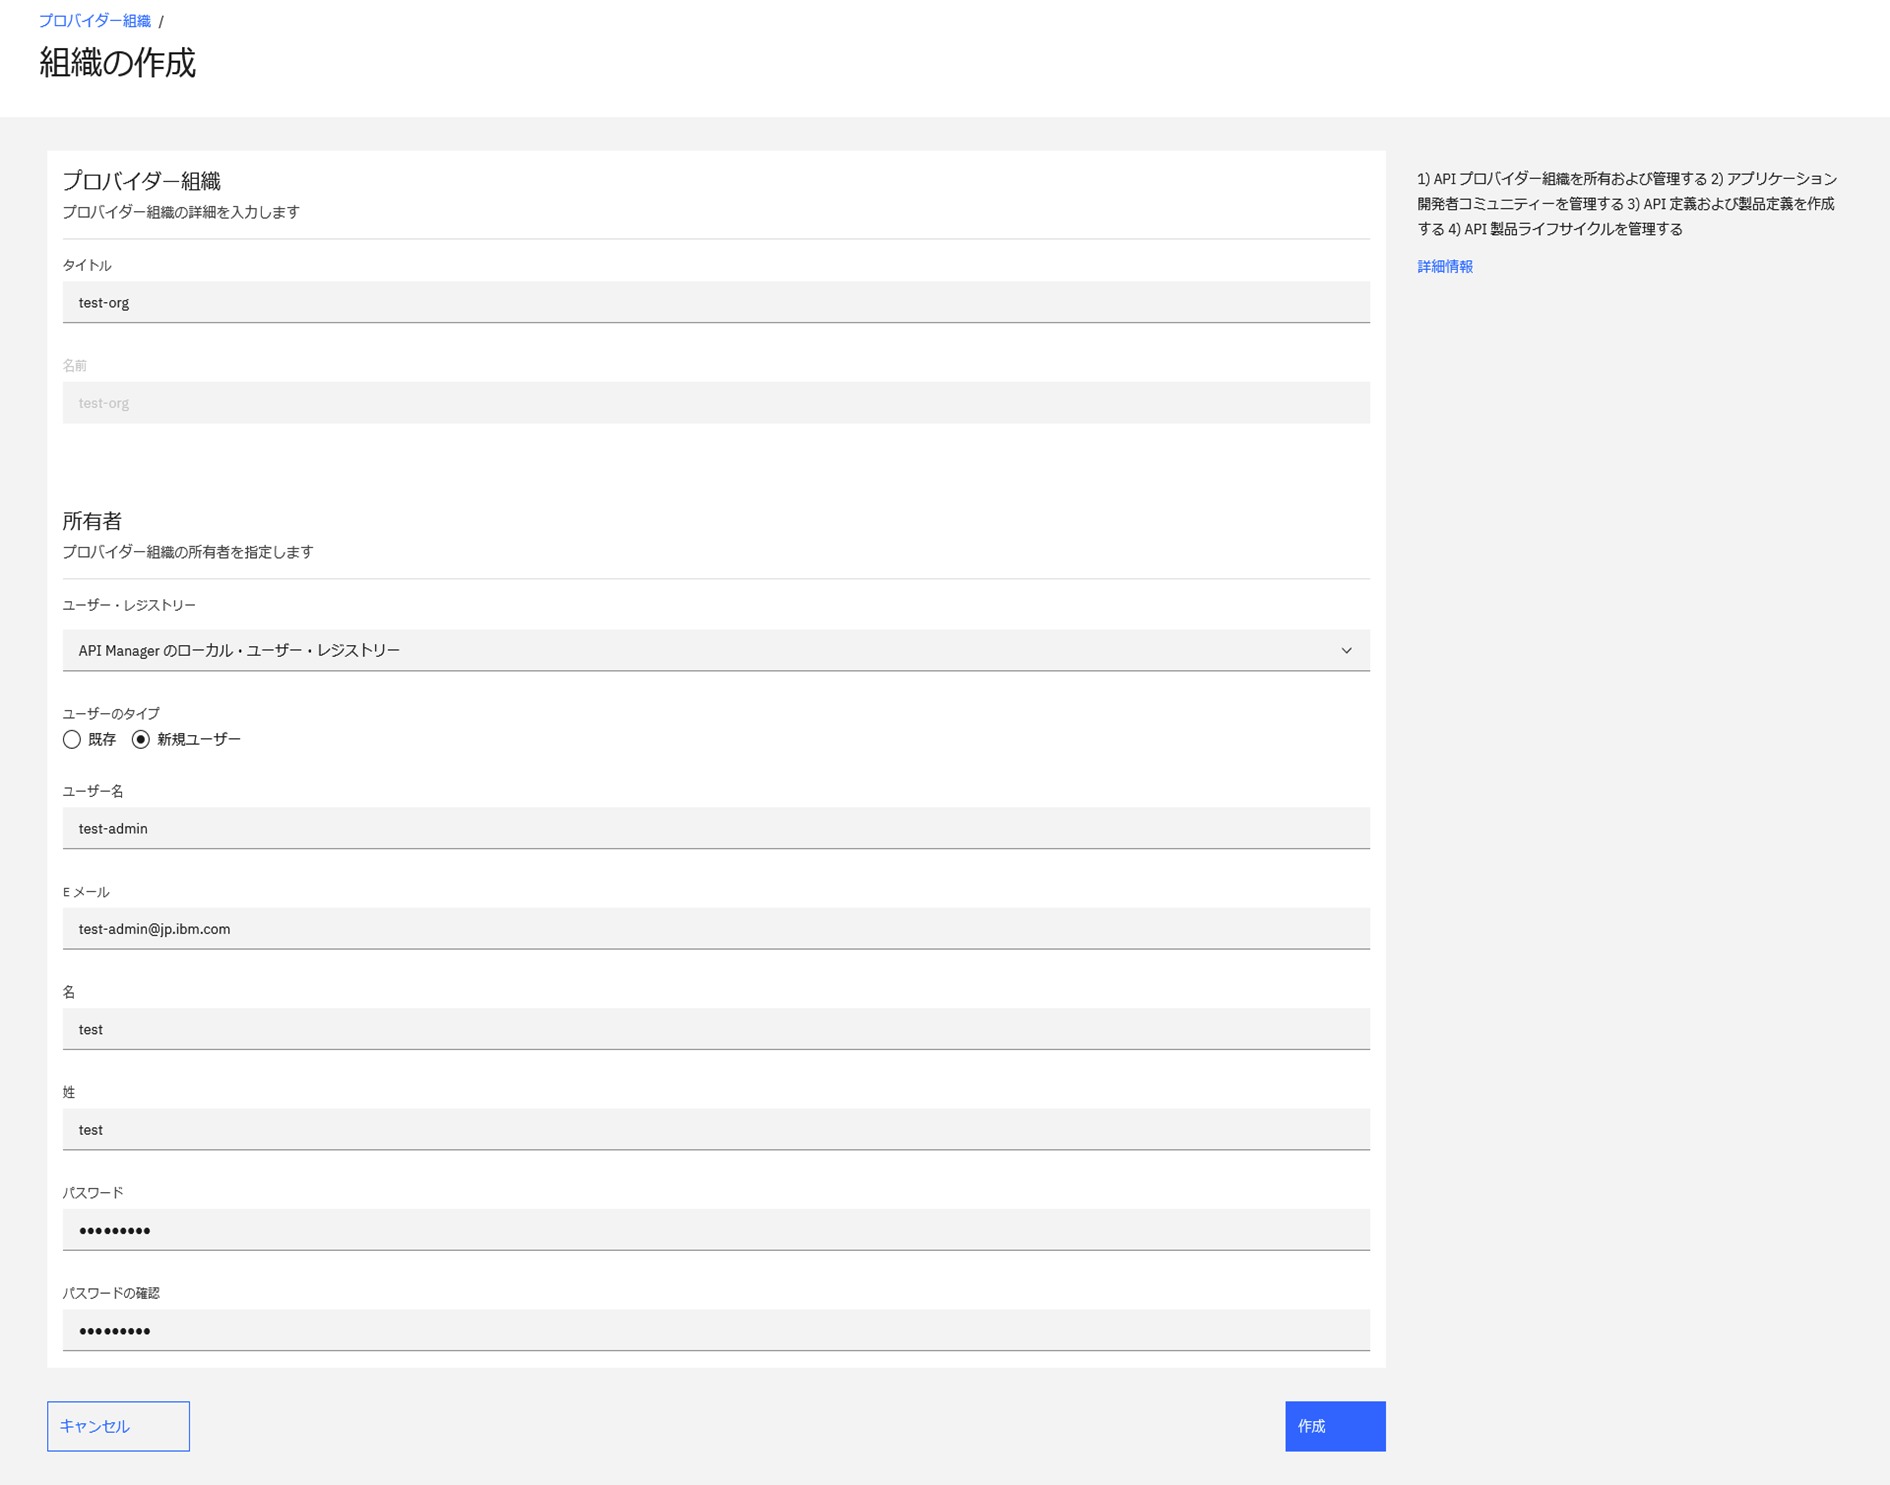
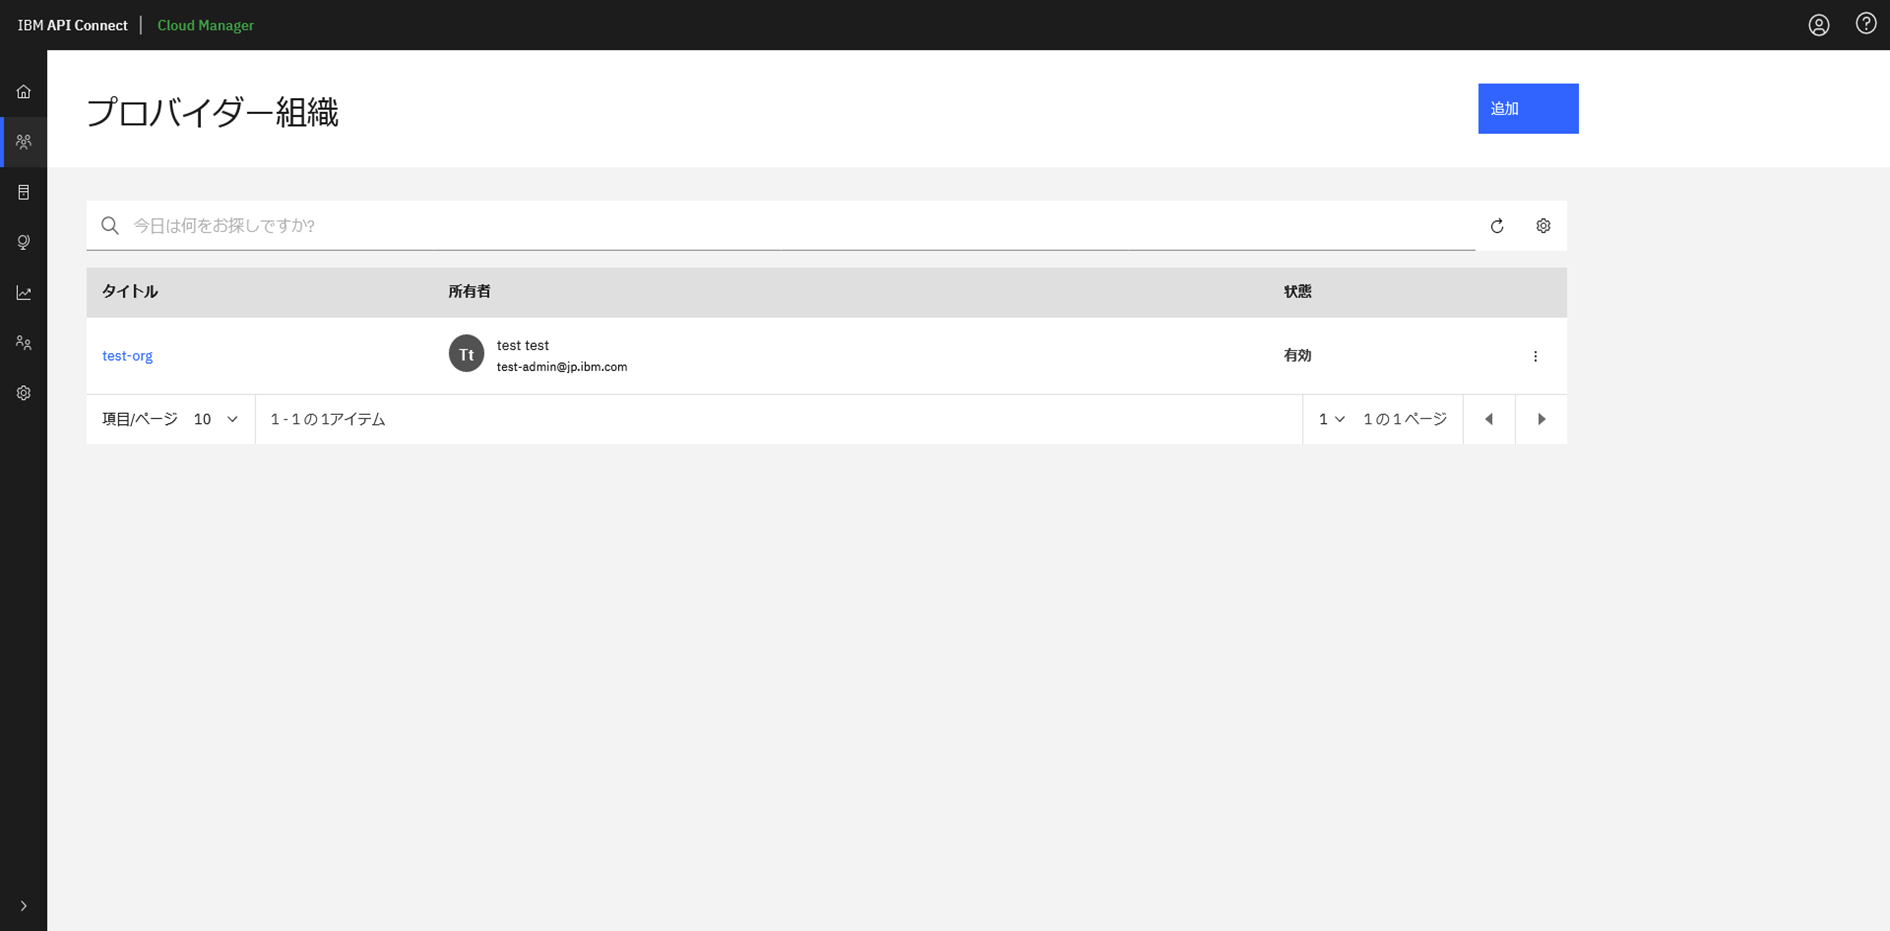
2.3 プロバイダー組織登録
プロバイダー組織メニュから追加を実施します。
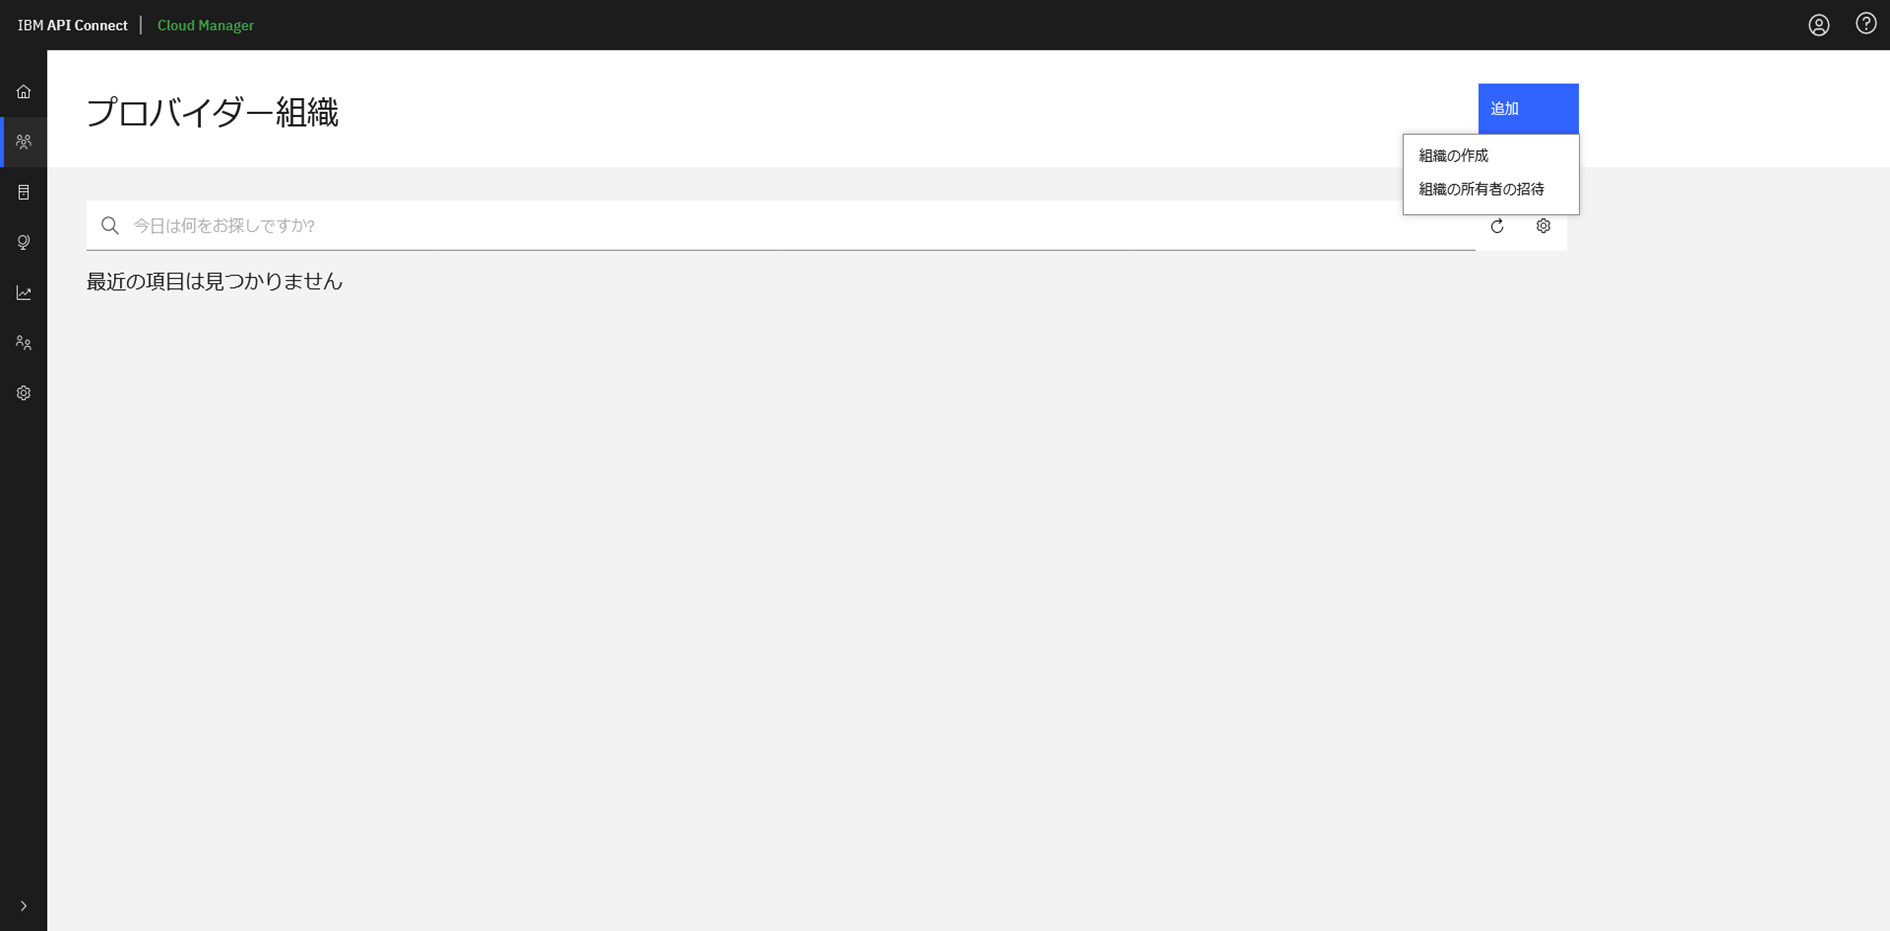
以下のように任意のユーザー名、パスワードを設定します。
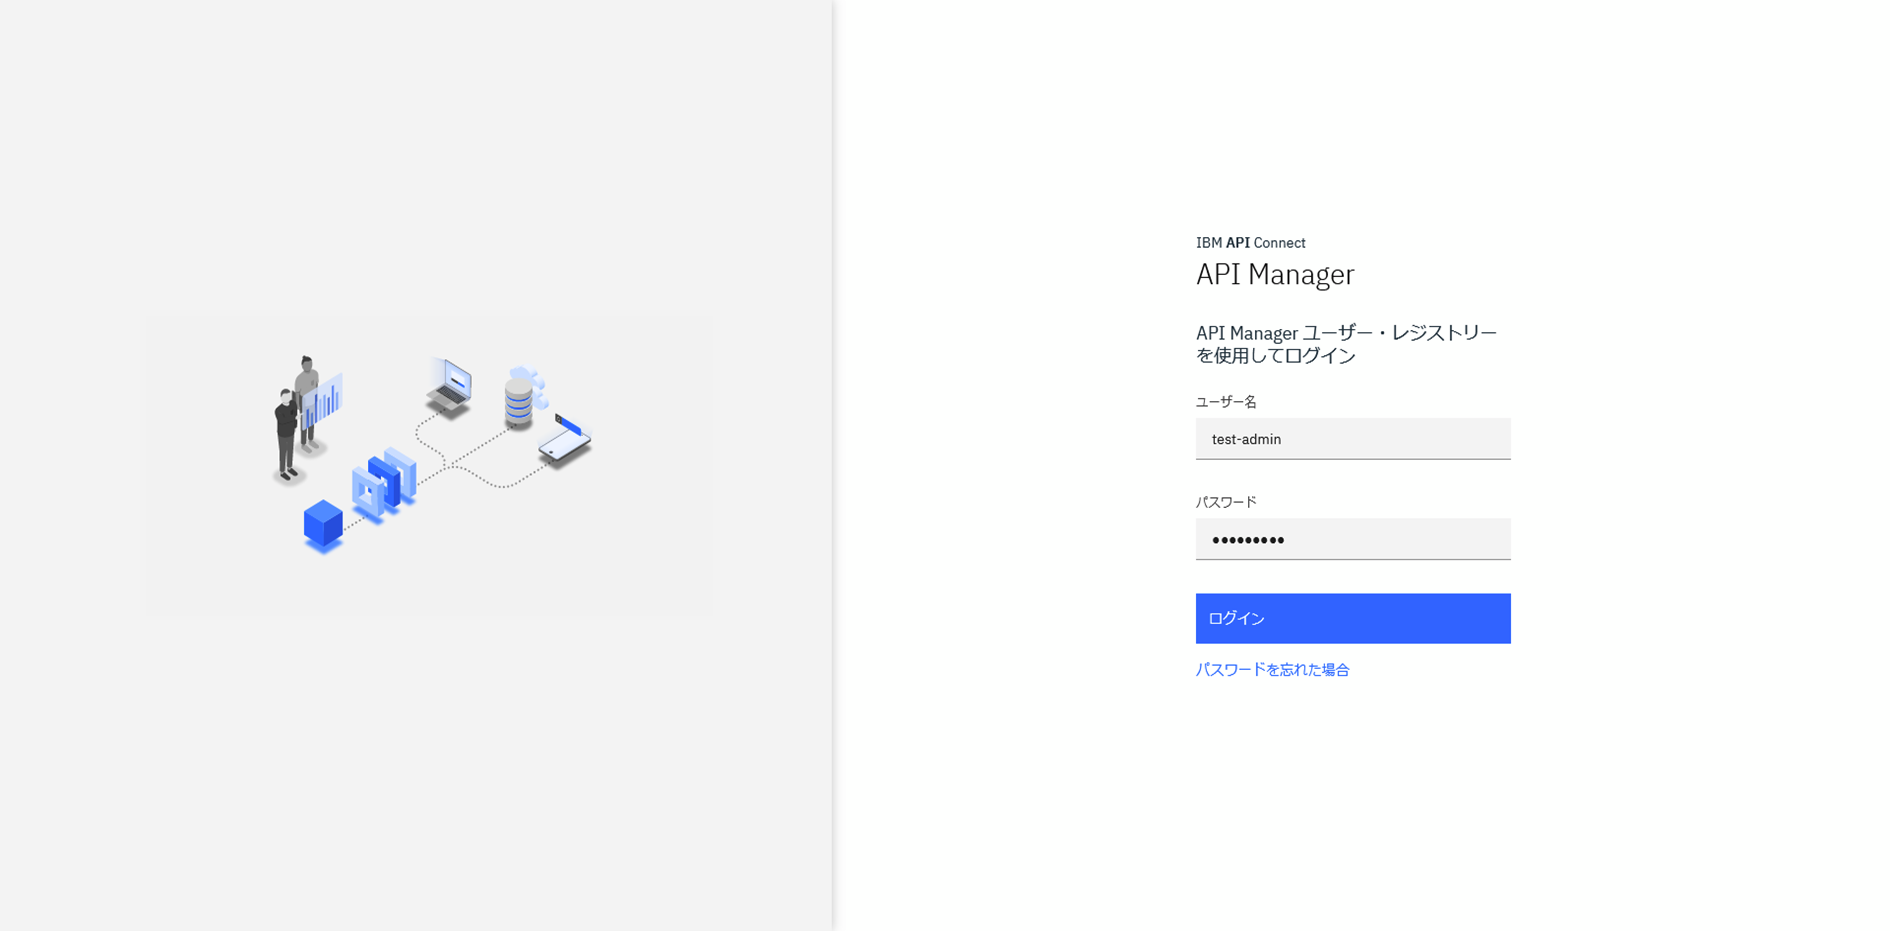
ブラウザーからIngressの「management-api-manager」のアドレスにアクセスします。
先ほど登録したユーザーでログインします。
2.4 API稼働検証
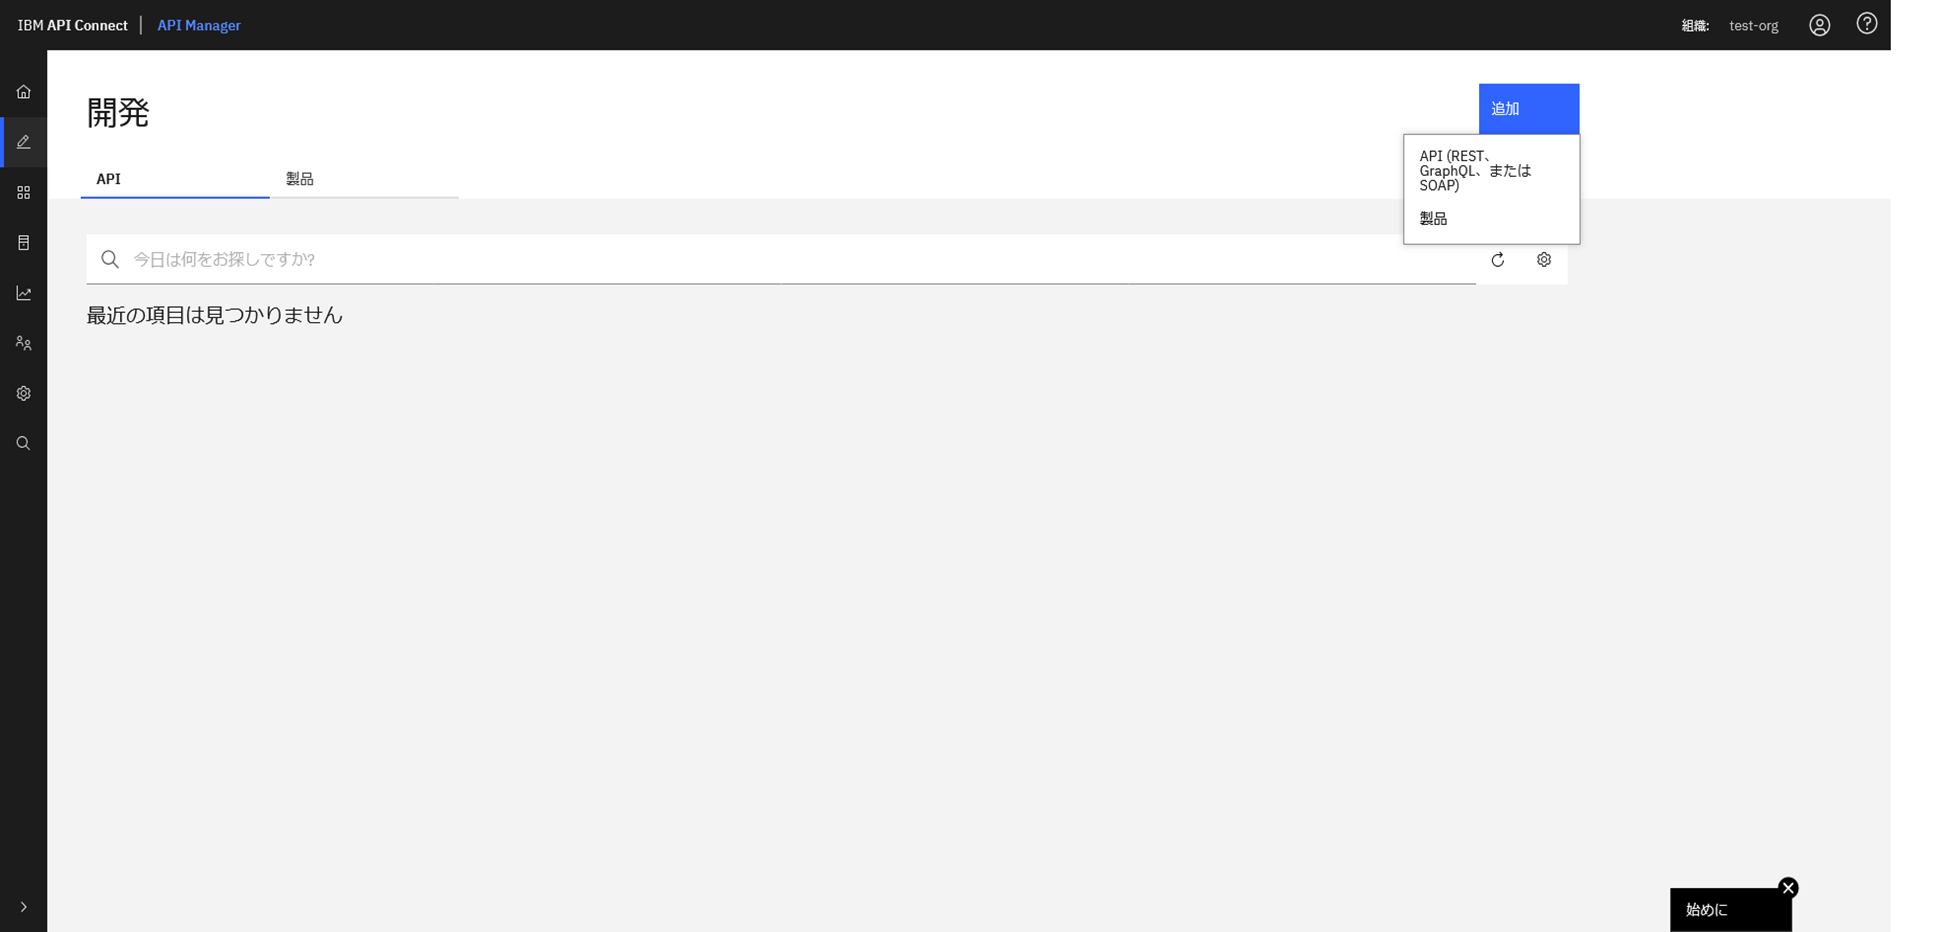
プロバイダー組織の管理コンソールにログインできました。
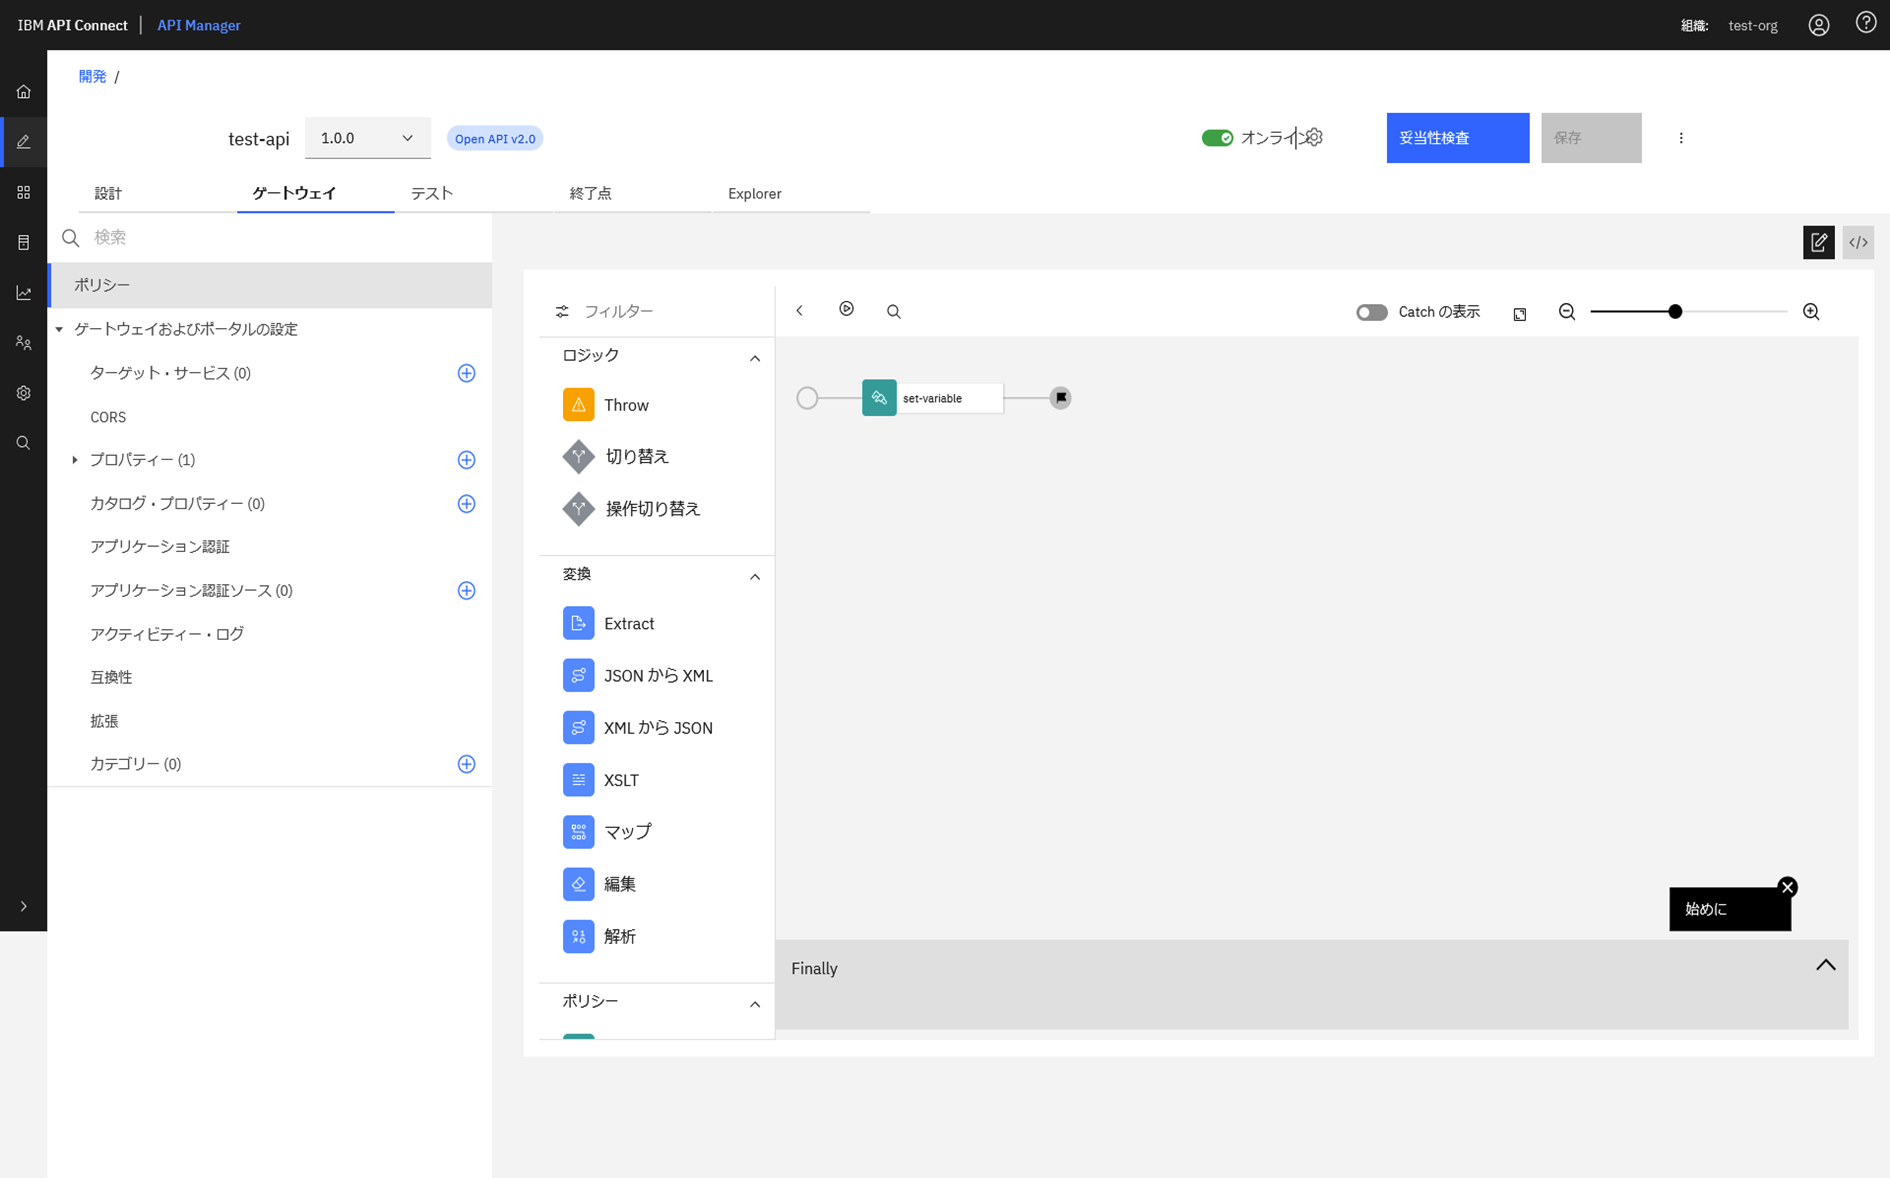
簡易的なAPIを作成してテストしてみます。
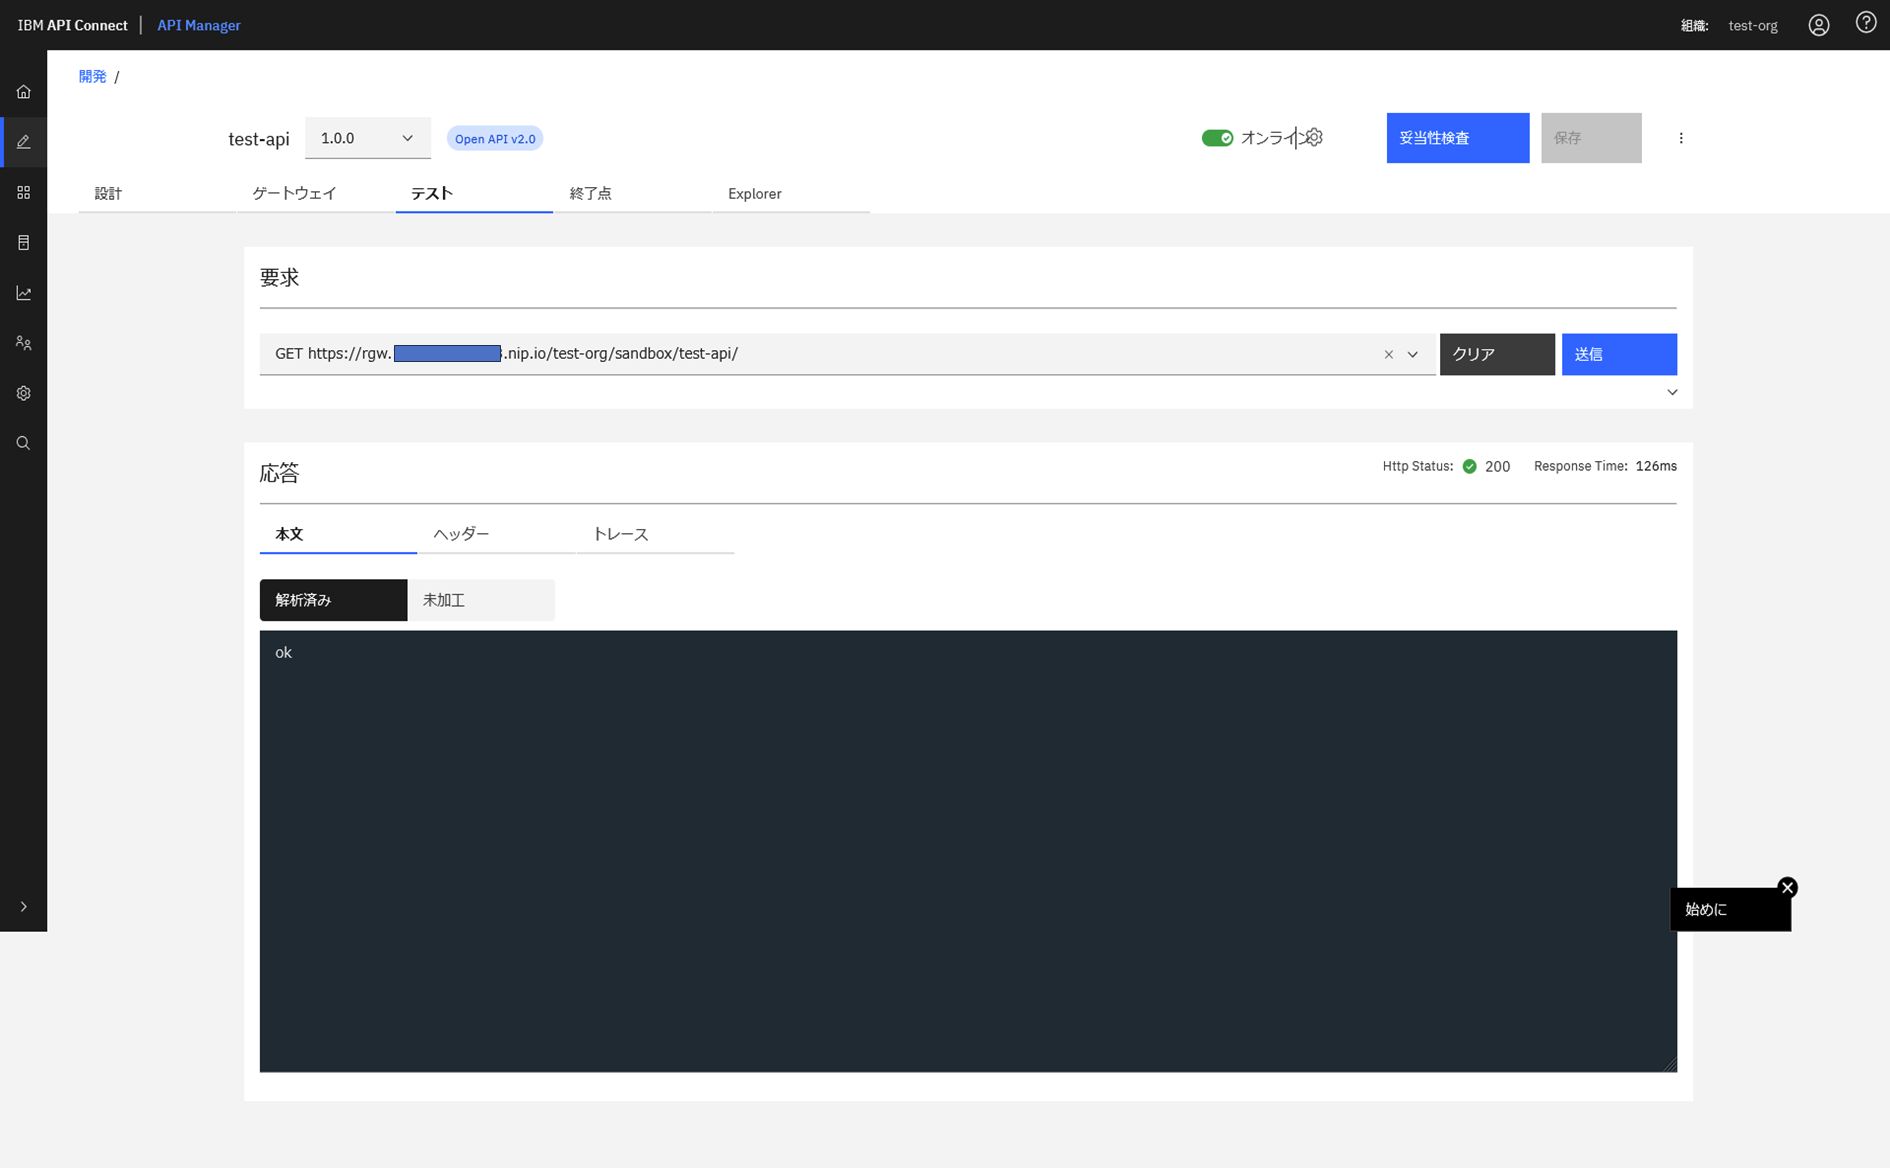
問題なくDataPowerにAPI定義がデプロイされ、呼び出せることが確認できました。
以上です。