概要
Youtubeの動画を参考にStreamlitとMicrosoft AzureのFace APIを使用してWebアプリを作成しました。
動画では顔の部分に枠線を描画するところまででしたが、追加で性別と年齢を描画するようにしています。
ソース
ソース全文です。
GithubにUPしています。
main.py
import io
import requests
import streamlit as st
from PIL import Image
from PIL import ImageDraw
from PIL import ImageFont

st.title('顔認証アプリ')

subscription_key = '' # AzureのAPIキー
endpoint = ''         # AzureのAPIエンドポイント
face_api_url = endpoint + 'face/v1.0/detect'
headers = {
    'Content-Type': 'application/octet-stream',
    'Ocp-Apim-Subscription-Key': subscription_key
}
params = {
    'returnFaceId': 'true',
    'returnFaceAttributes': 'age,gender',
}

# 検出した顔に描く長方形の座標を取得
def get_rectangle(faceDictionary):
    rect = faceDictionary['faceRectangle']
    left = rect['left']
    top = rect['top']
    right = left + rect['width']
    bottom = top + rect['height']

    return ((left, top), (right, bottom))


# 描画するテキストを取得
def get_draw_text(faceDictionary):
    rect = faceDictionary['faceRectangle']
    faceAttr = faceDictionary['faceAttributes']
    age = int(faceAttr['age'])
    gender = faceAttr['gender']
    text = f'{gender} {age}'

    # 枠に合わせてフォントサイズを調整
    font_size = max(16, int(rect['width'] / len(text)))
    font = ImageFont.truetype(r'C:\windows\fonts\meiryo.ttc', font_size)

    return (text, font)


# 認識された顔の上にテキストを描く座標を取得
def get_text_rectangle(faceDictionary, text, font):
    rect = faceDictionary['faceRectangle']
    text_width, text_height = font.getsize(text)
    left = rect['left'] + rect['width'] / 2 - text_width / 2
    top = rect['top'] - text_height - 1

    return (left, top)


# テキストを描画
def draw_text(faceDictionary):
    text, font = get_draw_text(faceDictionary)
    text_rect = get_text_rectangle(faceDictionary, text, font)
    draw.text(text_rect, text, align='center', font=font, fill='red')


uploaded_file = st.file_uploader("Choose an image...", type="jpg")

if uploaded_file is not None:
    img = Image.open(uploaded_file)

    with io.BytesIO() as output:
        img.save(output, format='JPEG')
        binary_img = output.getvalue()

    res = requests.post(face_api_url, params=params,
                        headers=headers, data=binary_img)
    results = res.json()

    if not results:
        raise Exception('画像から顔を検出できませんでした。')

    for result in results:
        draw = ImageDraw.Draw(img)
        draw.rectangle(get_rectangle(result), outline='green', width=3)

        draw_text(result)

    st.image(img, caption='Uploaded Image.', use_column_width=True)
基本的な流れは動画を見てもらうとして、性別と年齢を描画する部分を説明します。
描画するテキストを取得
Face APIの戻り値から性別と年齢をを取得して描画するテキストを取得しています。
それから、枠のサイズに合わせてフォントサイズを変更しています。
フォントサイズが小さいと見えないので、16以上になるように16と算出したサイズを比較して、値の大きい方を選択しています。
def get_draw_text(faceDictionary):
    rect = faceDictionary['faceRectangle']
    faceAttr = faceDictionary['faceAttributes']
    age = int(faceAttr['age'])
    gender = faceAttr['gender']
    text = f'{gender} {age}'

    # 枠に合わせてフォントサイズを調整
    font_size = max(16, int(rect['width'] / len(text)))
    font = ImageFont.truetype(r'C:\windows\fonts\meiryo.ttc', font_size)

    return (text, font)
認識された顔の上にテキストを描く座標を取得
Face APIの戻り値から枠の位置と、描画するテキストのサイズを使用して、枠の上部に中央揃えになる座標を計算しています。
# 認識された顔の上にテキストを描く座標を取得
def get_text_rectangle(faceDictionary, text, font):
    rect = faceDictionary['faceRectangle']
    text_width, text_height = font.getsize(text)
    left = rect['left'] + rect['width'] / 2 - text_width / 2
    top = rect['top'] - text_height - 1

    return (left, top)
テキストを描画
テキストを画像に描画しています。
# テキストを描画
def draw_text(faceDictionary):
    text, font = get_draw_text(faceDictionary)
    text_rect = get_text_rectangle(faceDictionary, text, font)
    draw.text(text_rect, text, align='center', font=font, fill='red')
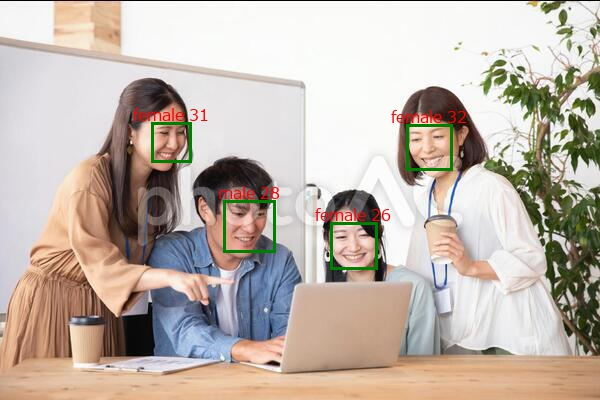
実行結果
枠線の上に性別と年齢が描画されました。
画像はphotoACのフリー素材を使用しています。