概要
こちらの記事で作成したアプリのAzureのFace APIの使い方が現在は変わっているようなので、現在の使い方に合わせて変更しました。
公式ドキュメント
ソース
ソース全文です。
GithubにUPしています。
main.py
import io
import streamlit as st
from PIL import Image
from PIL import ImageDraw
from PIL import ImageFont
from azure.cognitiveservices.vision.face import FaceClient
from msrest.authentication import CognitiveServicesCredentials
from azure.cognitiveservices.vision.face.models import TrainingStatusType, Person

st.title('顔認証アプリ')

subscription_key = '' # AzureのAPIキー
endpoint = ''         # AzureのAPIエンドポイント

# クライアントを認証する
face_client = FaceClient(endpoint, CognitiveServicesCredentials(subscription_key))


# 検出した顔に描く長方形の座標を取得
def get_rectangle(faceDictionary):
    rect = faceDictionary.face_rectangle
    left = rect.left
    top = rect.top
    right = left + rect.width
    bottom = top + rect.height

    return ((left, top), (right, bottom))


# 描画するテキストを取得
def get_draw_text(faceDictionary):
    rect = faceDictionary.face_rectangle
    age = int(faceDictionary.face_attributes.age)
    gender = faceDictionary.face_attributes.gender
    text = f'{gender} {age}'

    # 枠に合わせてフォントサイズを調整
    font_size = max(16, int(rect.width / len(text)))
    font = ImageFont.truetype(r'C:\windows\fonts\meiryo.ttc', font_size)

    return (text, font)


# 認識された顔の上にテキストを描く座標を取得
def get_text_rectangle(faceDictionary, text, font):
    rect = faceDictionary.face_rectangle
    text_width, text_height = font.getsize(text)
    left = rect.left + rect.width / 2 - text_width / 2
    top = rect.top - text_height - 1

    return (left, top)


# テキストを描画
def draw_text(faceDictionary):
    text, font = get_draw_text(faceDictionary)
    text_rect = get_text_rectangle(faceDictionary, text, font)
    draw.text(text_rect, text, align='center', font=font, fill='red')


uploaded_file = st.file_uploader("Choose an image...", type="jpg")
if uploaded_file is not None:
    img = Image.open(uploaded_file)
    stream = io.BytesIO(uploaded_file.getvalue())

    detected_faces = face_client.face.detect_with_stream(
        stream, return_face_attributes=['age', 'gender'])
    if not detected_faces:
        raise Exception('画像から顔を検出できませんでした。')
    img = Image.open(uploaded_file)

    draw = ImageDraw.Draw(img)
    for face in detected_faces:
        draw.rectangle(get_rectangle(face), outline='green', width=3)
        draw_text(face)

    st.image(img, caption='Uploaded Image.', use_column_width=True)
全体の基本的な流れは前回と同じです。
大きく変わった部分を説明します。
クライアントの認証
使用する前にクライアントの認証を行います。
FaceClientのインスタンスを作成します。
face_client = FaceClient(endpoint, CognitiveServicesCredentials(subscription_key))
顔の検出結果取得
detect_with_streamを使用して結果を取得します。
受け渡すデータがバイトではなく、画像ストリームに変わっているようなので、io.BytesIOを使用して作成したデータを引数に渡しています。
stream = io.BytesIO(uploaded_file.getvalue())
detected_faces = face_client.face.detect_with_stream(stream, return_face_attributes=['age', 'gender'])
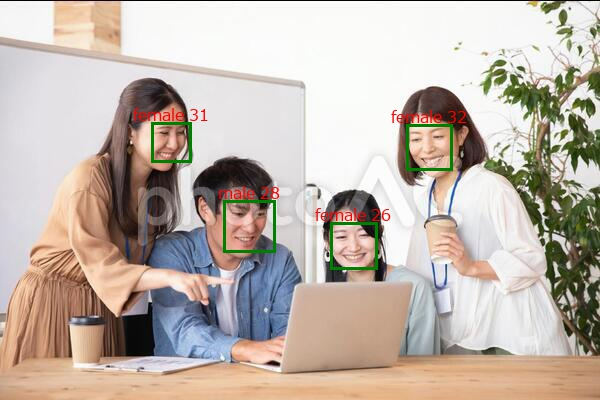
実行結果
前回と同じ結果になったので、旨くいっているようです。