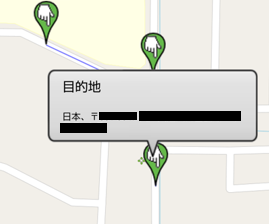
AndroidアプリでGPSを扱い始めると誰しも一度はGoogleMapに代表されるような地図アプリケーションを作りたいと思うのではないかと思います。
しかしGoogleが提供するGoogle Maps API(無償版)には利用目的やAPI呼び出し回数の制限があります。
今回は、Google Maps APIを使用せずにAndroid上で動作する地図アプリケーションを作成します。
動作検証環境
Aquos R3
API Level 26
地図データの取得
地図データにはOpenStreetMapというオープンソースの地図プロジェクトのものを使用します。
OpenStreetMapの地図データをAndroidで使用するために、osmdroidというライブラリを使用します。
まずプロジェクトを作成したら、ルート直下のbuild.gradleに以下の一文を追加します。
repositories {
    jcenter()
    mavenCentral() //追記
}
次に、appフォルダ配下のbuild.gradleに以下の一文を追加します。
dependencies {
    implementation fileTree(dir: 'libs', include: ['*.jar'])
    implementation 'androidx.appcompat:appcompat:1.0.2'
    implementation 'androidx.constraintlayout:constraintlayout:1.1.3'
    implementation 'org.osmdroid.osmdroid-android:6.0.3' //追記
    testImplementation 'junit:junit:4.12'
    androidTestImplementation 'androidx.test.ext:junit:1.1.0'
    androidTestImplementation 'androidx.test.espresso:espresso-core:3.1.1'
}
以下のようにlayoutファイルに追記することでosmdroidのMapViewを追加できます。
<org.osmdroid.views.MapView
        android:id="@+id/mapView"
        android:layout_width="wrap_content"
        android:layout_height="300dp"
        app:layout_constraintBottom_toBottomOf="parent"
        app:layout_constraintEnd_toEndOf="parent"
        app:layout_constraintStart_toStartOf="parent" />
GPSの利用
GPSの取得にはFusedLocationProviderClientを使用します。
そのためにまず、build.gradleに以下の一文を追加してGoogle Play ServicesのLocation APIを使用できるようにします。
dependencies {
    implementation fileTree(dir: 'libs', include: ['*.jar'])
    implementation 'androidx.appcompat:appcompat:1.0.2'
    implementation 'androidx.constraintlayout:constraintlayout:1.1.3'
    implementation 'org.osmdroid.osmdroid-android:6.0.3'
    implementation 'com.google.android.gms:play-services-location:17.0.0' //追記
    testImplementation 'junit:junit:4.12'
    androidTestImplementation 'androidx.test.ext:junit:1.1.0'
    androidTestImplementation 'androidx.test.espresso:espresso-core:3.1.1'
}
また、AndroidManifest.xmlの<application>要素以下に<meta-data>を追記します。
    <application
        ......
        ......
        ...... >
        <meta-data                                                      //ここから
            android:name="com.google.android.gms.version"               //
            android:value="@integer/google_play_services_version" />    //ここまで追記
    </application>
これでFusedLocationProviderClientが使えるようになりました。
今回は、Locationは複数のアクティビティで取り扱えるように汎用的なクラスを作成して任意のクラスから呼び出します。
新たにクラスを作成し、LocationCallbackを継承します。
public class MyLocationManager extends LocationCallback {
}
他のクラスではonLocationResultListenerで取得したLocationを返します。
public interface OnLocationResultListener {
    void onLocationResult(LocationResult locationResult);
}
コンストラクタで呼び出し元のクラスの情報を取得します。
private Context context;
private FusedLocationProviderClient fusedLocationProviderClient;
private OnLocationResultListener mListener;

public MyLocationManager(Context context, OnLocationResultListener mListener) {
    this.context = context;
    this.mListener = mListener;
    this.fusedLocationProviderClient = LocationServices.getFusedLocationProviderClient(context);
}
/* 位置情報が更新されたら位置情報を返す */
    @Override
    public void onLocationResult(LocationResult locationResult) {
        super.onLocationResult(locationResult);
        mListener.onLocationResult(locationResult);

        if(locationResult == null) {
            Log.e("Error", "# No location data.");
            return;
        }
    }
位置情報の取得開始と停止を制御できるようにします。
また、位置情報サービスが無効化されている場合に有効化を促します。
/* 位置情報の更新を開始する */
    public void startLocationUpdates() {
        //端末の位置情報サービスが無効になっている時、有効化を促す
        if(!isGPSEnabled()) {
            showLocationSettingDialog();
            return;
        }

        LocationRequest request = new LocationRequest();
        request.setInterval(5000);
        request.setPriority(LocationRequest.PRIORITY_HIGH_ACCURACY);

        fusedLocationProviderClient.requestLocationUpdates(request, this, null);
    }

    /* 位置情報の更新を停止する */
    public void stopLocationUpdates() {
        fusedLocationProviderClient.removeLocationUpdates(this);
    }

    /* 端末のGPS利用可否を返す */
    private Boolean isGPSEnabled() {
        android.location.LocationManager locationManager = (android.location.LocationManager)context.getSystemService(Context.LOCATION_SERVICE);
        return locationManager.isProviderEnabled(LocationManager.GPS_PROVIDER);
    }

    /* 位置情報サービスの有効化を促す */
    private void showLocationSettingDialog() {
        new android.app.AlertDialog.Builder(context)
                .setMessage("設定画面で位置情報サービスを有効にしてください")
                .setPositiveButton("設定", new DialogInterface.OnClickListener() {
                    @Override
                    public void onClick(DialogInterface dialog, int which) {
                        Intent intent = new Intent(Settings.ACTION_LOCATION_SOURCE_SETTINGS);
                        context.startActivity(intent);
                    }
                })
                .setNegativeButton("キャンセル", new DialogInterface.OnClickListener() {
                    @Override
                    public void onClick(DialogInterface dialog, int which) {
                        //何もしない
                    }
                })
                .create()
                .show();
    }
ここまでで作成したMyLocationManager.javaのOnLocationListenerをベースになるActivityに実装します。
public abstract class BaseActivity extends FragmentActivity implements MyLocationManager.OnLocationResultListener {
    private MyLocationManager locationManager;

    @Override
    public void onStart() {
        super.onStart();

        locationManager = new MyLocationManager(getBaseContext(), this);
        locationManager.startLocationUpdates(); //位置情報の更新を開始する
        Log.d(getClass().getSimpleName(), "Start Location Update");
    }

    @Override
    public void onResume() {
        super.onResume();
    }

    @Override
    public void onPause() {
        super.onPause();

        if(locationManager != null) {
            locationManager.stopLocationUpdates(); //位置情報の更新を停止する
            Log.d(getClass().getSimpleName(), "Stop Location Update");
        }
    }

    @Override
    public void onLocationResult(LocationResult locationResult) {

    }
}
これで、BaseActivityを継承したクラスから容易にLocationを利用できるようになりました。
現在地から目的地までの経路を探索する
経路探索サービスMapQuestに登録して得たAPIキーを登録し経路探索APIを利用します。
RoadManager roadManager = new MapQuestRoadManager("***YOUR API KEY***");
roadManager.addRequestOption("routeType=bicycle"); //自転車向けルートの設定
ArrayList<GeoPoint> waypoints = new ArrayList<GeoPoint>(); //経路の始点と終点
アプリを起動した段階では地図の示す位置が全く違う場所なので、初回に呼び出されたonLocationResultで取得した現在地を中心にします。
double lat,lng; //緯度と経度
boolean isFirstGetLoc = false;

@Override
public void onLocationResult(LocationResult locationResult) {
    if(locationResult == null) { //位置情報が取得できなかった場合
        Log.e(getClass().getSimpleName(), "# No location data.");
        return;
    }

    /* 現在地の緯度経度の取得 */
    lat = locationResult.getLastLocation().getLatitude();
    lng = locationResult.getLastLocation().getLongitude();

    if(isFirstGetLoc == false) {
        initializeGeoPoint(mMapView);
        isFirstGetLoc = true;
    }

    updateNowDot();
}
/* 起動時の初期座標で中心点を設定する */
protected void initializeGeoPoint(MapView mMapView) {
    IMapController mapController = mMapView.getController();
    //ズームレベルの設定
    mMapView.setMinZoomLevel(1.0);
    mapController.setZoom(20.0);

    //中心座標の設定
    setCenterPoint(lat, lng);
    //ズームボタンの無効化
    mMapView.getZoomController().setVisibility(CustomZoomButtonsController.Visibility.NEVER);
    mMapView.setMultiTouchControls(false);
    mMapView.setClickable(false);
}

/* 指定された座標を地図の中心に設定する */
protected void setCenterPoint(double latitude, double longitude) {
    GeoPoint centerPoint = new GeoPoint(lat, lng);
    IMapController mapController = mMapView.getController();
    mapController.setCenter(centerPoint);
}
現在地にマーカーを描画します。
/* 現在地にマーカーを描画する */
protected void updateNowDot() {
    //現在地マーカーをリセットする
    if(nowDot.getPosition() != null) { //現在地のマーカーがあれば
        nowDot.remove(mMapView); //現在地のマーカーを削除する
    }

    //現在地にマーカーを生成する
    nowDot.setPosition(new GeoPoint(lat, lng));
    mMapView.getOverlays().add(nowDot);
    mMapView.invalidate(); //マーカーを最適化する

    //マーカーのアイコンの変更
    Drawable icon = ResourcesCompat.getDrawable(getResources(), R.drawable.marker_default, null);
    nowDot.setIcon(icon);
}
タップした位置を目的地とすると共に、MapQuestAPIを使って経路に線を引きます。
private double targetLat, targetLng;
private Road road;
private RoadNode node;
private Polyline roadOverlay;
private Marker marker;

final MapEventsReceiver mReceive = new MapEventsReceiver() {

            @Override
            public boolean singleTapConfirmedHelper(GeoPoint p) {

                /* 地図上でタップした座標の取得 */
                targetLat = p.getLatitude();
                targetLng = p.getLongitude();

                GeoPoint startPoint = new GeoPoint(lat, lng); //現在地
                GeoPoint endPoint = new GeoPoint(targetLat, targetLng); //タップした地点を目的地に設定する
                waypoints.add(startPoint); //始点を経路に追加する
                waypoints.add(endPoint); //終点を経路に追加する


                road = roadManager.getRoad(waypoints); //経路を取得する
                roadOverlay = RoadManager.buildRoadOverlay(road); //経路のオーバーレイを生成する
                mMapView.getOverlays().add(roadOverlay); //経路のオーバーレイを地図上に追加する
                mMapView.invalidate(); //マーカーの最適化

                //経路探索
                Drawable nodeIcon = getResources().getDrawable(R.drawable.marker_default);
                for(int i = 0; i < road.mNodes.size(); i++) {
                    node = road.mNodes.get(i);
                    nodeMarker = new Marker(mMapView);
                    nodeMarker.setPosition(node.mLocation);
                    nodeMarker.setIcon(nodeIcon);
                    nodeMarker.setTitle("道順 " +i);
                    mMapView.getOverlays().add(nodeMarker);
                    nodeMarker.setSnippet(node.mInstructions);
                    nodeMarker.setSubDescription(Road.getLengthDurationText(getApplicationContext(), node.mLength, node.mDuration));
                }

                targetDot.setPosition(new GeoPoint(targetLat, targetLng));
                mMapView.getOverlays().add(targetDot);
                mMapView.invalidate();
                Drawable icon = ResourcesCompat.getDrawable(getResources(), R.drawable.center, null);
                targetDot.setIcon(icon);
                targetDot.setTitle("目的地");

                targetAddress = getAddress(targetLat, targetLng);
                targetDot.setSubDescription(targetAddress);


                return false;
            }

            @Override
            public boolean longPressHelper(GeoPoint p) {
                return false;
            }
        };

        MapEventsOverlay eventsOverlay = new MapEventsOverlay(getBaseContext(), mReceive);
        mMapView.getOverlays().add(eventsOverlay);
緯度経度から住所文字列を得る
Geocoderを利用して位置情報をもとに住所を取得します。
 /* 住所の取得 */
protected String getAddress(double latitude, double longitude){
    String address = new String();
    Geocoder geocoder = new Geocoder(this, Locale.getDefault());
    try {
        List<Address> list_address = geocoder.getFromLocation(latitude, longitude, 1);
        if(!list_address.isEmpty()) { //住所情報が空でなければ
            int index = list_address.get(0).getMaxAddressLineIndex(); //取得できる住所情報が何行あるか
            for(int i = 0; i <= index; i++) { //住所情報を取得し文字列変数に格納する
                address = list_address.get(0).getAddressLine(i);
            }
        }
   } catch (IOException e) {
        e.printStackTrace();
   }

    return address; //住所を返す
}
ここまでで、最低限の経路探索ができるマップアプリケーションが出来ました。
