はじめに
kubectl apply で Pod を作ったとき、なぜ特定のノードに配置されるのでしょうか?
「kube-scheduler がいい感じにノードを選んでくれる」——ざっくりそう理解している方は多いと思います。しかし実際には、SchedulingQueue への enqueue、Filter プラグインによる候補ノード絞り込み、Score プラグインによる採点、Binding subresource への POST など、複数のフェーズが連携してノード選定が行われています。さらに、フィットするノードが見つからない場合は Preemption で低優先 Pod を退避させて枠を空ける挙動も組み込まれています。
本記事では、Pod のスケジューリングフローを 7 つのステップに分解し、各ステップで何が起きるかを実機のイベントとともに解説します。
この記事のインタラクティブなアニメーション版は k8s-flows で公開しています。
全体像
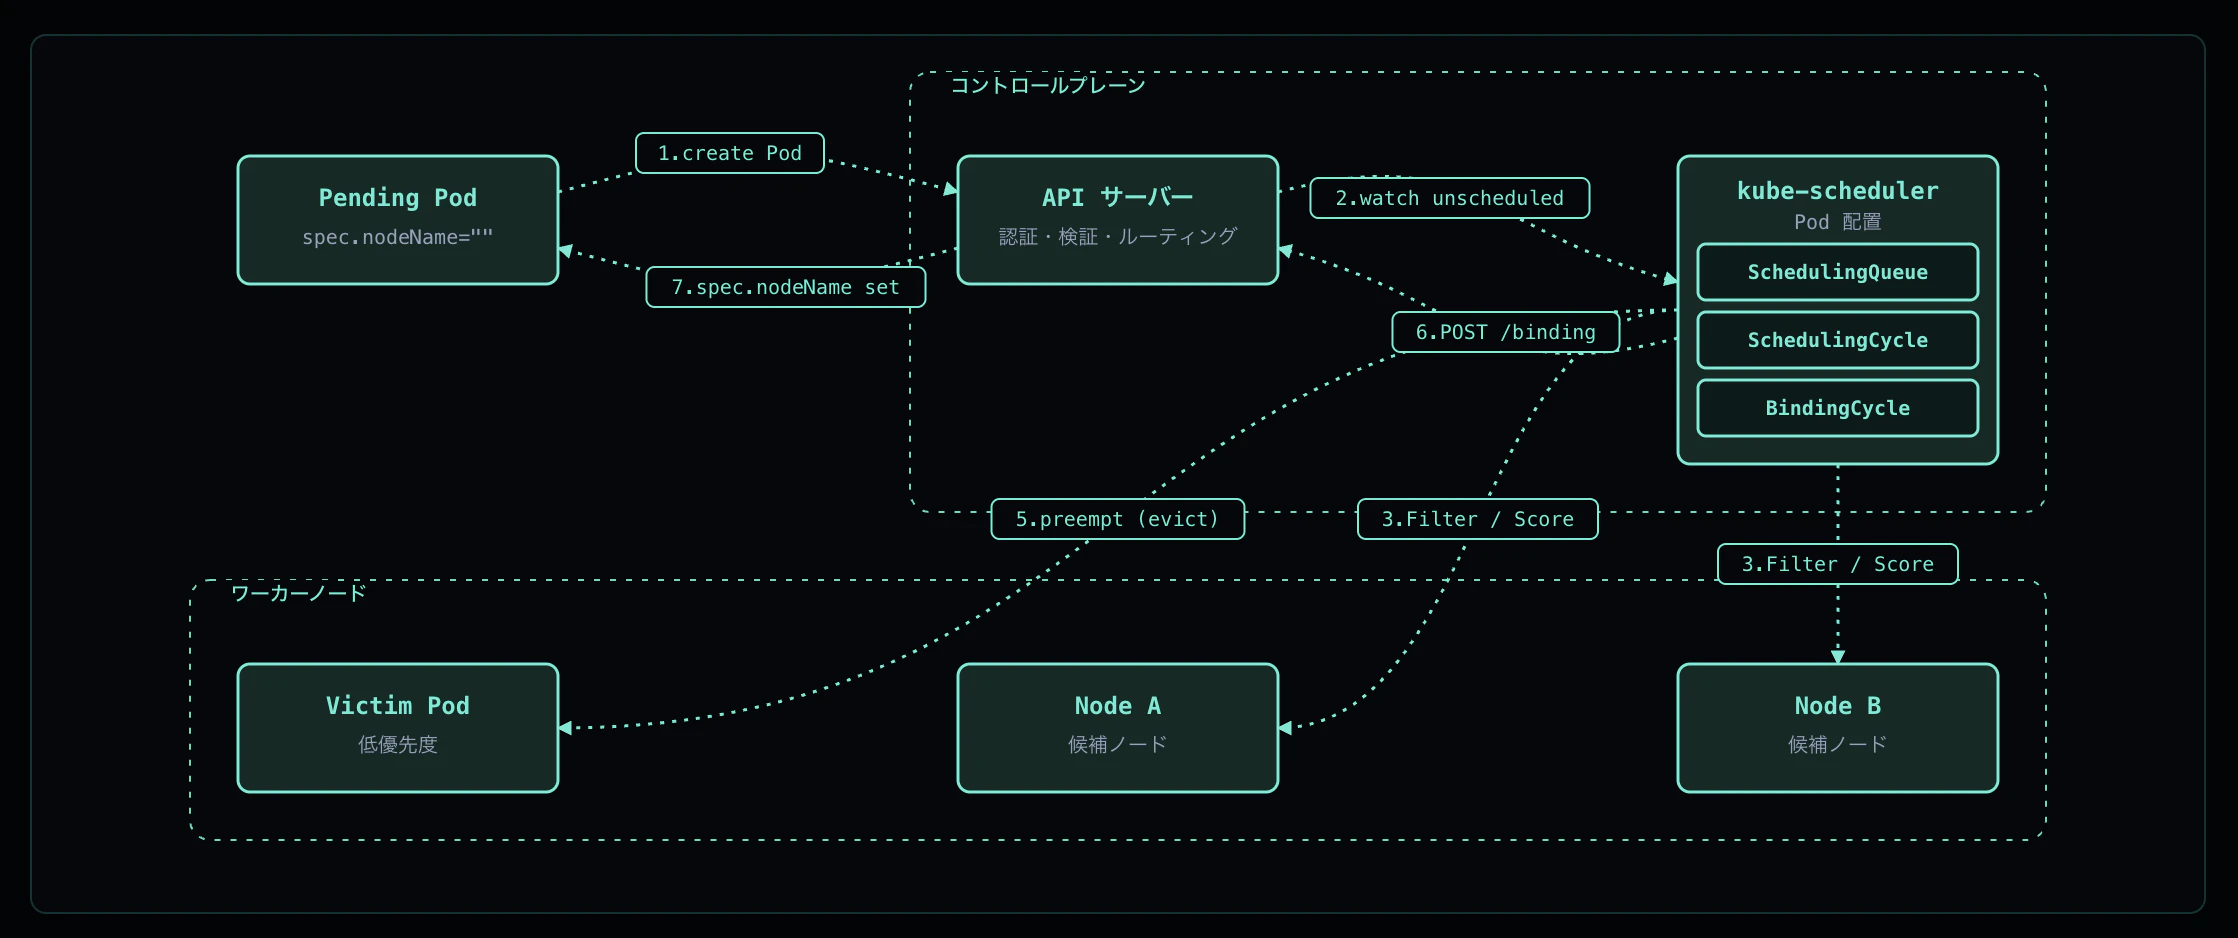
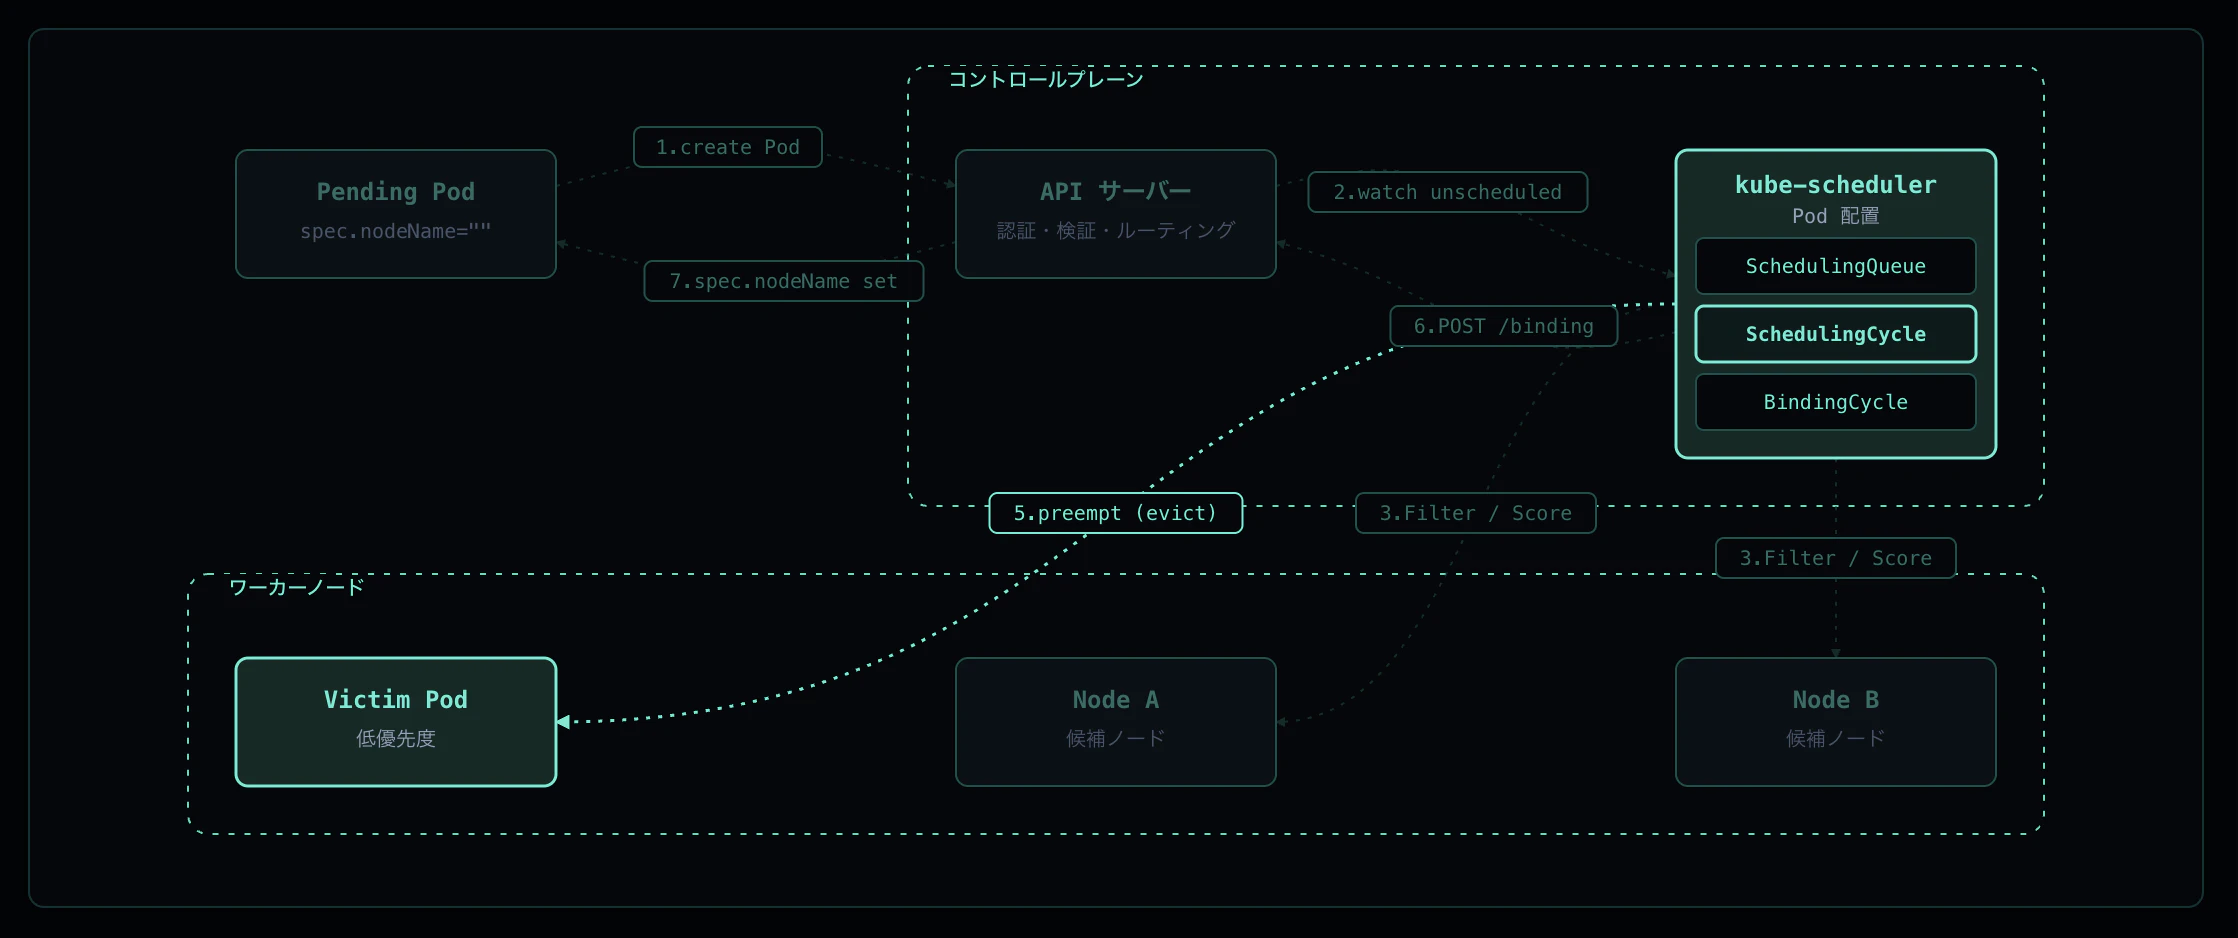
Pod のスケジューリングは以下の順序で進みます:
① Pod 作成 — API Server が spec.nodeName="" のまま etcd に保存
    ↓
② Scheduler が SchedulingQueue へ enqueue(activeQ / backoffQ / unschedulableQ)
    ↓
③ Scheduling Cycle - Filter — 各ノードで Yes/No 判定
    ↓
④ Scheduling Cycle - Score → Reserve — 候補ノードを採点して勝者を決定
    ↓
⑤ Preemption(候補が 0 のとき)— 低優先 Pod を evict して枠を空ける
    ↓
⑥ Binding Cycle — POST /pods/.../binding で spec.nodeName を更新
    ↓
⑦ spec.nodeName 反映 → 対象ノードの Kubelet が watch で検知して syncPod 開始
重要なのは、Scheduling Cycle と Binding Cycle が分かれているという点です。Binding は goroutine で非同期に走るため、scheduler は次の Pod の Scheduling Cycle を即座に開始でき、スループットが稼げる設計になっています。
検証環境
K8s        : v1.23.4 (Kind kindest/node:v1.23.4)
クラスタ    : kind-pod-scheduling (control-plane 1 + worker 1)
ノード      : pod-scheduling-control-plane / pod-scheduling-worker
ランタイム  : containerd 1.5.10 / crictl 1.23.0
Scheduler  : デフォルト --v=2
worker ノードの allocatable cpu = 11、master ノードには node-role.kubernetes.io/master:NoSchedule taint が付いている状態で検証しています。
なお、kube-scheduler の --v を 4 に上げる試みは権限エラーで拒否されたため、ルーチンのスケジューラ詳細ログ (Attempting to schedule、Successfully bound) は採取できていません。本検証では Events / Pod status / FailedScheduling メッセージ をエビデンスとして用います。
クラスタのセットアップ
$ export KUBECONFIG=/tmp/kubeconfig-pod-scheduling.yaml
$ cat /tmp/flow-verify-pod-scheduling/cluster.yaml
kind: Cluster
apiVersion: kind.x-k8s.io/v1alpha4
nodes:
  - role: control-plane
  - role: worker

$ kind create cluster --name pod-scheduling --config /tmp/flow-verify-pod-scheduling/cluster.yaml --wait 180s
$ kubectl --context kind-pod-scheduling wait --for=condition=Ready node --all --timeout=120s
node/pod-scheduling-control-plane condition met
node/pod-scheduling-worker condition met
ノードの状態:
NAME                           STATUS   ROLES                  AGE   VERSION
pod-scheduling-control-plane   Ready    control-plane,master   52s   v1.23.4
pod-scheduling-worker          Ready    <none>                 21s   v1.23.4
Step 1: Pod 作成(spec.nodeName が空)
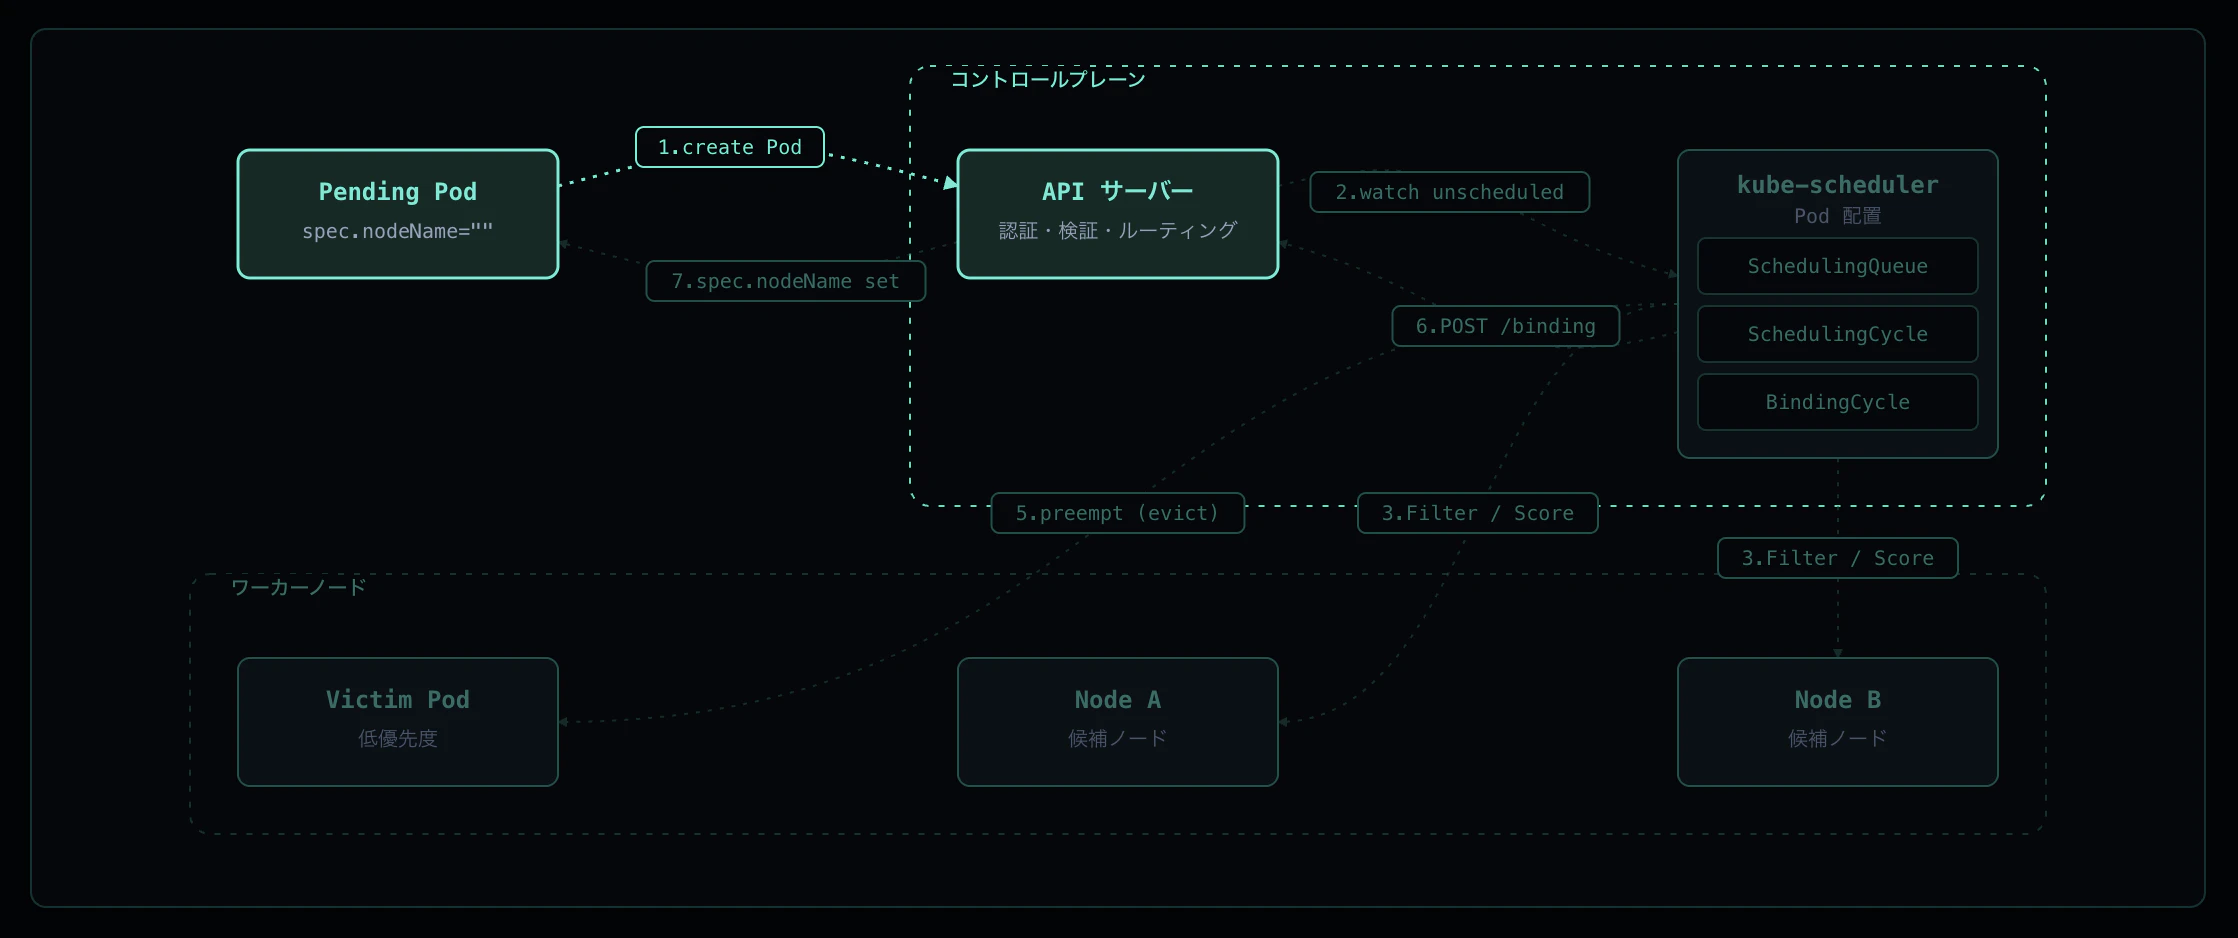
kubectl apply などで Pod が作られると、API サーバは認証 / 認可 / Admission を通したあと etcd に書き込みます。この時点では spec.nodeName は空で、Pod は status.phase=Pending として存在します。スケジューラーが介入するまで、この Pod はどのノードでも動きません。
実機ログ
わざとどのノードにも入らない Pod を作って Pending を保持させてみます。どのノードにも無いラベルを nodeSelector で要求することで、API サーバが nodeName を空のまま etcd に保存する瞬間を観察できます。
# verify-unscheduled.yaml
apiVersion: v1
kind: Pod
metadata:
  name: verify-unscheduled
spec:
  schedulerName: default-scheduler
  nodeSelector:
    nonexistent.example.com/label: "yes"
  containers:
    - name: pause
      image: registry.k8s.io/pause:3.9
$ kubectl apply -f verify-unscheduled.yaml
pod/verify-unscheduled created

$ kubectl get pod verify-unscheduled -o jsonpath='nodeName=[{.spec.nodeName}] phase=[{.status.phase}]'
nodeName=[] phase=[Pending]
ポイント
-
nodeName=[]が空文字 — API サーバはnodeNameを埋めずに受理した -
phase=[Pending]— Pod は実体としては存在するが、まだ実行ノードが決まっていない - スケジューラーは「Pod の
spec.nodeNameを決める」だけのコンポーネントで、API サーバ側は何のノード判定もしない
Step 2: Scheduler が SchedulingQueue へ enqueue

kube-scheduler は API サーバを watch し、spec.nodeName == "" の Pod を SchedulingQueue にプッシュします。SchedulingQueue は内部に 3 つのサブキュー を持ちます。
| サブキュー | 用途 |
|---|---|
| activeQ | これからスケジュール対象とする Pod |
| backoffQ | 直前の試行で失敗した Pod。指数バックオフが満了したら activeQ に戻る |
| unschedulableQ | どのノードにも入らなかった Pod。クラスタ状態 (Node 追加・Tolerations 変更等) が変われば再評価 |
Scheduler は activeQ から 1 つ Pod を取り出して 1 サイクルを回します。
実機ログ
デフォルトの scheduler ログレベル (--v=2) では「pop」「bound」のルーチンログは出ないため、サイクルが回ったこと自体は scheduler 発行の Event で確認します。Pending Pod に FailedScheduling か Scheduled イベントが出れば、Scheduler が activeQ からその Pod を取り出してサイクルを回した証拠になります。
$ kubectl describe pod verify-unscheduled | grep -A3 'Events:'
Events:
  Type     Reason            Age   From               Message
  ----     ------            ----  ----               -------
  Warning  FailedScheduling  2s    default-scheduler  0/2 nodes are available: ...
ポイント
-
From: default-scheduler— このイベントを発行できるのは Scheduler 本体のみ - 1 つの scheduler サイクルは「pop → Filter → Score → Reserve → (Permit) → Bind」の 1 直列で、各サイクルは結果として Event を発行する
- ルーチンの詳細ログが取れなくても、Event の有無で「サイクルが回ったか」は確実に判定できる
Step 3: Scheduling Cycle - Filter
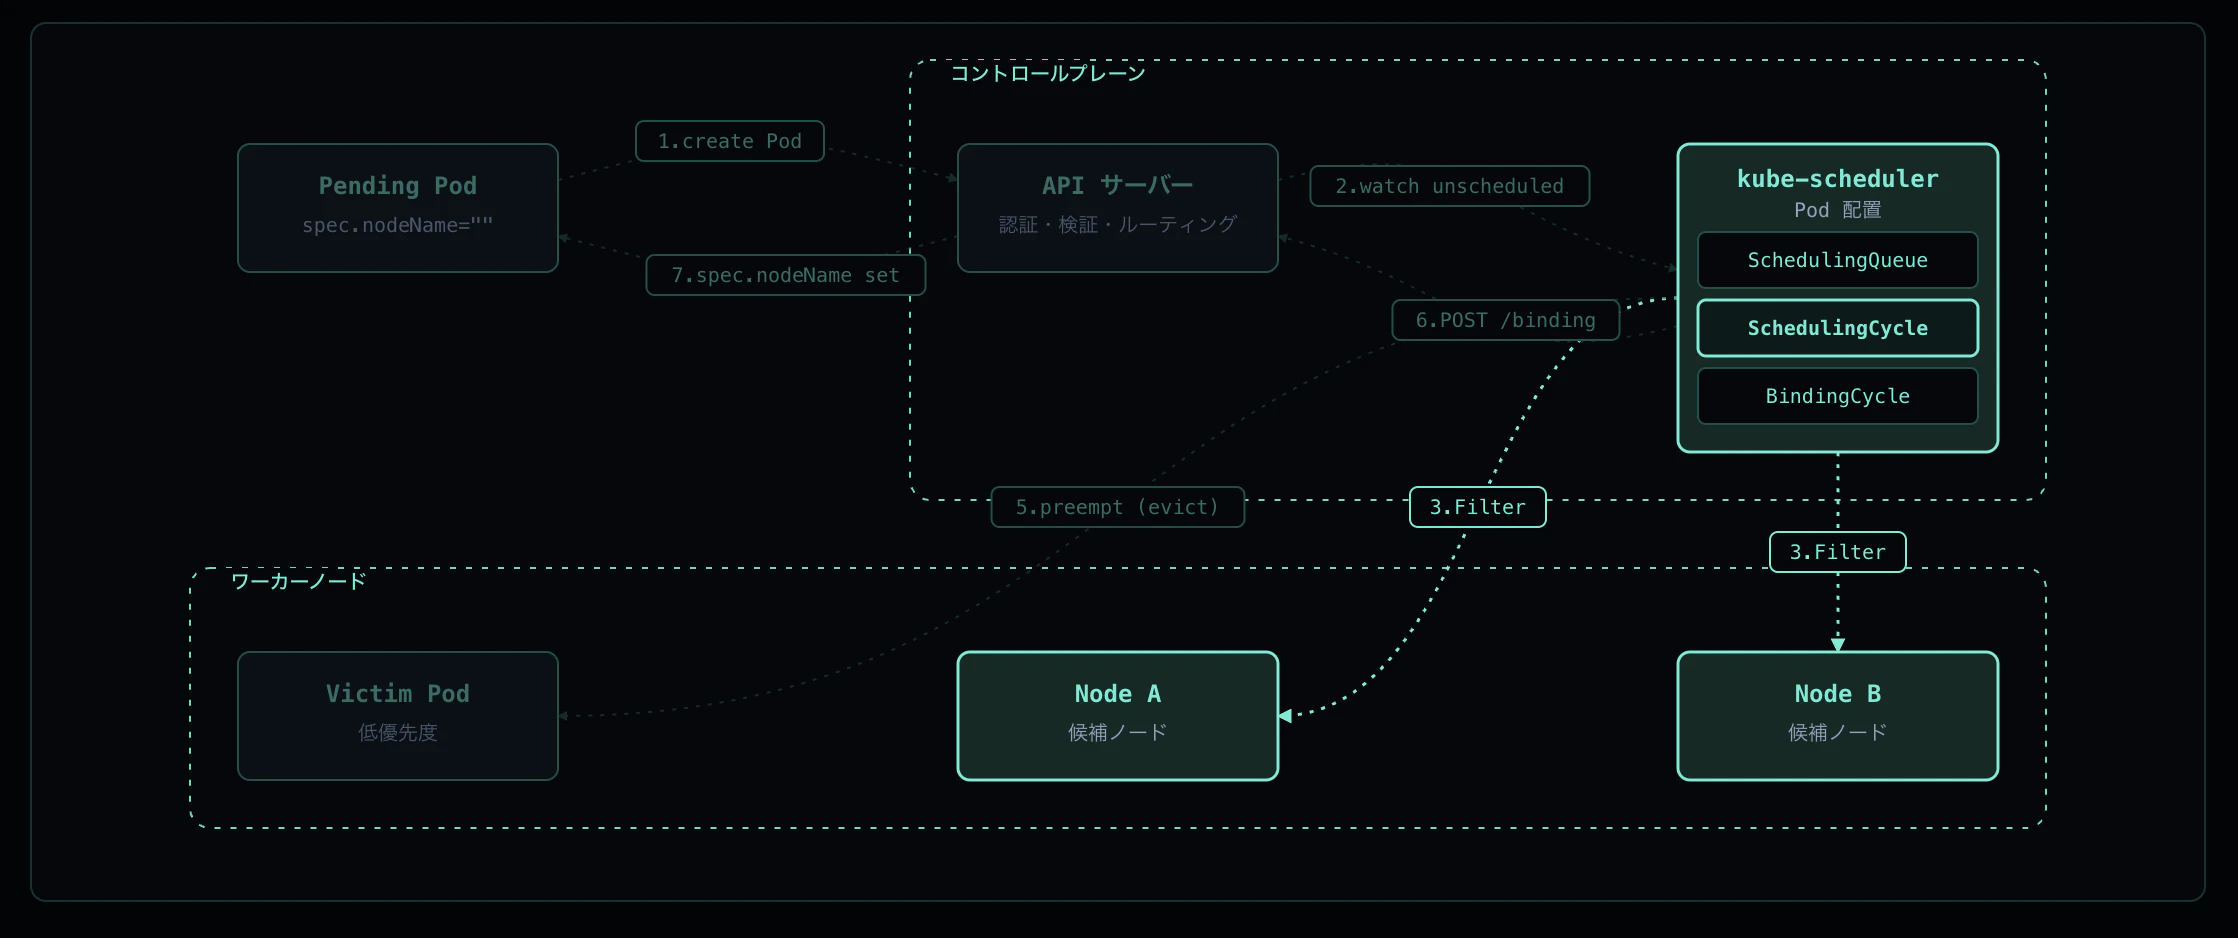
Scheduling Cycle はまず PreFilter で前計算を行い、次に Filter プラグインを各ノードに対して並列実行します。Filter は「このノードで Pod が動くか」を Yes / No で判定するため、ここで返ってくるのは候補ノードの集合 (feasible nodes) です。
主な Filter プラグイン:
-
NodeResourcesFit — ノードに
requests.cpu/requests.memoryの空きがあるか -
NodeAffinity —
spec.affinity.nodeAffinityを満たすか -
TaintToleration — Pod の
tolerationsがノードの taints を許容するか -
NodePorts —
hostPortが衝突しないか - VolumeBinding — PVC が bind 可能か
Filter で 0 ノードになると Preemption(Step 5)に進みます。
実機ログ
Filter で 0 ノード残った Pod の FailedScheduling メッセージは、各 Filter プラグインの除外理由を集計して返します。verify-unscheduled (Step 1 で作った Pod) を見ると Filter プラグインが行った判定がそのまま読めます。
$ kubectl describe pod verify-unscheduled | grep -A1 'Events:'
Events:
  Type     Reason            Age   From               Message
  ----     ------            ----  ----               -------
  Warning  FailedScheduling  2s    default-scheduler  0/2 nodes are available: 1 node(s) didn't match Pod's node affinity/selector, 1 node(s) had taint {node-role.kubernetes.io/master: }, that the pod didn't tolerate.
| メッセージ片 | 担当 Filter プラグイン |
|---|---|
1 node(s) didn't match Pod's node affinity/selector |
NodeAffinity |
1 node(s) had taint {node-role.kubernetes.io/master: } |
TaintToleration |
ポイント
- worker は
nodeSelectorに該当するラベルを持たない → NodeAffinity で除外 - control-plane (master) は
NoScheduletaint がある → TaintToleration で除外 - 結果
0/2 nodes are available→ 候補集合が空になり Score 段に進めず、PostFilter (Preemption) へ進む -
FailedSchedulingメッセージは Filter プラグインの判定結果を直接露出するため、設計のミスマッチを切り分ける一次情報になる
Step 4: Scheduling Cycle - Score → Reserve
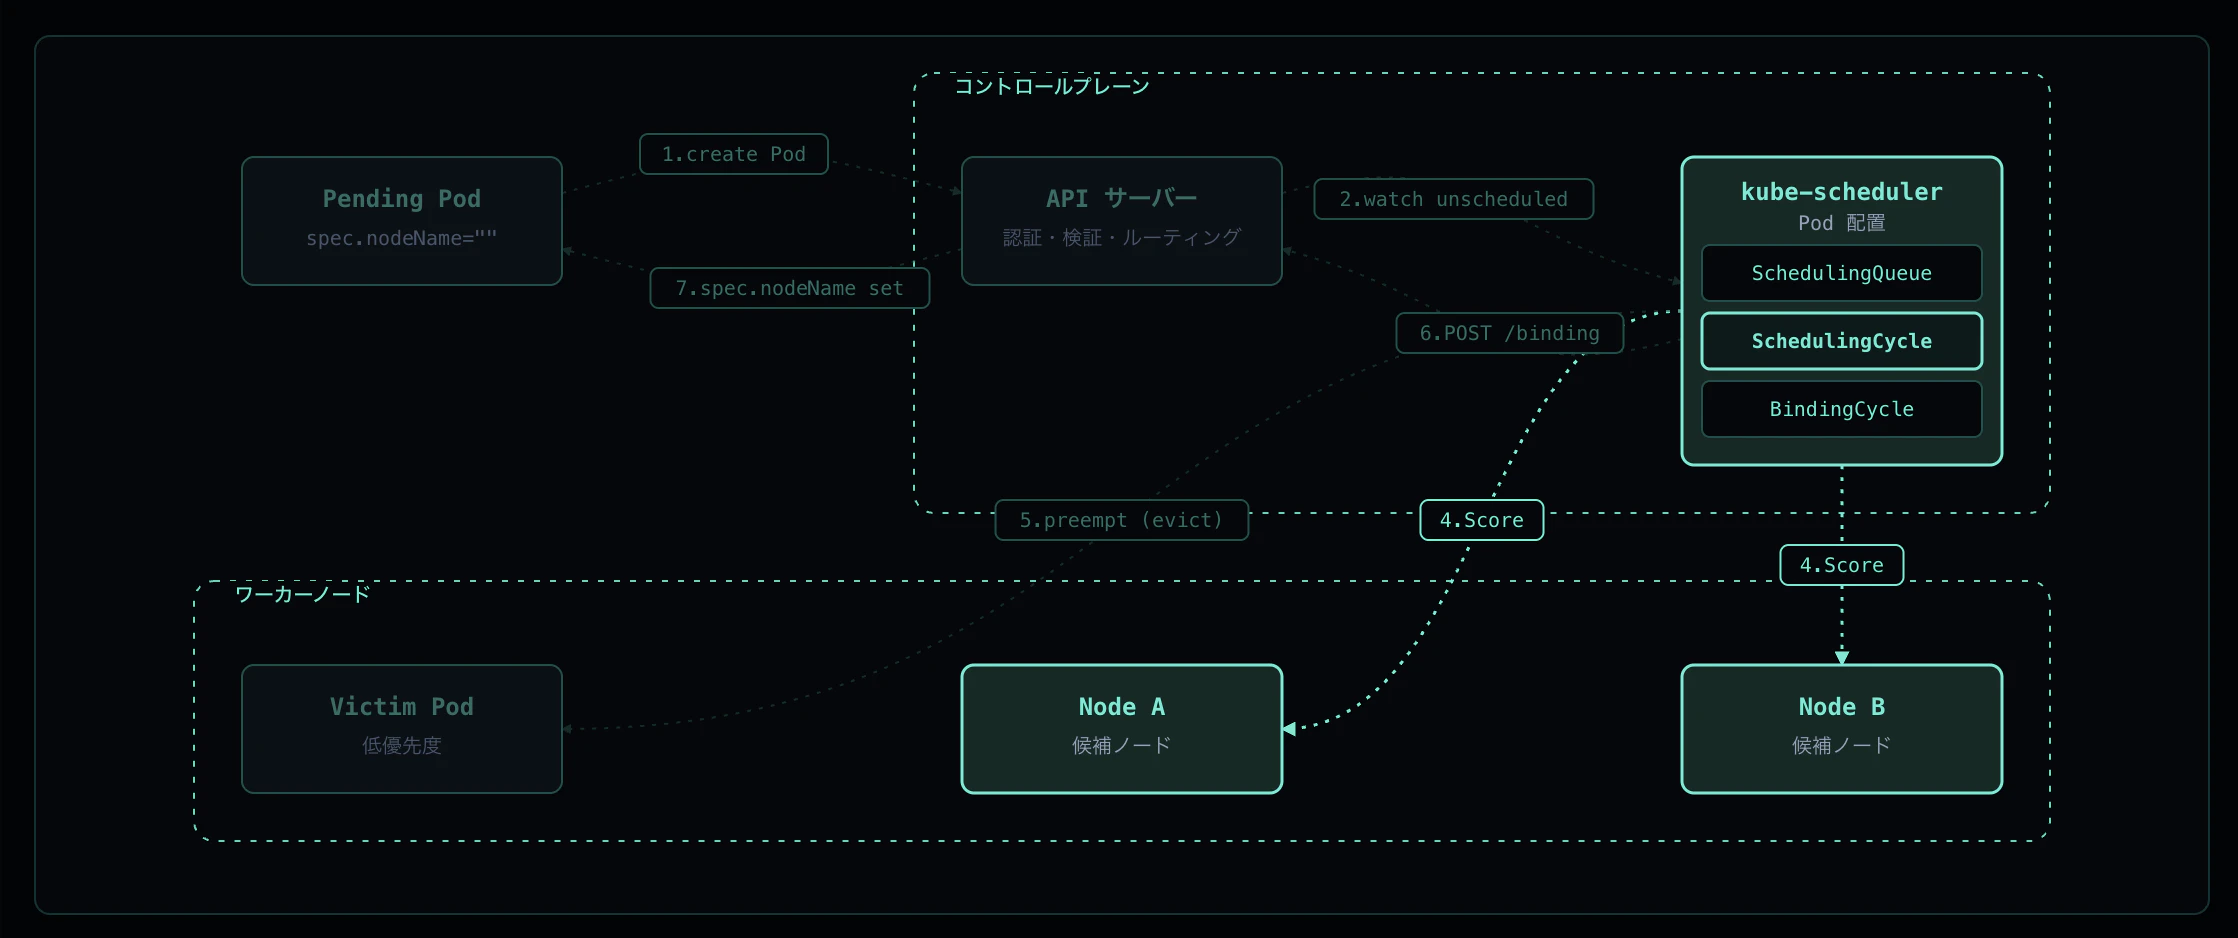
候補ノードが 2 つ以上残ったら Score プラグインが各ノードを [0, 100] で採点します。代表的な Score プラグイン:
- NodeResourcesBalancedAllocation — CPU と memory の使用率を均等に
- ImageLocality — 既にイメージがあるノードを優先
- InterPodAffinity — 親和性 / 反親和性
-
TaintToleration (score 部分) —
PreferNoScheduleを考慮
各プラグインのスコアを重み付き合計した最高点ノードが勝者となります。同点なら Pseudo-random tiebreak でランダムに選択されます。勝者は assumed cache(binding 完了前に「このノードに割り当て済み」と仮定して保持する scheduler 内部キャッシュ)に登録 (Reserve / Permit phase) され、後続の Pod が同じ枠を取らないようにします。
実機ログ
通常の Pod を投げると、Filter を通過した候補から Score 勝者が選ばれて bind されます。最終勝者は Scheduled イベントの to <node> で確認できます。
$ kubectl describe pod verify-pending | grep -A2 'Events:'
Events:
  Type    Reason     Age   From               Message
  ----    ------     ----  ----               -------
  Normal  Scheduled  3s    default-scheduler  Successfully assigned default/verify-pending to pod-scheduling-worker
ポイント
-
Successfully assigned ... to <node>の<node>が Score の勝者 - このイベントは binding が完了した後に scheduler が発行する(= Reserve から Bind までの全段が成功した証拠)
- 2 ノードクラスタで control-plane が taint で除外されるため、Filter 通過は worker のみ → Score 勝者も自動的に worker
- Score の各プラグイン詳細は
--v=10以上で出る。デフォルトの--v=2では総合勝者だけがイベントとして見える
Step 5: Preemption(ノードが足りないとき)
Filter の結果が 0 ノードになると、PostFilter プラグインの Defaults Preemption が走ります。
-
新 Pod の優先度を確認(
spec.priority/ PriorityClass) - 候補ノードごとに「自分より低優先な Pod を 何個 evict すれば自分が入るか」を計算
-
最少の eviction で済むノードを選び、その victim を
DELETE /podsで退避 - Pod 自体は そのサイクルでは bind しない — 次サイクル以降に再 enqueue されて、空いた枠で配置される
PriorityClass を持たない Pod (priority 0) は victim として選ばれやすくなります。
実機ログ
worker の allocatable cpu = 11 に対し、cpu: "10" を要求する Pod を 2 つ並べます。両方は同居できないため、後発(高優先)が先発(低優先)を evict することを確認します。両 Pod は nodeSelector で worker に固定しています。
# /tmp/flow-verify-pod-scheduling/preemption.yaml
apiVersion: scheduling.k8s.io/v1
kind: PriorityClass
metadata:
  name: high-priority
value: 1000000
---
apiVersion: v1
kind: Pod
metadata:
  name: verify-victim          # priority 0 (デフォルト)
spec:
  schedulerName: default-scheduler
  nodeSelector:
    kubernetes.io/hostname: pod-scheduling-worker
  containers:
    - { name: pause, image: registry.k8s.io/pause:3.9, resources: { requests: { cpu: "10" } } }
---
apiVersion: v1
kind: Pod
metadata:
  name: verify-attacker        # priority 1,000,000
spec:
  schedulerName: default-scheduler
  priorityClassName: high-priority
  nodeSelector:
    kubernetes.io/hostname: pod-scheduling-worker
  containers:
    - { name: pause, image: registry.k8s.io/pause:3.9, resources: { requests: { cpu: "10" } } }
イベント(時系列):
$ kubectl get events --sort-by .lastTimestamp | grep verify-
66s   Normal    Scheduled         pod/verify-victim     Successfully assigned default/verify-victim to pod-scheduling-worker
66s   Normal    Preempted         pod/verify-victim     Preempted by default/verify-attacker on node pod-scheduling-worker
64s   Warning   FailedScheduling  pod/verify-attacker   0/2 nodes are available: 1 Insufficient cpu, 1 node(s) had taint {node-role.kubernetes.io/master: }, that the pod didn't tolerate.
62s   Normal    Scheduled         pod/verify-attacker   Successfully assigned default/verify-attacker to pod-scheduling-worker

$ kubectl get pod verify-victim
Error from server (NotFound): pods "verify-victim" not found
| Age (大→小) | 出来事 |
|---|---|
| 66s | victim が Scheduled (worker に bound) |
| 66s | victim が Preempted — attacker のために evict 対象として選定 |
| 64s | attacker が FailedScheduling (Insufficient cpu) |
| 62s | attacker が Scheduled — victim 削除後の枠で再試行成功 |
ポイント
-
Preempted by default/verify-attacker on node pod-scheduling-workerは scheduler 自身が発行したイベント -
FailedSchedulingの1 Insufficient cpuは NodeResourcesFit Filter の除外理由 - victim 削除直後ではなく、attacker は 再 enqueue されて次サイクルで bind されている(Age 66 → 62 の 4 秒差)
- Preemption は 1 サイクルで完結せず、「victim を evict → 次サイクルで再試行」の 2 段になっているのがポイント
Step 6: Binding Cycle — POST /pods/.../binding
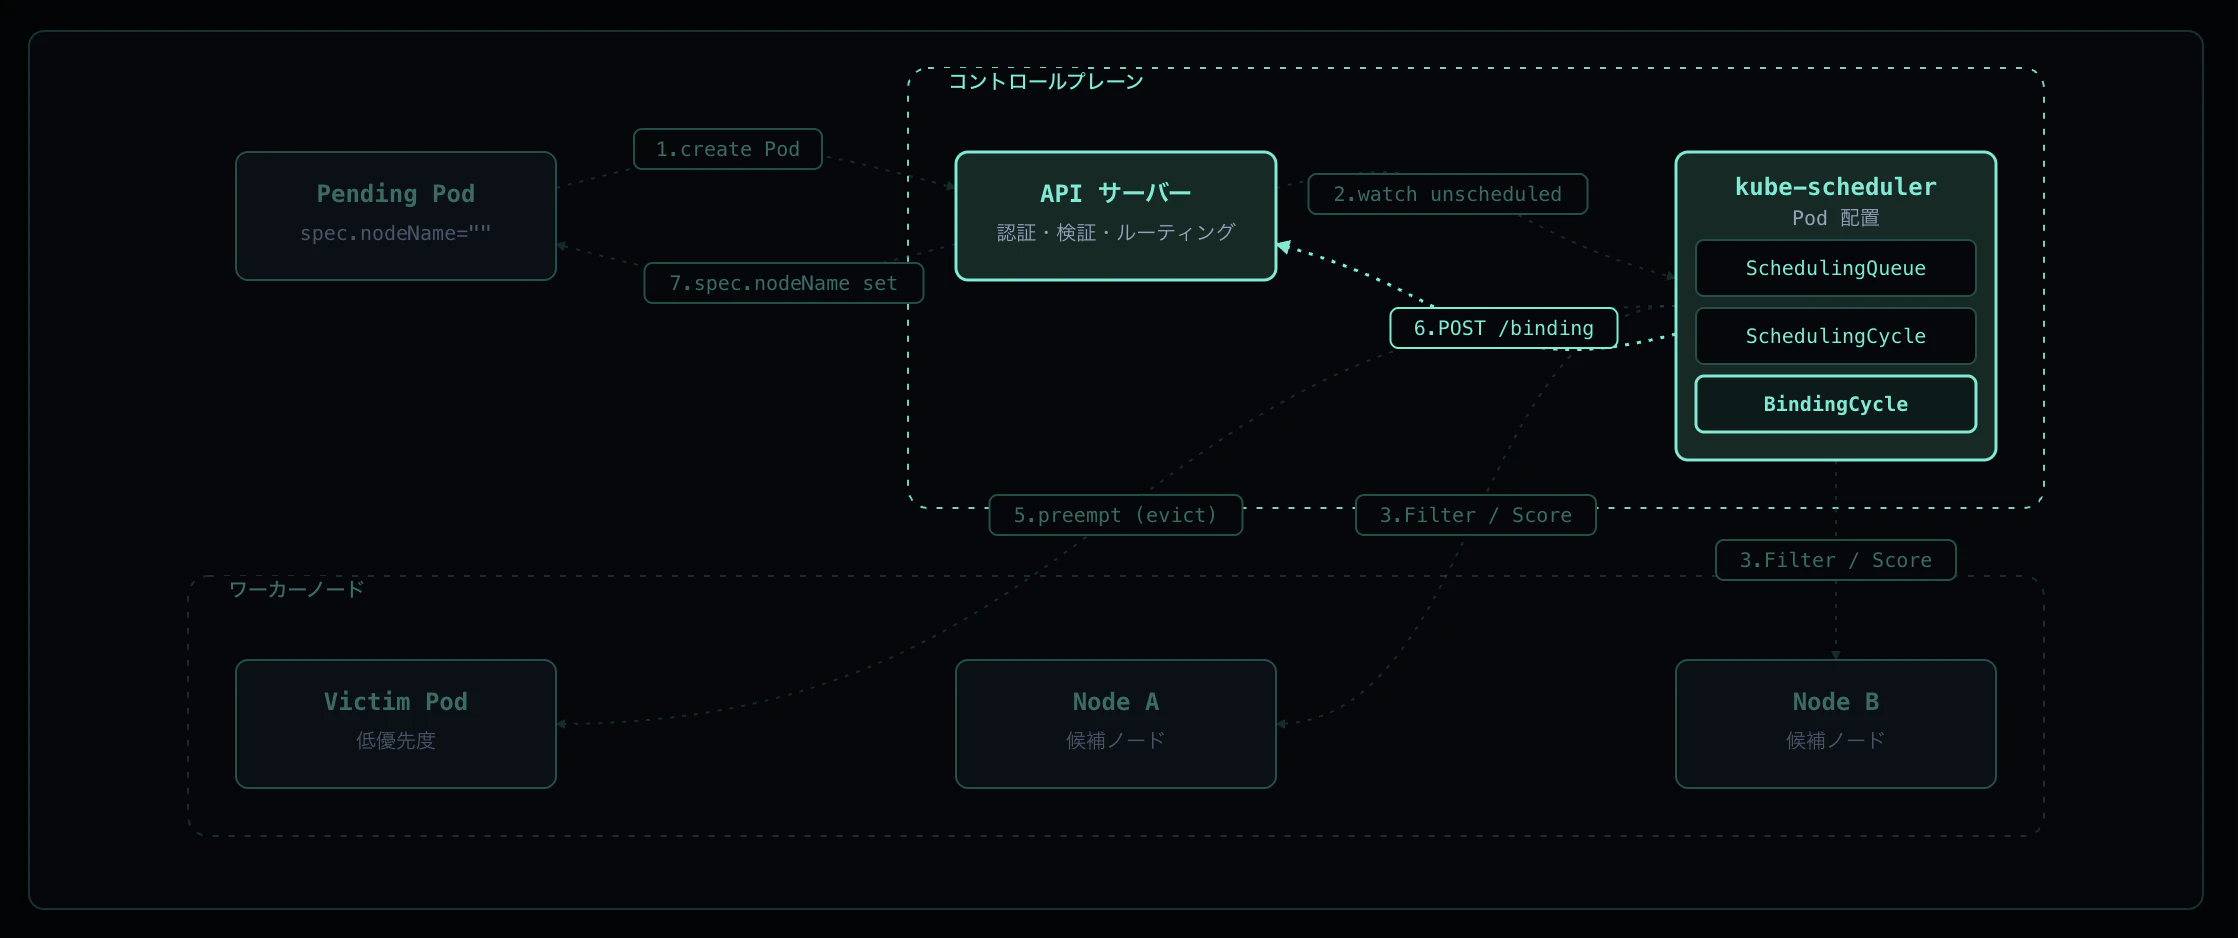
Scheduling Cycle で勝者ノードが決まったら Binding Cycle が起動します。Binding Cycle は goroutine で非同期 に走るため、scheduler は次の Pod の Scheduling Cycle を即座に開始できます(= Throughput を稼ぐためのパイプライン)。
Binding Cycle がやること:
-
PreBind プラグイン(例:
VolumeBindingの最終 PV bind) -
Bind プラグイン —
POST /api/v1/namespaces/<ns>/pods/<name>/bindingを API サーバに送信。リクエストボディはBinding{target: ObjectReference{Kind: "Node", Name: "<node>"}} - PostBind — 結果イベントを発行
API サーバは binding subresource の専用ハンドラで pod.spec.nodeName を更新し、etcd に書き戻します。これは PATCH ではなく専用エンドポイント で、認可上もスケジューラーは pods/binding への create 権限のみで Pod を bind できます。
実機ログ
binding の成否は、scheduler が発行する Scheduled イベント + Pod 側の spec.nodeName 反映で確認できます。pods/binding への書き込み権限は ClusterRole system:kube-scheduler だけが持つため、spec.nodeName が埋まっている = scheduler が binding API を呼んだ証拠になります。
$ kubectl describe pod verify-pending | grep -A2 'Events:'
Events:
  Type    Reason     Age   From               Message
  ----    ------     ----  ----               -------
  Normal  Scheduled  3s    default-scheduler  Successfully assigned default/verify-pending to pod-scheduling-worker

$ kubectl get pod verify-pending -o jsonpath='{.spec.nodeName}'
pod-scheduling-worker
ポイント
-
ScheduledイベントはFrom: default-scheduler— Bind プラグインが API サーバから201 Createdを受けた直後に発行 -
spec.nodeName=pod-scheduling-workerが永続化されており、binding subresource 経由で書かれた値そのもの - 例外: Pod 作成時に
spec.nodeNameを手書きすると scheduler 自体をバイパスして bind されるためScheduledイベントは出ない。「scheduler 経由か」を厳密に判定したい場合はspec.nodeNameではなくScheduledイベントの有無で見るのが確実
Step 7: spec.nodeName 反映 → Kubelet が起動
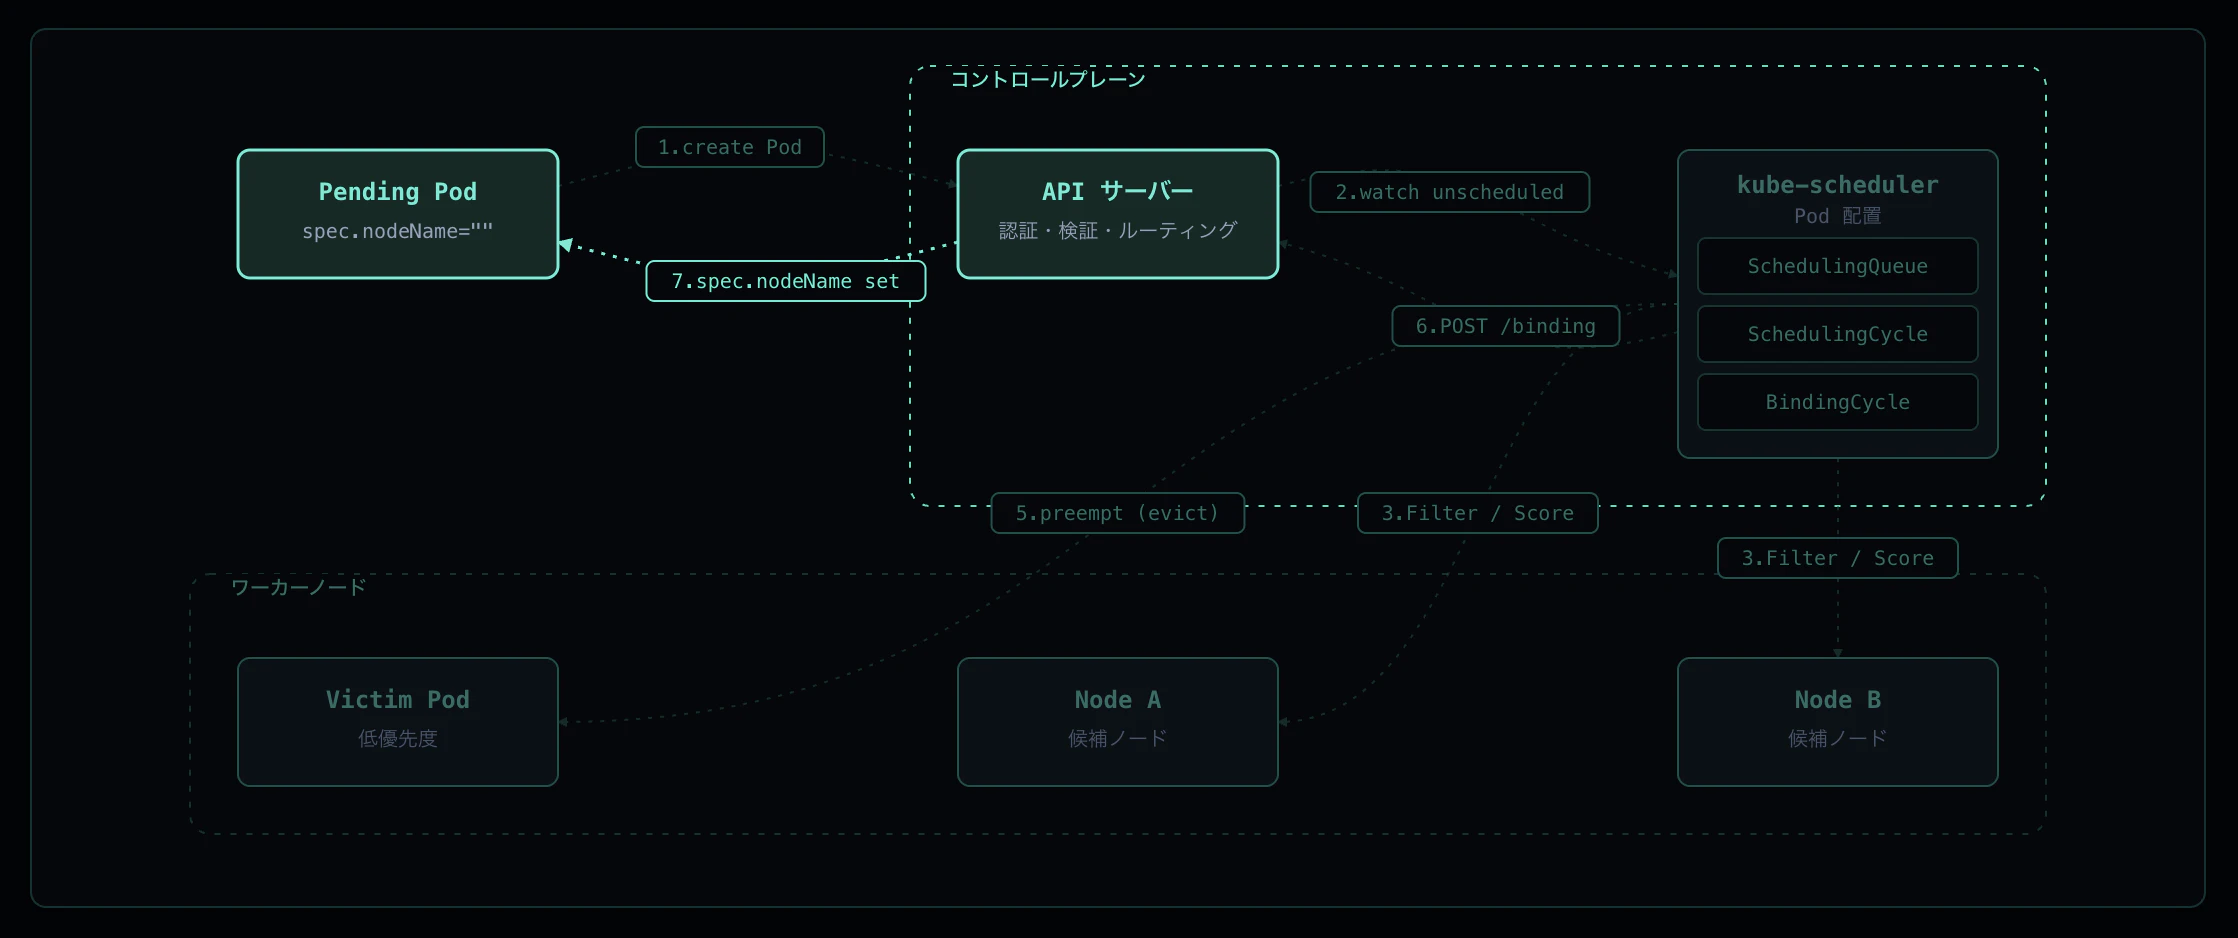
API サーバが binding を etcd に永続化すると、spec.nodeName=<node> が Pod に書かれます。対象ノードの Kubelet は API サーバの watch (fieldSelector: spec.nodeName=<self>) でこの変更を検知し、syncPod に入って起動を始めます。ここから先は Pod 起動フローに引き継がれます。
実機ログ
binding 後の Pod を確認すると spec.nodeName が埋まっており、Kubelet が即座に sync を開始しています。
$ kubectl get pod verify-pending -o jsonpath='nodeName=[{.spec.nodeName}] phase=[{.status.phase}]'
nodeName=[pod-scheduling-worker] phase=[Running]

$ kubectl describe pod verify-pending | grep -E 'Scheduled|Pulling|Started'
  Normal  Scheduled  3s    default-scheduler  Successfully assigned default/verify-pending to pod-scheduling-worker
  Normal  Pulling    3s    kubelet            Pulling image "registry.k8s.io/pause:3.9"
  Normal  Pulled     2s    kubelet            Successfully pulled image "registry.k8s.io/pause:3.9" in 620.209167ms
  Normal  Created    2s    kubelet            Created container pause
  Normal  Started    2s    kubelet            Started container pause
ポイント
-
Scheduled(Age=3s, default-scheduler) とPulling(Age=3s, kubelet) が 同一秒 — binding が反映された瞬間に kubelet が動き出す - スケジューラーの仕事は
Scheduledイベントの発行までで、それ以降の起動は kubelet 側のフロー - watch のレイテンシはミリ秒オーダーで、binding 完了とほぼ同時に kubelet 側のパイプラインが起動する
総合タイムライン
Preemption シナリオ(Step 5)の時系列を UTC で整理すると以下のようになります。
| 経過時刻 | 出来事 |
|---|---|
| 0s | victim Pod を作成 — Filter / Score を通過し worker に bound(Scheduled) |
| 0s | attacker Pod を作成 — Filter で 0/2 nodes(Insufficient cpu)、PostFilter で victim を evict(Preempted) |
| ~2s | attacker が FailedScheduling を出して unschedulableQ → backoffQ へ |
| ~4s | attacker が再 enqueue され、空いた枠で再試行 → Scheduled
|
通常の単一 Pod シナリオ(Step 1〜4, 6, 7)は以下の流れです:
| 経過時刻 | 出来事 |
|---|---|
| 0s | Pod 作成(spec.nodeName=""、phase=Pending) |
| ~1s | Scheduler が activeQ から pop → Filter → Score → 勝者決定 |
| ~1s | Binding Cycle が POST /pods/.../binding → Scheduled イベント発行 |
| ~1s | Kubelet が watch で検知 → Pulling 開始(Scheduled と同一秒) |
| ~3s | コンテナ Started、Pod Running |
Pending から Running まで 約 3 秒。スケジューラー本体の処理(pop → Bind 完了)は秒未満で、残りはイメージ pull とコンテナ起動が占めています。
実務で気をつけるポイント
1. Pending の原因切り分けは FailedScheduling メッセージから始める
FailedScheduling メッセージは各 Filter プラグインの除外理由を集計して返してくれるため、最初に見るべき一次情報です。
$ kubectl describe pod <pending-pod> | grep -A5 'Events:'
-
didn't match Pod's node affinity/selector→ NodeAffinity / nodeSelector のミスマッチ -
had taint ... that the pod didn't tolerate→ tolerations 不足 -
Insufficient cpu/Insufficient memory→ リソース不足(NodeResourcesFit) -
had volume node affinity conflict→ PVC とノードの zone ミスマッチ
0/N nodes are available: の N がノード総数と一致しているかも確認しましょう。一致していなければ Ready でないノードや cordon 中のノードが除外されている可能性があります。
2. PriorityClass は Preemption の挙動を決める
PriorityClass を設定していない Pod は priority 0 になり、Preemption の victim として真っ先に選ばれます。本番環境では:
- 業務クリティカルな Pod には明示的に高い PriorityClass を設定する
- バッチ・開発用 Pod は priority を低く設定して、いざというとき evict されてよい設計にする
-
system-cluster-critical/system-node-criticalはシステム Pod 専用で、ユーザー Pod に付与すると Cluster Autoscaler の挙動が壊れるので避ける
spec.priority が暗黙のうちに 0 になっている Pod が大量にあると、突発的なリソース逼迫で予想外の Pod が evict される事故につながります。
3. Scheduled イベント ≠ Pod が動いている
Scheduled イベントは binding が成功した時点で発行されますが、その後の PullImage や CreateContainer で失敗するケース(ImagePullBackOff、CreateContainerConfigError 等)も多々あります。
- スケジューリングの問題か →
FailedSchedulingの有無で判定 - 起動フェーズの問題か →
Failed、BackOff等の Reason、kubectl describeのContainersセクション - 「Scheduler 経由で bind されたか」を厳密に判定したいときは
spec.nodeNameではなくScheduledイベントの有無で見る(spec.nodeNameを手書きするとスケジューラーがバイパスされる)
まとめ
Pod のスケジューリングフローは「いい感じにノードが決まる」のではなく、7 つのステップで構成されています:
-
Pod 作成 — API Server が
spec.nodeName=""のまま etcd に保存 - SchedulingQueue へ enqueue — activeQ / backoffQ / unschedulableQ の 3 サブキュー
- Scheduling Cycle - Filter — 各ノードで Yes/No 判定、候補集合を絞り込む
- Scheduling Cycle - Score → Reserve — 候補を採点して勝者を決定、assumed cache に登録
- Preemption(候補が 0 のとき)— 低優先 Pod を evict して次サイクルで再試行
-
Binding Cycle —
POST /pods/.../bindingでspec.nodeNameを更新(非同期 goroutine) - spec.nodeName 反映 → Kubelet が起動 — watch で検知して syncPod 開始
これらの仕組みを理解することで、「Pod が Pending のまま動かない」「特定ノードに偏って配置される」「優先度の高い Pod が来たら別の Pod が消えた」といった挙動の原因を、FailedScheduling メッセージや scheduler 発行のイベントから素早く切り分けられるようになります。
インタラクティブなアニメーションで各ステップを視覚的に確認したい方は、ぜひ k8s-flows をご覧ください。