
はじめに
EKSでステートフルなワークロードを動かすとき、EBSボリュームの管理は避けて通れません。しかし、kubectl apply でPVCを作ってからPodにマウントされるまでの間に、Kubernetes内部では複数のコンポーネントが連携して動いています。
この記事では、EBS CSI Driverを使ったPV/PVCのライフサイクル(プロビジョニング → アタッチ → マウント → デタッチ → 削除)を、実際のログを追跡しながら一つずつ確認していきます。

この記事で学べること
- EBS CSI Driverの内部アーキテクチャ(Controller / Node の役割分担)
- PVC作成からEBSボリュームが作られるまでの具体的なフロー
-
WaitForFirstConsumerによるトポロジー対応プロビジョニングの仕組み - AZ制約(
InvalidVolume.ZoneMismatch)が発生する条件と回避策 - 旧in-tree
kubernetes.io/aws-ebsとの違い
想定読者
- EKSでステートフルワークロードを運用している方
- CSI Driverの内部動作を理解したい方
- EBSボリュームのトラブルシューティングに役立てたい方
背景・課題
Kubernetesのストレージは、もともとコア本体に組み込まれた「in-tree」プラグインで提供されていました。EBSの場合は kubernetes.io/aws-ebs がそれにあたります。
しかし、in-treeプラグインはKubernetes本体のリリースサイクルに縛られるため、ストレージベンダーが独立して機能追加やバグ修正を行えないという課題がありました。この問題を解決するために策定されたのが Container Storage Interface(CSI) です。
EKSでは Kubernetes 1.25 以降、CSI Migration が有効化されており、既存の kubernetes.io/aws-ebs を使ったStorageClassも内部的にはCSI Driverにルーティングされます。新規構築では ebs.csi.aws.com を明示的に使うことが推奨されています。
参考: Kubernetes 1.25: Kubernetes In-Tree to CSI Volume Migration Status Update
検証環境
| 項目 | 内容 |
|---|---|
| EKS バージョン | 1.31 |
| EBS CSI Driver | v1.57.1(EKSアドオン) |
| ノード | t3.small × 2(ap-northeast-1a, ap-northeast-1c) |
| リージョン | ap-northeast-1 |
| IAM認証 | IRSA(IAM Roles for Service Accounts) |
検証内容
1. EBS CSI Driverのアーキテクチャ確認
EBS CSI Driverは、大きく2つのコンポーネントで構成されています。
Controller(Deployment: 2レプリカ)
ボリュームの作成・削除・アタッチ・デタッチを担当します。以下のサイドカーコンテナで構成されています。
$ kubectl get pods -n kube-system -l app=ebs-csi-controller \
    -o jsonpath='{.items[0].spec.containers[*].name}'
ebs-plugin csi-provisioner csi-attacher csi-snapshotter csi-resizer liveness-probe
| コンテナ | 役割 |
|---|---|
ebs-plugin |
メインのCSIドライバー。AWS APIを呼び出してEBSを操作 |
csi-provisioner |
PVCの作成を検知し、ebs-pluginにCreateVolumeを要求 |
csi-attacher |
VolumeAttachmentを検知し、ebs-pluginにAttach/Detachを要求 |
csi-resizer |
PVCの容量変更を検知し、ebs-pluginにExpandVolumeを要求 |
csi-snapshotter |
VolumeSnapshotを検知し、スナップショット操作を要求 |
liveness-probe |
ヘルスチェック |
Node(DaemonSet: 各ノードに1つ)
ボリュームのフォーマット・マウントを担当します。
$ kubectl get pods -n kube-system -l app=ebs-csi-node \
    -o jsonpath='{.items[0].spec.containers[*].name}'
ebs-plugin node-driver-registrar liveness-probe
| コンテナ | 役割 |
|---|---|
ebs-plugin |
ノード上でのマウント・アンマウント操作を実行 |
node-driver-registrar |
kubeletにCSIドライバーを登録 |
liveness-probe |
ヘルスチェック |
2. StorageClassの比較(in-tree vs CSI)
まず、デフォルトで存在するin-treeのStorageClassを確認します。
$ kubectl get storageclass
NAME          PROVISIONER             RECLAIMPOLICY   VOLUMEBINDINGMODE      ALLOWVOLUMEEXPANSION   AGE
gp2           kubernetes.io/aws-ebs   Delete          WaitForFirstConsumer   false                  15m
CSI Driver用のStorageClassを作成します。
# storageclass-gp3.yaml
apiVersion: storage.k8s.io/v1
kind: StorageClass
metadata:
  name: ebs-gp3-csi
provisioner: ebs.csi.aws.com
parameters:
  type: gp3
  fsType: ext4
volumeBindingMode: WaitForFirstConsumer
reclaimPolicy: Delete
allowVolumeExpansion: true
$ kubectl get storageclass
NAME          PROVISIONER             RECLAIMPOLICY   VOLUMEBINDINGMODE      ALLOWVOLUMEEXPANSION   AGE
ebs-gp3-csi   ebs.csi.aws.com         Delete          WaitForFirstConsumer   true                   6s
gp2           kubernetes.io/aws-ebs   Delete          WaitForFirstConsumer   false                  15m
主な違いは以下の通りです。
| 項目 | in-tree (gp2) |
CSI (ebs-gp3-csi) |
|---|---|---|
| provisioner | kubernetes.io/aws-ebs |
ebs.csi.aws.com |
| ボリュームタイプ | gp2 | gp3 |
| ボリューム拡張 | 不可 | 可能 |
| スナップショット | 非対応 | 対応 |
3. プロビジョニングフローのログ追跡
PVCを作成し、Podをデプロイして、EBSボリュームがプロビジョニングされるまでの流れをログで追跡します。
# pvc-test.yaml
apiVersion: v1
kind: PersistentVolumeClaim
metadata:
  name: ebs-test-pvc
spec:
  accessModes:
    - ReadWriteOnce
  storageClassName: ebs-gp3-csi
  resources:
    requests:
      storage: 10Gi
PVCを作成した時点では、WaitForFirstConsumer の設定により、ボリュームはまだ作成されません。Podを作成して初めてプロビジョニングが開始されます。
# pod-test.yaml
apiVersion: v1
kind: Pod
metadata:
  name: ebs-test-pod
spec:
  containers:
  - name: app
    image: amazonlinux:2
    command: ["sleep", "3600"]
    volumeMounts:
    - mountPath: /data
      name: ebs-volume
  volumes:
  - name: ebs-volume
    persistentVolumeClaim:
      claimName: ebs-test-pvc
csi-provisioner のログ:
Podが作成されると、csi-provisionerがPVCのプロビジョニングを開始します。
I0406 08:37:16  Event occurred  object="default/ebs-test-pvc"
  type="Normal" reason="Provisioning"
  message="External provisioner is provisioning volume for claim \"default/ebs-test-pvc\""

I0406 08:37:18  successfully created PV pvc-xxxxxxxx-... for PVC ebs-test-pvc
  and csi volume name vol-xxxxxxxxxxxxxxxxx

I0406 08:37:18  Event occurred  type="Normal" reason="ProvisioningSucceeded"
  message="Successfully provisioned volume pvc-xxxxxxxx-..."
ebs-plugin(Controller)のログ:
ebs-pluginがAWS APIを呼び出してEBSボリュームを作成し、続けてノードへのアタッチを実行します。
I0406 08:37:19  ControllerPublishVolume: attaching
  volumeID="vol-xxxxxxxxxxxxxxxxx" nodeID="i-xxxxxxxxxxxxxxxxx"

I0406 08:37:21  ControllerPublishVolume: attached
  volumeID="vol-xxxxxxxxxxxxxxxxx" nodeID="i-xxxxxxxxxxxxxxxxx" devicePath="/dev/xvdaa"
実行結果:
PVが作成され、EBSボリュームとの対応が確認できます。
$ kubectl describe pv pvc-xxxxxxxx-xxxx-xxxx-xxxx-xxxxxxxxxxxx
Name:              pvc-xxxxxxxx-xxxx-xxxx-xxxx-xxxxxxxxxxxx
StorageClass:      ebs-gp3-csi
Status:            Bound
Claim:             default/ebs-test-pvc
Capacity:          10Gi
Access Modes:      RWO
VolumeMode:        Filesystem
Source:
    Type:       CSI
    Driver:     ebs.csi.aws.com
    VolumeHandle:  vol-xxxxxxxxxxxxxxxxx
Node Affinity:
  Required Terms:
    Term 0:  topology.kubernetes.io/zone in [ap-northeast-1c]
AWS側でもgp3タイプ・10GiBのボリュームが作成されていることを確認できます。
$ aws ec2 describe-volumes --volume-ids vol-xxxxxxxxxxxxxxxxx \
    --query 'Volumes[0].{VolumeId:VolumeId,Size:Size,VolumeType:VolumeType,State:State,AvailabilityZone:AvailabilityZone}'
{
    "VolumeId": "vol-xxxxxxxxxxxxxxxxx",
    "Size": 10,
    "VolumeType": "gp3",
    "State": "in-use",
    "AvailabilityZone": "ap-northeast-1c"
}
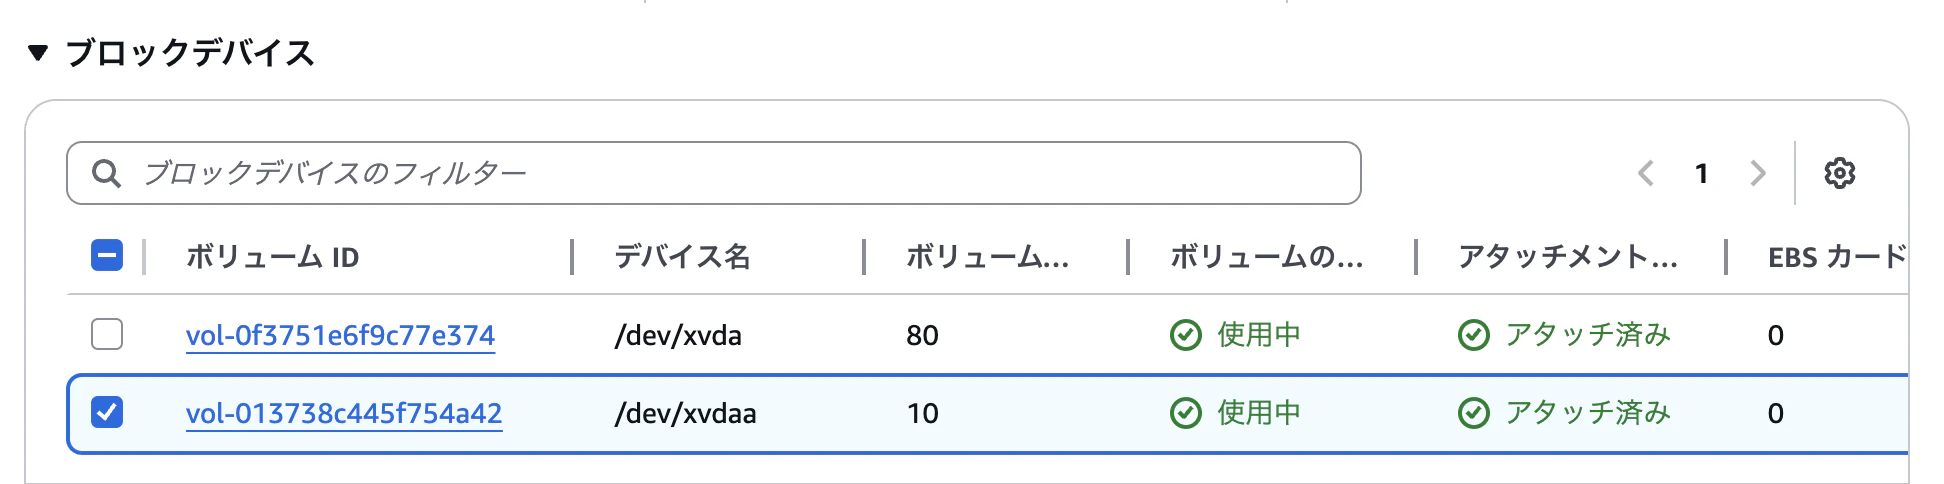
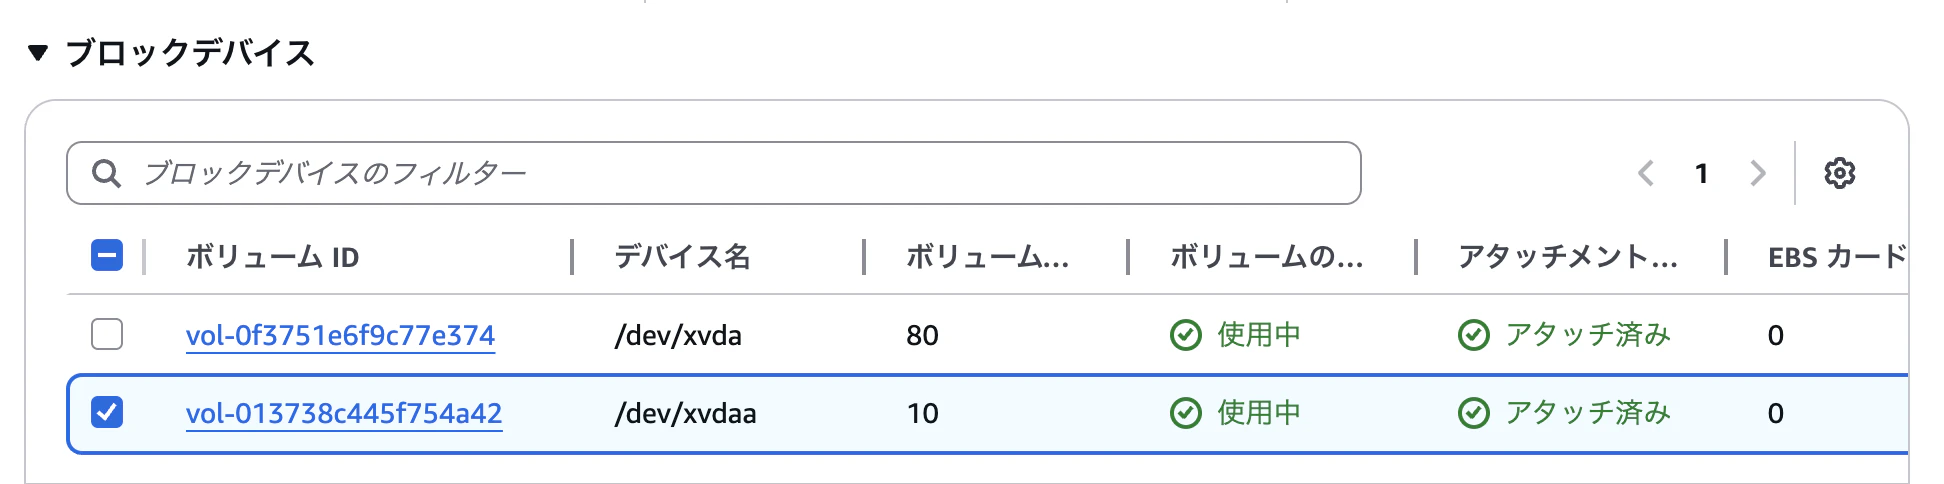
AWSコンソールのブロックデバイス画面でも、ルートボリューム(80GB)に加えて、CSI Driverが作成した10GBのボリュームが /dev/xvdaa としてアタッチされていることが確認できます。
4. Attach/Mountプロセスの詳細
ボリュームがプロビジョニングされた後、ノードへのアタッチとPodへのマウントが行われます。
csi-attacher のログ:
I0406 08:37:19  Attaching  VolumeAttachment="csi-xxxxxxxx..."
I0406 08:37:22  Attached   VolumeAttachment="csi-xxxxxxxx..."
ebs-plugin(Node)のログ:
Node側のebs-pluginが、ブロックデバイスのフォーマットとマウントを実行します。
I0406 08:37:22  Disk "/dev/nvme1n1" appears to be unformatted,
  attempting to format as type: "ext4" with options: [-F -m0 /dev/nvme1n1]

I0406 08:37:22  Disk successfully formatted (mkfs): ext4
  - /dev/nvme1n1 /var/lib/kubelet/plugins/kubernetes.io/csi/...

I0406 08:37:22  Volume needs resizing  source="/dev/nvme1n1"
I0406 08:37:22  Device /dev/nvme1n1 resized successfully
VolumeAttachment リソース:
KubernetesのVolumeAttachmentリソースで、ボリュームとノードの紐付けが管理されています。
$ kubectl describe volumeattachment csi-xxxxxxxx...
Spec:
  Attacher:   ebs.csi.aws.com
  Node Name:  ip-192-168-xx-xxx.ap-northeast-1.compute.internal
  Source:
    Persistent Volume Name:  pvc-xxxxxxxx-xxxx-xxxx-xxxx-xxxxxxxxxxxx
Status:
  Attached:  true
  Attachment Metadata:
    Device Path:  /dev/xvdaa
EC2側でもアタッチ状態を確認できます。
$ aws ec2 describe-volumes --volume-ids vol-xxxxxxxxxxxxxxxxx \
    --query 'Volumes[0].Attachments[0].{InstanceId:InstanceId,Device:Device,State:State}'
{
    "InstanceId": "i-xxxxxxxxxxxxxxxxx",
    "Device": "/dev/xvdaa",
    "State": "attached"
}
5. Pod再スケジュール時のDetach/Re-attachとAZ制約
Podを削除して別ノードに再スケジュールした際の挙動を確認します。ここが最も重要なポイントです。
Detachの確認:
Podを削除すると、csi-attacherがDetachを実行します。
I0406 09:06:26  Detaching  VolumeAttachment="csi-xxxxxxxx..."
I0406 09:06:32  Detached   VolumeAttachment="csi-xxxxxxxx..."
AZ制約エラーの再現:
EBSボリュームは作成されたAZから移動できません。nodeName で別AZのノードを直接指定すると、スケジューラのAZ考慮がバイパスされ、以下のエラーが発生します。
Error processing VolumeAttachment err="failed to attach: rpc error:
  code = Internal desc = Could not attach volume \"vol-xxxxxxxxxxxxxxxxx\"
  to node \"i-yyyyyyyyyyyyyyyyy\":
  operation error EC2: AttachVolume, api error InvalidVolume.ZoneMismatch:
  The volume 'vol-xxxxxxxxxxxxxxxxx' is not in the same availability zone
  as instance 'i-yyyyyyyyyyyyyyyyy'"
実際にノードのAZを確認すると、ボリューム(ap-northeast-1c)と指定先ノード(ap-northeast-1a)が異なっていました。
$ kubectl get nodes -L topology.kubernetes.io/zone
NAME                                                STATUS   ROLES    AGE   VERSION                ZONE
ip-192-168-xx-xxx.ap-northeast-1.compute.internal   Ready    <none>   51m   v1.31.14-eks-f69f56f   ap-northeast-1a
ip-192-168-yy-yyy.ap-northeast-1.compute.internal   Ready    <none>   51m   v1.31.14-eks-f69f56f   ap-northeast-1c
正しい再スケジュール:
nodeName を指定せずにPodを再作成すると、スケジューラがPVのNode Affinityを考慮して同一AZのノードに配置し、正常にアタッチされます。
I0406 09:12:27  Detached   VolumeAttachment="csi-xxxxxxxx..."
I0406 09:12:30  Attaching  VolumeAttachment="csi-xxxxxxxx..."
I0406 09:12:31  Attached   VolumeAttachment="csi-xxxxxxxx..."
6. PVC削除時のボリューム削除フロー
最後に、PodとPVCを削除した際のクリーンアップフローを確認します。
ebs-plugin(Controller)のログ:
I0406 09:15:17  ControllerUnpublishVolume: detaching
  volumeID="vol-xxxxxxxxxxxxxxxxx" nodeID="i-xxxxxxxxxxxxxxxxx"

I0406 09:15:18  Waiting for volume state
  volumeID="vol-xxxxxxxxxxxxxxxxx" actual="detaching" desired="detached"

I0406 09:15:22  ControllerUnpublishVolume: detached
  volumeID="vol-xxxxxxxxxxxxxxxxx" nodeID="i-xxxxxxxxxxxxxxxxx"
reclaimPolicy: Delete が設定されているため、PVC削除後にPVとEBSボリュームが自動的に削除されます。
検証結果のまとめ
| 検証項目 | 結果 | 備考 |
|---|---|---|
| CSI Driverのデプロイ構成 | Controller(Deployment) + Node(DaemonSet) | Controller 2レプリカ、Node 各ノード1つ |
| プロビジョニング | WaitForFirstConsumerでPod作成後に実行 | PVC作成だけではボリューム未作成 |
| Attach/Mount | Controller→Attach、Node→Format+Mount | 初回はext4フォーマットが実行される |
| AZ制約 | 別AZノードへのアタッチは ZoneMismatch エラー |
nodeNameの直接指定で再現 |
| 再スケジュール | スケジューラに任せれば同一AZに配置 | PVのNode Affinityが考慮される |
| 削除フロー | Detach → PV削除 → EBS削除 | reclaimPolicy: Deleteで自動クリーンアップ |
わかったこと・学び
- WaitForFirstConsumerは必須: PVC作成時点ではボリュームが作られず、Podのスケジュール先AZにボリュームが作成されます。これにより初回のAZミスマッチを防げます
- サイドカーパターンの理解が重要: csi-provisioner、csi-attacher、ebs-pluginがそれぞれ異なる責務を持ち、Kubernetes APIのリソース(PVC、VolumeAttachment)をウォッチして連携しています
-
Node Affinityが再スケジュールの鍵: PVに
topology.kubernetes.io/zoneのNode Affinityが設定されるため、スケジューラに任せれば同一AZのノードに自動配置されます
まとめ
EBS CSI Driverのボリュームライフサイクルを、実際のログを追跡しながら確認しました。
- プロビジョニング: csi-provisioner → ebs-plugin → AWS CreateVolume API
- アタッチ: csi-attacher → ebs-plugin → AWS AttachVolume API
- マウント: kubelet → ebs-plugin(Node) → mkfs + mount
- デタッチ: csi-attacher → ebs-plugin → AWS DetachVolume API
- 削除: ebs-plugin → AWS DeleteVolume API
各フェーズで異なるコンポーネントが責務を分担しており、ログを見ることでどこで問題が起きているかを特定できます。EBSボリュームのトラブルシューティング時には、まず csi-provisioner → csi-attacher → ebs-plugin の順にログを確認するのがおすすめです。