前置き
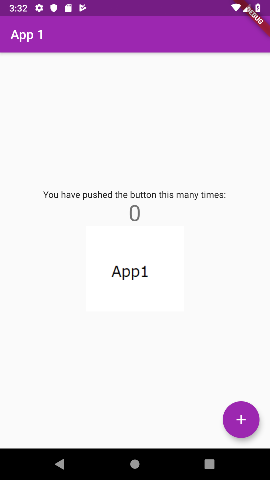
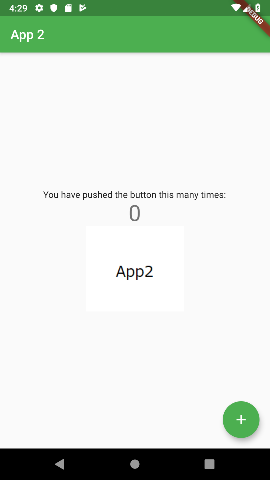
flutterでのflavorの設定し、アプリに表示する画像や、テキスト、基本となる色を変更してみました。iOSは持っていないので、Androidのみの記事となります。
flutterでデザインが違うアプリを作成する必要があったので、その練習を記録です。
基本とするアプリは、公式でもおなじみのボタンを押すと数字が足されるやつです。
flutterの公式ページに乗っている以下の記事が非常に有用なのでこちらを参考にしています。
flavorの設定
- android/app/build.gradle を編集し、flavorを設定する。
android {
	...
	flavorDimensions "flavor" // なんでもOKです。
    productFlavors {

        app1 {
            dimension "flavor"
            applicationIdSuffix ".app1" // idを変更することにより別アプリ扱いとなります。
            versionNameSuffix "-app1" // アプリ詳細画面のversionに使いされる文字列です。
        }

        app2 {
            dimension "flavor"
            applicationIdSuffix ".app2"
            versionNameSuffix "-app2"
        }
    }
}
-
android/app/src/main/AndroidManifest.xmlの編集
android:label を"@string/app_name" に変更し、この後作成するファイルでアプリケーション名を設定します。
<application
        android:name="io.flutter.app.FlutterApplication"
        android:label="@string/app_name"
        android:icon="@mipmap/ic_launcher">
-
android/app/src/main/res/values/strings.xml を作成しデフォルトのアプリケーション名を記述します。
android/app/src/main/res/values/strings.xml<?xml version="1.0" encoding="utf-8"?> <resources> <string name="app_name">Default App Name</string> </resources> -
android/app/src/flavor名/res/values/strings.xmlのフォルダを作成し、
flavorごとのアプリケーション名を記述します。
android/app/src/App1/res/values/strings.xml<?xml version="1.0" encoding="utf-8"?> <resources> <string name="app_name">App1</string> </resources>android/app/src/App2/res/values/strings.xml<?xml version="1.0" encoding="utf-8"?> <resources> <string name="app_name">App2</string> </resources> -
この時点でflavorを指定して、flutter run することで、別アプリケーションとしてアプリケーションがビルド、インストールできます。
$ flutter run --flavor app1
flavorアプリごとに画像、テキスト、primarySwatchを変更する。
-
mian.dart を main_common.dart に変更
Flavorでテキストなどを変更するために、mainを分けて対応します。
もともとのmian.dartは分割したmianから呼び出す形に変更します。import 'package:flutter/material.dart'; import 'package:flavor_flutter/home_page.dart'; import 'package:flavor_flutter/app_config.dart'; class MyApp extends StatelessWidget { @override Widget build(BuildContext context) { var config = AppConfig.of(context); //設定を取得します。 return _buildApp(config.appDisplayName, config.appColor); } Widget _buildApp(String appName, Color appColor){ return MaterialApp( title: appName, theme: ThemeData( primarySwatch: appColor, // flavorで変更します。 ), home: MyHomePage(title: appName), ); } } -
app_config.dart の作成
InheritedWidgetを使用して、アプリ内の任意のWidgetからアクセスできるアプリ設定データを作成します。
import 'package:flutter/material.dart'; class AppConfig extends InheritedWidget { AppConfig({this.appDisplayName,this.appInternalId,this.appColor, Widget child}):super(child: child); final String appDisplayName; final int appInternalId; final Color appColor; static AppConfig of(BuildContext context) { return context.inheritFromWidgetOfExactType(AppConfig); } @override bool updateShouldNotify(InheritedWidget oldWidget) => false; } -
main_app1.dart , main_app2.dart を作成します。
ここで先ほど作成したAppConfig Widgetを作ります。
main_app1.dartとmain_app2.dartは設定する内容だけ違います。
lib/main_app1.dartimport 'package:flavor_flutter/app_config.dart'; import 'package:flavor_flutter/main_common.dart'; import 'package:flutter/material.dart'; void main() { var configuredApp = AppConfig( appDisplayName: "App 1", // "App 2" App2の場合 appInternalId: 1, // "2" appColor: Colors.purple, // Colors.green child: MyApp(), ); runApp(configuredApp); }画像はルートフォルダにassets/1 or 2 / icon.png として保存しておきます。
pubspec.yaml に登録するのを忘れないようにします。
pubspec.yamlflutter: assets: - assets/1/ - assets/2/ -
MyHomePageWidgetを編集
最後にhome_page.dartを作成し、メインコンテンツを記述します。
Widget build(BuildContext context) {
    var config = AppConfig.of(context);  //設定を取得します。
    return Scaffold(
      appBar: AppBar(
        title: Text(widget.title),
      ),
      body: Center(
        child: Column(
          mainAxisAlignment: MainAxisAlignment.center,
          children: <Widget>[
            Text(
              'You have pushed the button this many times:',
            ),
            Text(
              '$_counter',
              style: Theme.of(context).textTheme.display1,
            ),
            Image.asset('assets/' + config.appInternalId.toString() + '/icon.png', width: 150.0, height: 130.0),  //flavorによって取得する画像を変えます。
          ],
        ),
      ),
      floatingActionButton: FloatingActionButton(
        onPressed: _incrementCounter,
        tooltip: 'Increment',
        child: Icon(Icons.add),
      ), // This trailing comma makes auto-formatting nicer for build methods.
    );
  }
- 起動時には、flavorと合わせて、mainとなるファイルを指定する必要があります。
$ flutter run --flavor app1 -t ./lib/main_app1.dart
以上により、Flutterでのflavorでアプリケーション名、テキスト、画像、基本となる色の変更ができました。ファイルの数が増えますので、もう少し簡単になるとありがたいですね。

