はじめに
今回がQiita初投稿です。プログラミングは初心者に毛が生えた程度なので、温かい目で見ていただければ幸いです。
また、今回の記事の内容はUnityについてある程度分かる人向けとなっています。
(一応手順をすべて記述したので、初心者の方も丸写しすれば同じことができると思います)
概要
今回はUnityのAR Foundationと、Photon Unity Networking2(PUN2)を使用してARシーンの中で3Dオブジェクトの動きを共有する方法をご紹介します。
Unityを使ったARを学習しながら作った関係で、ARのテンプレートシーンを使用しなかったため、初期設定が少し面倒になっています。ご了承ください。
今回のゴール
↓PCとスマートフォンで同じシーンを共有して、PCで操作しているオブジェクトをスマートフォンから観察しています。

目次
1. 環境
2. パッケージのインポートと初期設定
3. ARシーンにオブジェクトを表示させる
4. PUN2を使ってオブジェクトの動きを共有する
5. まとめ
1. 環境
OS
- Windows11
Unity&Assetsバージョン
- Unity - 2022.3.17f1
- AR Foundation - 5.1.1
- Photon Unity Networking 2 - 2.44.0
テストデバイス
- Galaxy S22 (Android 13)
- Google Pixel 6 (Android 12)
2. パッケージのインポートと初期設定
Unity Hubで、新しいプロジェクトから3Dを選択し、プロジェクトを作成します。
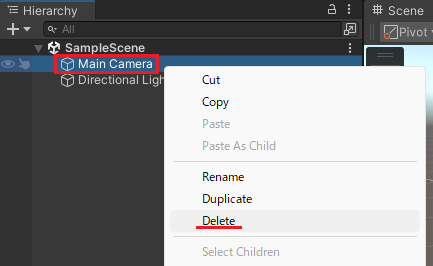
プロジェクトが開いたら、Main Cameraを選択して削除します。(今回はARカメラを使用するため、通常のカメラは使用しません)
2-1. AR Foundation
まずはAR Foundationをインストールします。[Window] -> [Package Manager] を選択し、
[Packages: Unity Registry] からARをインストールします。
このような警告が表示されるので、Yesを押します。すると、Unityが再起動され、ARパッケージのインストールが完了します。
次に、ARを使うための設定を行います。
Androidでの開発が初めての方はこちらもご確認ください
[Unity Hub] -> [インストール] から、右の歯車をクリックし、
モジュールを加えるを選択プラットフォームの中にある
Android Build Supportがインストールされているか確認してください。
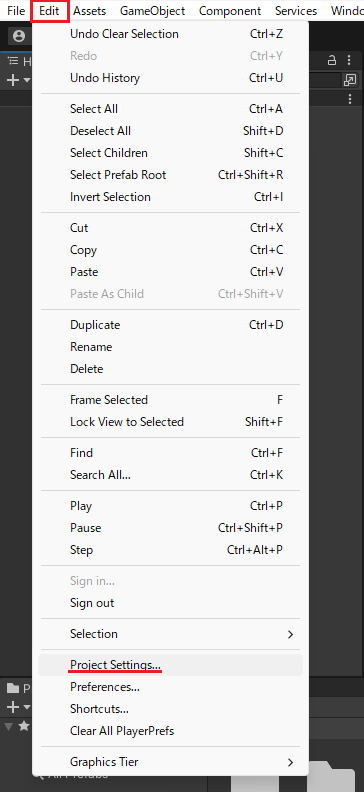
まずは [Edit] -> [Project Settings] を開きます。
[XR Plug-in Management] の [Android] タブにあるGoogle ARCoreのチェックボックスを有効にします。
次に、[File] -> [Build Settings] を開き、
Androidを選択後、[Switch Platform] を押します。
この際、Scenes In Buildに何もなければ、シーンを追加してください。
次に [Build Settings] ウインドウの左下にある [Player Settings] を開きます。
[Player] -> [Other Settings] の中にある設定を変更していきます。
Auto Graphics API のチェックを外し、
[Graphics APIs] のVulkanを選択後 - を押して削除し、OpenGLES3のみに設定。
[Minimum API Level] を API level 27以上に設定。
[Scripting Backend] を Mono からIL2CPP に設定。
ARM64 を有効に設定。
お疲れ様でした。
ARの実装に向けた設定は以上です。
2-2. PUN2
PUN2のインストールについては、下記リンクを参考にして行ってください。
非常にわかりやすくPUN2の基礎について解説されています。
PUN2(Photon Unity Networking 2)で始めるオンラインゲーム開発入門
3. ARシーンにオブジェクトを表示させる
パッケージのインストールが完了したので、いよいよARのシーン作成をしていきましょう。
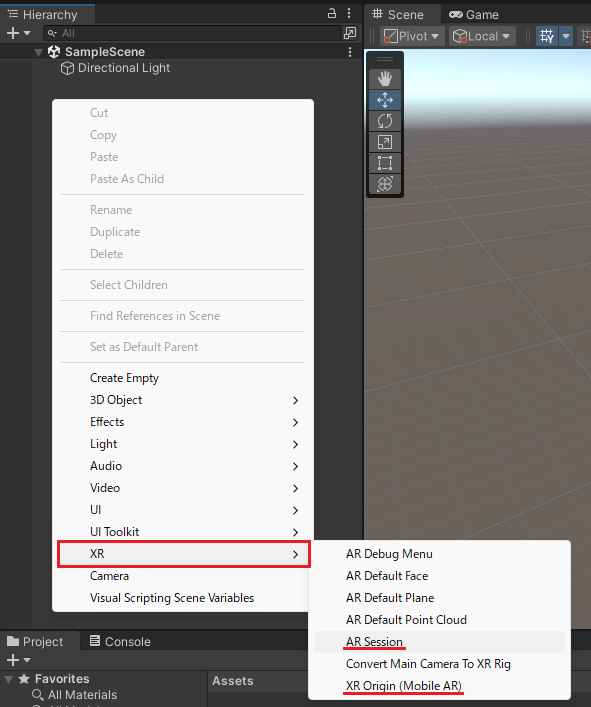
ヒエラルキーウインドウを右クリックし、[XR] -> AR Session と XR Origin(Mobile AR) をシーンに配置します。
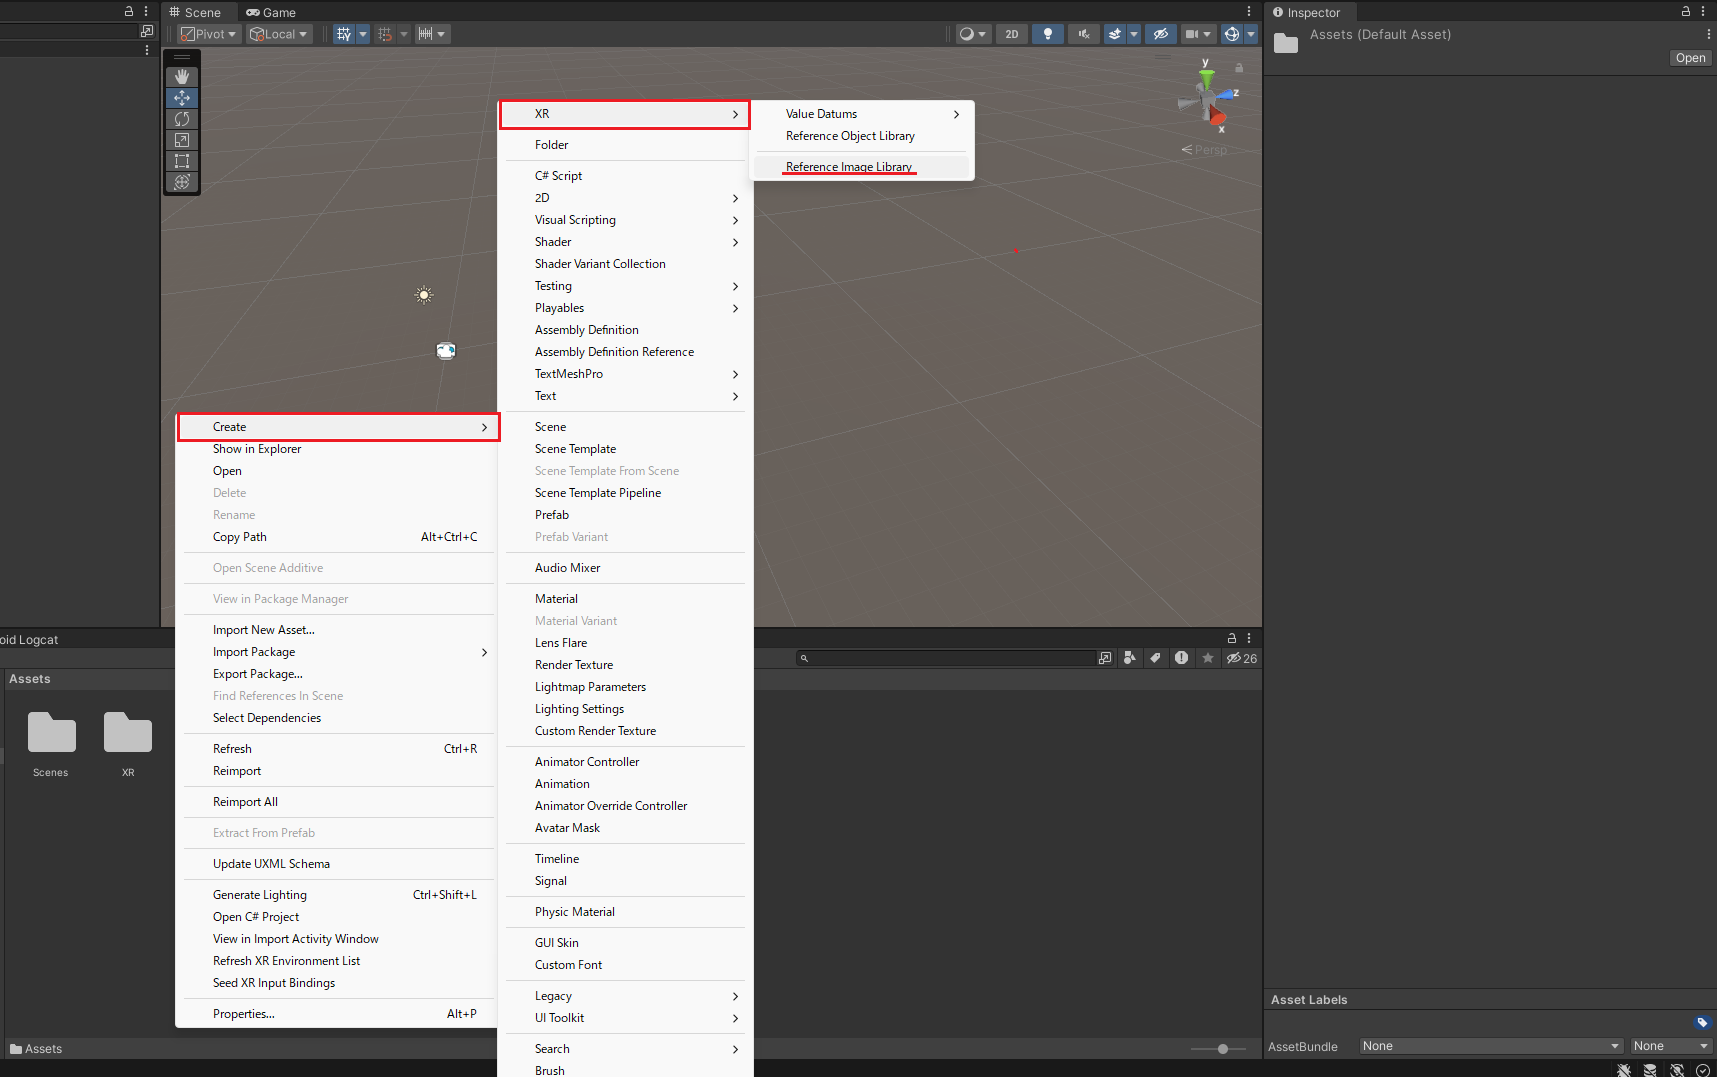
次に、Projectウインドウを右クリックし、[Create] -> [XR] -> Referance Image Library を選択して配置します。
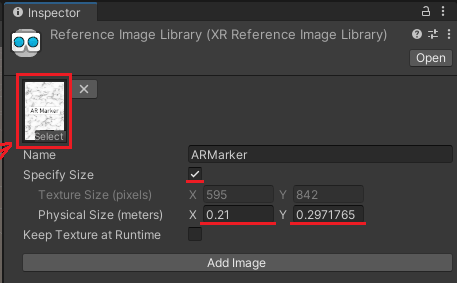
Referance Image Libraryを選択し、Inspectorから [Add Image] を選択します。
ARのマーカーにしたいものの画像をUnityに取り込み、Inspectorの左上にドラッグアンドドロップします。
Specify Sizeのチェックを有効にしてサイズを入力すると、マーカーを検出しやすくなります。
ここのX、Yの 1 は、ARシーンでは 1m に相当します。
cm ではない点に注意してください!
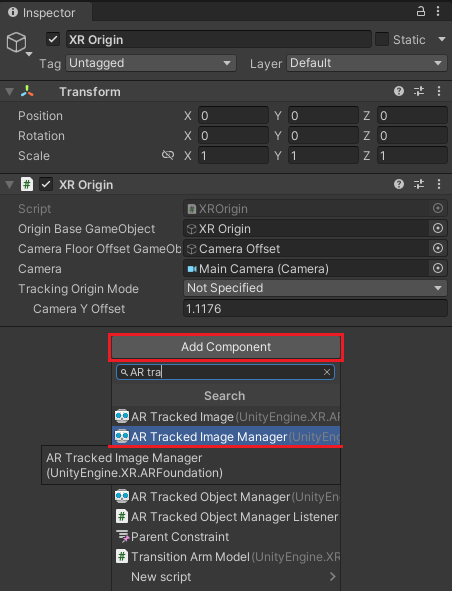
次にXR Originを選択し、Inspector上の [Add Component] から AR Tracked Image Manager を追加します。
[Serialized Library] に先ほどの Referance Image Library を、
[Tracked Image Prefab] に表示したいオブジェクトのプレハブを設定します。
ARの表示準備が整いました。AndroidデバイスをPCにつなげてビルドしてみましょう。
ビルドができなかった場合
ビルドができなかった場合
Androidでのビルドができなかった場合、考えられる主な原因は以下の3つです。
- シーンがBuild Settingsに入っていない
- ビルドの目標プラットフォームがAndroidに設定されていない
- Android端末が開発者モードになっていない
一つずつ解決策を提示していきます。
シーンがBuild Settingsに入っていない
[Build Settings] ウインドウの上部に Scenes In Build という項目があり、ここに制作したシーンが入っていないとビルドできません。Add Open Scenesを押すか、Projectウインドウの [Scenes] フォルダからシーンをドラッグアンドドロップしてビルドシーンを設定しましょう。
ビルドの目標プラットフォームがAndroidに設定されていない
これも同じく[Build Settings] ウインドウの左側にあるPlatform から
Androidを選択してSwitch Platformボタンを押して変更してください。Android端末が開発者モードになっていない
Android端末が開発者モードに入っていないと、ビルドしたファイルを端末に送ることができません。
開発者モードのオン/オフの方法は端末によって異なりますので、インターネットで調べて変更してください。そのほかの原因
これら以外にもビルドできない原因は存在しますので、ビルドができなかった場合はコンソールウインドウのエラーログを確認してみてください。
無事にマーカーの上にオブジェクトが出現しました。
4. PUN2を使ってオブジェクトの動きを共有する
ARシーンの準備ができたので、次はPUN2を使った同期をしていきます。
4-1.同期されるオブジェクトの作成
まずは、シーン上で同期されるネットワークオブジェクトを作成します。
今回は例としてCubeで作成しましたが、オブジェクトは何でも大丈夫です。
大体の流れをつかんでいただければ幸いです。
ヒエラルキーウインドウを右クリックし、[3D Object] から適当なオブジェクトを作成します。
作成したCubeのInspectorから少し設定を行います。
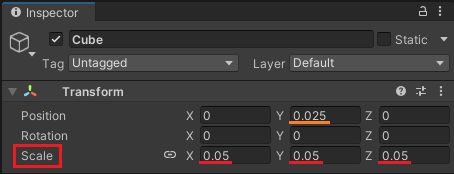
ScaleをARシーン上で見える大きさに調整し、マーカーにめり込まないようにY座標も調整しましょう。
ScaleやPositionの 1 は、ARシーンでは 1m に相当します。
しっかり見える大きさに設定しましょう。
次に、同じInspectorウインドウの下部にある [Add Component] -> [Photon Networking]から、
Photon ViewとPhoton Transform Viewを追加します。
さらに、プロジェクトウインドウを右クリックし、[Create] -> [C# Script] から、PlayerControllerというスクリプトを作成してください。
using UnityEngine;
using Photon.Pun;

public class PlayerController : MonoBehaviourPunCallbacks
{
    void Update()
    {
        //自分のオブジェクトでなければ処理しない
        if (!photonView.IsMine) return;

        var input = new Vector3(Input.GetAxis("Horizontal"), 0f, Input.GetAxis("Vertical"));
        transform.Translate(0.1f * Time.deltaTime * input.normalized);
    }
}
作成が終わったら、先ほどのCubeにアタッチしてください。
仕上げとして、[Assets] フォルダの中にResourcesという名前のフォルダを作成し、Cubeをドラッグアンドドロップで格納してプレハブ化すれば、ネットワークオブジェクトの準備完了です。
ヒエラルキーウインドウ上にあるCubeは不要なので削除してください。
4-2. PUN2のサーバーに接続する
次にPUN2のサーバーに接続する準備をします。
PUN2Managerというスクリプトを作ったら、ヒエラルキーウインドウを右クリックし、 [Create Enpty] を選択して出てくる空のオブジェクトにアタッチしてください。(名前はなんでも大丈夫ですが、分かりやすくPUN2ManagerObjなどにすると良いと思います)
using UnityEngine;
using Photon.Pun;
using Photon.Realtime;

public class PUN2Manager : MonoBehaviourPunCallbacks
{
    [SerializeField] private GameObject _playerPrefab;

    void Start()
    {
        // PhotonServerSettingsの設定内容を使ってマスターサーバーへ接続する
        PhotonNetwork.ConnectUsingSettings();
    }

    // マスターサーバーへの接続が成功した際に呼ばれる
    public override void OnConnectedToMaster() {
        // "Room"という名前のルームに参加する(ルームが存在しなければ作成する)
        PhotonNetwork.JoinOrCreateRoom("Room", new RoomOptions(), TypedLobby.Default);
    }

    // ルームへの接続が成功した際に呼ばれる
    public override void OnJoinedRoom() {
        var position = new Vector3(Random.Range(-0.1f, 0.1f), 0.025f, Random.Range(-0.1f, 0.1f));
        PhotonNetwork.Instantiate(_playerPrefab.name, position, Quaternion.identity);
    }
}
これで、起動時に自動的にPUN2のサーバーに接続されるようになりました。
4-3. ARシーンの原点を固定する
次に、ARの出現位置を合わせるために原点をマーカーに固定する処理を実装します。
以下の二つのスクリプトを作成し、二つ目のOriginDecideFromImageMakerのみヒエラルキーウインドウを右クリックし、 [Create Enpty] を選択して出てくる空のオブジェクトにアタッチしてください。(名前はなんでも大丈夫ですが、分かりやすくOriginDecideFromImageMakerObjなどにすると良いと思います)
この二つのスクリプトは引用、または大部分を参考にさせていただき開発環境に合わせて一部を変更したものです。
スクリプトの下部に引用元を示してありますので、そちらもご覧ください。
XROriginExtensionsusing System; using Unity.XR.CoreUtils; using UnityEngine; namespace UnityEngine.XR.ARFoundation.Samples { /// <summary> /// This class contains extension methods suitable for replacing the <c>ARSessionOrigin.MakeContentAppearAt</c> /// API as existed in AR Foundation 4.2, allowing users to upgrade projects from /// <see cref="ARSessionOrigin"/> to <see cref="XROrigin"/> with continued access to this API. /// </summary> public static class XROriginExtensions { /// <summary> /// Makes <paramref name="content"/> appear to be placed at <paramref name="position"/> with orientation <paramref name="rotation"/>. /// </summary> /// <param name="origin">The <c>XROrigin</c> in the Scene.</param> /// <param name="content">The <c>Transform</c> of the content you wish to affect.</param> /// <param name="position">The position you wish the content to appear at. This could be /// a position on a detected plane, for example.</param> /// <param name="rotation">The rotation the content should appear to be in, relative /// to the <c>Camera</c>.</param> /// <remarks> /// This method does not actually change the <c>Transform</c> of content; instead, /// it updates the <c>XROrigin</c>'s <c>Transform</c> so the content /// appears to be at the given position and rotation. This is useful for placing AR /// content onto surfaces when the content itself cannot be moved at runtime. /// For example, if your content includes terrain or a NavMesh, it cannot /// be moved or rotated dynamically. /// </remarks> public static void MakeContentAppearAt(this XROrigin origin, Transform content, Vector3 position, Quaternion rotation) { MakeContentAppearAt(origin, content, position); MakeContentAppearAt(origin, content, rotation); } /// <summary> /// Makes <paramref name="content"/> appear to be placed at <paramref name="position"/>. /// </summary> /// <param name="origin">The <c>XROrigin</c> in the Scene.</param> /// <param name="content">The <c>Transform</c> of the content you wish to affect.</param> /// <param name="position">The position you wish the content to appear at. This could be /// a position on a detected plane, for example.</param> /// <remarks> /// This method does not actually change the <c>Transform</c> of content; instead, /// it updates the <c>XROrigin</c>'s <c>Transform</c> so the content /// appears to be at the given position. /// </remarks> public static void MakeContentAppearAt(this XROrigin origin, Transform content, Vector3 position) { if (content == null) throw new ArgumentNullException(nameof(content)); var originTransform = origin.transform; // Adjust the Camera Offset transform to account // for the actual position we want the content to appear at. origin.CameraFloorOffsetObject.transform.position += originTransform.position - position; // The XROrigin's position needs to match the content's pivot. This is so // the entire XROrigin rotates around the content (so the impression is that // the content is rotating, not the rig). originTransform.position = content.position; } /// <summary> /// Makes <paramref name="content"/> appear to have orientation <paramref name="rotation"/> relative to the <c>Camera</c>. /// </summary> /// <param name="origin">The <c>XROrigin</c> in the Scene.</param> /// <param name="content">The <c>Transform</c> of the content you wish to affect.</param> /// <param name="rotation">The rotation the content should appear to be in, relative /// to the <c>Camera</c>.</param> /// <remarks> /// This method does not actually change the <c>Transform</c> of content; instead, /// it updates the <c>XROrigin</c>'s <c>Transform</c> so that the content /// appears to be in the requested orientation. /// </remarks> public static void MakeContentAppearAt(this XROrigin origin, Transform content, Quaternion rotation) { if (content == null) throw new ArgumentNullException(nameof(content)); // Since we aren't rotating the content, we need to perform the inverse // operation on the XROrigin. For example, if we want the // content to appear to be rotated 90 degrees on the Y axis, we should // rotate our rig -90 degrees on the Y axis. origin.transform.rotation = Quaternion.Inverse(rotation) * content.rotation; } } }
XROriginExtensions引用元:
OriginDecideFromImageMakerusing System.Collections; using Unity.XR.CoreUtils; using UnityEngine; using UnityEngine.XR.ARFoundation; using UnityEngine.XR.ARFoundation.Samples; /// <summary> /// 画像マーカーから原点を定める /// </summary> public class OriginDecideFromImageMaker : MonoBehaviour { /// <summary> /// ARTrackedImageManager /// </summary> [SerializeField] private ARTrackedImageManager _imageManager; /// <summary> /// ARSessionOrigin /// </summary> [SerializeField] private XROrigin _sessionOrigin; /// <summary> /// ワールドの原点として振る舞うオブジェクト /// </summary> private GameObject _worldOrigin; /// <summary> /// コルーチン /// </summary> private Coroutine _coroutine; private void OnEnable() { _worldOrigin = new GameObject("Origin"); _imageManager.trackedImagesChanged += OnTrackedImagesChanged; } private void OnDisable() { _imageManager.trackedImagesChanged -= OnTrackedImagesChanged; } /// <summary> /// 原点を定める /// 今回は画像マーカーの位置が原点となる /// </summary> /// <param name="trackedImage">認識した画像マーカー</param> /// <param name="trackInterval">認識のインターバル</param> /// <returns></returns> private IEnumerator OriginDecide(ARTrackedImage trackedImage,float trackInterval) { yield return new WaitForSeconds(trackInterval); var trackedImageTransform = trackedImage.transform; _worldOrigin.transform.SetPositionAndRotation(Vector3.zero,Quaternion.identity); _sessionOrigin.MakeContentAppearAt(_worldOrigin.transform, trackedImageTransform.position,trackedImageTransform.localRotation); _coroutine = null; } /// <summary> /// ワールド座標を任意の点から見たローカル座標に変換 /// </summary> /// <param name="world">ワールド座標</param> /// <returns></returns> public Vector3 WorldToOriginLocal(Vector3 world) { return _worldOrigin.transform.InverseTransformDirection(world); } /// <summary> /// TrackedImagesChanged時の処理 /// </summary> /// <param name="eventArgs">検出イベントに関する引数</param> private void OnTrackedImagesChanged(ARTrackedImagesChangedEventArgs eventArgs) { foreach (var trackedImage in eventArgs.added) { StartCoroutine(OriginDecide(trackedImage,0)); } foreach (var trackedImage in eventArgs.updated) { if(_coroutine == null) _coroutine = StartCoroutine(OriginDecide(trackedImage, 5)); } } }
OriginDecideFromImageMaker引用・参考元:
4-4. 締めのアタッチ祭り
これが最後の作業になります。ミスが起こった場合は発見しにくいので慎重に作業しましょう。
今まで作成してきたオブジェクトやスクリプトがお互いを認識できるように、Inspector上でアタッチしていきます。
PUN2ManagerをアタッチしたオブジェクトのInspectorにある [Player Prefab] に、Resourceフォルダにある4-1で作成したネットワークオブジェクトをドラッグアンドドロップして設定しましょう。
同様に、OriginDecideFromImageMakerをアタッチしたオブジェクトのInspectorにある [Image Manager] と [Session Origin] に、ヒエラルキーウインドウにあるXR Originをドラッグアンドドロップして設定しましょう。
最後に、XR Originの[Tracked Image Prefab]をNoneに設定してください。(ARシーンの確認の際に何かしら設定していると思います。)
お疲れさまでした!これでビルドを行えば、ARシーンの中でオブジェクトの動きを同期することができます。
↓PCとスマートフォンで同じシーンを共有して、PCで操作しているオブジェクトをスマートフォンから観察しています。

5. まとめ
今回は、AR FoundationとPhoton Unity Networking2を使用して、ARシーン内のオブジェクトの動きを共有する方法について解説しました。
本当に動きを共有するところまでしか作っていないので、スマートフォンでの操作などは改めて実装する必要があります。また機会があれば、そこについても記事を作りたいです。
丁寧に解説しようとしたらとんでもない長文になってしまいましたが、ここまで読んでいただきありがとうございました。
問題点や改善点、ご質問などがありましたら教えてください。
参考文献

