概要
- JavaとApache Sparkを使った機械学習入門編です
- 「価格推定」を題材にApache Sparkの使い方から実際の機械学習(学習、回帰)までステップアップ方式でハンズオンします
- 機械学習アルゴリズムには教師あり学習の勾配ブースティングツリーを使います
- ステップアップ方式に複数回に分けて投稿します
- 全ソースコードはこちら https://github.com/riversun/spark-gradient-boosting-tree-regression-example
環境
- Apache Spark 2.4.3
- Java 8~
機械学習モデルを作る
いよいよ、機械学習のフェーズです。今回は、実際に動作する「価格推定エンジン」を作ります
前回は、文字列で表現されていたカテゴリ変数を数値に置き換える処理をパイプラインで実行しました。
そして、数値化カテゴリ変数名には末尾(suffix)にIndexをつけるように処理をしたので、
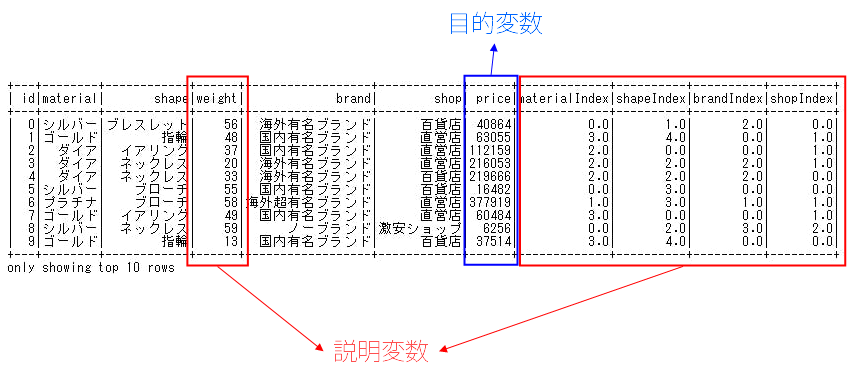
Datasetには数値型の変数としてmaterialIndex,shapeIndex,brandIndex,shopIndex,weight,priceがある状態です。
説明変数と目的変数
今回の例では、アクセサリーの価格を推定(予測)したいのですが、予測したい対象となるデータ(ここでは価格)を目的変数と呼びます。
アクセサリーの価格を推定(予測)したいとき、アクセサリーの価格は何によって決まるでしょうか。
そのアクセサリーがダイアモンド製なら高価になりそうですし、宝石や貴金属は重ければ重いほど価値が高そうです。また、有名ブランドが手がけた商品ならプレミアムがつきそうです。
このように、アクセサリーの価格の上下には何らかの理由、つまり原因となる要素があります。
この原因となるデータのことを説明変数と呼びます。
原因・・・説明変数(explanatory variable)
結果・・・目的変数(objective variable)
ということで、
Datasetにある変数を説明変数と目的変数を分けると以下のようになります。
説明変数・・・materialIndex,shapeIndex,brandIndex,shopIndex,weight
目的変数・・・price
これから、このデータをつかって学習をやっていきます。
学習は説明変数と目的変数の関連性・規則を数式や学習アルゴリズムをつかって発見・表現(必ずしも人間が理解できるとは限らないが)できるようにすることで、多種多様な手法が提案されています。
学習によって獲得した説明変数と目的変数の関連性のことを学習モデル(または機械学習モデル、または単にモデル)と呼びます。
未知の関連性を解き明かしていく、近似していくためには当然、相当量のデータが無いといけないので、機械学習はアルゴリズムと同じかそれ以上にデータの量と質が重要といわれています。
今回は、学習アルゴリズムとして勾配ブースティングツリー、データはアクセサリの価格データ(欠損値なし)を500件準備してやってみます。
回帰
今回のように、機械学習によって予測したい目的変数(=価格)が連続値である場合、このような予測のことを回帰(regression)と呼びます。
そして、回帰をするための学習モデルをRegressorと呼びます。
これに対して、目的変数が2値だったり、複数のクラス(カテゴリー)を求めるような場合を分類(clasification)と呼びます。分類のための学習モデルをClassifierと呼びます。
特徴ベクトル(feature vector)を作る
学習に使うため、複数の変数(カラム)を1つにまとめる処理を行います。
import java.lang.reflect.Array;
import java.util.Arrays;
import java.util.List;
import java.util.stream.Collectors;

import org.apache.spark.ml.Pipeline;
import org.apache.spark.ml.PipelineStage;
import org.apache.spark.ml.feature.StringIndexer;
import org.apache.spark.ml.feature.VectorAssembler;
import org.apache.spark.sql.Dataset;
import org.apache.spark.sql.Row;
import org.apache.spark.sql.SparkSession;

public class GBTRegressionStep03_part01 {

  public static void main(String[] args) {

    System.setProperty("hadoop.home.dir", "c:\\Temp\\winutil\\");// for windows

    org.apache.log4j.Logger.getLogger("org").setLevel(org.apache.log4j.Level.ERROR);
    org.apache.log4j.Logger.getLogger("akka").setLevel(org.apache.log4j.Level.ERROR);

    SparkSession spark = SparkSession
        .builder()
        .appName("GradientBoostingTreeGegression")
        .master("local[*]")
        .getOrCreate();

    Dataset<Row> dataset = spark
        .read()
        .format("csv")
        .option("header", "true")
        .option("inferSchema", "true")
        .load("dataset/gem_price_ja.csv");

    List<String> categoricalColNames = Arrays.asList("material", "shape", "brand", "shop");

    List<StringIndexer> stringIndexers = categoricalColNames.stream()
        .map(col -> new StringIndexer()
            .setStringOrderType("frequencyDesc")
            .setInputCol(col)
            .setOutputCol(col + "Index"))
        .collect(Collectors.toList());

    String[] indexedCategoricalColNames = stringIndexers// (1)
        .stream()
        .map(StringIndexer::getOutputCol)
        .toArray(String[]::new);

    String[] numericColNames = new String[] { "weight" };// (2)

    VectorAssembler assembler = new VectorAssembler()// (3)
        .setInputCols(array(indexedCategoricalColNames, numericColNames))
        .setOutputCol("features");

    PipelineStage[] indexerStages = stringIndexers.toArray(new PipelineStage[0]);// (5)

    PipelineStage[] pipelineStages = array(indexerStages, assembler);// (6)

    Pipeline pipeline = new Pipeline().setStages(pipelineStages);// (7)

    pipeline.fit(dataset).transform(dataset).show(10);// (8)

  }

  @SuppressWarnings("unchecked")
  public static <T> T[] array(final T[] array1, final T... array2) {
    final Class<?> type1 = array1.getClass().getComponentType();
    final T[] joinedArray = (T[]) Array.newInstance(type1, array1.length + array2.length);
    System.arraycopy(array1, 0, joinedArray, 0, array1.length);
    System.arraycopy(array2, 0, joinedArray, array1.length, array2.length);
    return joinedArray;
  }
}
コード解説
(1)・・・StringIndexerの出力(outputCol)となるカラム名をまとめて配列にする処理。以下のように数値化されたカテゴリ変数のカラム名の配列になります。
[materialIndex,shapeIndex,brandIndex,shopIndex]
(2)・・・連続値(numeric variable)をとるカラム名の配列。今回はweightのみ
(3)・・・複数の数値型の変数をベクトル化する。
VectorAssembler#setInputColsには、ベクトル化したいカラム名を指定します。ここでは、説明変数の候補となるすべてのカラム名(materialIndex,shapeIndex,brandIndex,shopIndex,weight)をすべて指定1しています。
VectorAssembler assembler = new VectorAssembler()// (3)
    .setInputCols(array(indexedCategoricalColNames, numericColNames))
    .setOutputCol("features");
(5)~(7)・・・PipelineにStringIndexerとVectorAssemblerを設定する。
PipelineStage[] indexerStages = stringIndexers.toArray(new PipelineStage[0]);// (5)
PipelineStage[] pipelineStages = array(indexerStages, assembler);// (6)
Pipeline pipeline = new Pipeline().setStages(pipelineStages);// (7)
(8)・・・このパイプライン処理を実行する
実行結果は以下のようになります。
featuresというベクトル型のカラムが追加されているのがわかります。
つまり、VectorAssemblerによって、複数の変数がweight,materialIndex,shapeIndex,brandIndex,shopIndexが単一の"features"名前のベクトルになりました。
このfeaturesのようなデータを特徴ベクトル(feature vector)と呼びます。
学習モデルを構築し、価格を予測する
さて、ようやく準備が整ったので
いよいよ学習モデルを構築し、実際にアクセサリの価格を予測(回帰)します。
早速ですが、学習と予測のコードは以下のようになります。
import java.lang.reflect.Array;
import java.util.Arrays;
import java.util.List;
import java.util.stream.Collectors;

import org.apache.spark.ml.Pipeline;
import org.apache.spark.ml.PipelineModel;
import org.apache.spark.ml.PipelineStage;
import org.apache.spark.ml.feature.StringIndexer;
import org.apache.spark.ml.feature.VectorAssembler;
import org.apache.spark.ml.regression.GBTRegressor;
import org.apache.spark.sql.Dataset;
import org.apache.spark.sql.Row;
import org.apache.spark.sql.SparkSession;

public class GBTRegressionStep03_part02 {

  public static void main(String[] args) {

    SparkSession spark = SparkSession
        .builder()
        .appName("GradientBoostingTreeGegression")
        .master("local[*]")
        .getOrCreate();

    Dataset<Row> dataset = spark
        .read()
        .format("csv")
        .option("header", "true")
        .option("inferSchema", "true")
        .load("dataset/gem_price_ja.csv");

    List<String> categoricalColNames = Arrays.asList("material", "shape", "brand", "shop");

    List<StringIndexer> stringIndexers = categoricalColNames.stream()
        .map(col -> new StringIndexer()
            .setStringOrderType("frequencyDesc")
            .setInputCol(col)
            .setOutputCol(col + "Index"))
        .collect(Collectors.toList());

    String[] indexedCategoricalColNames = stringIndexers
        .stream()
        .map(StringIndexer::getOutputCol)
        .toArray(String[]::new);

    String[] numericColNames = new String[] { "weight" };

    VectorAssembler assembler = new VectorAssembler()
        .setInputCols(array(indexedCategoricalColNames, numericColNames))
        .setOutputCol("features");

    GBTRegressor gbtr = new GBTRegressor()// (1)
        .setLabelCol("price")
        .setFeaturesCol("features")
        .setPredictionCol("prediction");

    PipelineStage[] indexerStages = stringIndexers.toArray(new PipelineStage[0]);

    PipelineStage[] pipelineStages = array(indexerStages, assembler, gbtr);// (2)

    Pipeline pipeline = new Pipeline().setStages(pipelineStages);

    long seed = 0;

    Dataset<Row>[] splits = dataset.randomSplit(new double[] { 0.7, 0.3 }, seed);// (3)

    Dataset<Row> trainingData = splits[0];// (4)
    Dataset<Row> testData = splits[1];// (5)

    PipelineModel pipelineModel = pipeline.fit(trainingData);// (6)

    Dataset<Row> predictions = pipelineModel.transform(testData);// (7)

    predictions.select("id", "material", "shape", "weight", "brand", "shop", "price", "prediction").show(10);// (8)

  }

  @SuppressWarnings("unchecked")
  public static <T> T[] array(final T[] array1, final T... array2) {
    final Class<?> type1 = array1.getClass().getComponentType();
    final T[] joinedArray = (T[]) Array.newInstance(type1, array1.length + array2.length);
    System.arraycopy(array1, 0, joinedArray, 0, array1.length);
    System.arraycopy(array2, 0, joinedArray, array1.length, array2.length);
    return joinedArray;
  }
}
コード解説
(1)・・・教師あり学習の勾配ブースティングツリーの学習器(Estimator)を作ります。
setLabelColには予測したいカラム名(price)を指定、
setFeaturesColには、特徴ベクトルのカラム名(features)を指定、
setPredictionColには、予測結果を格納する新しいカラム名(prediction)を指定します。
 GBTRegressor gbtr = new GBTRegressor()// (1)
        .setLabelCol("price")
        .setFeaturesCol("features")
        .setPredictionCol("prediction");
(2)・・・Pipelineに学習器(gbt)も追加。
これで、学習時にカテゴリ変数のインデックス化処理、ベクトル化処理に加え、学習器も追加された状態になります。
PipelineStage[] pipelineStages = array(indexerStages, assembler, gbtr);// (2)
Pipeline pipeline = new Pipeline().setStages(pipelineStages);
(3)・・・dataset.randomSplitで元のDatasetを70%:30%の比率でランダムに分割
(4)・・・Datasetを分割したうち、70%のほうを訓練データ(training data)とする
(5)・・・Datasetを分割したうち、30%のほうをテストデータ(test data)とする
(6)・・・pipeline.fitで、訓練データを学習器にいれて学習(training)させる。
学習後、学習済の学習モデル(機械学習モデル)としてpipelineModelが取得できる。
この学習モデルをつかって回帰(priceの予測)ができるようになる
PipelineModel pipelineModel = pipeline.fit(trainingData);// (6)
(7)・・・ pipelineModel.transform(testData)で学習済のモデルをつかって予測(回帰)を実行!
予測するのは、ここに指定したテストデータ(testData)にあるアクセサリーの価格。
予測結果(具体的にはprediction**カラム)のはいったDatasetが返される。
Dataset<Row> predictions = pipelineModel.transform(testData);// (7)
(8)・・・実行結果を表示。showでは表示したいカラム名を指定して表示している。
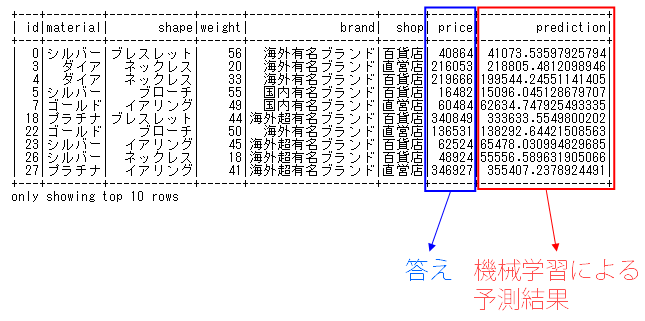
はい、予測実行結果は以下の通りです
表の右端にあるpredictionと右から2番目にあるpriceは、それぞれ機械学習による予測結果と、元データに含まれている答えです。
predictionとpriceの差が予測と答えの差になりますが、それなりといえばそれなりに近い値を予測できているのではないでしょうか。
とくにチューニングなどもしていませんが、簡単な「アクセサリーの価格推定エンジン」ができました^_^
次回へと続く
次回は、学習結果の評価指標、ハイパーパラメーターチューニングとグリッドサーチを取り扱いたいとおもいます。
-
機械学習のアルゴリズムによっては、説明変数について良く理解して、説明変数を選択(Feature Selection)しないとうまく学習できない場合があります。たとえば、説明変数間の相関が高いと多重共線性(マルチコ)という問題が発生する場合があります。今回はアルゴリズムが決定木系(非線形モデル)であり入門編ですので、すべての説明変数候補をぶちこみました。array関数は配列を結合するための関数です。ベクトル化した結果はsetOutputColで指定したカラム名としてDatasetに追加されます。 ↩


