概要
- JavaScriptのテストフレームワーク**Jest**をES6+Babel7の環境で使う方法について書きます
- 仕掛けを理解するために、ゼロからnpmプロジェクトを作っていきます
npmプロジェクトを作る
mkdir babel7jest
cd babel7jest
npm init
npm initしたらエンターを10回たたけばOK。以下のようなpackage.jsonができる。
{
  "name": "babel7jest",
  "version": "1.0.0",
  "description": "",
  "main": "index.js",
  "scripts": {
    "test": "echo \"Error: no test specified\" && exit 1"
  },
  "author": "",
  "license": "ISC",
}
インストール
関連モジュールのインストールをする。
Babelのインストール
npm install --save-dev @babel/core @babel/preset-env
Jestのインストール
npm install --save-dev jest babel-jest
ぜんぶで4つのモジュールをインストールしたので、package.jsonは以下のようになった
{
  "name": "babel7jest",
  "version": "1.0.0",
  "description": "",
  "main": "index.js",
  "scripts": {
    "test": "echo \"Error: no test specified\" && exit 1"
  },
  "author": "",
  "license": "ISC",
  "devDependencies": {
    "@babel/core": "^7.8.4",
    "@babel/preset-env": "^7.8.4",
    "babel-jest": "^25.1.0",
    "jest": "^25.1.0"
  }
}
さて、インストールしたモジュールは以下のような役割をもっている
| モジュール名 | 役割 | |
|---|---|---|
| 1 | @babel/core | Babelの本体 |
| 2 | @babel/preset-env | 指定したターゲットに合うように 「よしな1」にコード変換(transpile)してくれる |
| 3 | jest | Facebookが開発したJavaScript(とその仲間達)用の テストフレームワーク |
| 4 | babel-jest | テスト実行時にBabelの設定ファイルを 読み込んでコードを変換する |
ソースコードを書く
srcディレクトリを作ってES6文法で以下のようなコードを書いた。
import {greetings} from "./words";

export default class Hello {
    constructor() {
    }
    sayHello() {
        return greetings;
    }
}
export const greetings='Hi, there!';
words.jsでは定数を定義しており、それをhello.jsにあるHelloクラスのsayHelloメソッドで返す というシンプルな構成。
わざわざword.jsを外だししているのはES6らしくimport文を使いたかった為。
ここまででディレクトリ構成
babel7jest
├── node_modules
├── src
│   └── hello.js
├── package.json
└── package-lock.json
Babelの設定ファイルを書く
Babelの設定ファイル babel.config.js を準備する。
module.exports = {
    presets: [
        [
            '@babel/preset-env',
            {
                'modules': 'false',
                'useBuiltIns': 'usage',
                'targets': '> 0.25%, not dead',
            }
        ]
    ],
};
ここまでのディレクトリ構成
babel7jest
├── node_modules
├── src
│   ├── hello.js
│   └── words.js
├── babel.config.js
├── package.json
└── package-lock.json
ここでは、 "targets": "> 0.25%, not dead" の部分で、「市場シェアが0.25%を超えるブラウザーで実行可能な最低限のコード出力せよ」と指定している。
(こうすることで、BabelはES6文法で書かれたJavaScriptコードをES5文法にコード変換してくれたりする。、詳しくはこちらの記事などを参照)
ちなみに、Babelの設定ファイルはいくつかの書き方があり
babel.config.jsを書く、.babelrcに書く、webpack.config.jsの中のbabel-loader設定内に書く、などいろんなパターンが許されている。ただし、Jestを使うときは、babel.config.jsまたは**.babelrcに書くのが正解。もしwebpack.config.jsに書いていたら、babel.config.jsまたは.babelrcに外だしする。理由は、さきほどインストールしたbabel-jestがJestでテストを実行しにいくとき、babel.config.jsまたは.babelrc**を読みに行く為。
Jestの設定ファイルを書く
次は、
テストコードを書く前に、Jestの設定ファイルである jest.config.js を作る
module.exports = {
    verbose: true ,
    testMatch: [
        "**/test/**/*.test.js"
    ],
};
ここでは、testMatchで、テストケースのファイルがtestディレクトリ以下にあること、*.test.jsという名前であることを設定している。
(他の詳しい設定については公式参照)
ここまでのディレクトリ構成
babel7jest
├── node_modules
├── src
│   ├── hello.js
│   └── words.js
├── babel.config.js
├── jest.config.js
├── package.json
└── package-lock.json
Jestをつかったテストコードを書く
testディレクトリを作り、その中にhello.test.jsというファイルを作る
import {default as Hello} from '../src/hello'

test('greeting#sayHello returns hello', () => {
    const greeting = new Hello();
    expect(greeting.sayHello()).toBe('Hi, there!');
});
このテストコードは、HelloクラスのsayHelloメソッドが'Hi, there!'を返すことを期待するテストケースとなる
ここまでのディレクトリ構成
babel7jest
├── node_modules
├── src
│   ├── hello.js
│   └── words.js
├── test
│   └── hello.test.js
├── babel.config.js
├── jest.config.js
├── package.json
└── package-lock.json
package.jsonのテスト起動用スクリプトを変更する
package.jsonのscriptsを以下のように変更する
  "scripts": {
    "test": "echo \"Error: no test specified\" && exit 1"
  }
↓
  "scripts": {
    "test": "jest"
  }
これで、npm testでJestでテストができるようになる
npm test
とすると、見事にエラーになる。
> babel7jest@1.0.0 test babel7jest
> jest

 FAIL  test/hello.test.js
  ● Test suite failed to run

    Jest encountered an unexpected token

    This usually means that you are trying to import a file which Jest cannot parse, e.g. it's not plain JavaScript.

    By default, if Jest sees a Babel config, it will use that to transform your files, ignoring "node_modules".

    Here's what you can do:
     ・ To have some of your "node_modules" files transformed, you can specify a custom "transformIgnorePatterns" in your config.
     ・ If you need a custom transformation specify a "transform" option in your config.
     ・ If you simply want to mock your non-JS modules (e.g. binary assets) you can stub them out with the "moduleNameMapper" config option.

    You'll find more details and examples of these config options in the docs:
    https://jestjs.io/docs/en/configuration.html

    Details:

    babel7jest\test\hello.test.js:1
    ({"Object.<anonymous>":function(module,exports,require,__dirname,__filename,global,jest){import { default as Hello } from '../src/hello';
                                                                                             ^^^^^^

    SyntaxError: Unexpected token import

      at Runtime.createScriptFromCode (node_modules/jest-runtime/build/index.js:1059:14)

Test Suites: 1 failed, 1 total
Tests:       0 total
Snapshots:   0 total
Time:        1.64s
Ran all test suites.
npm ERR! Test failed.  See above for more details.
Unexpected token importなどと表示されてエラーになった原因は、JestはCommonJSに従っていない構文(例:ES6のimport文など)を解釈できないため。そこで次のステップでCommonJSに従うようにする。理屈がわかっていれば、そんなに大変ではない。
JestはCommonJS形式のコードしかテストできないので、CommonJS形式に変換する
Jestではテスト実行にnode.jsをつかうので、CommonJSのお作法に従う必要がある。
CommonJSのモジュール管理ではrequire構文をつかうが、
さきほど書いたhello.jsではES6より導入されたimport文によるモジュール管理をつかっている。
そこで、本番向け開発はいままでどおりES6で書いて、Jestでテストするときには、CommonJS形式にしよう、というのが良くやられている。
CommonJS形式にするコード変換はBabelにやらせようというのが今回のポイントとなる。
babel.config.jsにJest用の設定を追記する
さて、テストのときだけ(Babelが)CommonJSに変換してからJestを実行するには、babel.config.jsを以下のようにする。
module.exports = {
    presets: [
        [
            '@babel/preset-env',
            {
                'modules': 'false',
                'useBuiltIns': 'usage',
                'targets': '> 0.25%, not dead',
            }
        ]
    ],
    env: {
        test: {
            presets: [['@babel/preset-env', {targets: {node: 'current'}}]],
        },
    },
};
ポイントは以下の部分
    env: {
        test: {
            presets: [['@babel/preset-env', {targets: {node: 'current'}}]],
        },
    },
これは環境変数NODE_ENVがtestだった場合に有効になる設定となる。
さらに、その後のpreset-env以下でnode: 'current'としているが、この設定によって現在のnode.jsにあわせてトランスパイルすることを意味している。
つまり、NODE_ENVがtestだった場合は、Babelのpresett-envが「よしな」に現在のnode.js(CommonJS)にあわせたコード変換をしてくれるということ。先に書いたとおりJestはnode.jsで動くのでnode.js用にコード変換してもらえれば無事Jestでテストを動かすことができるようになる。
JestをつかうとNODE_ENVはデフォルトで'test'にセットされる
前述の例でNODE_ENVがtestだったときの設定を、babel.config.jsに書いたが、Jestを使う時に実行するときに環境変数を明示的にtestになくてよい。
それはJestが
if (process.env.NODE_ENV == null) {
process.env.NODE_ENV = 'test'
}
のようにしており、NODE_ENVに値がセットされていないときは、自動的にNODE_ENV=test になるため。
preset-envでnodeを指定していれば、追加のプラグイン指定は不要
上のように、
presets: [['@babel/preset-env', {targets: {node: 'current'}}]],
を指定してpreset-envが現在のnode.js用のプラグインをよしなに導入してくれるので、
マニュアルで**@babel/plugin-transform-modules-commonjs**プラグイン2を指定する必要はない。
(preset-envが勝手に親切にも**@babel/plugin-transform-modules-commonjs**を取り込んでくれる)
ということで、できあがったbabel.config.jsを再掲する
module.exports = {
    presets: [
        [
            '@babel/preset-env',
            {
                'modules': 'false',
                'useBuiltIns': 'usage',
                'targets': '> 0.25%, not dead',
            }
        ]
    ],
    env: {
        test: {
            presets: [['@babel/preset-env', {targets: {node: 'current'}}]],
        },
    },
};
これでオッケー。
Jestを実行する
npm test
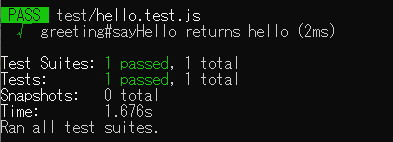
テストが、無事実行された
まとめ
- ES6で書かれたフロントエンドアプリを想定して、そこでJestによるテストを書くための準備について説明しました
- 記事内のソースコードはこちらにおいてあります
https://github.com/riversun/es6_babel7_jest
-
Babel本体にはコード変換の機能は無い。コード変換はBabel用のプラグインが行うもので、本来は変換先のターゲット(たとえばIE11対応とか)に合わせて自前でプラグインを指定しないといけない。しかしそれではあまりに面倒なので、preset-envを指定しておくと、preset-envが気を利かせて変換先ターゲットに向けたコード変換に必要な各種プラグインを導入してくれるというカラクリになっている。「プリセット」という名前の通りある程度のメジャーな想定で作られており万能というわけではないが、たいていは事足りるレベルで変換してくれる。 ↩
-
古くはbabel-plugin-transform-es2015-modules-commonjsプラグイン ↩