Googleが提供する One-Tap Sign-Up / Automatic Sign-In 機能とは
今回はGoogleが提供する、登録/認証のUXを便利にできるかもしれない機能を紹介します。
概要
One-tap sign-up and auto sign-in on websites
"現状" の機能を3行でまとめると
- One-Tap Sign-Up : Google でログイン中のユーザーのクレデンシャル(プロフィール情報、ID Token などを)1タップで取得
- Automatic Sign-In : One-Tap Sign-Up でクレデンシャルを取得したユーザーは、次回から自動的に取得できる。オプションとしてパスワード認証などとの組み合わせも可能
- Google に複数アカウント(個人 + 会社のアカウントとか)でログインしている時は どちら も選択したユーザーのクレデンシャルを1タップで取得
というところです。
位置付け的には
- Sign-In : ログインのためのクレデンシャル取得
- Sign-Up : 登録のためのhintを取得
となっていますが、どちらも同じ形式のクレデンシャル(後述)が渡されるようです。
後から紹介するJavaScriptライブラリ的には他の IdP がサポートされる余地があるので、そうなるとより便利になりそうです。
今の所はGoogleアカウントとの連携がシャレオツにできそうなので挙動を見ていきます。
0. 準備
Use of this API requires review and approval. Submit the "review request form"(Googleのフォームへのリンク) to begin the process.
ということで、この機能を実際のドメインで動作させるためには、Googleに対してお願いをする必要があります。
Google の One-Tap Sign-In/Sign-Up 機能、使うにはフォームからリクエストを送る必要があるんだけど「わしはデモサイト実装するんじゃ!それだけ!」って送ったら許可されたらしく動くようになったのでそのうちドキュメント書く
— 秋田の猫 (@ritou) 2018年6月30日
と得意げにTweetしてましたが、実は手元の開発環境(ブラウザで確認時はhttp://localhost:(ポート番号)を利用) でしか動かないというオチでした。。。
が、そのうちリクエスト通るだろと願いつつ、動作確認はできるので進めます。
1. Client ID の用意とライブラリの導入
Get started with automatic sign-in and one-tap sign-up
1.1. Google API の Client ID を取得
- OAuth 2.0 Web Application タイプの Client を登録 or 既存の Google Sign-In などで利用していればそれでも可能
- JavaScript origins の設定をしておく
- Client ID は ID Token の取得やバックエンドでの検証に利用
1.2. JavaScript クライアントライブラリをロードする
// Load the googleyolo client library on any page a user might sign in on:
<script src="https://smartlock.google.com/client"></script>

// Register a onGoogleYoloLoad callback to be notified when the library has loaded:
window.onGoogleYoloLoad = (googleyolo) => {
  // The 'googleyolo' object is ready for use.
};
2. One-Tap Sign-Up
Sign up users with one tap using hint credentials
2.1. クレデンシャル要求
const hintPromise = googleyolo.hint({
  supportedAuthMethods: [
    "https://accounts.google.com"
  ],
  supportedIdTokenProviders: [
    {
      uri: "https://accounts.google.com",
      clientId: "YOUR_GOOGLE_CLIENT_ID"
    }
  ]
});
2.2. クレデンシャルのハンドリング
後述しますが、 credential にはメールアドレス、プロフィール画像、ID Tokenなどをもつオブジェクトです。
hintPromise.then((credential) => {
  if (credential.idToken) {
    // Send the token to your auth backend.
    useGoogleIdTokenForAuth(credential.idToken);
  }
}, (error) => {
  switch (error.type) {
    case "userCanceled":
      // The user closed the hint selector. Depending on the desired UX,
      // request manual sign up or do nothing.
      break;
    case "noCredentialsAvailable":
      // No hint available for the session. Depending on the desired UX,
      // request manual sign up or do nothing.
      break;
    case "requestFailed":
      // The request failed, most likely because of a timeout.
      // You can retry another time if necessary.
      break;
    case "operationCanceled":
      // The operation was programmatically canceled, do nothing.
      break;
    case "illegalConcurrentRequest":
      // Another operation is pending, this one was aborted.
      break;
    case "initializationError":
      // Failed to initialize. Refer to error.message for debugging.
      break;
    case "configurationError":
      // Configuration error. Refer to error.message for debugging.
      break;
    default:
      // Unknown error, do nothing.
  }
});
エラーでハンドリングが必要になるのは次の2つでしょう。
-
userCanceled: ユーザーが ❌ ボタンなどで処理をキャンセルした -
noCredentialsAvailable: Google アカウントに誰もログインしていない
これらのエラーが帰ってきたときに意地でもGoogleアカウントと連携したいときは既存のGoogle SignInフローを使ったり、Googleアカウント以外の登録処理もサポートしている場合はそちらに流すなどの対応が必要そうです。
挙動
Google アカウントの状態による挙動の違いを確認します。
Google アカウントにログインしていない場合 : noCredentialsAvailable エラー
ユーザーインタラクションなしでエラーが返されます。
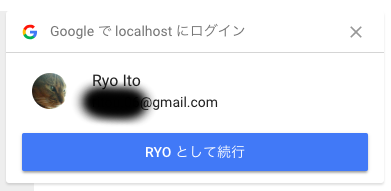
1つのGoogleアカウントでログインしている場合 : 「Google で ●● にログイン」
PCだと右上とかにそれっぽいフォームが表示されます。
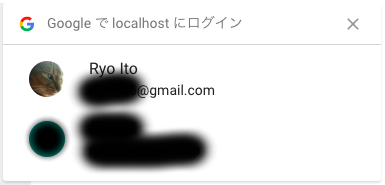
2つのGoogleアカウントでログインしている場合 : 選択画面
Account Chooserっぽく並びます。
3. Automatic Sign-In
ここからはSign-Inの方を見ていきます。概要として説明した通り、現状ではSign-Up + αみたいな挙動になる感じであります。
Sign in users automatically with their saved credentials
3.1. クレデンシャル要求
今回はひとまず Google を IdP にした ID Token を取得する部分の挙動を確認します。
const retrievePromise = googleyolo.retrieve({
  supportedAuthMethods: [
    "https://accounts.google.com"
  ],
  supportedIdTokenProviders: [
    {
      uri: "https://accounts.google.com",
      clientId: "YOUR_GOOGLE_CLIENT_ID"
    }
  ]
});
3.2. クレデンシャルのハンドリング
retrievePromise.then((credential) => {
  if (credential.password) {
    // An ID (usually email address) and password credential was retrieved.
    // Sign in to your backend using the password.
    signInWithEmailAndPassword(credential.id, credential.password);
  } else {
    // A Google Account is retrieved. Since Google supports ID token responses,
    // you can use the token to sign in instead of initiating the Google sign-in
    // flow.
    useGoogleIdTokenForAuth(credential.idToken);
  }
}, (error) => {
  // Credentials could not be retrieved. In general, if the user does not
  // need to be signed in to use the page, you can just fail silently; or,
  // you can also examine the error object to handle specific error cases.

  // If retrieval failed because there were no credentials available, and
  // signing in might be useful or is required to proceed from this page,
  // you can call `hint()` to prompt the user to select an account to sign
  // in or sign up with.
  if (error.type === 'noCredentialsAvailable') {
    googleyolo.hint(...).then(...);
  }
});
エラーハンドリングのところが One-Tap Sign-Up のサンプルと異なり、noCredentialsAvailable エラーの場合に One-Tap Sign-Up に流すような例が載っています。
しかし、現状でGoogleの IdP だけ使う時は Sign-In で noCredentialsAvailable の時に Sign-Up でも noCredentialsAvailable になるので...
この辺りの細かい処理分岐は実装する側で想定する挙動になるかをよく確認しながら利用する必要がありそうですね。
挙動
Google アカウントにログインしていない場合 : noCredentialsAvailable エラー
One-Tap Sign-Up と同様にユーザーインタラクションなしでエラーが返されます。
1つのGoogleアカウントでログインしている場合(初回) : 「Google で ●● にログイン」
One-Tap Sign-Up の1つのGoogleアカウントでログインしている場合の挙動と同じです。
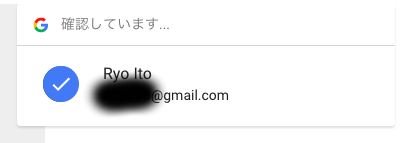
1つのGoogleアカウントでログインしている場合(2回目以降) : 自動ログイン
画像ではうまく説明できないですが、プロフィール画像の周りがぐるぐるして☑️に変わるアニメーションとなります。
2つのGoogleアカウントでログインしている場合 : 選択画面
こちらもOne-Tap Sign-Up の挙動と同じです。
ということで、仕事用のアカウントとかと一緒にGoogleにログインしている人は Automatic にならないですね。
クレデンシャルについて
内容は以下の通りです。
- "id" : メールアドレス
- "authMethod" : "https://accounts.google.com"
- "authDomain" : "http://(ドメイン)"
- "displayName" : 氏名
- "profilePicture" : プロフィール画像
- "idToken" : ID Token の値
ID Tokenについて
こちらもデコードしてみます。eyJ!eyJ!eyJ!...
{
  "aud": "(Client ID)",
  "sub": "(GoogleアカウントのユーザーID)",
  "email": "(メールアドレス)",
  "email_verified": true, // メアド確認済みの場合は true
  "azp": "(Client ID)",
  "exp": (有効期限),
  "iss": "https://accounts.google.com",
  "jti": "(このID Tokenの識別子)",
  "iat": (発行日時),
  "nbf": (省略),
  "name": "Ryo Ito",
  "picture": "(プロフィール画像)",
  "given_name": "Ryo",
  "family_name": "Ito"
}
ID Token にもちゃんとプロフィール画像入ってました。
クレデンシャルの中身は "id" としてメアドが入っているのに、こちらはちゃんと "sub" にユーザー識別子が入っているのでちょっと気持ち悪いです。
クレデンシャルの方は "email" としてメアドを返すほうが正確で良いと思いますね!!!
実装どうなってるのか
いわゆるクロスドメインな感じじゃないすか。どうやって実現してるのでしょう。
というあたりは、あとでライブラリをみて何かわかったらまとめます(やらない確率半端ない)
最後に : お前のじゃなくGoogleの人の説明が聞きたい!
はい、こちらをどうぞ。
Check out our session "What's new with sign-up and sign-in on the web" introducing One Tap Sign-Up, reCAPTCHA v3 and Web Authentication at Google I/O 2018 #io18 #io18jphttps://t.co/nNCIySBO8J
— Eiji Kitamura / えーじ (@agektmr) 2018年5月14日
以上です。