はじめに
ElasticsearchはBeatsとの間で暗号通信や認証をもちろんサポートしています(TLSおよび一部クライアント認証がElasticsearchのベーシックサブスクリプションでも無償で利用することができるようになったようです)。
一方で暗号通信処理や認証をWebサービス(この場合Elasticsearch)の前段でリバースプロキシに行わせる構成も柔軟性(障害ポイントの分離・暗号処理オフロード・負荷分散・冗長化・WAF経由通信・クローズドネットワーク構成の隠蔽/抽象化など)や管理の分離(担当者の役割分担など)といった観点で有用な場合も依然としてあります。
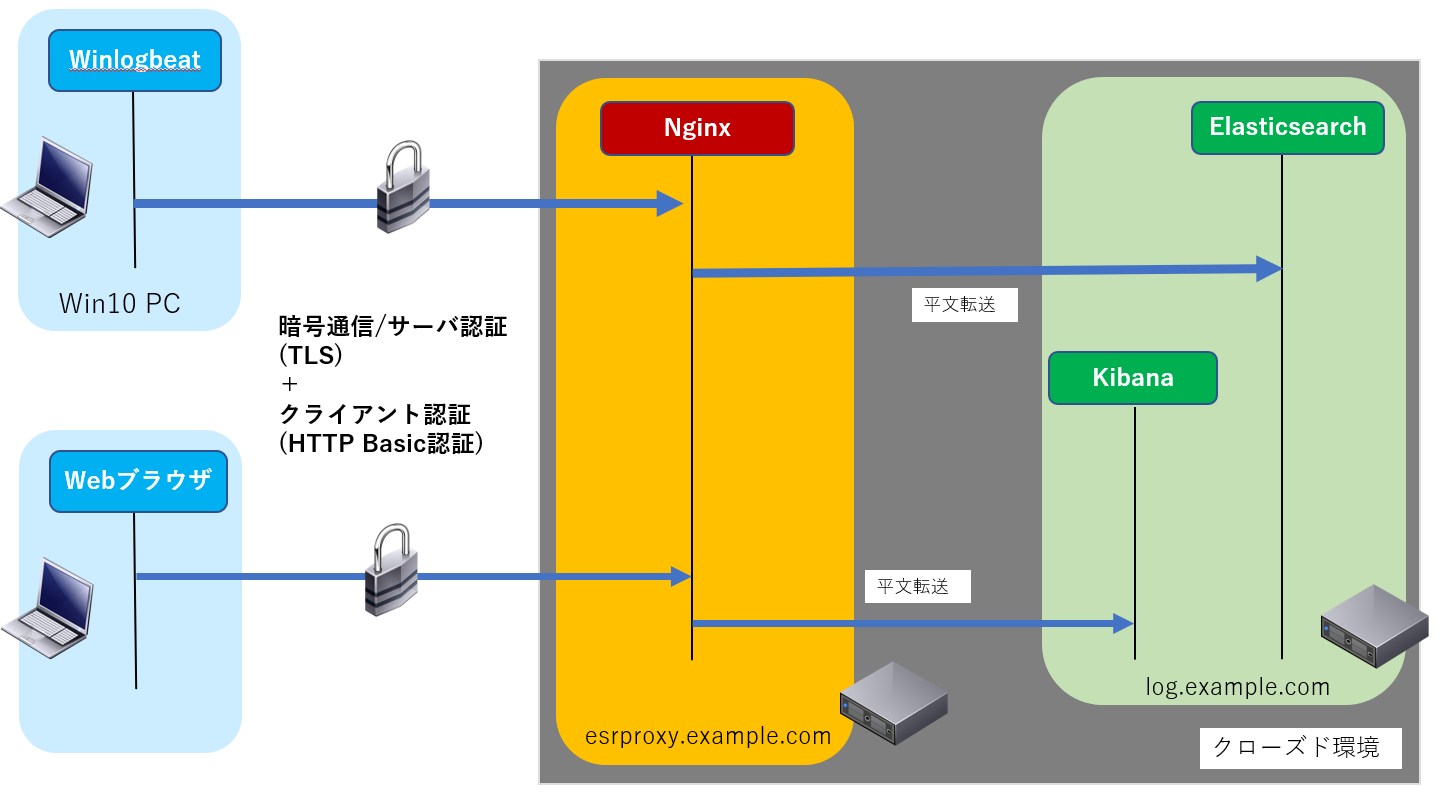
本記事はElasticsearchの前段にリバースプロキシとしてNginxを配置し、暗号通信/サーバ認証(TLS)およびクライアント認証(HTTP Basic認証)を実行させる構成についての備忘録です。
利用するソフトウェア
- OS: Ubuntu 18.04
- Nginx(1.14.0)
- XCA(1.4.1)
- Elasticsearch (7.3.2)
- Kibana (7.3.2)
- Winlogbeat (7.4.0)
- プロキシサーバ: Squid (3.5.27)
- DNSサーバ: Dnsmasq (2.79)
- VMware Workstation Player等のVMソフトウェア
- Windows 10 (クライアントPC)
Winlogbeat 7.4.2やSysmon等のインストールについては本記事ではふれません(こちらの記事もご参考になれば幸いです)。
ネットワーク構成例
ここでは以下のようなシンプルなネットワーク構成を想定。
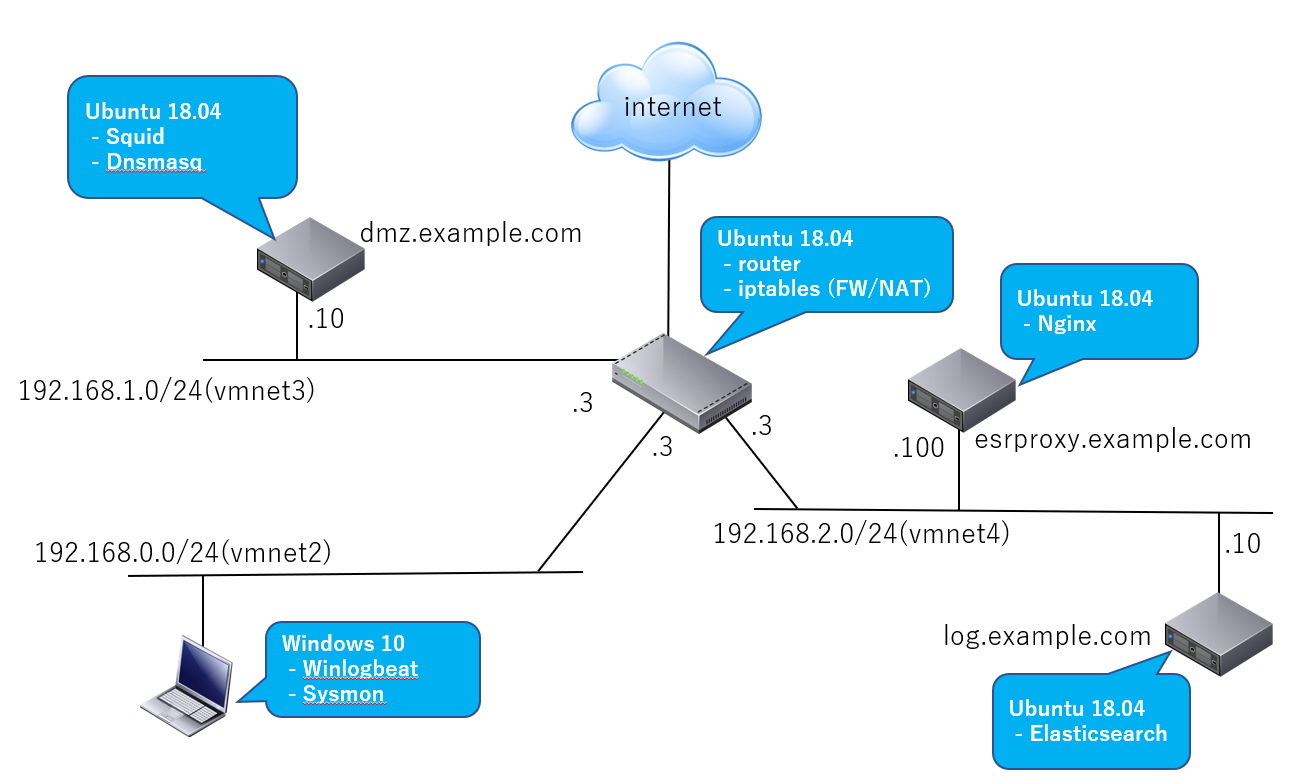
dmz.example.com上で動作するDnsmasqが全ホストの名前解決を行います。
クライアントPCからの通信は以下の通りです。
| 説明 | |
|---|---|
| Webアクセス | Win10クライアントPC上のWebブラウザはインターネットへdmz.example.comで動作するプロキシサーバ(Squid)経由でアクセス |
| ログ転送 | Windows 10 PC上で動作するSysmonにより採取されたエンドポイントログをWinlogbeatがElasticsearch(log.example.com)へNginx(esrproxy.example.com, リバースプロキシ)経由で転送。暗号通信/サーバ認証はTLSおよびクライアント認証はHTTP Basic認証 |
作業内容
- XCAでTLSのサーバ証明書を作成(Elasticsearchの認証用)
- リバースプロキシ(Nginx)の設定
- WinlogbeatにTLSおよびHTTP Basic認証の設定
XCAでサーバ証明書を作成(log.example.comのElasticsearch認証用)
以下はXCAを使ってプライベートサーバ証明書を作成する場合の例です。
# XCAをインストール
$ apt install xca

# 起動
$ xca &
以降はこちらのチュートリアル動画を参考に作成します。本記事の例では以下のように作成しました。
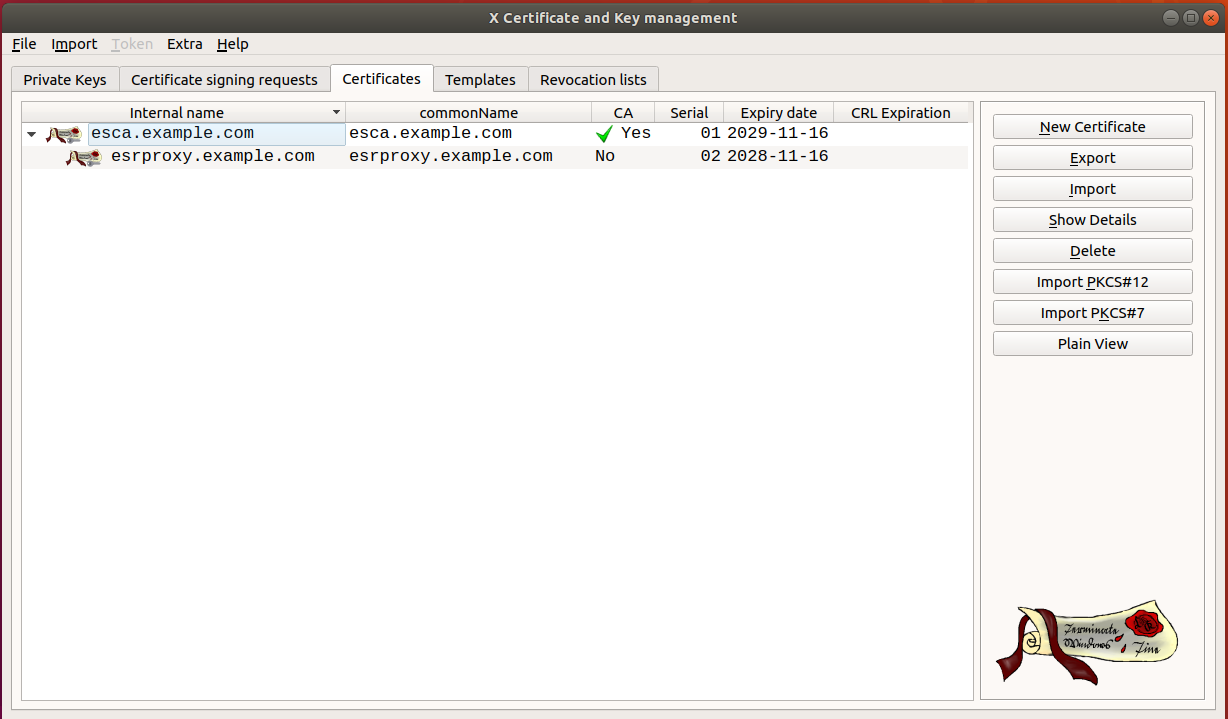
CA (esca.example.com)


サーバ証明書 (esrproxy.example.com)
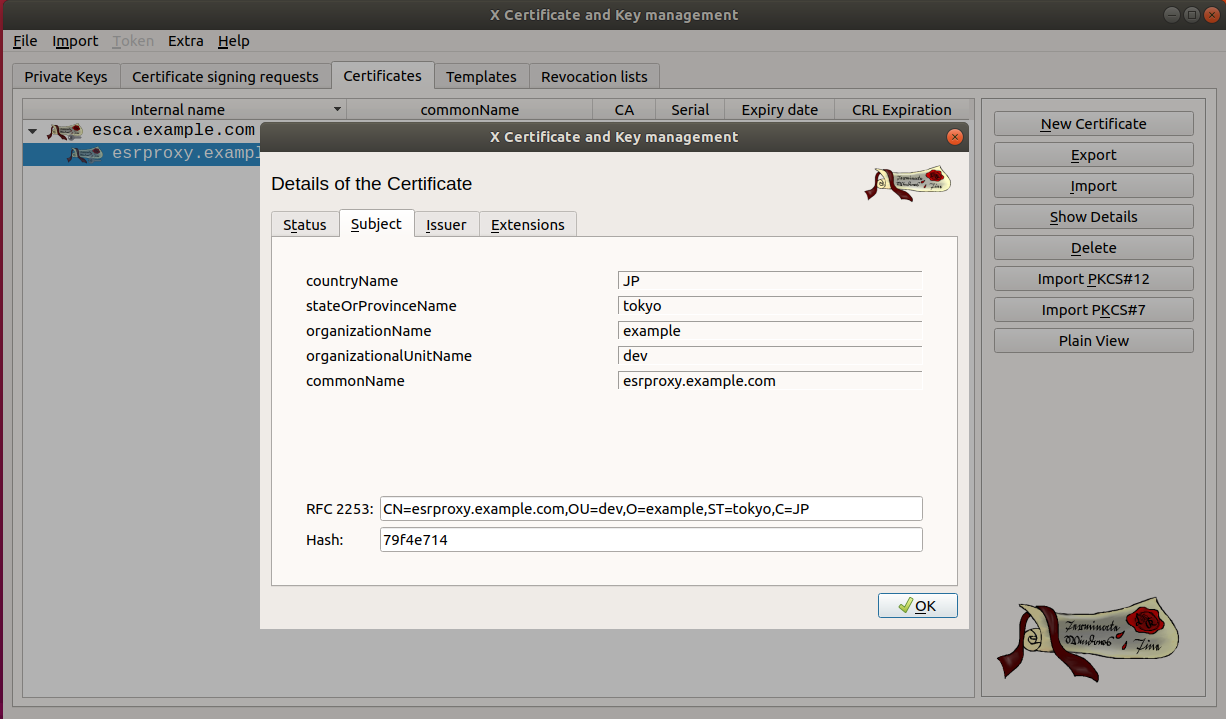
 SubjectAltNameにリバースプロキシのホスト名を設定しています(**esrproxy.example.com**)。
証明書と鍵をエクスポート
CAの証明書、リバースプロキシのサーバ証明書と秘密鍵をPEM形式でエクスポートしておきます。
| ファイル名 | 説明 |
|---|---|
| esca.example.com.crt | CA証明書。Winlogbeatへ設定 |
| esrproxy.example.com.crt | esrproxy.example.comのサーバ証明書。Nginxへ設定 |
| esrproxy.example.com.key | esrproxy.example.comの秘密鍵。Nginxへ設定 |
リバースプロキシ(Nginx)の設定
HTTP Basic認証用のパスワード設定
Winlogbeatの認証(クライアント認証)用にHTTP Basic認証のユーザ名とパスワードを設定します。
# Apacheのツールを利用します。
$ apt install apache2-utils

# HTTP Basic認証のユーザ名(winlogbeat1)とパスワードを設定
$ htpasswd -c /etc/nginx/.htpasswd winlogbeat1
リバースプロキシの設定
(1) XCAでエクスポートしたリバースプロキシホスト用のサーバ証明書と秘密鍵ファイルをコピーして配置します。
/etc/nginx/certs/esrproxy.example.com.crt
/etc/nginx/certs/esrproxy.example.com.key
(2) NginxのElasticsearchとKibana用のリバースプロキシ設定ファイルを**/etc/nginx/sites-available**配下へ作成します。ポート番号はElasticsearchとKibanaのデフォルトポートのままとしておきます。
# Elasticsearchの設定
server{
    listen         9200;
    server_name    .esrproxy.example.com;

    # TLS(SSL)の設定
    ssl                 on;
    ssl_certificate     /etc/nginx/certs/esrproxy.example.com.crt; # サーバ証明書のパス
    ssl_certificate_key /etc/nginx/certs/esrproxy.example.com.key; # 秘密鍵ファイルのパス

  #転送用の追加HTTPヘッダ(一応念のため)
    proxy_set_header    Host    $host;
    proxy_set_header    X-Real-IP    $remote_addr;
    proxy_set_header    X-Forwarded-Host       $host;
    proxy_set_header    X-Forwarded-Server    $host;
    proxy_set_header    X-Forwarded-For    $proxy_add_x_forwarded_for;

    location / {

        #HTTP Basic認証の設定
        auth_basic "Restricted";
        auth_basic_user_file /etc/nginx/.htpasswd; # htpasswdコマンドで生成したパスワードファイル

        # Elasticsearchが動作するlog.example.comへの転送設定
        proxy_pass    http://192.168.2.10:9200;
    }
}

# Kibanaの設定
server{
    listen         5601;
    server_name    .esrproxy.example.com;

    ssl                 on;
    ssl_certificate     /etc/nginx/certs/esrproxy.example.com.crt;
    ssl_certificate_key /etc/nginx/certs/esrproxy.example.com.key;

    proxy_set_header    Host    $host;
    proxy_set_header    X-Real-IP    $remote_addr;
    proxy_set_header    X-Forwarded-Host       $host;
    proxy_set_header    X-Forwarded-Server    $host;
    proxy_set_header    X-Forwarded-For    $proxy_add_x_forwarded_for;

    location / {
        auth_basic "Restricted";
        auth_basic_user_file /etc/nginx/.htpasswd;
        proxy_pass    http://192.168.2.10:5601;
    }
}
補足
上述の通りlocation/proxy_passへElasticsearchやKibanaが動作するlog.example.comへの転送を設定するのですが、以下のようにホスト名の最後を'/'で終わるように書いてしまうとElasticseachへ転送されるURLがNginxによりデコードされてしまい正しく処理されません。
server{
    listen         9200;
    ...
    location / {
        ...
        proxy_pass    http://192.168.2.10:9200/; #最後に'/'をつけてしまう。
    }
}
 [Nginxのマニュアル](http://nginx.org/en/docs/http/ngx_http_proxy_module.html#proxy_pass)によると以下のように記述があります。
...
If proxy_pass is specified without a URI, the request URI is passed to the server
in the same form as sent by a client when the original request is processed, or
the full normalized request URI is passed when processing the changed URI:

location /some/path/ {
    proxy_pass http://127.0.0.1;
}
...
ということで以下のように設定するとURLがデコードされずそのままElasticsearchへ転送されます。
server{
    listen         9200;
    ...
    location / {
        ...
        proxy_pass    http://192.168.2.10:9200; #最後に'/'をつけない。
    }
}

(3) 設定ファイルのシンボリックリンクを**/etc/nginx/sites-enabled**へ張り有効化します。
$ ln -s /etc/nginx/sites-available/es-rproxy.conf /etc/nginx/sites-enabled/es-rproxy.conf
(4) Nginxを再起動します。
$ systemctl restart nginx.service
Winlogbeatを設定
(1) XCAでエクスポートしたCA証明書をコピーして配置します。
C:\Program Files\winlogbeat-7.4.0-windows-x86_64\nginx_rproxy\esca.example.com.crt
(2) Elasticsearchへの出力設定にTLS(SSL)の設定を追加します。
...
# ================================ Outputs =====================================
# Configure what output to use when sending the data collected by the beat.
# -------------------------- Elasticsearch output ------------------------------
output.elasticsearch:
  # Array of hosts to connect to.
  # Winlogbeatの接続先をリバースプロキシホストへ向けます
  hosts: ["esrproxy.example.com:9200"]

  # Optional protocol and basic auth credentials.
  protocol: "https"
  #クライアント認証(HTTP Basic認証)用のユーザ名とパスワードを設定
  username: "winlogbeat1"
  password: "password"

  # Use SSL settings for HTTPS.
  # TLS(SSL)を有効化
  ssl.enabled: true

  # Configure SSL verification mode. If `none` is configured, all server hosts
  # and certificates will be accepted. In this mode, SSL-based connections are
  # susceptible to man-in-the-middle attacks. Use only for testing. Default is
  # `full`.
  # テストのときにはnoneでまずは試してみてもいいかも。
  ssl.verification_mode: full

  # List of root certificates for HTTPS server verifications
  # リバースプロキシホストのサーバ証明書を認証するCA証明書のパスを指定します
  ssl.certificate_authorities: ["C:\\Program Files\\winlogbeat-7.4.0-windows-x86_64\\nginx_rproxy\\esca.example.com.crt"]
...
(3) PowerShellを起動し設定の確認とElasticsearchへの接続確認をしておきます
PS C:\Program Files\winlogbeat-7.4.0-windows-x86_64> .\winlogbeat.exe test config
Config OK
PS C:\Program Files\winlogbeat-7.4.0-windows-x86_64> .\winlogbeat.exe test output
elasticsearch: https://esrproxy.example.com:9200...
  parse url... OK
  connection...
    parse host... OK
    dns lookup... OK
    addresses: 192.168.2.100
    dial up... OK
  TLS...
    security: server's certificate chain verification is enabled
    handshake... OK
    TLS version: TLSv1.2
    dial up... OK
  talk to server... OK
  version: 7.3.2
(4) Winlogbeatを再起動します。
PS C:\Program Files\winlogbeat-7.4.0-windows-x86_64> Restart-Service winlogbeat
まとめ
NginxをリバースプロキシにしてElasticsearchのTLSや認証機能を使わずにWinlogbeatからのログ転送を安全に行えるように設定してみました。
(補足)
本当はWinlogbeatの通信はdmz.example.com上のSquid(プロキシサーバ)経由で通信したかったのですが・・・Winlogbeat 7.4でうまく動作しなかったので割愛しました。このあたりについては別記事「Elastic StackのWinlogbeatをソースコードからビルドしてみる」にて扱っていますのでご興味のあるかたは参照してみてください。