ACCESS Advent Calendar 24日 へようこそ
レザです。2018年の新卒ですが、8月間ぐらい ACCESS 正社員になって、本当に早かったと思います。
楽しいことや悔しいことがあったけど、良い経験だと思います。
今回の記事では私の最初のAdvent Calendarです (これも私の最初のブログポスト!![]() )。
)。
私の日本語が分かりづらいと思いますが、英語版も念の為書いてあります (皆さんにとってそれの方が分かりやすいかもしれません ![]() )。
)。
今回の記事では Tensorflow-Lite と Android の話です。そして、試したことは Fashion-MNIST というデータセットを使って、端末で絵を描いて、Tensorflow-Lite で認識したいと思いま!
Tensorflow and Tensorflow lite?
皆さんもうご存知だと思いますが、Tensorflow はグーグルさんが作った世界中で一番有名な機械学習ライブラリーです。
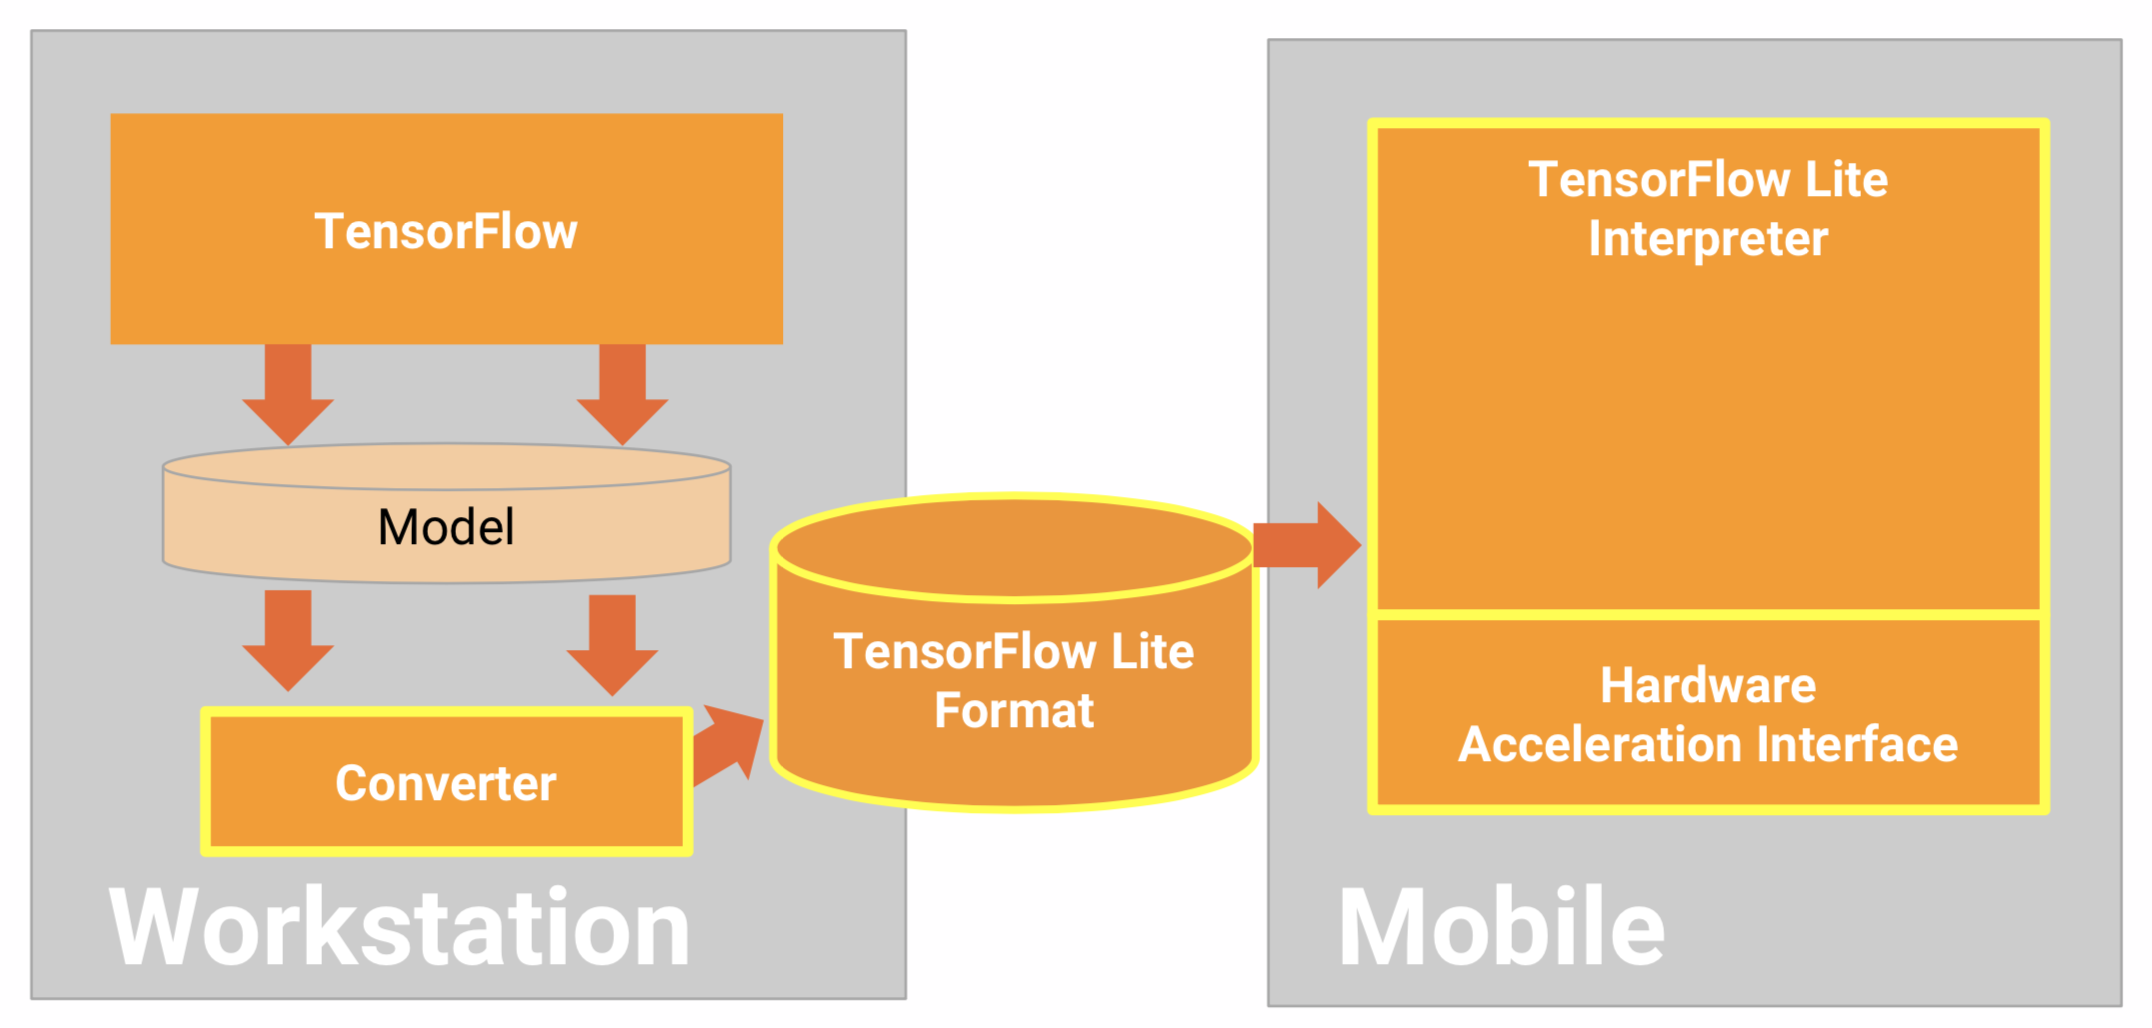
TensorflowーLite は Embedded Devicesやスマホなどを対応するために作られたものです。
Tensorflow と Tensorflow Liteの違い?
(以下の画像は私が12月7日に参加したミートアップから取ったものです。Laurence Moroney さん (グーグルさんの社員) の発表から取りました)
TensorFlow Lite is the official solution for running machine learning models on mobile and embedded devices. It enables on‑device machine learning inference with low latency and a small binary size on Android, iOS, and other operating systems. - https://www.tensorflow.org/lite/
Tensorflow は機械学習世界になんでも使えます。モデルを作成、学習する、データ処理、分析などもできました。
問題なのは機械学習、特にディープラーニングが計算量が多いため、パワフルなコンピュータが必要です。なので、スマホとかでするなら時間がかかります。スマホやEmbedded Systemなどでディープラーニングができるように **学習の段階 (Training Phase)**は Tensorflow がやってくれて、Inference Phase は Tensorflow Lite 上でやります。
[//]: # ( )
)
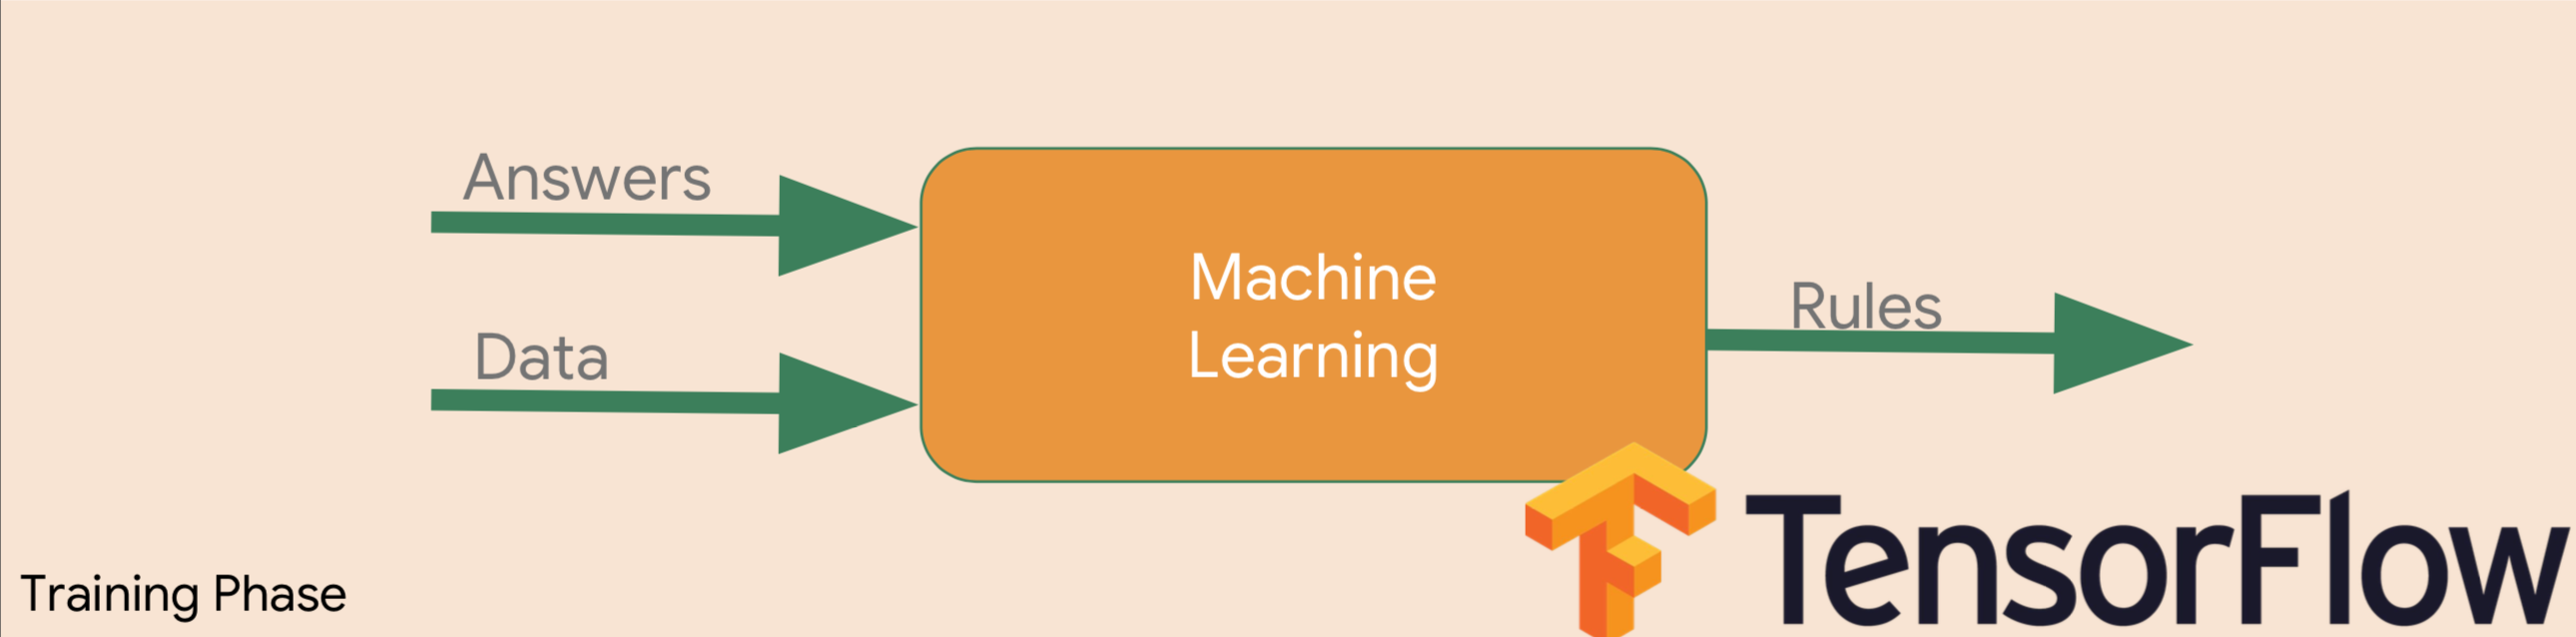
Tensorflow が学習をやってくれて、ルール(モデル)を作成し、できあがたルールを Android に入れ、認識や分析などのために使用できます。
[//]: # ( )
)
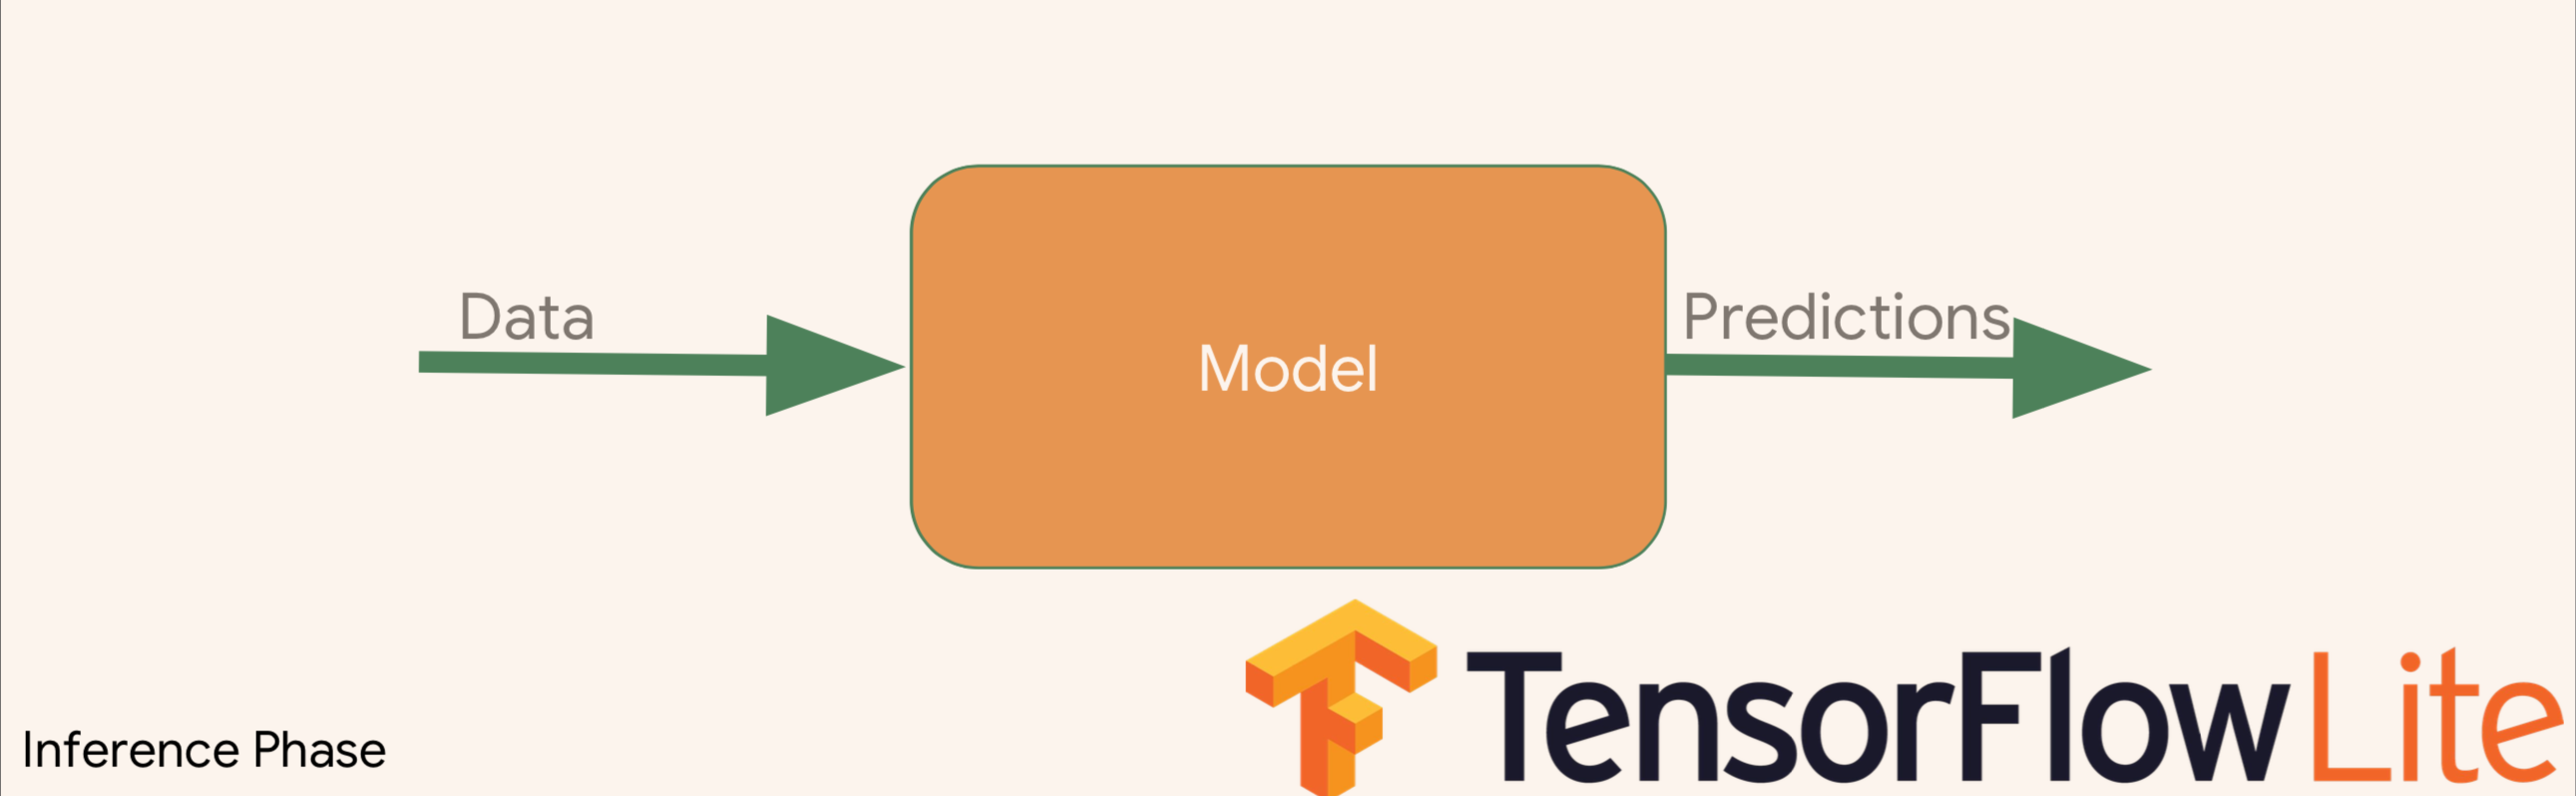
流れとしては以下のようなになります。
[//]: # ( )
)
Let's code!
この記事の目的は Tensorflow Lite 用いた、シンプルな機械学習アプリを Android で楽しめるように書きました。
ユーザーが絵を描いて、そして、その絵を認識されるようにしたいと思います。
インタネットでももっと良い記事があるので、ご興味があればぜひそれらも見てみてください。
モデルを準備する
こちらは Google Colaboratory上でやった方がいいと思います。
Colaboratory は、完全にクラウドで実行される Jupyter ノートブック環境です。設定不要で、無料でご利用になれます。
GPU と TPU も無料で使えるので (時間限定)!!! So, why not?
データセットとの付き合い 
今回は Fashion-MNIST というデータセットを使おうと思います。MNIST のような均衡なデータセットで、MNIST では数字の画像ですが、Fashion-MNIST では、名前の通り、着るものです。ズボンとか、ドレスとか、コートとかが入っています。
このデータセットは Zalando Research が作ったデータセットです。中身は 7万画像で、10クラスのファションアイテムが入っています。
クラスは以下のリストです。
- T-shirt/top
- Trouser
- Pullover
- Dress
- Coat
- Sandal
- Shirt
- Sneaker
- Bag
- Ankle boot
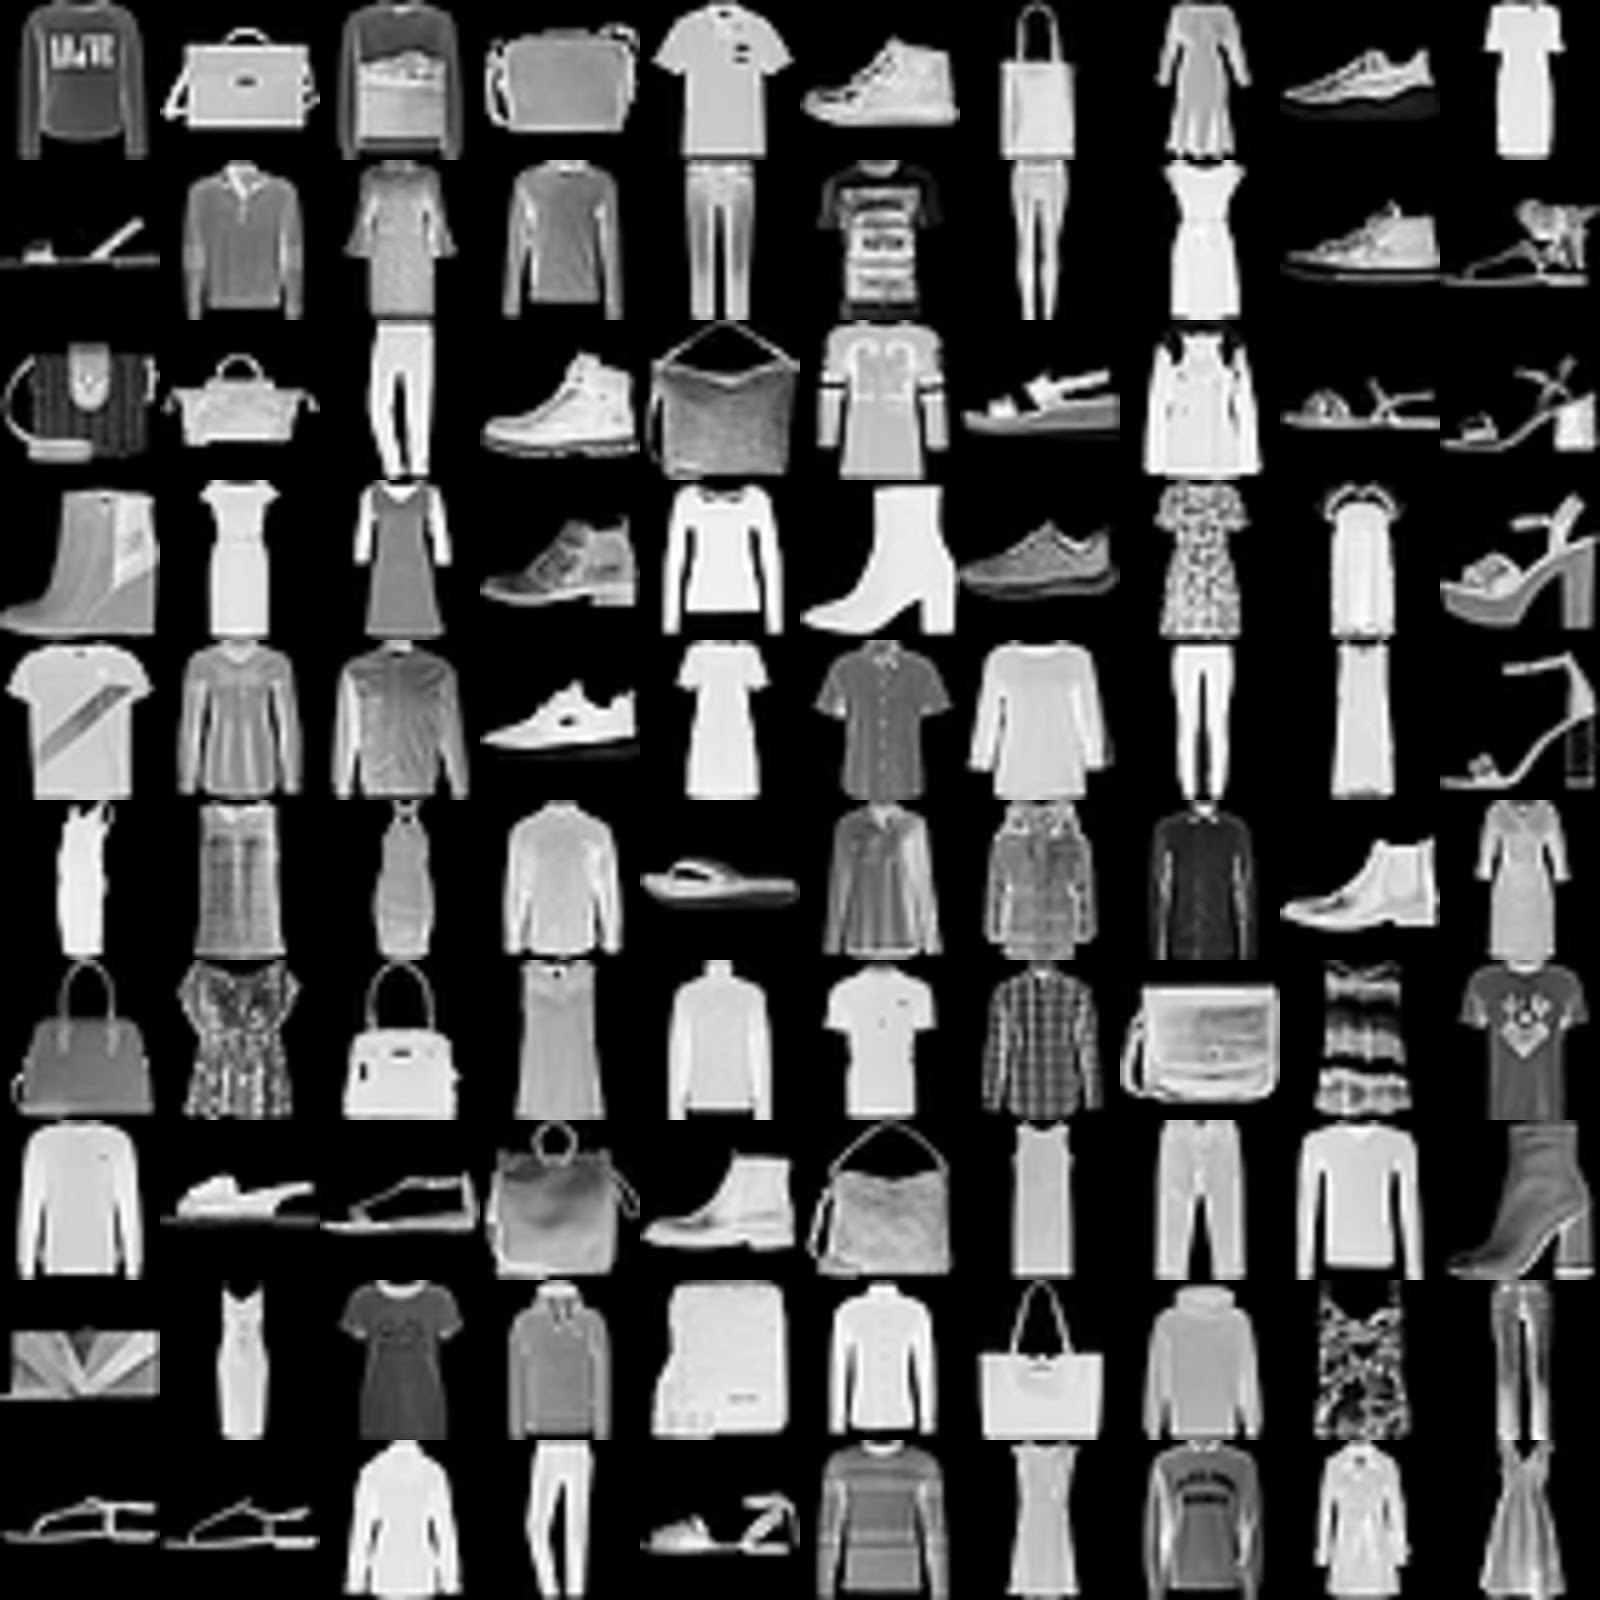
画像のサイズは 28 x 28 のグレイスケールの画像です。
学習のコードを準備しよう!
今回はシンプルな畳み込みを Tensorflow の Keras ラッパー を使用すると思います。
Imports!!!
# TensorFlow and tf.keras
import tensorflow as tf
from tensorflow import keras

# Helper libraries
import numpy as np
import matplotlib.pyplot as plt
データの準備
Fashion-MNIST は Keras の中に入っているので、すぐ使えます!
fashion_mnist.load_data()から帰ってきた値はもう学習用のデータ (6万画像) とテスト用のデータ (1万画像)が別れています。
fashion_mnist = keras.datasets.fashion_mnist

(train_images, train_labels), (test_images, test_labels) = fashion_mnist.load_data()
ロードされた物をみてみよう!

靴だ!
モデルを作成!
今回のモデルは複雑ではないので、チュートリアルページでもよくあります。
data_format='channels_last'は画像データに対して、color channels が一番後ろに置いてあるように追加します。
例えば画像のサイズは (28, 28)、このデータフォマットを使うと入力の値は (28, 28, 1) グレースケール, か (28, 28, 3) RGB です。
model = keras.Sequential([
    keras.layers.Conv2D(32, kernel_size=(3, 3),
                        activation=tf.nn.relu,
                        input_shape=input_shape,
                        data_format='channels_last'),
    keras.layers.Conv2D(64, (3, 3), activation=tf.nn.relu),
    keras.layers.MaxPool2D(pool_size=(2, 2)),
    keras.layers.Dropout(0.25),
    keras.layers.Flatten(),
    keras.layers.Dense(128, activation=tf.nn.relu),
    keras.layers.Dropout(0.5),
    keras.layers.Dense(10, activation=tf.nn.softmax)
])
model.compile(optimizer="Adadelta",
              loss='sparse_categorical_crossentropy',
              metrics=['accuracy'])
サマリーのモデルを見ると、以下のような仕組みが出てきます。
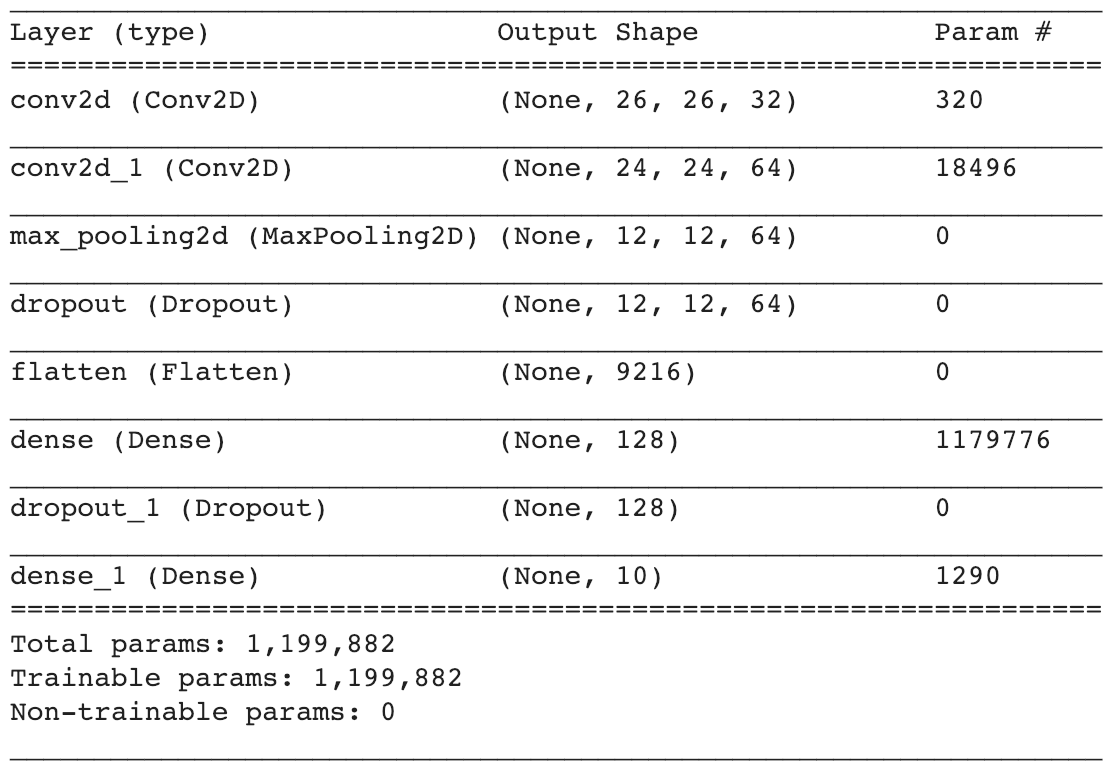
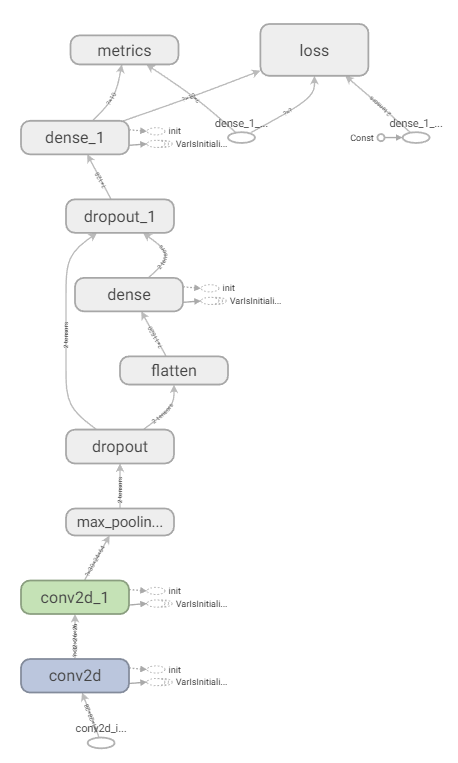
もっと詳しい見るなら Tensorboard で見てみよう.
モデルは作成した後に、もちろん学習ですね。こんなモデルってどれぐらいできるの。。。Epoch 10 までを見ると
Epoch 1/100
60000/60000 [==============================] - 6s 102us/step - loss: 0.5628 - acc: 0.8017
Epoch 2/100
60000/60000 [==============================] - 5s 82us/step - loss: 0.3599 - acc: 0.8730
Epoch 3/100
60000/60000 [==============================] - 5s 82us/step - loss: 0.3118 - acc: 0.8885
Epoch 4/100
60000/60000 [==============================] - 5s 82us/step - loss: 0.2798 - acc: 0.9006
Epoch 5/100
60000/60000 [==============================] - 5s 82us/step - loss: 0.2553 - acc: 0.9084
Epoch 6/100
60000/60000 [==============================] - 5s 82us/step - loss: 0.2351 - acc: 0.9161
Epoch 7/100
60000/60000 [==============================] - 5s 82us/step - loss: 0.2186 - acc: 0.9210
Epoch 8/100
60000/60000 [==============================] - 5s 83us/step - loss: 0.2074 - acc: 0.9247
Epoch 9/100
60000/60000 [==============================] - 5s 82us/step - loss: 0.1980 - acc: 0.9293
Epoch 10/100
60000/60000 [==============================] - 5s 82us/step - loss: 0.1846 - acc: 0.9339
Epoch 10 で 0.9339 accuracy. 結構良いですね! 100 epoch なら......
Epoch 100/100
60000/60000 [==============================] - 5s 85us/step - loss: 0.0569 - acc: 0.9807
0.9807! そうすると学習用なデータで学習すると、98% 確率で認識できています。
テスト用のデータセットなら。。
10000/10000 [==============================] - 1s 68us/step
Test accuracy: 0.9324
93%. 悪くないですね! 次はそのモデルを保存しよう.
これでも Keras で楽にできます。model.save(file_name.h5) を書けば、HDF5フォマットで学習モデルを保存され他の様にも使える様になりました!
Tensorflow-Lite と連携できるため、h5 のフォマットを tflite フォマットに変更することが必要です。
それをするために、いくつか方法があります。
There're several ways to do the conversion.
- By Command Line
tflite_convert --output_file=test.tflite --keras_model_file=fashion_mnist.h5 - By Python code
import tensorflow as tf

# In Tensorflow 1.12, lite still under contrib package
converter = tf.contrib.lite.TFLiteConverter.from_keras_model_file("file.h5")
tflite_model = converter.convert()
open("file.tflite", "wb").write(tflite_model)
注意:
Mac ・ Linux でうまく動いているが、Windows でやった時にエラーが出てきました。Windows ではまだ対応されていなさそうです。Windows で作業するなら、Google Colaboratory を使用して上記のスクリプトを実行し、tflite ファイルを保存することにした方が楽かもしれません。
Colaboratory を使うと、上記のため Google Colaboratory を使うと Google Drive の権限が必要です。
# Load the Drive helper and mount
from google.colab import drive
drive.mount('/content/drive')
mount された後にファイルパスは /content/drive/My Drive/path_to_file のようになっています。
Conversion が終わったら、tflite をコンピュータに保存し、Android を始めよう!ここまでは Tensorflow の役割は終わりです。
Preparing the Android
注意:
- WARNING: The API is currently experimental and is not covered by TensorFlow API stability guarantees.
- Kotlin にはまだ公式対応されていないが、Moroney さんによると、今実装中ですが、いつリリースするのがまだ分かりません。
今回の記事では絵を書くことですが、その仕組みをあまり詳しく書かないので、以下のリンクに見てみると幸いです。
https://android.googlesource.com/platform/development/+/master/samples/ApiDemos/src/com/example/android/apis/graphics/FingerPaint.java
Prepare Tensorflow lite
To make Tensorflow works, you need to add Tensorflow-lite at Gradle File like below.
Tensorflow lite が動けるように以下の設定が必要です。
dependencies {
    ...
    implementation 'org.tensorflow:tensorflow-lite:+'
    ...
}
tflite ファイルのため "no compression" フラグも追加します.
aaptOptions {
    noCompress "tflite"
    noCompress "lite"
}
先ほど作った tflite ファイルは assets フォルダに入れます。ラベルのために、.txt ファイルを作成し、1行は1クラスになります。並び順番としては、学習と同じ重ん版です。なので今回は以下の通りです。
T-shirt/top
Trouser
Pullover
Dress
Coat
Sandal
Shirt
Sneaker
Bag
Ankle boot
分析するため、org.tensorflow.lite.Interpreter を instantiate して、interpreter.run(image, output)を実行することです。
Interpreter を初期化から始めよう!
Interpreter を初期化するために、先ほど assets の所に入れたモデルをアプリにロードすることが必要です。
Interpreter は以下の方法でモデルを渡し、初期化 することができます。
public Interpreter(@NotNull File modelFile);
か MappedByteBuffer:
public Interpreter(@NotNull MappedByteBuffer mappedByteBuffer);
最初にFileの方法をやってみましたが、失敗して、例 から取ってきたコードを使うことにしました。
private static MappedByteBuffer loadModelFile(AssetManager assets, String modelFilename)
      throws IOException {
    AssetFileDescriptor fileDescriptor = assets.openFd(modelFilename);
    FileInputStream inputStream = new FileInputStream(fileDescriptor.getFileDescriptor());
    FileChannel fileChannel = inputStream.getChannel();
    long startOffset = fileDescriptor.getStartOffset();
    long declaredLength = fileDescriptor.getDeclaredLength();
    return fileChannel.map(FileChannel.MapMode.READ_ONLY, startOffset, declaredLength);
}
上記で interpreter の初期化ができました。次は run の部分です。
run を実行するために 2変数が必要です。認識したい画像と出力のコンテナです。
まずは画像から準備しよう。以下のようなビューで画面上でドローができるようになりました。
public class DrawingView extends View {

    private static final float TOUCH_TOLERANCE = 4;

    private Context mContext;

    private Bitmap mBitmap;
    private Canvas mCanvas;
    private Path mPath;
    private Paint mBitmapPaint;
    private Paint mPaint;
    private float mOldXPos;
    private float mOldYPos;

    public DrawingView(Context context) {
        super(context);
        initialize(context);
    }

    public DrawingView(Context context, @Nullable AttributeSet attrs) {
        super(context, attrs);
        initialize(context);
    }

    public DrawingView(Context context, @Nullable AttributeSet attrs, int defStyleAttr) {
        super(context, attrs, defStyleAttr);
        initialize(context);
    }

    public DrawingView(Context context, @Nullable AttributeSet attrs, int defStyleAttr, int defStyleRes) {
        super(context, attrs, defStyleAttr, defStyleRes);
    }


    private void initialize(Context context) {
        mContext = context;
        mPath = new Path();
        mBitmapPaint = new Paint(Paint.DITHER_FLAG);
        mPaint = new Paint();
        mPaint = new Paint();
        mPaint.setAntiAlias(true);
        mPaint.setDither(true);
        mPaint.setColor(0xFF000000);
        mPaint.setStyle(Paint.Style.STROKE);
        mPaint.setStrokeJoin(Paint.Join.ROUND);
        mPaint.setStrokeCap(Paint.Cap.ROUND);
        mPaint.setStrokeWidth(12);
    }

    @Override
    protected void onSizeChanged(int w, int h, int oldW, int oldH) {
        super.onSizeChanged(w, h, oldW, oldH);
        mBitmap = Bitmap.createBitmap(w, h, Bitmap.Config.ARGB_8888);
        mCanvas = new Canvas(mBitmap);
        mCanvas.drawColor(Color.WHITE);
    }

    @Override
    protected void onDraw(Canvas canvas) {
        super.onDraw(canvas);

        canvas.drawBitmap(mBitmap, 0, 0, mBitmapPaint);
        canvas.drawPath(mPath, mPaint);
    }

    @Override
    public boolean onTouchEvent(MotionEvent event) {
        float xPos = event.getX();
        float yPos = event.getY();

        switch (event.getAction()) {
            case MotionEvent.ACTION_DOWN: {
                resetDrawPath(xPos, yPos);
                invalidate();
                break;
            }
            case MotionEvent.ACTION_MOVE: {
                drawPath(xPos, yPos);
                invalidate();
                break;
            }
            case MotionEvent.ACTION_UP: {
                resetTouch();
                invalidate();
                break;
            }
        }
        return true;
    }

    private void resetDrawPath(float x, float y) {
        mPath.reset();
        mPath.moveTo(x, y);
        mOldXPos = x;
        mOldYPos = y;
    }

    private void drawPath(float x, float y) {
        float dx = Math.abs(x - mOldXPos);
        float dy = Math.abs(y - mOldYPos);
        if (dx >= TOUCH_TOLERANCE || dy >= TOUCH_TOLERANCE) {
            mPath.quadTo(mOldXPos, mOldYPos, (x + mOldXPos)/2, (y + mOldYPos)/2);
            mOldXPos = x;
            mOldYPos = y;
        }
    }

    private void resetTouch() {
        mPath.lineTo(mOldXPos, mOldYPos);
        mCanvas.drawPath(mPath, mPaint);
        mPath.reset();
    }

    public void resetCanvas() {
        mCanvas.drawColor(Color.WHITE);
        invalidate();
    }

    public Bitmap getBitmap() {
        return mBitmap;
    }
}
上記のビューで画面をタッチしたら、ドロー始まり、指を動かしたら、黒い線をドローし、指を画面から離れたら止まります。
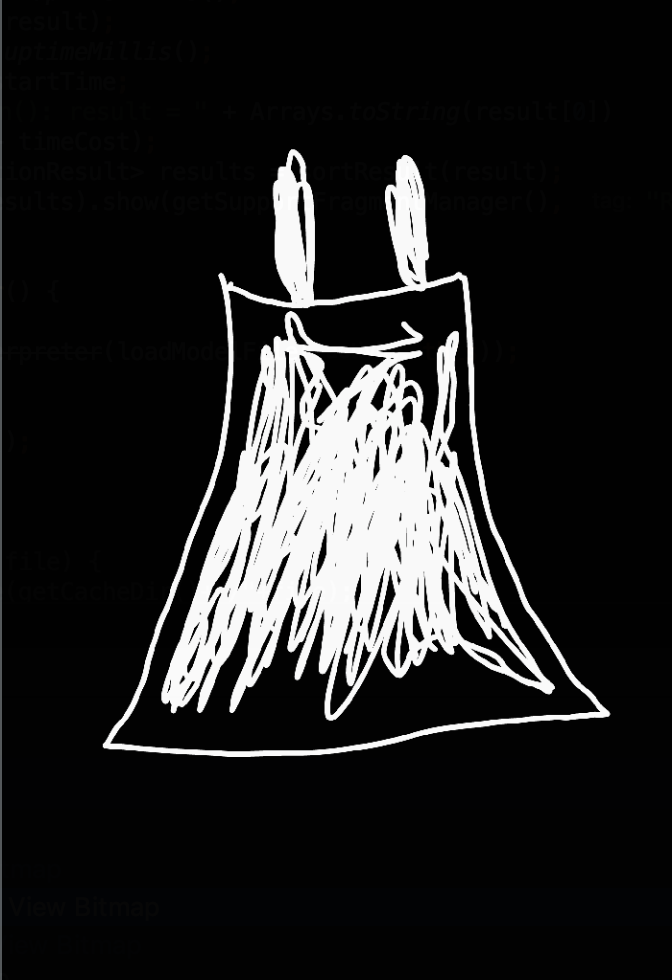
例え、皆さんが同じ方法で作ると、取った Bitmap は背景が白で画像が黒です。そうしたら学習データと違って、反転しなければなりません。背景は黒いで絵は白いになります。
From
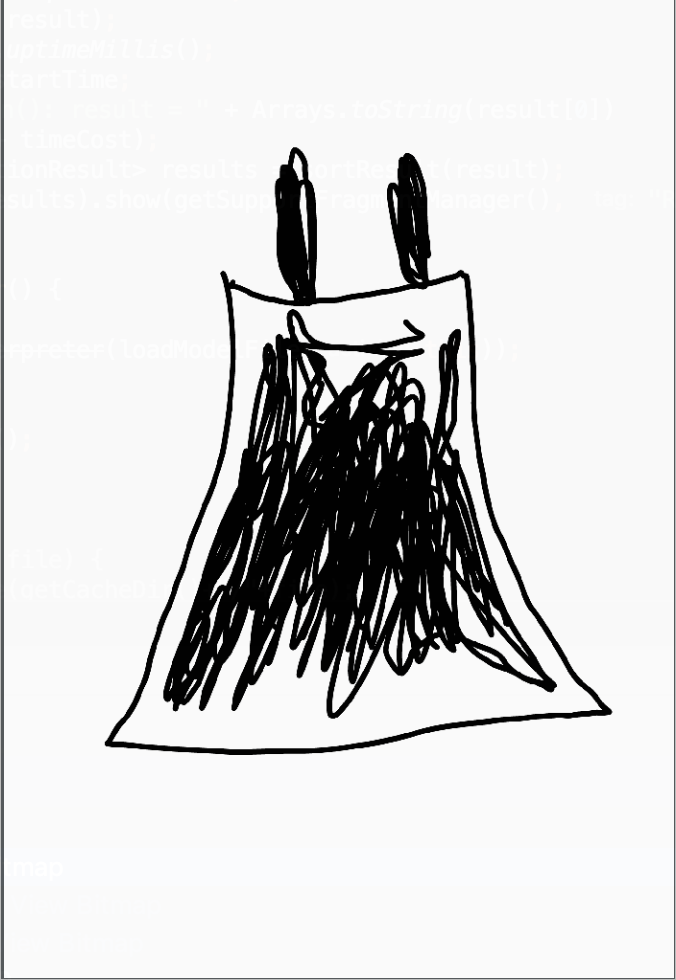
To
上記で書きましたが、fashion-MNIST の画像サイズは 28x28 ピックセルです。先ほど作られたモデルの入力サイズも 28x28 です。絵をそのまま取ったら、大きすぎるので、縮小しなければなりません。そうして、color channel も初期化しなければなりません。なので以下のような ByteBuffer を準備しましょう!
// 32-bit float value requires 4 bytes
ByteBuffer byteBuffer = ByteBuffer.allocateDirect(4 * batchSize * imageWidth * imageHeight * colorChannel);
画像は白黒なので、color channel が 1 に設定し、認識したい画像も 1 つだけなので、1に設定します。
次は output のコンテナーです。
このコンテナーは floating point の 2 次元配になります。
float[][] result = new float[1][mLabels.size()];
1 に設定する理由は 1 だけの画像を認識したいからです。mLabels.size() はクラスごとに、prediction の結果を見られます。
結果はラベルの順番と同じです。
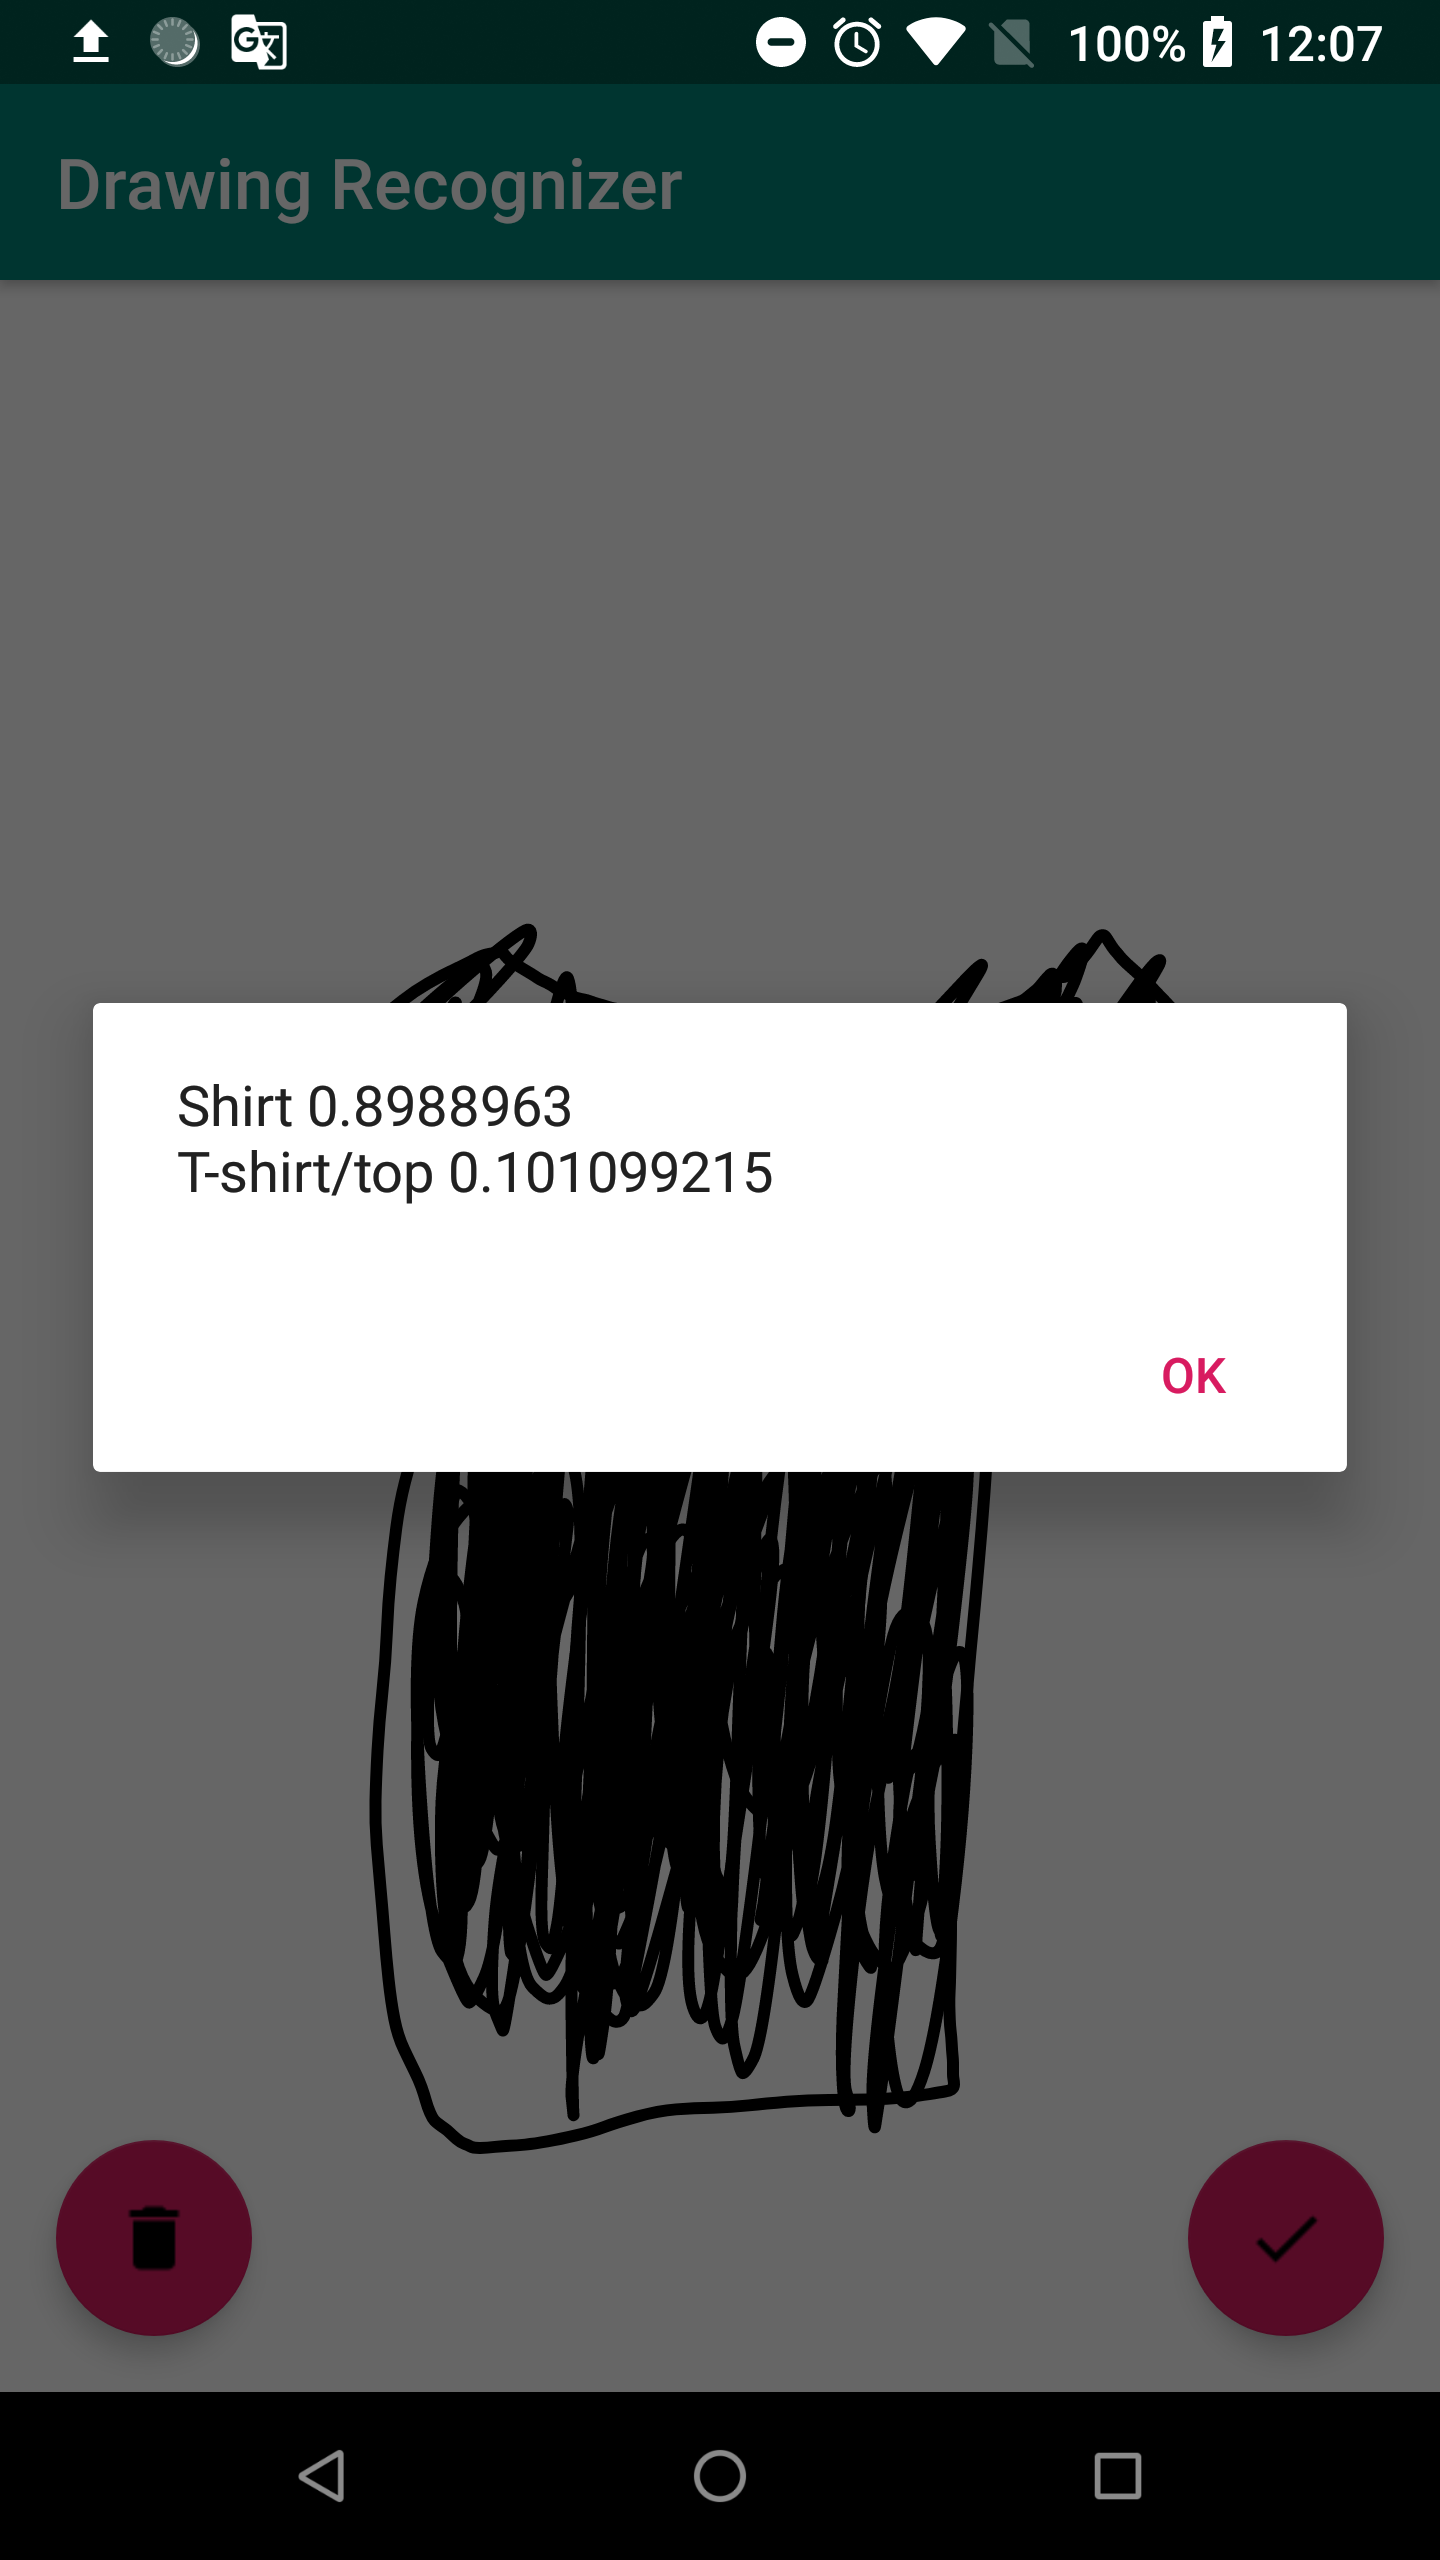
Result
Success Story and Failed Story
上手くできた所と上手くできなかった所があります。もちろん私が絵を描けないと言う影響もあると思います。
以下はスクリンショットです。
Success

Failed
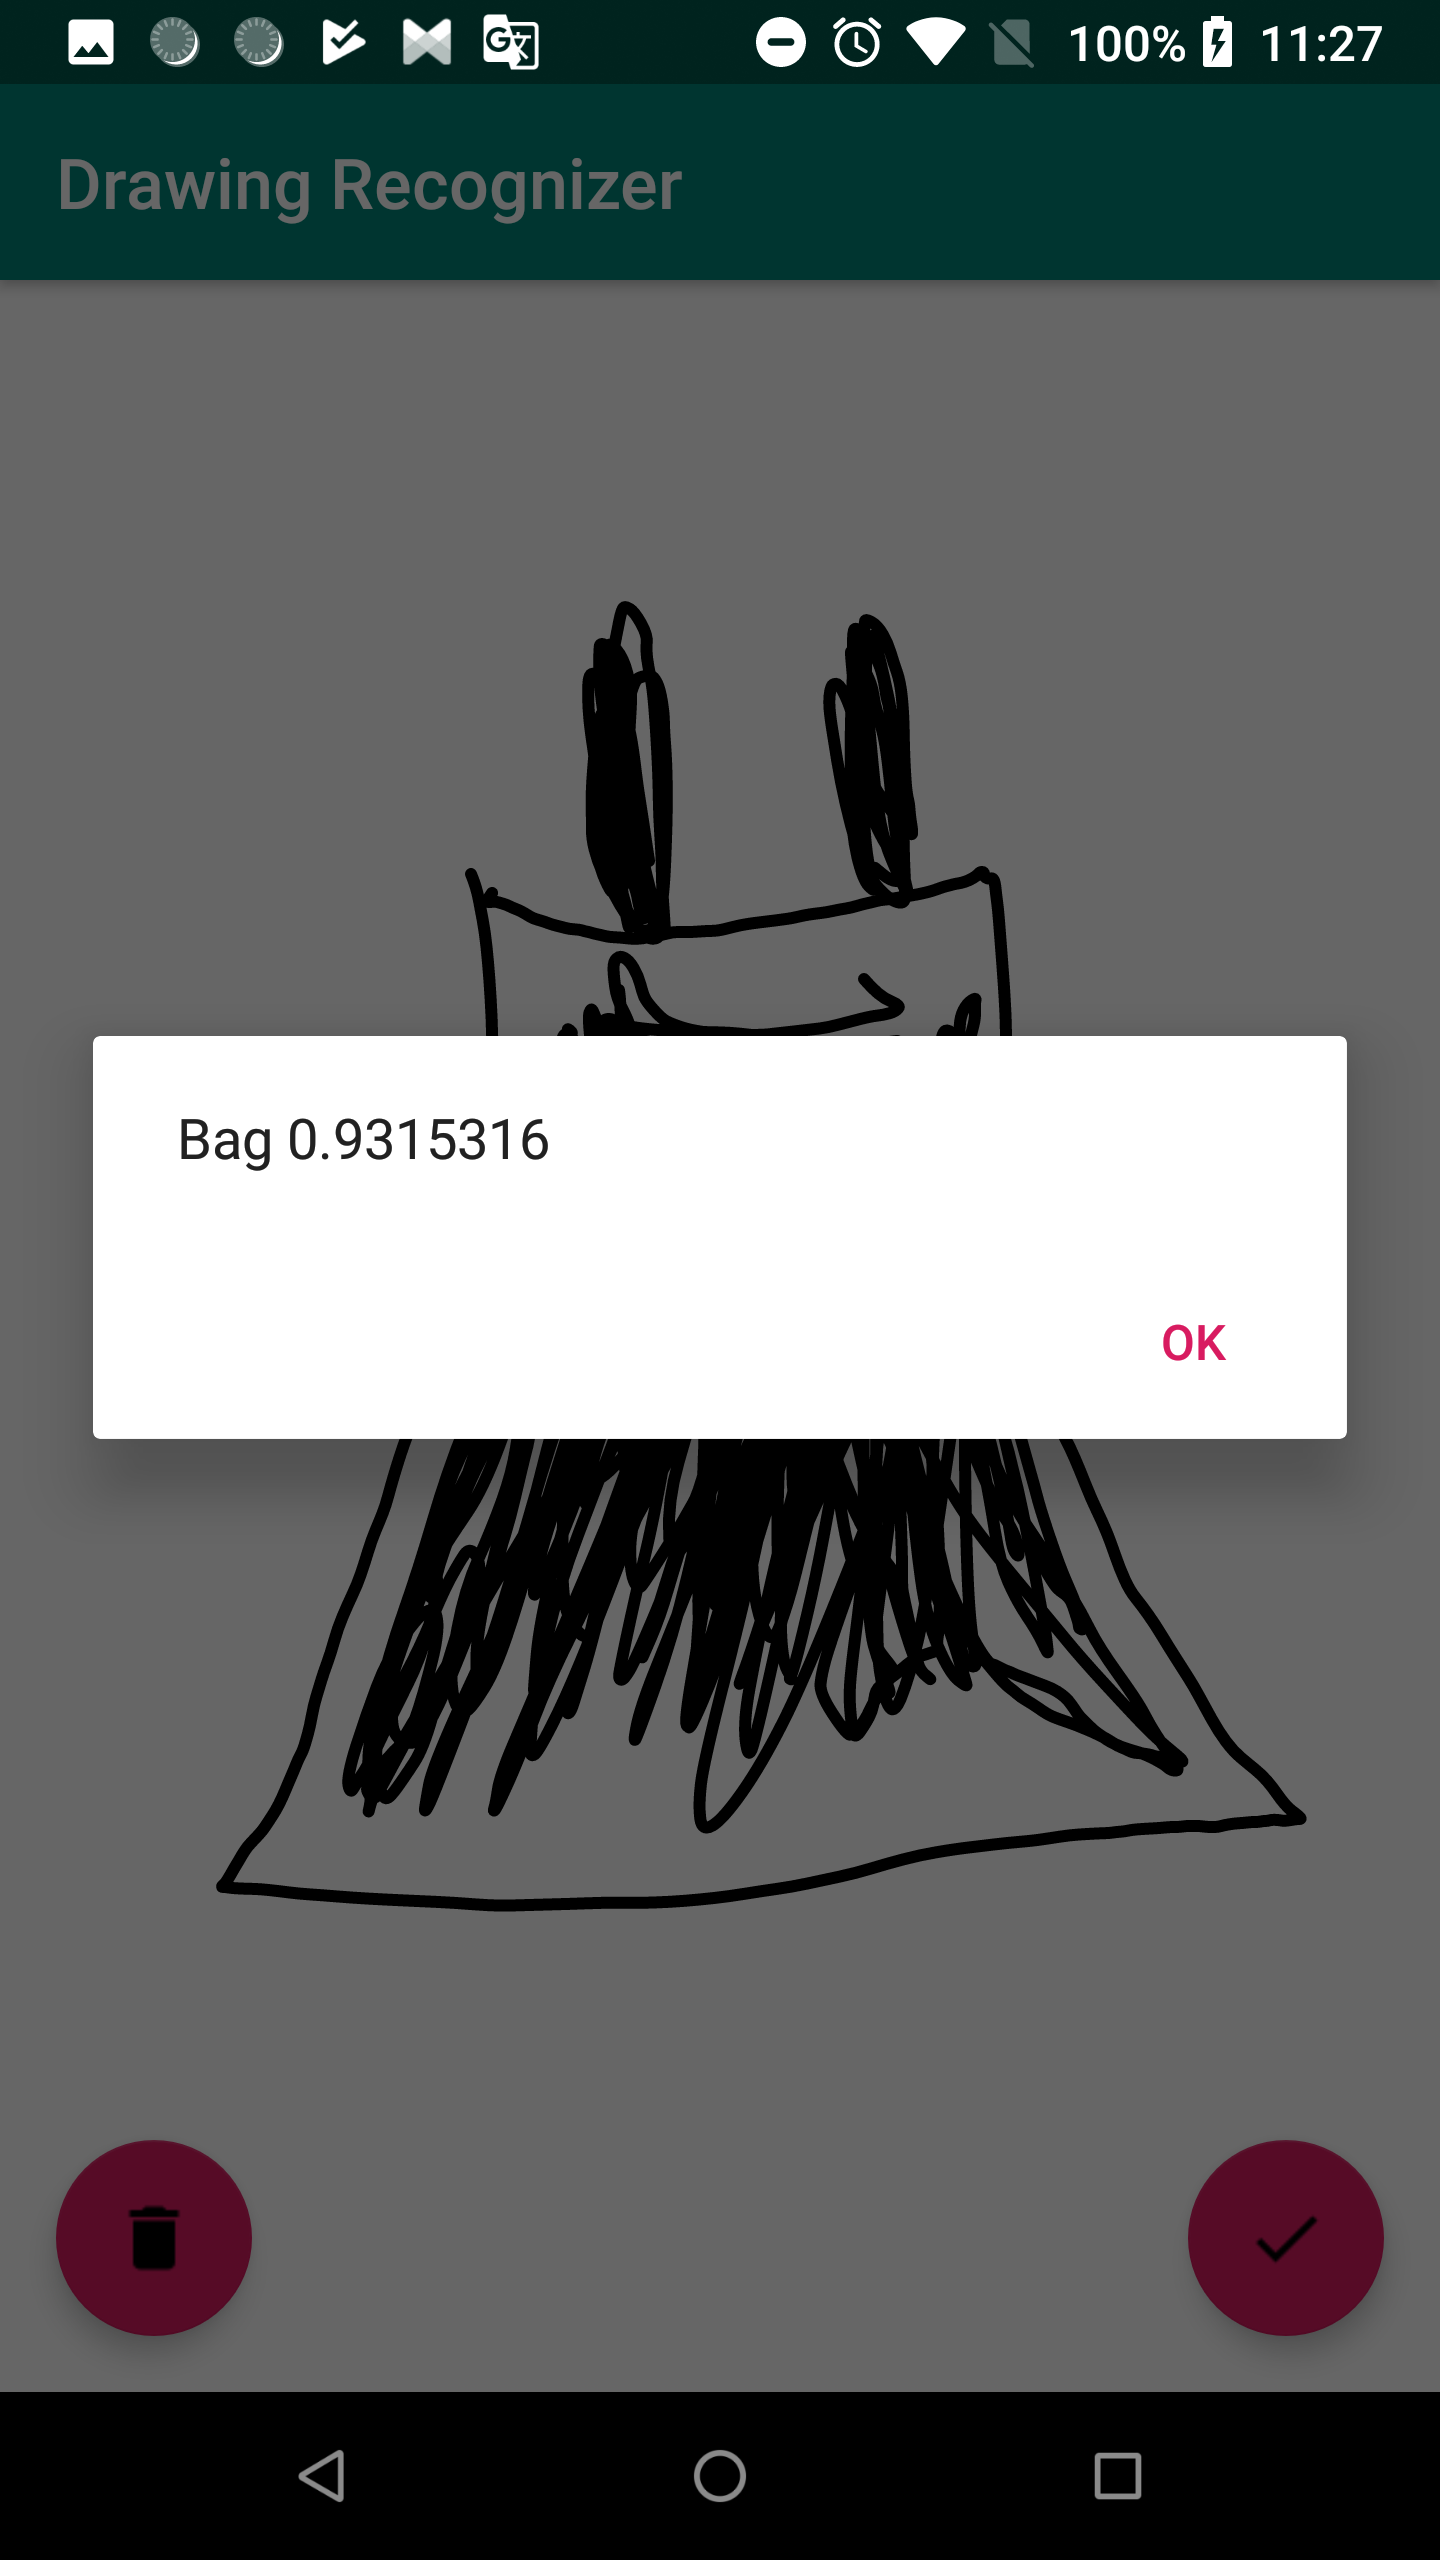
これはカバンではなくドレスを描きたいですね :(
Performance
真面目に測っていませんが、全処理入っていませんが、inference の所のみで、24 ~ 128 ms で結果が出ました。
28 x 28 の小さな画像もありますが、結構早いと思います。
Challenge
この実装でチャレンジとしては画像のサイズです。実験のため、Nexus 6P を使って、Bitmap のサイズが 1440x2112 ぐらいで、context を無くさないで、28 x 28 に縮小すると結構難しいです。
例えば以下のような画像です。

28 x 28 に縮小すると以下のような画像になります。

結構違いますね。。。
End
- 端末で直接 inference をするのがメリットがあります。特にセキュリティーです。インタネットに繋がっていなくても処理できますし、安全性があります。
- 端末でinference をするともちろんトレード・オフがあります。例えば、精度が落ちるとか、画像がもっと大きいなら、遅くなるとか、ビデオで frame ごとの処理も遅いかもしれません。こちらの辺はまた次回に話したいと思います。 (実験しないと分かりません
 )
) - Tensorflow Liteは Android だけ対応するではなく iOS でも 使えます。
この記事を読んでいただきありがとうございます。日本語が分かりづらかったら申し訳ございません。
こちらも日本語を書く勉強になると思います。
やっと機械学習を使う機会が見つかって楽しかったです。
私から以上となります。メリークリスマス・ハッピーホリデー ![]()
外部リンク:
https://gist.github.com/rhezaharliman/c5bba018fed19c638306ada3c6d87f37 (英語版)
https://medium.com/tensorflow/using-tensorflow-lite-on-android-9bbc9cb7d69d
https://github.com/tensorflow/tensorflow/tree/master/tensorflow/lite
https://github.com/keras-team/keras/blob/master/examples/mnist_cnn.py
https://github.com/nex3z/tflite-mnist-android