【目的】
Coral 社のUSB TPU Accelerator(EdgeTPU)をRaspberry Piにつないで、リアルタイムで物体検出を行います。
下記の記事の続きになります。
【Coral USB TPU Accelerator(EdgeTPU)をとりあえず使う (Quick Start)】
【1. サンプルリポジトリのダウンロード】
ラズパイ上で、以下のコマンドを実行してCoral社が公開しているサンプルリポジトリをダウンロードします。
# ホームディレクトリに移動
cd ~

# サンプルリポジトリのダウンロード
git clone https://github.com/google-coral/examples-camera.git

# リポジトリのディレクトリに移動
cd examples-camera
【2. 公開中のすべてのモデルとラベルファイルを用意】
Coral社からEdge TPUを使うように事前にコンバート済みのモデルが公開されていますので、これを利用して物体検知を行ってみます。
先ほどダウンロードしたリポジトリに、公開中のモデルとラベルファイルをすべてダウンロードするためのスクリプトが用意してあるので、これを利用してダウンロードします。
# 公開中のすべてのモデルとラベルファイルをダウンロードして解凍
sh download_models.sh
上記操作で「~/examples-camera/all_models/ 」に展開されるので、中を確認します。
ls ~/examples-camera/all_models/
coco_labels.txt                                         mobilenet_ssd_v2_coco_quant_postprocess_edgetpu.tflite
imagenet_labels.txt                                     mobilenet_ssd_v2_face_quant_postprocess.tflite
inat_bird_labels.txt                                    mobilenet_ssd_v2_face_quant_postprocess_edgetpu.tflite
inat_insect_labels.txt                                  mobilenet_v1_1.0_224_quant.tflite
inat_plant_labels.txt                                   mobilenet_v1_1.0_224_quant_edgetpu.tflite
inception_v1_224_quant.tflite                           mobilenet_v1_1.0_224_quant_embedding_extractor.tflite
inception_v1_224_quant_edgetpu.tflite                   mobilenet_v1_1.0_224_quant_embedding_extractor_edgetpu.tflite
inception_v2_224_quant.tflite                           mobilenet_v2_1.0_224_inat_bird_quant.tflite
inception_v2_224_quant_edgetpu.tflite                   mobilenet_v2_1.0_224_inat_bird_quant_edgetpu.tflite
inception_v3_299_quant.tflite                           mobilenet_v2_1.0_224_inat_insect_quant.tflite
inception_v3_299_quant_edgetpu.tflite                   mobilenet_v2_1.0_224_inat_insect_quant_edgetpu.tflite
inception_v4_299_quant.tflite                           mobilenet_v2_1.0_224_inat_plant_quant.tflite
inception_v4_299_quant_edgetpu.tflite                   mobilenet_v2_1.0_224_inat_plant_quant_edgetpu.tflite
mobilenet_ssd_v1_coco_quant_postprocess.tflite          mobilenet_v2_1.0_224_quant.tflite
mobilenet_ssd_v1_coco_quant_postprocess_edgetpu.tflite  mobilenet_v2_1.0_224_quant_edgetpu.tflite
mobilenet_ssd_v2_coco_quant_postprocess.tflite          pet_labels.txt
Edge TPUを使うものと、使わない(CPU)ものの二種類が用意されているようです。
【3. USBカメラを使って物体検出を行う】
安価なUSB Webカメラを使って物体検出を行います。
まずは、下記コマンドを実行して、環境を構築します。
# USBカメラを利用する場合はgstreamerをインストールする
# インストール用のスクリプトは用意されている
cd ~/examples-camera/gstreamer/
sudo sh install_requirements.sh
インストールが完了したら、下記コマンドで実行します。
python3 classify.py
Loading ../all_models/mobilenet_v2_1.0_224_quant_edgetpu.tflite with ../all_models/imagenet_labels.txt labels.
Gstreamer pipeline:  v4l2src device=/dev/video0 ! video/x-raw,width=640,height=480,framerate=30/1 ! queue max-size-buffers=1 leaky=downstream  ! tee name=t
            t. ! queue max-size-buffers=1 leaky=downstream ! videoconvert ! videoscale ! video/x-raw,format=RGB,width=320,height=180 ! appsink name=appsink sync=false emit-signals=true max-buffers=1 drop=true
            t. ! queue max-size-buffers=1 leaky=downstream ! videoconvert
               ! rsvgoverlay name=overlay ! videoconvert ! ximagesink

libv4l2: error setting pixformat: Input/output error
Error: gst-resource-error-quark: Device '/dev/video0' cannot capture at 640x480 (13): gstv4l2object.c(3559): gst_v4l2_object_set_format_full (): /GstPipeline:pipeline0/GstV4l2Src:v4l2src0:
Call to S_FMT failed for RGB3 @ 640x480: Input/output error
何故か失敗しました…
手元にあったUSB Webカメラのスペックが悪すぎて、動かせなかったようです。
その後いろいろやりましたが解決せず、とりあえず諦めてラズパイの公式カメラのサンプルを動かします。
なお、本記事末尾に付録としてラズパイの公式カメラをUSBカメラとして動かしています。
動作結果はそちらをご覧ください。
【4. RaspiCameraを使って物体検出を行う】
ラズパイの公式カメラを使って物体検出を行います。
公式カメラは高価ですが、専用BUS接続でデータの転送が速いです。
高速で高解像度のキャプチャを行うのに向いていますが、機械学習の世界では高解像度データはあまり必要ありません。
最近はサードパーティ製で多少解像度の低いカメラが1000円台で売っているので、それを使ってもいいかもしれません。
まずは、下記コマンドを実行して、Pythonから公式カメラにアクセスする環境を構築します。
pip3 install picamera
また、sudo raspi-config を実行し、"Interfacing Options"から"Camera"を選択し、RaspiCameraを有効化します。
インストールが完了したら、下記コマンドで実行します。
cd ~/examples-camera/raspicam/
python3 classify_capture.py
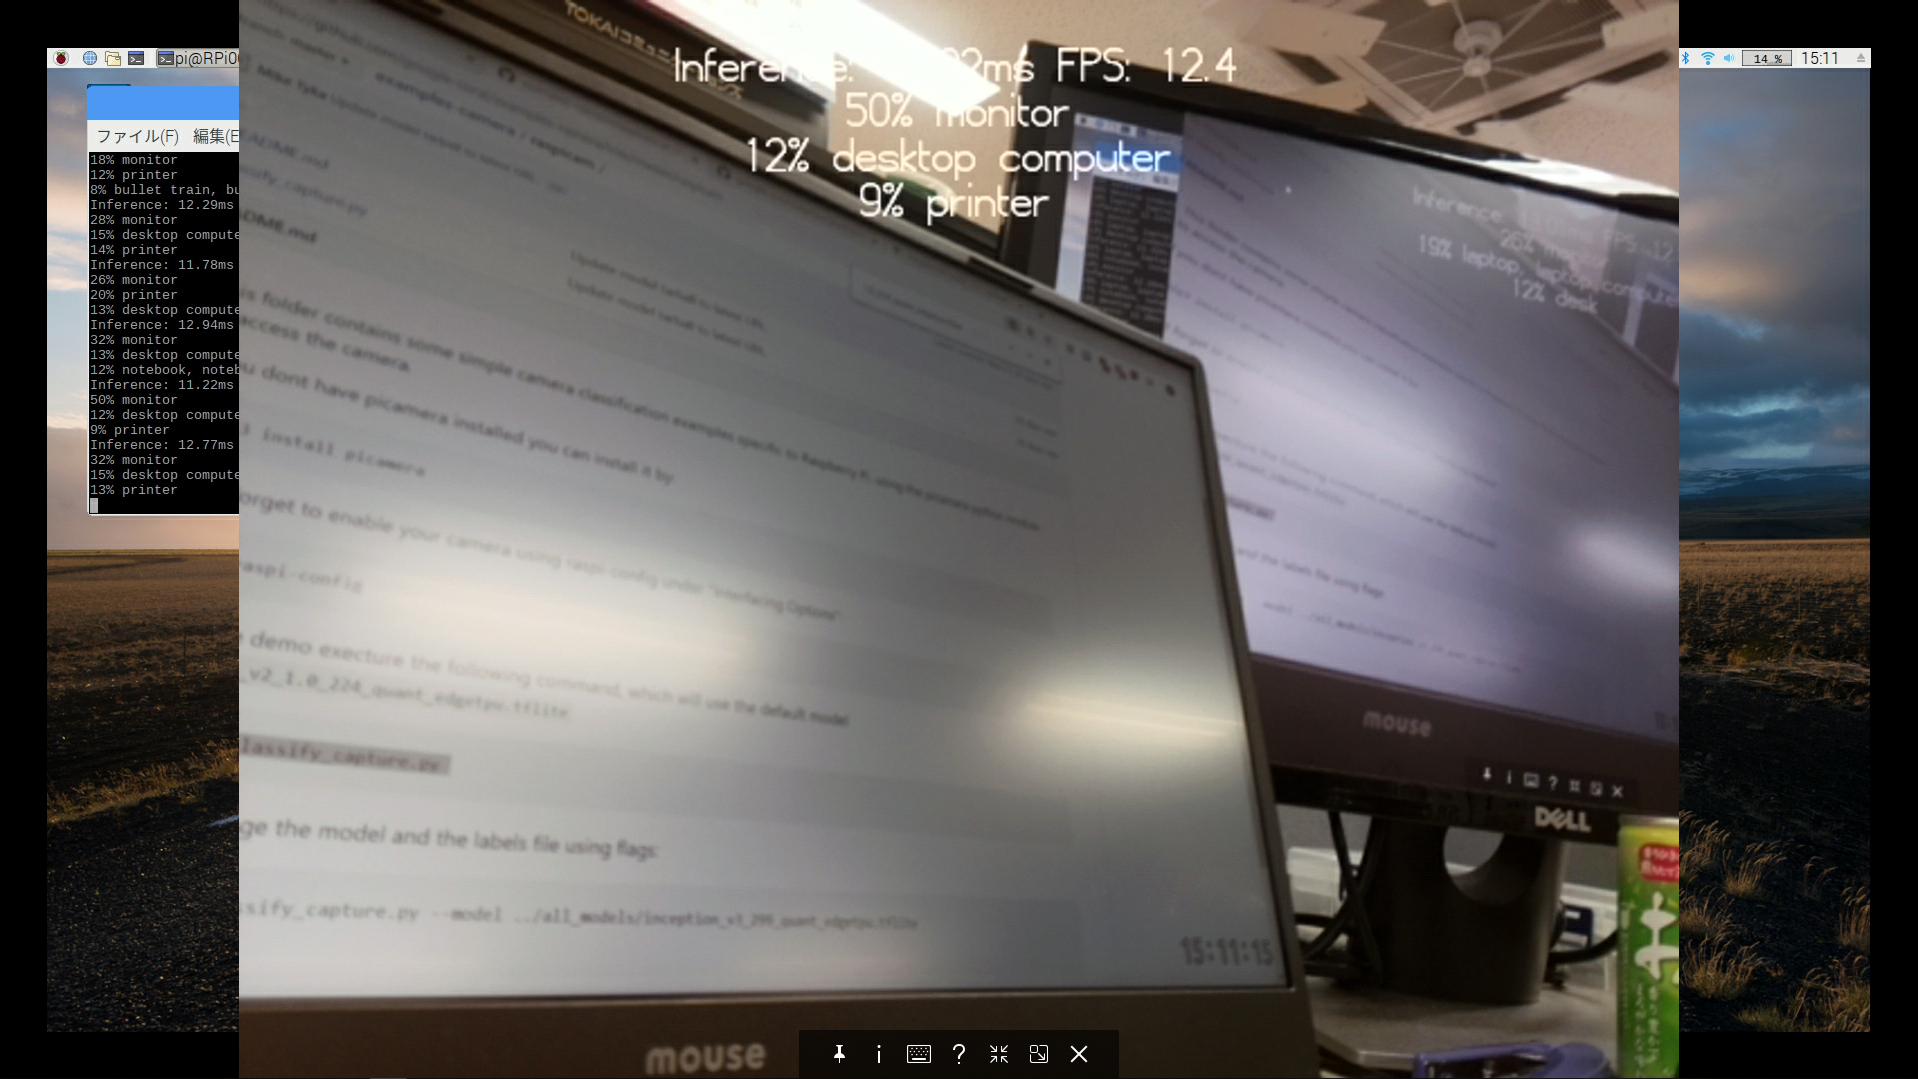
精度はともかく何かが動きました。
出力結果は以下のようになります。
/home/pi/.local/lib/python3.5/site-packages/picamera/encoders.py:521: PiCameraAlphaStripping: using alpha-stripping to convert to non-alpha format; you may find the equivalent alpha format faster
  "using alpha-stripping to convert to non-alpha "
Inference: 10.96ms FPS: 16.7
27% desk
23% desktop computer
17% monitor
Inference: 10.77ms FPS: 17.7
23% desktop computer
23% monitor
16% desk
Inference: 11.21ms FPS: 17.4
18% monitor
16% desk
16% desktop computer
Inference: 10.74ms FPS: 17.7
9% monitor
9% desktop computer
5% hard disc, hard disk, fixed disk
Inference: 10.99ms FPS: 17.6
29% monitor
23% desktop computer
16% screen, CRT screen
精度は低いですがデスクトップコンピュータやモニターとして認識しています。
驚くべきは認識速度で11ms弱で認識して、15FPS以上出ています。
認識速度からすれば60FPS以上出てもおかしくないですが、推論以外の部分は非力なラズパイですので、そこがボトルネックになっているのでしょう。
なんにしても、とりあえずEdgeTPUを使って物体認識ができました。
【付録. RaspiCameraをUSBカメラとして物体検出をしてみる】
ラズパイの公式カメラをUSBカメラ同様に利用できるようにします。
この手法は公式カメラを使ってOpenCVでVideoCaprueする場合にも使えるので、覚えておいて損はありません。
具体的には以下のコマンドを実行します。
sudo modprobe bcm2835-v4l2
実行に成功すると/dev/video0として認識します。
この状態で、【3.】で失敗したプログラムを再実行してみます。
cd ~/examples-camera/gstreamer/
python3 classify.py
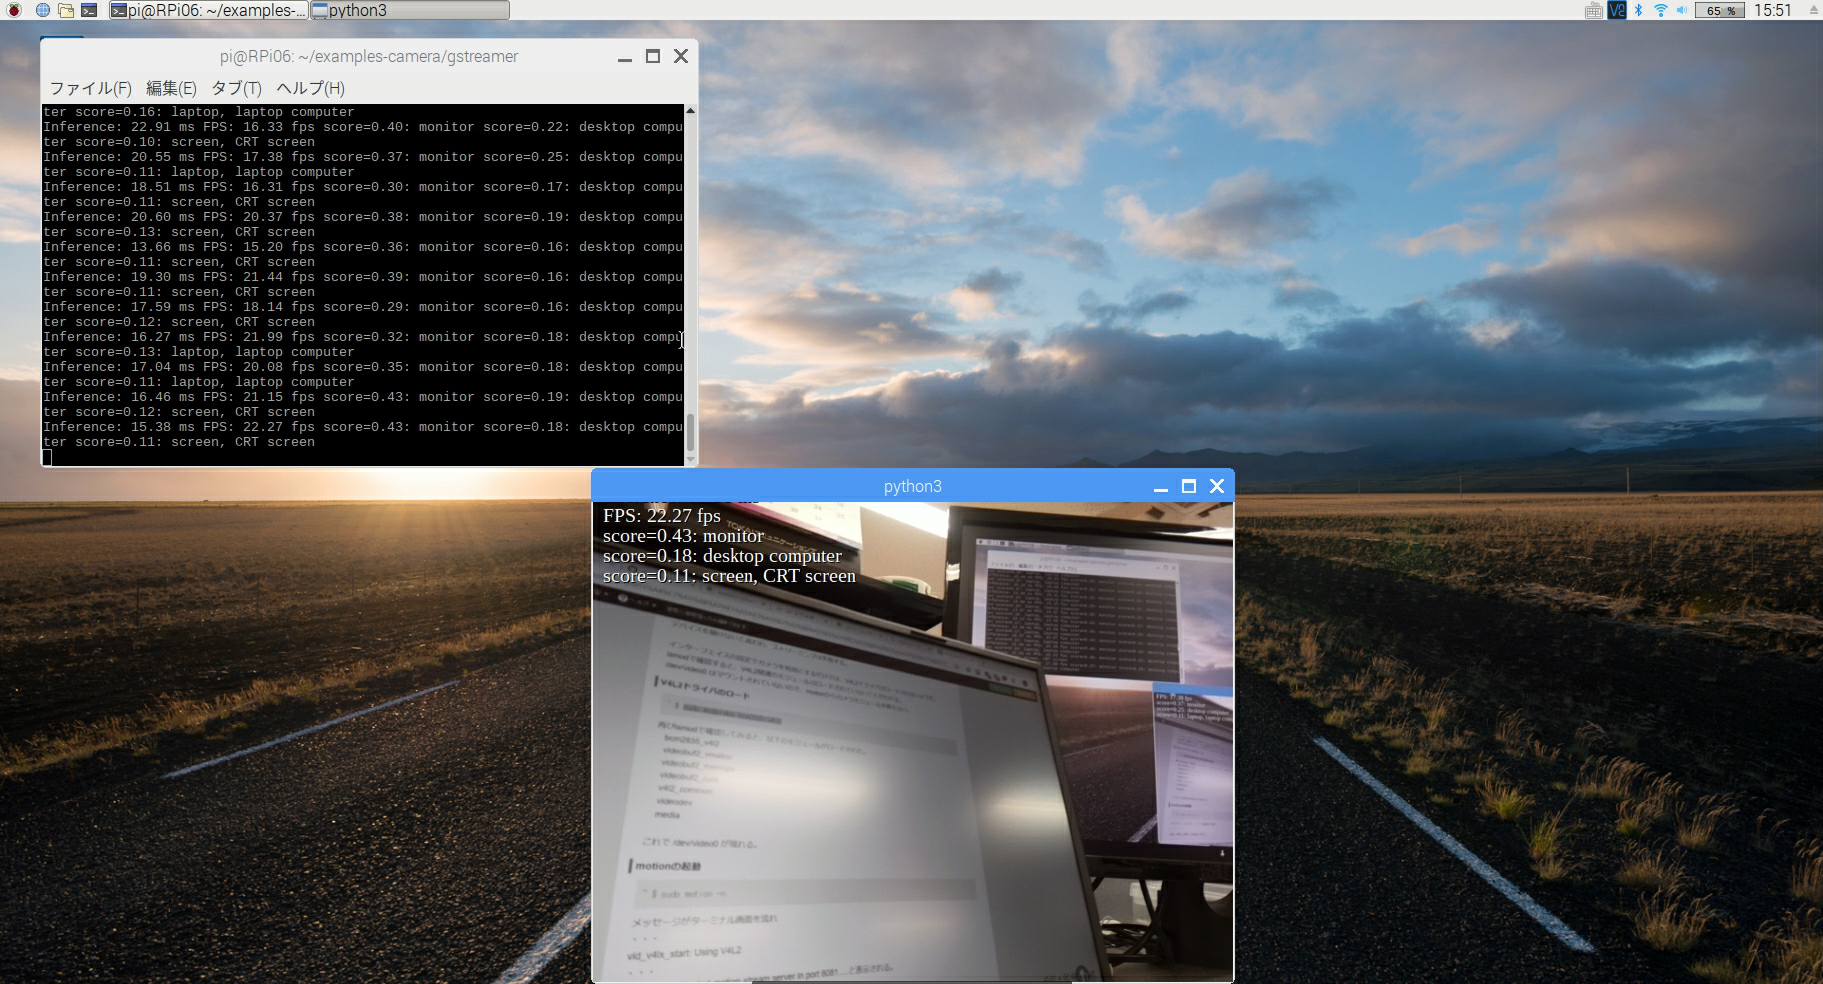
動きました。
先のUSB Webカメラでの失敗は、カメラ本体の問題だったようです。
左上のターミナル画面を見る限り、認識速度や認識精度は似たようなものです。
同じモデルを使っているので当たり前ですが。
FPSに関してはこちらのプログラムのほうが若干早いようです。
おそらく、画面に表示している画像の大きさに依存するものかと思います。
要するにラズパイの描画速度が遅い=ラズパイの処理速度がボトルネックになっているということだと思います。
とはいえ15FPS出ればリアルタイム感は出るので、極端に速度が必要なものでなければ十分な速度かと思います。
スペックの高いPCでUSB3.0に接続した状態ならば60FPS以上も夢ではなさそうなので、時間(と端末)があったら試してみたいと思います。