Processingで描ける図形についてまとめました。
この記事でよく使っている vertex について解説記事を書いたのでこちらもあわせてご覧ください!
Processingのvertexについて解説! : だらっと学習帳
p5.js版も書きました!こちらもどうぞ。
p5.jsで描ける図形まとめ - Qiita
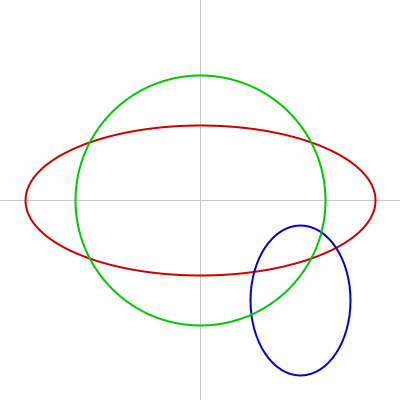
円
ellipse() で描けます。
横の大きさと縦の大きさをそれぞれ指定できるので、楕円も描けます。
正円(真円)はellipseで横の大きさと縦の大きさを同じにするか、Processing3.5で追加された circle() を利用すると描けます。
void setup() {
  size(400, 400);
}

void draw() {
  background(255);

  // 中心線
  strokeWeight(1);
  stroke(200);
  line(0, height/2, width, height/2);
  line(width/2, 0, width/2, height);

  noFill();
  strokeWeight(2);

  // 赤い楕円
  stroke(200, 0, 0);
  ellipse(width/2, height/2, 350, 150);

  // 青い楕円
  stroke(0, 0, 200);
  ellipse(300, 300, 100, 150);

  // 緑の正円
  stroke(0, 200, 0);
  circle(width/2, height/2, 250);
}
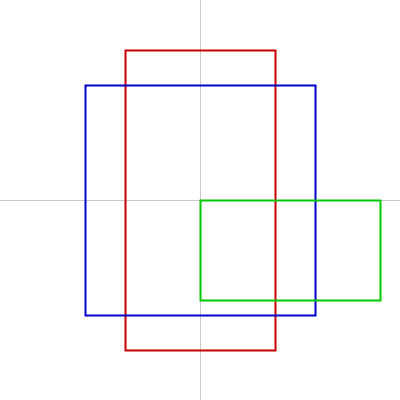
四角
rect() で描けます。
横の大きさと縦の大きさを指定できるので長方形が描けます。
正方形はrectで横の大きさと縦の大きさを同じにするか、Processing3.5で追加された square()
を利用すると描けます。
rectMode() を使うと引数として指定した座標位置がどこを指すのか変更できます。
なお、デフォルトでは左上が指定されるので、rectMode(CORNER)と同じ状態になります。
void setup() {
  size(400, 400);
}

void draw() {
  background(255);

  // 中心線
  strokeWeight(1);
  stroke(200);
  line(0, height/2, width, height/2);
  line(width/2, 0, width/2, height);

  noFill();
  strokeWeight(2);

  // 赤い長方形
  stroke(200, 0, 0);
  rectMode(CENTER);
  rect(width/2, height/2, 150, 300);

  //青い正方形
  stroke(0, 0, 200);
  square(width/2, height/2, 230);

  // 緑の長方形
  stroke(0, 200, 0);
  rectMode(CORNER);
  rect(width/2, height/2, 180, 100);
}
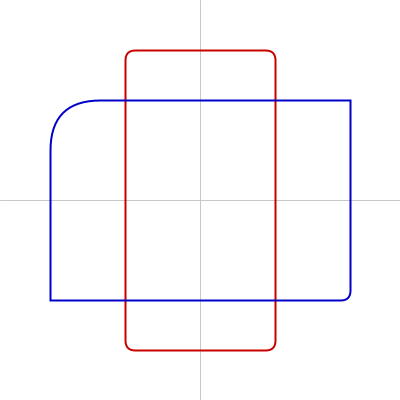
四角の角のまるみも指定できます。
位置やサイズの指定の後に4つの角のまるみを一括で指定したり、4つの角のまるみをそれぞれ指定したりできます。
void setup() {
  size(400, 400);
}

void draw() {
  background(255);

  // 中心線
  strokeWeight(1);
  stroke(200);
  line(0, height/2, width, height/2);
  line(width/2, 0, width/2, height);

  noFill();
  strokeWeight(2);

  // 赤い長方形、角まる
  stroke(200, 0, 0);
  rectMode(CENTER);
  rect(width/2, height/2, 150, 300, 10);

  // 青い長方形、角いろいろ
  stroke(0, 0, 200);
  rect(width/2, height/2, 300, 200, 50, 0, 10, 0);
}
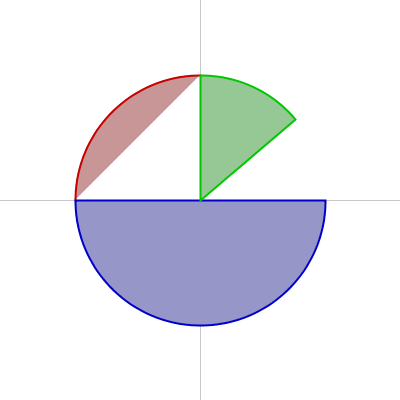
半円、パイカット図形
半円もしくはパイやピザをカットしたような図形は arc() を使って描けます。
オプションとしてOPEN(弧の線だけを描いて図形を閉じきらない)、CHORD(弧の線とその間の直線で図形を閉じきる)、PIE(弧と始点の間を線で結びピース状に閉じきる)が用意されています。
void setup() {
  size(400, 400);
}

void draw() {
  background(255);

  // 中心線
  strokeWeight(1);
  stroke(200);
  line(width/2, 0, width/2, height);
  line(0, height/2, width, height/2);

  strokeWeight(2);

  // 左上の赤い半円。線は閉じきっていない
  stroke(200, 0, 0);
  fill(200, 150, 150);
  arc(width/2, height/2, 250, 250, -PI, -PI/2, OPEN);

  // 下の青い半円。線は閉じきっている
  stroke(0, 0, 200);
  fill(150, 150, 200);
  arc(width/2, height/2, 250, 250, 0, PI, CHORD);

  // 右上の緑のピース。線は始点を含めて閉じきっている
  stroke(0, 200, 0);
  fill(150, 200, 150);
  arc(width/2, height/2, 250, 250, radians(270), radians(320), PIE);
}
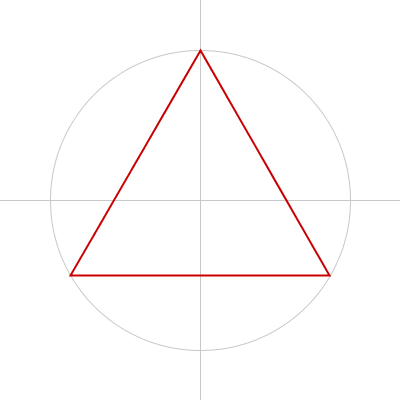
三角形
triangle() で描く方法もありますが、
beginShape()、endShape()、vertex() を使って描くと扱いやすいです。
詳しくは以下の記事をご覧ください。
Processing で三角形を描く : だらっと学習帳
void setup() {
  size(400, 400);
}

void draw() {
  background(255);

  // 中心線
  strokeWeight(1);
  stroke(200);
  line(width/2, 0, width/2, height);
  line(0, height/2, width, height/2);

  // 灰色の円
  stroke(200);
  ellipse(width/2, height/2, 150*2, 150*2);

  // 三角形
  noFill();
  strokeWeight(2);
  stroke(200, 0, 0);
  drawTriangle(width/2, height/2, 150);  // 横の位置、縦の位置、円の半径
}

void drawTriangle(int x, int y, int r) {
  pushMatrix();
  translate(x, y);  // 中心となる座標
  rotate(radians(-90));

  // 円を均等に3分割する点を結び、三角形をつくる
  beginShape();
  for (int i = 0; i < 3; i++) {
    vertex(r*cos(radians(360*i/3)), r*sin(radians(360*i/3)));
  }
  endShape(CLOSE);

  popMatrix();
}
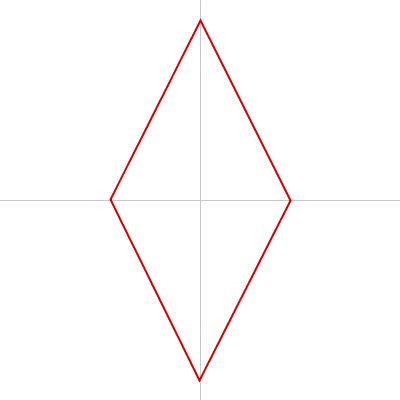
ひし形
beginShape()、endShape()、vertex() を使って描けます。
詳しくは以下の記事をご覧ください。
Processing で ひし形 を描く : だらっと学習帳
void setup() {
  size(400, 400);
}

void draw() {
  background(255);

  // 中心線
  strokeWeight(1);
  stroke(200);
  line(width/2, 0, width/2, height);
  line(0, height/2, width, height/2);

  // ひし形
  noFill();
  strokeWeight(2);
  stroke(200, 0, 0);
  drawDiamond(width/2, height/2, 150);  // 横の位置、縦の位置、中心点と中心から遠い頂点までの距離
}

void drawDiamond(int x, int y, int r) {
  int R;
  pushMatrix();
  translate(x, y);
  beginShape();
  for (int i = 0; i < 4; i++) {
    if (i % 2 == 0) {
      R = r/2;
    } else {
      R = r;
    }
    vertex(R*cos(radians(90*i)), R*sin(radians(90*i)));
  }
  endShape(CLOSE);
  popMatrix();
}
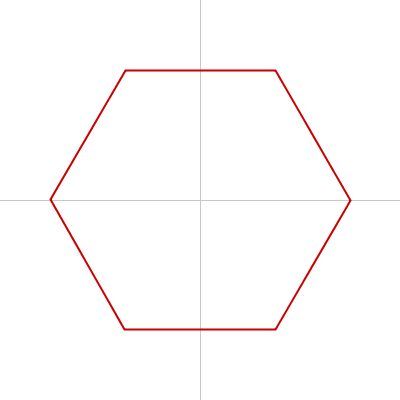
正多角形
シンプルな描き方
正五角形、正六角形、…正n角形は beginShape()、endShape()、vertex() を使って描けます。
詳しくは以下の記事をご覧ください。
Processingで多角形・星を描く : だらっと学習帳
正六角形を描く例 :
void setup() {
  size(400, 400);
}

void draw() {
  background(255);

  // 中心線
  strokeWeight(1);
  stroke(200);
  line(width/2, 0, width/2, height);
  line(0, height/2, width, height/2);

  // 正六角形
  noFill();
  strokeWeight(2);
  stroke(200, 0, 0);
  drawPolygon(width/2, height/2, 150, 6);  // 横の位置、縦の位置、中心点と頂点までの距離、頂点数
}

void drawPolygon(int x, int y, int r, int vertexNum) {
  pushMatrix();
  translate(x, y);
  beginShape();
  for (int i = 0; i < vertexNum; i++) {
    vertex(r*cos(radians(360*i/vertexNum)), r*sin(radians(360*i/vertexNum)));
  }
  endShape(CLOSE);
  popMatrix();
}
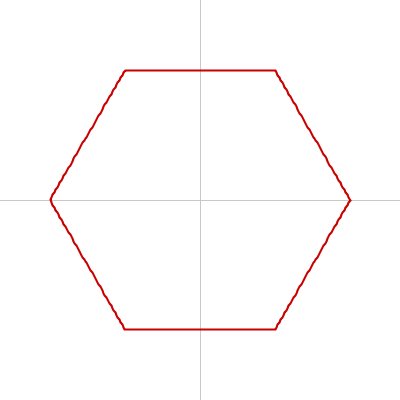
数式を利用した描き方
線が少しガタガタしてしまっていますが、数式を利用しても描けます。
数式は以下の記事を参考にさせていただきました。
Parametric equation of a regular pentagon – GeoGebra
正多角形とスピログラフの数式 | シキノート
詳しくは以下の記事をご覧ください。
[Processing][p5.js]多角形や星をバシッとした数式で描く : だらっと学習帳
void setup() {
  size(400, 400);
}

void draw() {
  background(255);

  // 中心線
  strokeWeight(1);
  stroke(200);
  line(width/2, 0, width/2, height);
  line(0, height/2, width, height/2);

  // 正六角形
  noFill();
  strokeWeight(2);
  stroke(200, 0, 0);
  drawPolygon(width/2, height/2, 150, 6);  // 横の位置、縦の位置、中心点と頂点までの距離、頂点数
}

void drawPolygon(int ox, int oy, int r, int vertexNum) {
  pushMatrix();
  translate(ox, oy);
  beginShape();
  for (int theta = 0; theta < 360; theta++) {
    PVector pos = calcPos(r, theta, vertexNum);

    float x = pos.x;
    float y = pos.y;

    vertex(x, y);
  }
  endShape(CLOSE);
  popMatrix();
}

PVector calcPos(int r, int t, int num) {
  float x = r * cos(radians(t)) * func(t, num);
  float y = r * sin(radians(t)) * func(t, num);

  return new PVector(x, y);
}

float func(int t, int num) {
  float A = cos(radians(180 / num));
  float b = 360 / num;
  float B = cos(radians(b * (t / b - floor(t / b)) - 180 / num));

  return A / B;
}
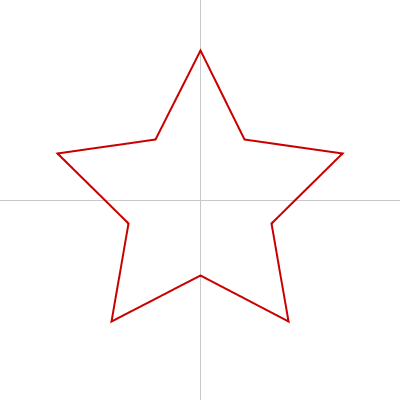
星
シンプルな描き方
星は beginShape()、endShape()、vertex() を使って描けます。
トゲの数も調整できます。
詳しくは以下の記事をご覧ください。
Processingで多角形・星を描く : だらっと学習帳
トゲの数が5つの例 :
void setup() {
  size(400, 400);
}

void draw() {
  background(255);

  // 中心線
  strokeWeight(1);
  stroke(200);
  line(width/2, 0, width/2, height);
  line(0, height/2, width, height/2);

  // 星
  noFill();
  strokeWeight(2);
  stroke(200, 0, 0);
  drawStar(width/2, height/2, 150, 5);  // 横の位置、縦の位置、中心点とトゲの頂点までの距離、トゲの数
}

void drawStar(int x, int y, int r, int prickleNum) {
  int vertexNum = prickleNum*2;  // 頂点数(トゲの数*2)
  int R;  // 中心点から頂点までの距離
  int outR = r;  // 中心点からトゲまでの距離
  int inR = outR/2;  // 中心点から谷までの距離

  pushMatrix();
  translate(x, y);
  rotate(radians(-90));
  beginShape();
  for (int i = 0; i < vertexNum; i++) {
    if (i%2 == 0) {
      R = outR;
    } else {
      R = inR;
    }
    vertex(R*cos(radians(360*i/vertexNum)), R*sin(radians(360*i/vertexNum)));
  }
  endShape(CLOSE);
  popMatrix();
}
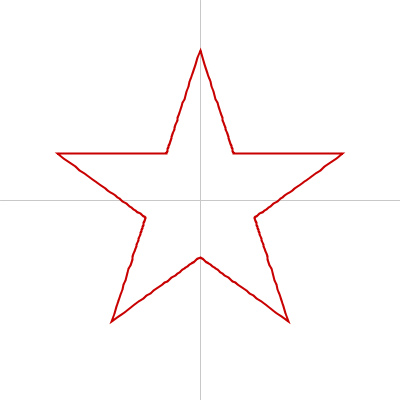
数式を利用した描き方
線が少しガタガタしてしまっていますが、数式を利用しても描けます。
数式は以下の記事を参考にさせていただきました。
正多角形とスピログラフの数式 | シキノート
詳しくは以下の記事をご覧ください。
[Processing][p5.js]多角形や星をバシッとした数式で描く : だらっと学習帳
void setup() {
  size(400, 400);
}

void draw() {
  background(255);

  // 中心線
  strokeWeight(1);
  stroke(200);
  line(width/2, 0, width/2, height);
  line(0, height/2, width, height/2);

  // 星
  noFill();
  strokeWeight(2);
  stroke(200, 0, 0);
  drawStar(width/2, height/2, 150, 5);  // 横の位置、縦の位置、中心点とトゲの頂点までの距離、トゲの数
}

void drawStar(int ox, int oy, int r, int prickleNum) {
  pushMatrix();
  translate(ox, oy);
  rotate(radians(-90));
  beginShape();
  for (int theta = 0; theta < 360; theta++) {
    PVector pos = calcPos(r, theta, prickleNum);

    float x = pos.x;
    float y = pos.y;

    vertex(x, y);
  }
  endShape(CLOSE);
  popMatrix();
}

PVector calcPos(int r, int t, int num) {
  float x = r * cos(radians(t)) * func(t, num);
  float y = r * sin(radians(t)) * func(t, num);

  return new PVector(x, y);
}

float func(int t, int num) {
  float a = 360 / num;
  float A = cos(radians(a));
  float b = acos(cos(radians(num * t)));
  float B = cos(radians(a) - b / num);

  return A / B;
}
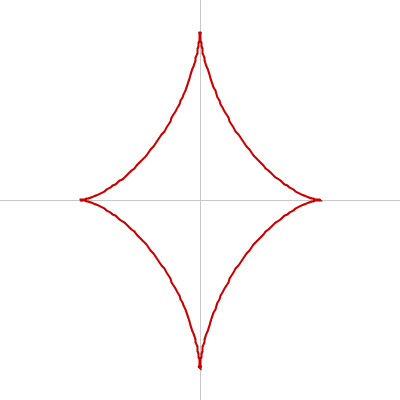
キラキラ星(アステロイド曲線)
キラキラな星はアステロイド曲線と呼ばれ、beginShape()、endShape()、vertex() を使って描けます。
図形を縦方向に大きめに描くとよりそれらしくなります。
詳しくは以下の記事を以下の記事をご覧ください。
Processing でキラキラ図形を描く : だらっと学習帳
void setup() {
  size(400, 400);
}

void draw() {
  background(255);

  // 中心線
  strokeWeight(1);
  stroke(200);
  line(width/2, 0, width/2, height);
  line(0, height/2, width, height/2);

  // アステロイド曲線
  noFill();
  strokeWeight(2);
  stroke(200, 0, 0);
  drawTwinkleStar(width/2, height/2, 120);  // 横の位置、縦の位置、中心点と横方向の頂点までの距離
}

void drawTwinkleStar(int x, int y, int r) {
  pushMatrix();
  translate(x, y);
  beginShape();
  for (int theta = 0; theta < 360; theta++) {
    vertex(r * pow(cos(radians(theta)), 3), r * 1.4 * pow(sin(radians(theta)), 3));
  }
  endShape(CLOSE);
  popMatrix();
}
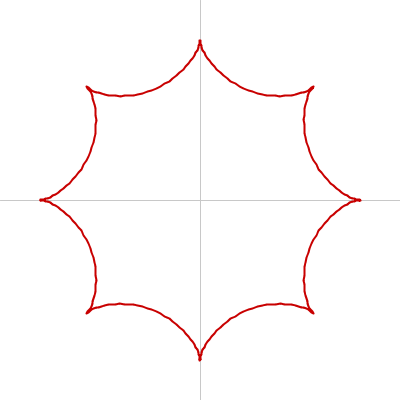
びっくり吹き出し(アステロイド曲線2)
漫画でよく見かける
_人人人人人人人人人人_
> びっくり吹き出し <
 ̄Y^Y^Y^Y^Y^Y^Y^Y^Y ̄
はアステロイド曲線で表現でき、beginShape()、endShape()、vertex() を使って描けます。
詳しくは以下の記事をご覧ください。
Processing でびっくり吹き出しみたいなとげの多い図形(アステロイド曲線)を描く : だらっと学習帳
void setup() {
  size(400, 400);
}

void draw() {
  background(255);

  // 中心線
  strokeWeight(1);
  stroke(200);
  line(width/2, 0, width/2, height);
  line(0, height/2, width, height/2);

  // アステロイド曲線
  noFill();
  strokeWeight(2);
  stroke(200, 0, 0);
  strokeJoin(ROUND);
  drawAstroid(width/2, height/2, 20, 8);  // 横の位置、縦の位置、大きさ調整用変数、トゲの数
}

void drawAstroid(int ox, int oy, int r, int vertexNum) {
  vertexNum -= 1;
  pushMatrix();
  translate(ox, oy);
  beginShape();
  for (int theta = 0; theta < 360; theta++) {
    float x = r * (vertexNum * cos(radians(theta)) + cos(radians(-vertexNum * theta)));
    float y = r * (vertexNum * sin(radians(theta)) + sin(radians(-vertexNum * theta)));

    vertex(x, y);
  }
  endShape();
  popMatrix();
}
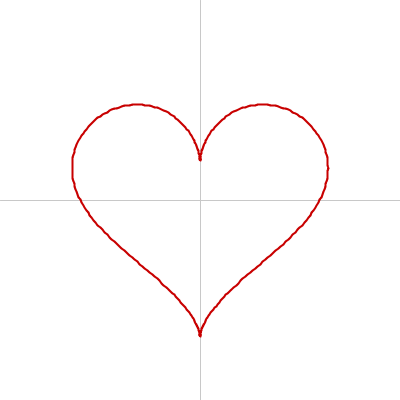
ハート
ハートは beginShape()、endShape()、vertex() を使って描けます。
strokeJoin()を利用して線のつなぎ目をなめらかにしています。
詳しくは以下の記事をご覧ください。
Processing でハートを描く : だらっと学習帳
void setup() {
  size(400, 400);
}

void draw() {
  background(255);

  // 中心線
  strokeWeight(1);
  stroke(200);
  line(width/2, 0, width/2, height);
  line(0, height/2, width, height/2);

  // ハート
  noFill();
  strokeWeight(2);
  stroke(200, 0, 0);
  strokeJoin(ROUND); //線のつなぎ目について設定
  drawHeart(width/2, height/2, 8);  // 横の位置、縦の位置、大きさ調整用変数
}

void drawHeart(int ox, int oy, int size) {
  pushMatrix();
  translate(ox, oy);
  beginShape();
  for (int theta = 0; theta < 360; theta++) {
    float x = size * (16 * sin(radians(theta)) * sin(radians(theta)) * sin(radians(theta)));
    float y = (-1) * size * (13 * cos(radians(theta)) - 5 * cos(radians(2 * theta))
      - 2 * cos(radians(3 * theta)) - cos(radians(4 * theta)));

    vertex(x, y);
  }
  endShape(CLOSE);
  popMatrix();
}
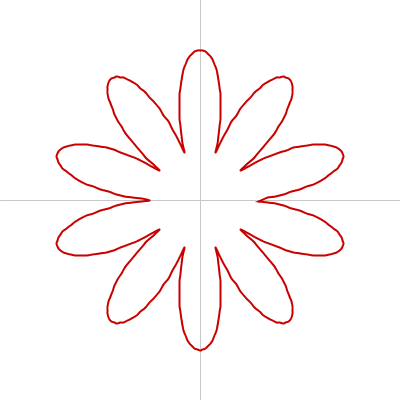
花
お花は beginShape()、endShape()、curveVertex() を使って描けます。
詳しくは以下の記事をご覧ください。
Processing でスーパーバラ曲線を描いてみた : だらっと学習帳
void setup() {
  size(400, 400);
}

void draw() {
  background(255);

  // 中心線
  strokeWeight(1);
  stroke(200);
  line(width/2, 0, width/2, height);
  line(0, height/2, width, height/2);

  // 花
  noFill();
  strokeWeight(2);
  stroke(200, 0, 0);
  drawFlower(width/2, height/2, 100);  // 横の位置、縦の位置、大きさ調整用変数
}

void drawFlower(int ox, int oy, int r) {
  pushMatrix();
  translate(ox, oy);
  beginShape();
  for (int theta = 0; theta < 360; theta++) {
    float R = r * abs(sin(radians(theta*5))) + r/2;
    float x = R * cos(radians(theta));
    float y = R * sin(radians(theta));

    curveVertex(x, y);
  }
  endShape(CLOSE);
  popMatrix();
}
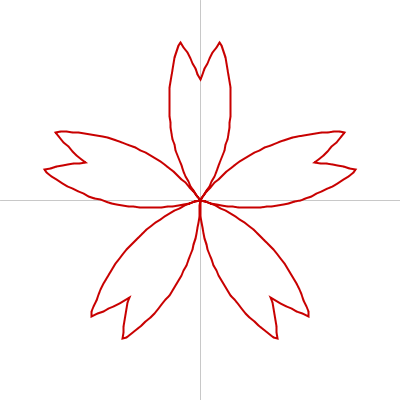
桜
花びらが分かれているタイプ
花びらがそれぞれ分かれていて、先端に鋭い切れ込みの入った桜の花は、beginShape()、endShape()、vertex() を使って描けます。
数式は以下の記事を参考にさせていただきました。
花の曲線を描く - CinderellaJapan
void setup() {
  size(400, 400);
}

void draw() {
  background(255);

  // 中心線
  strokeWeight(1);
  stroke(200);
  line(width/2, 0, width/2, height);
  line(0, height/2, width, height/2);

  // 桜
  noFill();
  strokeWeight(2);
  stroke(200, 0, 0);
  drawSakura(width/2, height/2, 200);  // 横の位置、縦の位置、大きさ調整用変数
}

void drawSakura(int ox, int oy, int or) {
  int petalNum = 5;  // 花びらの数

  pushMatrix();
  translate(ox, oy);
  rotate(radians(90));
  beginShape();
  for (int theta = 0; theta < 360; theta++) {
    float A = petalNum / PI * radians(theta);
    int md = floor(A) % 2;
    float r = pow(-1, md) * (A - floor(A)) + md;
    float R = r + 2 * calcH(r);

    float x = or * R * cos(radians(theta));
    float y = or * R * sin(radians(theta));

    vertex(x, y);
  }
  endShape(CLOSE);
  popMatrix();
}

float calcH(float x) {
  if (x < 0.8) {
    return 0;
  } else {
    return 0.8 - x;
  }
}
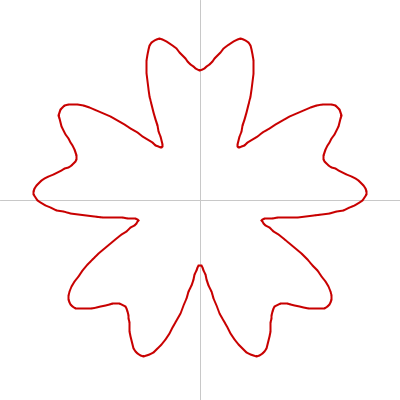
花びらが分かれていないタイプ
花びらが分かれていない、丸みのある桜の花は、beginShape()、endShape()、vertex() を使って描けます。
数式は以下の記事を参考にさせていただきました。
~スーパーバラ曲線を作ろう~
void setup() {
  size(400, 400);
}

void draw() {
  background(255);

  // 中心線
  strokeWeight(1);
  stroke(200);
  line(width/2, 0, width/2, height);
  line(0, height/2, width, height/2);

  // 桜
  noFill();
  strokeWeight(2);
  stroke(200, 0, 0);
  drawSakura(width/2, height/2, 130);  // 横の位置、縦の位置、大きさ調整用変数
}

void drawSakura(int ox, int oy, int or) {
  pushMatrix();
  translate(ox, oy);
  beginShape();
  for (int theta = 0; theta < 360; theta++) {
    float A = (sin(radians(theta * 5)) + cos(radians(theta * 10))) / 2.0;
    float B = A * 0.5 + 1.0;
    float R = or * B;
    float x = R * sin(radians(theta + 90));
    float y = R * cos(radians(theta + 90));

    vertex(x, y);
  }
  endShape(CLOSE);
  popMatrix();
}
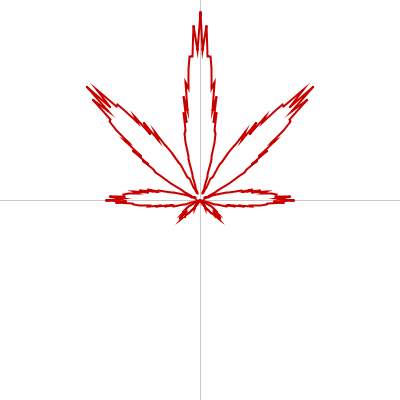
葉 (麻の葉、紅葉、楓)
葉っぱは beginShape()、endShape()、vertex() を使って描けます。
詳しくは以下の記事をご覧ください。
Processing で 葉っぱを描く(麻の葉?紅葉、楓?) : だらっと学習帳
void setup() {
  size(400, 400);
}

void draw() {
  background(255);

  // 中心線
  strokeWeight(1);
  stroke(200);
  line(width/2, 0, width/2, height);
  line(0, height/2, width, height/2);

  // 葉っぱ
  noFill();
  strokeWeight(2);
  stroke(200, 0, 0);
  noFill();
  drawLeaf(width/2, height/2, 45);  // 横の位置、縦の位置、大きさ調整用変数
}

void drawLeaf(int ox, int oy, int r) {
  pushMatrix();
  translate(ox, oy);
  beginShape();
  for (int theta = 0; theta < 360; theta++) {
    float R = - r * (1 + (9.0/10.0) * cos(radians(8 * theta))) * (1 + (1.0/10.0) * cos(radians(24 * theta))) * ((9.0/10.0) + (1.0/10.0) * cos(radians(200 * theta))) * (1 + sin(radians(theta)));

    float x = R * cos(radians(theta));
    float y = R * sin(radians(theta));

    vertex(x, y);
  }
  endShape(CLOSE);
  popMatrix();
}
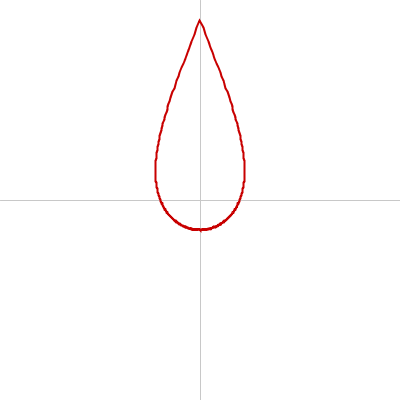
しずく
涙のようなしずく型の図形は beginShape()、endShape()、vertex() を使って描けます。
コード中、Aという変数がありますが、この値を小さくすると丸みのある形になり、大きくすると長細く鋭い形になります。
詳しくは以下の記事をご覧ください。
Processing でしずく型曲線を描く : だらっと学習帳
void setup() {
  size(400, 400);
}

void draw() {
  background(255);

  // 中心線
  strokeWeight(1);
  stroke(200);
  line(width/2, 0, width/2, height);
  line(0, height/2, width, height/2);

  // しずく
  noFill();
  strokeWeight(2);
  stroke(200, 0, 0);
  drawDrop(width/2, height/2, 180, 5);  // 横の位置、縦の位置、大きさ調整用変数、鋭さ調整用変数
}

void drawDrop(int x, int y, int r, int A) {
  pushMatrix();
  translate(x, y);
  rotate(radians(-90));
  beginShape();
  for (int theta = 0; theta < 360; theta++) {
    float R = r / (A * sin(radians(theta)/2)+1);
    vertex(R * cos(radians(theta)), R * sin(radians(theta)));
  }
  endShape(CLOSE);
  popMatrix();
}
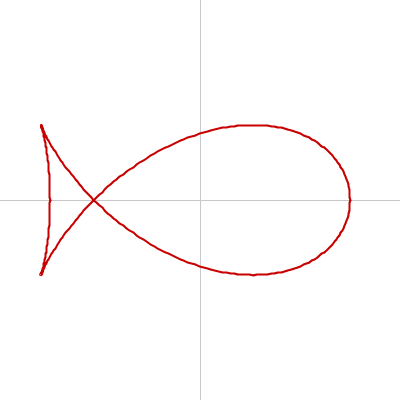
魚
魚の形は beginShape()、endShape()、vertex() を使って描けます。
数式は以下のページを参考にしました。
Fish curve - Wikipedia
void setup() {
  size(400, 400);
}

void draw() {
  background(255);

  // 中心線
  strokeWeight(1);
  stroke(200);
  line(width/2, 0, width/2, height);
  line(0, height/2, width, height/2);

  // 魚
  noFill();
  strokeWeight(2);
  stroke(200, 0, 0);
  drawFish(width/2, height/2, 150);  // 横の位置、縦の位置、大きさ調整用変数
}

void drawFish(int ox, int oy, int r) {
  pushMatrix();
  translate(ox, oy);
  beginShape();
  for (int theta= 0; theta< 360; theta++) {
    float x = r * cos(radians(theta)) - r * pow(sin(radians(theta)), 2) / sqrt(2);
    float y = r * cos(radians(theta)) * sin(radians(theta));

    vertex(x, y);
  }
  endShape(CLOSE);
  popMatrix();
}
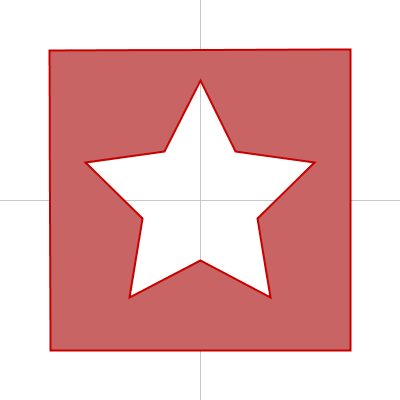
穴あき図形
ドーナツのように穴のあいた図形は beginContour()、beginShape()、endShape()、vertex()、endContour() を使って描けます。
詳しくは以下の記事をご覧ください。
Processing / p5.js で穴あき図形を描く beginContour() : だらっと学習帳
float R; // 星(穴)の大きさ調整用
int vertexNum = 10; // 星の頂点数

int w = 300; //図形の外枠の横の長さ
int h = 300; //図形の外枠の縦の長さ

void setup() {
  size(400, 400);
}

void draw() {
  background(255);

  // 中心線
  strokeWeight(1);
  stroke(200);
  line(0, height/2, width, height/2);
  line(width/2, 0, width/2, height);

  // 星形穴あき図形
  noFill();
  strokeWeight(2);
  stroke(200, 0, 0);
  fill(200, 100, 100);

  pushMatrix();
  translate(width/2, height/2);
  rotate(radians(-90));
  beginShape();
  vertex(-w/2, -h/2);
  vertex(w/2, -h/2);
  vertex(w/2, h/2);
  vertex(-w/2, h/2);
  beginContour();
  for (int i = vertexNum; i > 0; i--) {
    if (i % 2 == 0) {
      R = w * 0.4;
    } else {
      R = w * 0.2;
    }
    vertex(R * cos(radians(360 * i / vertexNum)), R * sin(radians(360 * i / vertexNum)));
  }
  endContour();
  endShape(CLOSE);
  popMatrix();
}