ヒカリちゃんと言ってもVoiceTextのHIKARIちゃんです。
以前記事にした「GoogleHomeでポケモン図鑑作ってみた」を改良したので、また記事にしました。
改良点
-
Beebotteの依存を排除し、ngrokを使うように変更
- BeeBotteの設定が面倒だったため
-
VoiceTextによる自然な日本語に変更
- google-home-notifierはGoogle翻訳の日本語音声を使うが、これがちょっと不自然だったため
- callback地獄をPromiseで整理し、コードを100行未満に
構成の変化
改良前の方式と改良後の方式は次のようになっています。
-
改良前
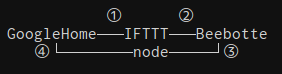
- ① 【IFTTTのthen】Google Assistantによるテキスト通知
- ② 【IFTTTのthat】WebhookによるBeebotteのキューへのメッセージポスト
- ③ nodeからキューをポーリング
- ④ nodeでpokemon APIから図鑑説明の取得、google-home-notifierで音声再生
-
改良後
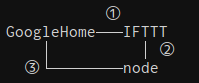
- ① 【IFTTTのthen】Google Assistantによるテキスト通知
- ② 【IFTTTのthat】Webhookでngrokのドメイン = nodeサーバーにメッセージをポスト
- ③ nodeでpokemon APIから図鑑説明の取得、VoiceText APIによるmp3ファイルの生成、google-home-notifierで音声再生
ソースコード
reireias/google-home-pokemon-dictionary
const bodyParser = require('body-parser')
const config = require('config')
const express = require('express')
const fs = require('fs')
const googlehome = require('google-home-notifier')
const path = require('path')
const request = require('request')
const VoiceText = require('voicetext')

const searchUrl = 'https://pokeapi.co/api/v2/pokemon-species/'
const nameIdMap = JSON.parse(fs.readFileSync('./pokemon.json', 'utf-8'))
const voice = new VoiceText(config.voice.key)
const app = express()

const main = () => {
  googlehome.ip(config.googlehome.ip, config.googlehome.language)
  app.use(express.static(path.join(__dirname, '/tmp')))
  app.use(bodyParser.json())
  app.post('/pokemon', postPokemon)
  app.listen(config.port, () => {
    console.log('started')
  })
}

const postPokemon = (req, res) => {
  var promise = Promise.resolve(req.body.name)
  promise.then(search).then(notify).catch(handleError)
  res.send('ok')
}

const search = name => {
  return new Promise((resolve, reject) => {
    if (nameIdMap[name]) {
      let options = {
        url: searchUrl + nameIdMap[name],
        json: true
      }
      request.get(options, (error, response, body) => {
        if (error) {
          reject(error)
        }
        if (response.statusCode === 200) {
          let message = createNotifyMessage(body)
          resolve(message)
        } else {
          reject(new Error('検索時にエラーが発生しました。'))
        }
      })
    } else {
      reject(new Error('ポケモンが見つかりませんでした。'))
    }
  })
}

const notify = message => {
  return new Promise((resolve, reject) => {
    console.info(message)
    voice.speaker(voice.SPEAKER.HIKARI).speak(message, (error, buf) => {
      if (error) {
        reject(error)
      }
      fs.writeFileSync('./tmp/tmp.wav', buf, 'binary')
      googlehome.play(`http://${config.server.ip}:${config.port}/tmp.wav`, response => {
        console.info(response)
      })
    })
  })
}

const handleError = error => {
  googlehome.notify(error.message, () => {
    console.error(error)
  })
}

const createNotifyMessage = body => {
  let language = config.pokeapi.language
  let ftLanguage = config.pokeapi.flavorText.language
  let version = config.pokeapi.flavorText.version
  let names = body.names.filter(name => language === name.language.name)
  let genera = body.genera.filter(genus => language === genus.language.name)
  let flavorTexts = body.flavor_text_entries.filter(text => {
    return ftLanguage === text.language.name && version === text.version.name
  })
  let message =
    names[0].name + '。' + genera[0].genus + '。' + flavorTexts[0].flavor_text
  message = message.replace(/\s/g, '')
  return message
}

if (require.main === module) {
  main()
}
使用方法
curl編
ここでは実際に自身のGoogleHomeでポケモン図鑑の説明音声を再生する手順を紹介します。
まずは、ngrokを使用せずに、curlで音声を再生してみましょう。
構成で言うところの、②と③に該当します。
-
事前準備として以下を実施しておきます。
- GoogleHomeのIPアドレスを調べておく(GoogleHomeアプリから確認可能)
- nodeを実行するマシンのIPを調べておく(GoogleHomeからアクセスできるIPであること)
- VoiceTextのAPIサイトに登録してAPI Keyを発行する
-
コードの取得とnpmモジュールのinstallを実施します。
# コードの取得
git clone https://github.com/reireias/google-home-pokemon-dictionary.git
# install
npm install
# or
yarn install
-
configディレクトリ直下に以下の内容でlocal.yamlを作成します。
local.yaml
googlehome:
  ip: 'google_home_ip'
voice:
  key: 'your_voice_text_key'
server:
  ip: 'node_server_ip'
これで準備はできました。
node main.jsでサーバーを起動しましょう。
続いて、下記のコマンドでメッセージを再生してみます。
curl -X POST -H 'Content-Type:application/json' -d '{"name": "フシギダネ"}' http://node_server_ip:8080/pokemon
ngrok編
ngrokを導入し、nodeを実行しているサーバーにグローバルにアクセスできるドメインを取得することで、GoogleHome -> IFTTT -> nodeのパスが使えるようにします。
- 公式サイトにしたがって、マシンにngrokを導入します
- ユーザー登録を実施しない場合は、8時間で取得したドメインが使えなくなってしまうので、ユーザー登録を行います(試すだけの人はスキップしてOK)
- 公式サイトからユーザー登録し、Authを選びAuth Tokenを取得します。
-
ngrok authtoken <取得したtoken>を実行することで、設定ファイルへtokenを記録します。
-
ngrok http 8080で起動し、取得したドメインを控えておきます。
最後にIFTTTの設定を行います。
詳細は以前の記事でキャプチャ付きで紹介しているので、そちらが参考になります。
- thenにはGoogleAssistantを設定し、任意のフレーズの後に
$を指定する。- 以降では仮に「ポケモン図鑑」というフレーズを指定したと仮定する。
- thatはWebhookを指定し、以下の設定とする。
- 宛先は
<ngrokで取得したドメイン>/pokemonとする。 - メソッドはPOSTとする。
- bodyは
{"name": "{{TextField}}"}と指定する。
- 宛先は
これで準備は完了です。
あなたのGoogleHomeに向かって**「ポケモン図鑑 ○○○(好きなポケモンの名前)」**と言ってみましょう。