はじめに
- 公式では、ReactとAngularしかないのでVite Vue3 Asp.net Coreの環境を作ってみる。
作成方法
- VisualStudioを立ち上げで、AngularでのASPNETcoreのテンプレートを選択しプロジェクトを作成する。

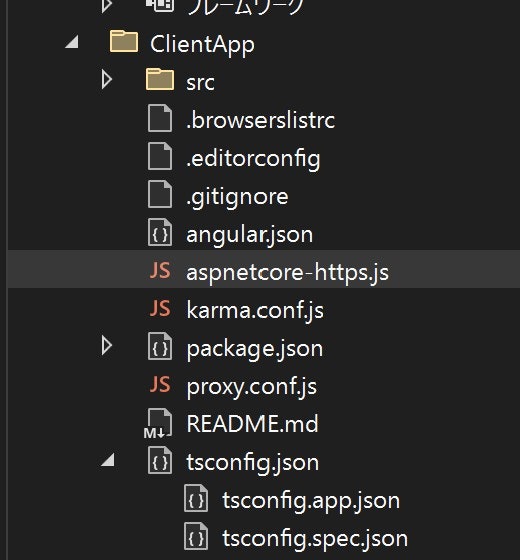
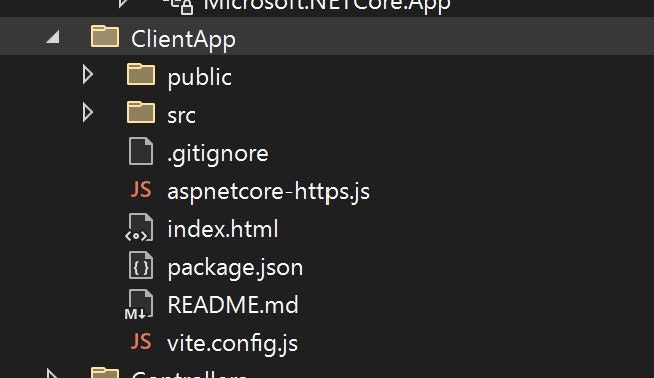
- ClientAppフォルダのaspnetcore-https.js以外を削除する。
- プロジェクトが保存されていない任意のフォルダで
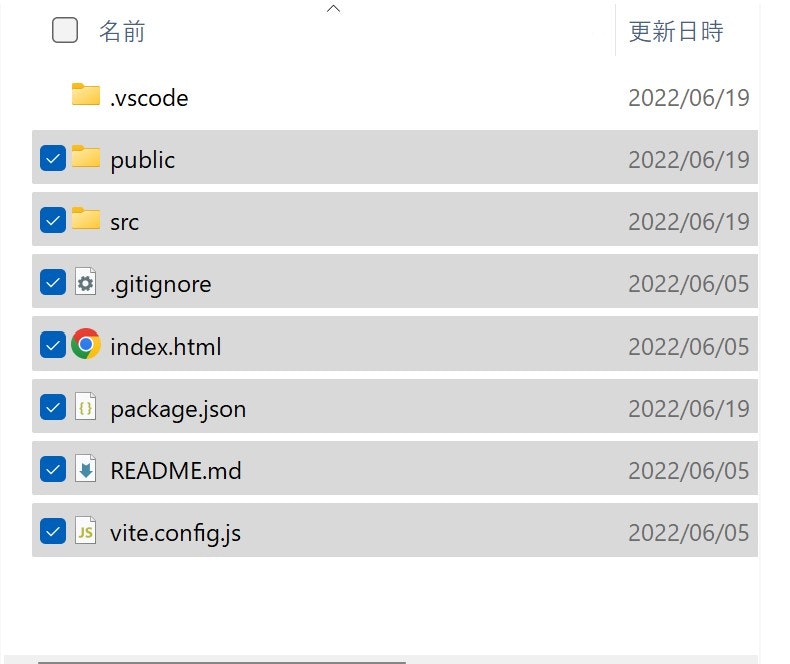
npm create vite@latest vuetemplate -- --template vueを実行する。 - 作成したフォルダにある.vccode フォルダ以外をプロジェクトのClientAppフォルダへコピーする。
- .csprojファイルを開く以降csprojファイルxmlを編集する。
- PropertyGroup要素にある、SpaProxyLaunchCommandがVisualStudioで実行時に実行される、npmのコマンドなので
npm run devに変更する。*.csproj<PropertyGroup> <TargetFramework>net6.0</TargetFramework> <Nullable>enable</Nullable> <IsPackable>false</IsPackable> <SpaRoot>ClientApp\</SpaRoot> <SpaProxyServerUrl>https://localhost:44421</SpaProxyServerUrl> <SpaProxyLaunchCommand>npm start</SpaProxyLaunchCommand> <ImplicitUsings>enable</ImplicitUsings> </PropertyGroup>- <SpaProxyLaunchCommand>npm start</SpaProxyLaunchCommand> + <SpaProxyLaunchCommand>npm run dev</SpaProxyLaunchCommand> - 下記がDebugBuild後に実行されるコマンドで、node_modulesディレクトリがないと実行される
npm installをnpm ciに変更。*.csproj<Target Name="DebugEnsureNodeEnv" BeforeTargets="Build" Condition=" '$(Configuration)' == 'Debug' And !Exists('$(SpaRoot)node_modules') "> <!-- Ensure Node.js is installed --> <Exec Command="node --version" ContinueOnError="true"> <Output TaskParameter="ExitCode" PropertyName="ErrorCode" /> </Exec> <Error Condition="'$(ErrorCode)' != '0'" Text="Node.js is required to build and run this project. To continue, please install Node.js from https://nodejs.org/, and then restart your command prompt or IDE." /> <Message Importance="high" Text="Restoring dependencies using 'npm'. This may take several minutes..." /> <Exec WorkingDirectory="$(SpaRoot)" Command="npm install" /> </Target>- <Exec WorkingDirectory="$(SpaRoot)" Command="npm install" /> + <Exec WorkingDirectory="$(SpaRoot)" Command="npm ci" /> - 下記がDotnet publishで実行されるコマンドなので同様に
npm installをnpm ciにnpm run build -- --prodをnpm run buildに変更する。*.csproj<Target Name="PublishRunWebpack" AfterTargets="ComputeFilesToPublish"> <!-- As part of publishing, ensure the JS resources are freshly built in production mode --> <Exec WorkingDirectory="$(SpaRoot)" Command="npm install" /> <Exec WorkingDirectory="$(SpaRoot)" Command="npm run build -- --prod" /> <!-- Include the newly-built files in the publish output --> <ItemGroup> <DistFiles Include="$(SpaRoot)dist\**; $(SpaRoot)dist-server\**" /> <ResolvedFileToPublish Include="@(DistFiles->'%(FullPath)')" Exclude="@(ResolvedFileToPublish)"> <RelativePath>wwwroot\%(RecursiveDir)%(FileName)%(Extension)</RelativePath> <CopyToPublishDirectory>PreserveNewest</CopyToPublishDirectory> <ExcludeFromSingleFile>true</ExcludeFromSingleFile> </ResolvedFileToPublish> </ItemGroup> </Target>- <Exec WorkingDirectory="$(SpaRoot)" Command="npm install" /> - <Exec WorkingDirectory="$(SpaRoot)" Command="npm run build -- --prod" /> + <Exec WorkingDirectory="$(SpaRoot)" Command="npm ci" /> + <Exec WorkingDirectory="$(SpaRoot)" Command="npm run build" /> - 同様に、distフォルダをコピーしたいので、
<DistFiles Include="$(SpaRoot)dist\**; $(SpaRoot)dist-server\**" />を<DistFiles Include="$(SpaRoot)dist\**/>に変更- <DistFiles Include="$(SpaRoot)dist\**; $(SpaRoot)dist-server\**" /> + <DistFiles Include="$(SpaRoot)dist\** /> - ClientAppフォルダでターミナルを開き、npm install を行う
- csprojファイルの
<SpaProxyServerUrl>要素で、Asp.netcore からnpmで起動されるポートが確認できる。今回の場合はhttps://localhost:44421です。 - ASP.NETCoreで使用する証明書を作成する。aspnetcore-https.jsを開くbaseFolderがWindowsとLinuxで違う場所に作成するために分岐をしていて、面倒くさいので、ClientAppにフォルダを作成してしまう。ClientApp.devcertを作成する。
- const baseFolder =process.env.APPDATA !== undefined && process.env.APPDATA !== '' - ? `${process.env.APPDATA}/ASP.NET/https` - : `${process.env.HOME}/.aspnet/https`; + const baseFolder = path.join(__dirname, '.devcert'); - .gitignoreに/.devcert/*を無視するように設定
- package.jsonを編集してnpm run dev の前にaspnetcore-https.jsを実行するように変更する。
"predev": "node aspnetcore-https",をscriptsに追加+ "predev": "node aspnetcore-https", - vite.config.jsを開きサーバー起動時に証明書の設定とポートの設定を行う。
vite.config.js
import path from 'path' const baseFolder = path.join(__dirname, '.devcert'); const certificateArg = process.argv.map(arg => arg.match(/--name=(?<value>.+)/i)).filter(Boolean)[0]; const certificateName = certificateArg ? certificateArg.groups.value : process.env.npm_package_name; const certFilePath = path.join(baseFolder, `${certificateName}.pem`); const keyFilePath = path.join(baseFolder, `${certificateName}.key`); export default defineConfig({ plugins: [vue()], server: { port: 44421, https: { key: keyFilePath, cert: certFilePath } }}) - VisualStudioから実行してみる。 SpaPorxyがnpm を起動して、サーバーが立ち上がるブラウザをlocalhos:44421へredirectしているのがわかる。

- ASP.NET core WebApiを呼び出すために、Proxyの設定をフロントエンドViteに設定する。WebAPIは
https://localhost:7066で動作しているので、https://localhost:7066/apiに対してProxyを設定する。vite.config.jsを修正。vite.config.jsimport path from 'path' const baseFolder = path.join(__dirname, '.devcert'); const certificateArg = process.argv.map(arg => arg.match(/--name=(?<value>.+)/i)).filter(Boolean)[0]; const certificateName = certificateArg ? certificateArg.groups.value : process.env.npm_package_name; const certFilePath = path.join(baseFolder, `${certificateName}.pem`); const keyFilePath = path.join(baseFolder, `${certificateName}.key`); export default defineConfig({ plugins: [vue()], server: { port: 44421, proxy: { '^/api': { target: 'https://localhost:7066', changeOrigin: true, secure: false } }, https: { key: keyFilePath, cert: certFilePath } }})