概要
Azure Computer Vision APIを使ってみるサンプルを書きました。
ほぼMicrosoft Computer Vision API OCR の使い方 (日本語) - Qiitaを参考にさせて頂きました。
また、OCRがどこでどのように読み込まれたのかビジュアライズできるようにしました。
プログラム
ocr.py
# エンドポイント
# https://westcentralus.api.cognitive.microsoft.com/vision/v1.0
# https://westcentralus.api.cognitive.microsoft.com/vision/v2.0

import requests
import json
import cv2

def text_to_points(txt):
    tmp = txt.split(",")
    p = [int(tmp[0]), int(tmp[1]), int(tmp[2]), int(tmp[3])]
    return (p[0], p[1]), (p[0]+p[2], p[1]+p[3])

local_image = cv2.imread("./000011705.jpg")

ocr_url = 'https://westcentralus.api.cognitive.microsoft.com/vision/v2.0/ocr'
headers  = {'Ocp-Apim-Subscription-Key': 'aaaaaaaaaaaa'}
params   = {'language': 'ja', 'detectOrientation ': 'true'}
data     = {'url': 'http://www.moj.go.jp/content/000011705.jpg'}
response = requests.post(ocr_url, headers=headers, params=params, json=data)
response.raise_for_status()

ocr_data = response.json()

output = ""
count = 0

for txt_lines in ocr_data['regions']:
    p1, p2 = text_to_points(txt_lines['boundingBox'])
    # cv2.rectangle(local_image, p1, p2, (0, 0, 255), 3)

    for txt_words in txt_lines['lines']:
        p1, p2 = text_to_points(txt_words['boundingBox'])
        cv2.rectangle(local_image, p1, p2, (0, 255, 0), 2)
        cv2.putText(local_image, str(count), p1, cv2.FONT_HERSHEY_COMPLEX_SMALL, 2, (0, 0, 0), 2)

        output += str(count) + ": "
        count += 1

        for txt_word in txt_words['words']:
            p1, p2 = text_to_points(txt_word['boundingBox'])
            cv2.rectangle(local_image, p1, p2, (255, 0, 0), 1)

            output += txt_word['text']
        output += '\n'
    output += '\n'

print(output)

f = open('output.json', 'w')
json.dump(ocr_data, f, indent=2)

cv2.imwrite("output.png", local_image)
結果
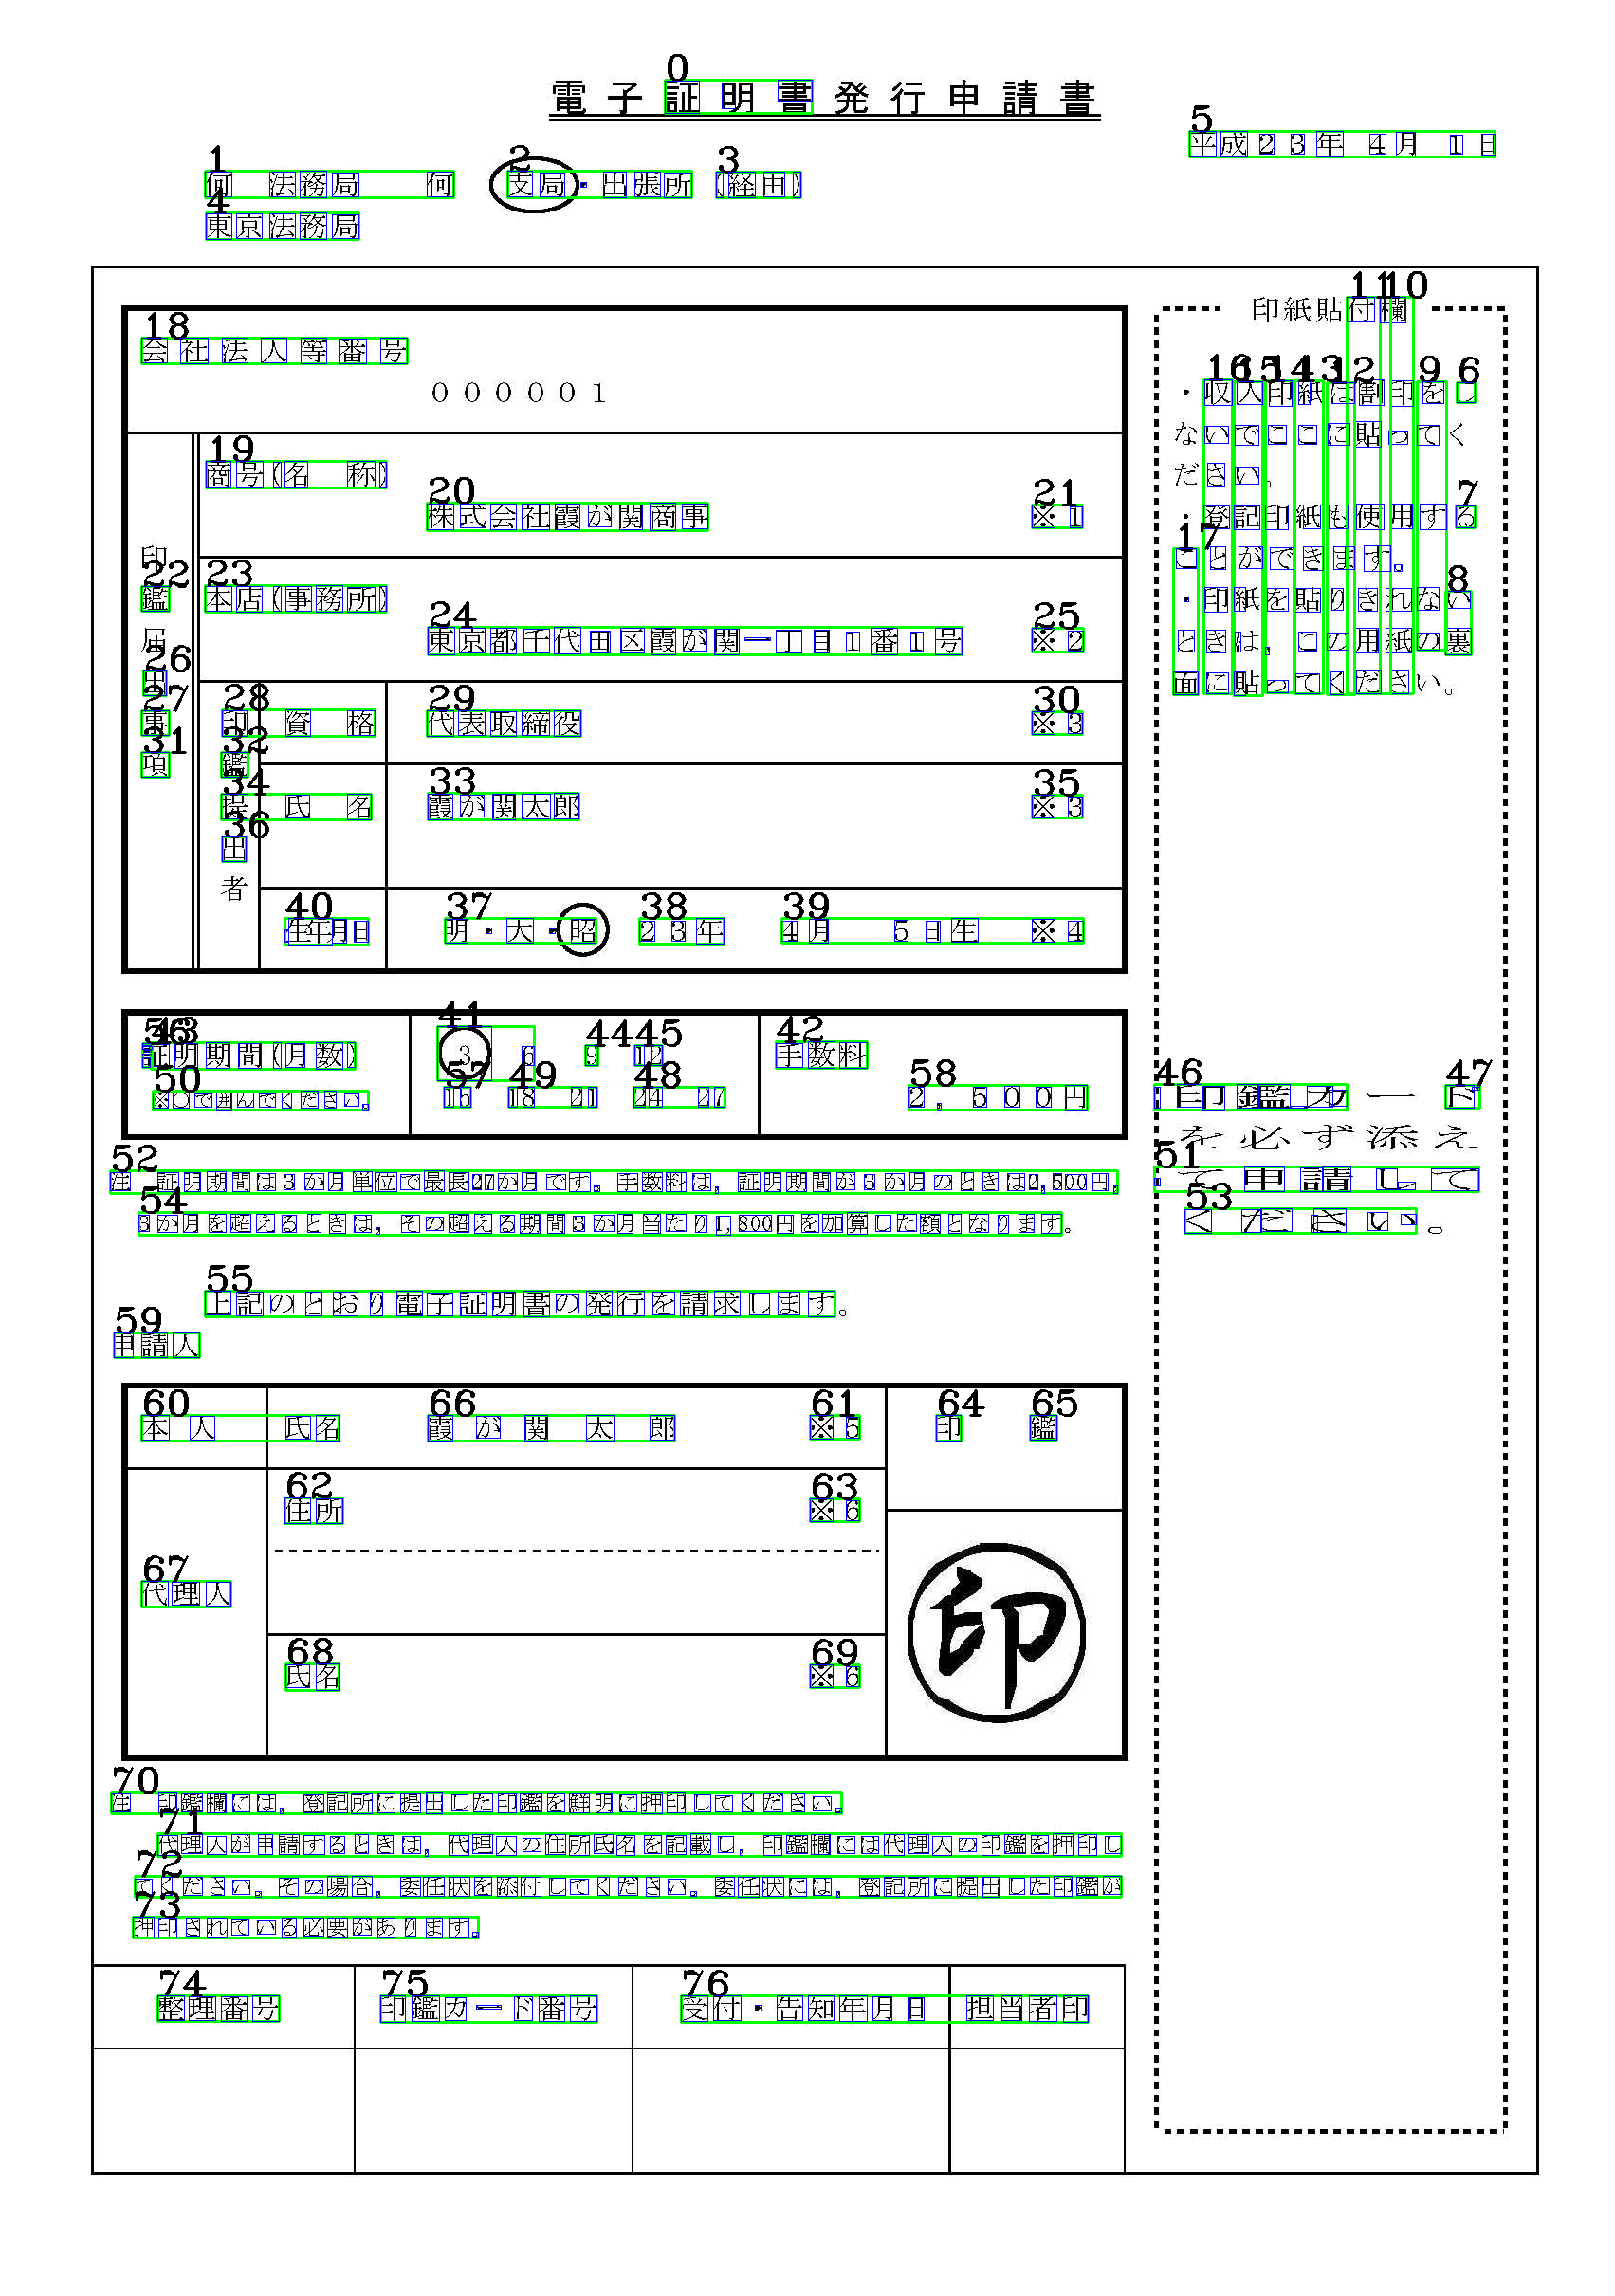
インプット
インプットは法務省の書類を使いました。

アウトプット
outout.json
{
  "language": "ja",
  "orientation": "Up",
  "textAngle": 0.0,
  "regions": [
    {
      "boundingBox": "116,84,1460,2048",
      "lines": [
        {
          "boundingBox": "701,84,155,35",
          "words": [
            {
              "boundingBox": "701,85,36,34",
              "text": "\u8a3c"
            },
            {
              "boundingBox": "761,87,14,27",
              "text": "\u65e5"
            },
            {
              "boundingBox": "820,84,36,23",
              "text": "\u7ae5"
            }
          ]
        },
        {
          "boundingBox": "216,180,
....
0: 証日童
1: 何法務局何
2: 支局・出張所
3: (経由)
4: 東京法務局
5: 平成23年4月1日
6: し
7: る
8: い裏
9: をてすなの
10: 欄印っ用。れ紙さ
11: 付割貼使すき用だ
12: はにもまりのく
13: 糸こ氏き貼こて
14: 印こ印でを,っ
15: 入でい記が糸ー貝
16: 収いさ登と印きに
17: こ・と面
18: 会社法人等番号
19: 商号(名称)
20: 株式会社霞が関商事
21: ※1
22: 鑑
23: 本店(事務所)
24: 東京都千代田区霞が関一丁目1番1号
25: ※2
26: 出
27: 事
28: 印資格
29: 代表取締役
30: ※3
31: 項
32: 鑑
33: 霞が関太郎
34: 提氏名
35: ※3
36: 出
37: 明・大・昭
38: 23年
39: 4月5日生※4
40: :蜉月日
41: 〇6
42: 手数料
43: 正明期間(月数)
44: 9
45: 12
46: :日卩金監ープノ
47: ト、
48: 2427
49: 1821
50: ※0で囲んでください。
51: 丨申言青廴′—C
52: 注証明期間は3か月単位て最長27か月です。手数料は。証明期間が3か月のときは2,5圓円,

53: くプビ~さし、
54: 3か月を超えるときは,その超える期間3か月当たりし800円を加算した額となります
55: 上記のとおり電子証明書の発行を請求します
56: 一1一一口
57: 15
58: 2,500円
59: 申請人
60: 本人氏名
61: ※5
62: 住所
63: ※6
64: 印
65: 鑑
66: 霞が関太郎
67: 代理人
68: 氏名
69: ※6
70: 注印鑑欄には。登記所に提出した印鑑を鮮明に押印してください。
71: 代理人が申請するときは,代理人の住所氏名を記載し。印鑑欄には代理人の印鑑を押印し
72: てください。その場合。委任状を添付してください。委任状には。登記所に提出した印鑑
が
73: 押印されている必要があります。
74: 整理番号
75: 印鑑カード番号
76: 受付・告知年月日担当者印
OpenCVで画像内に日本語の描画をするのがめんどうなので、数値を描画しました。
感想
わりと精度がひくい。