はじめに
Gif画像のようなポストエフェクトを制御するタイムラインを作ります

比較
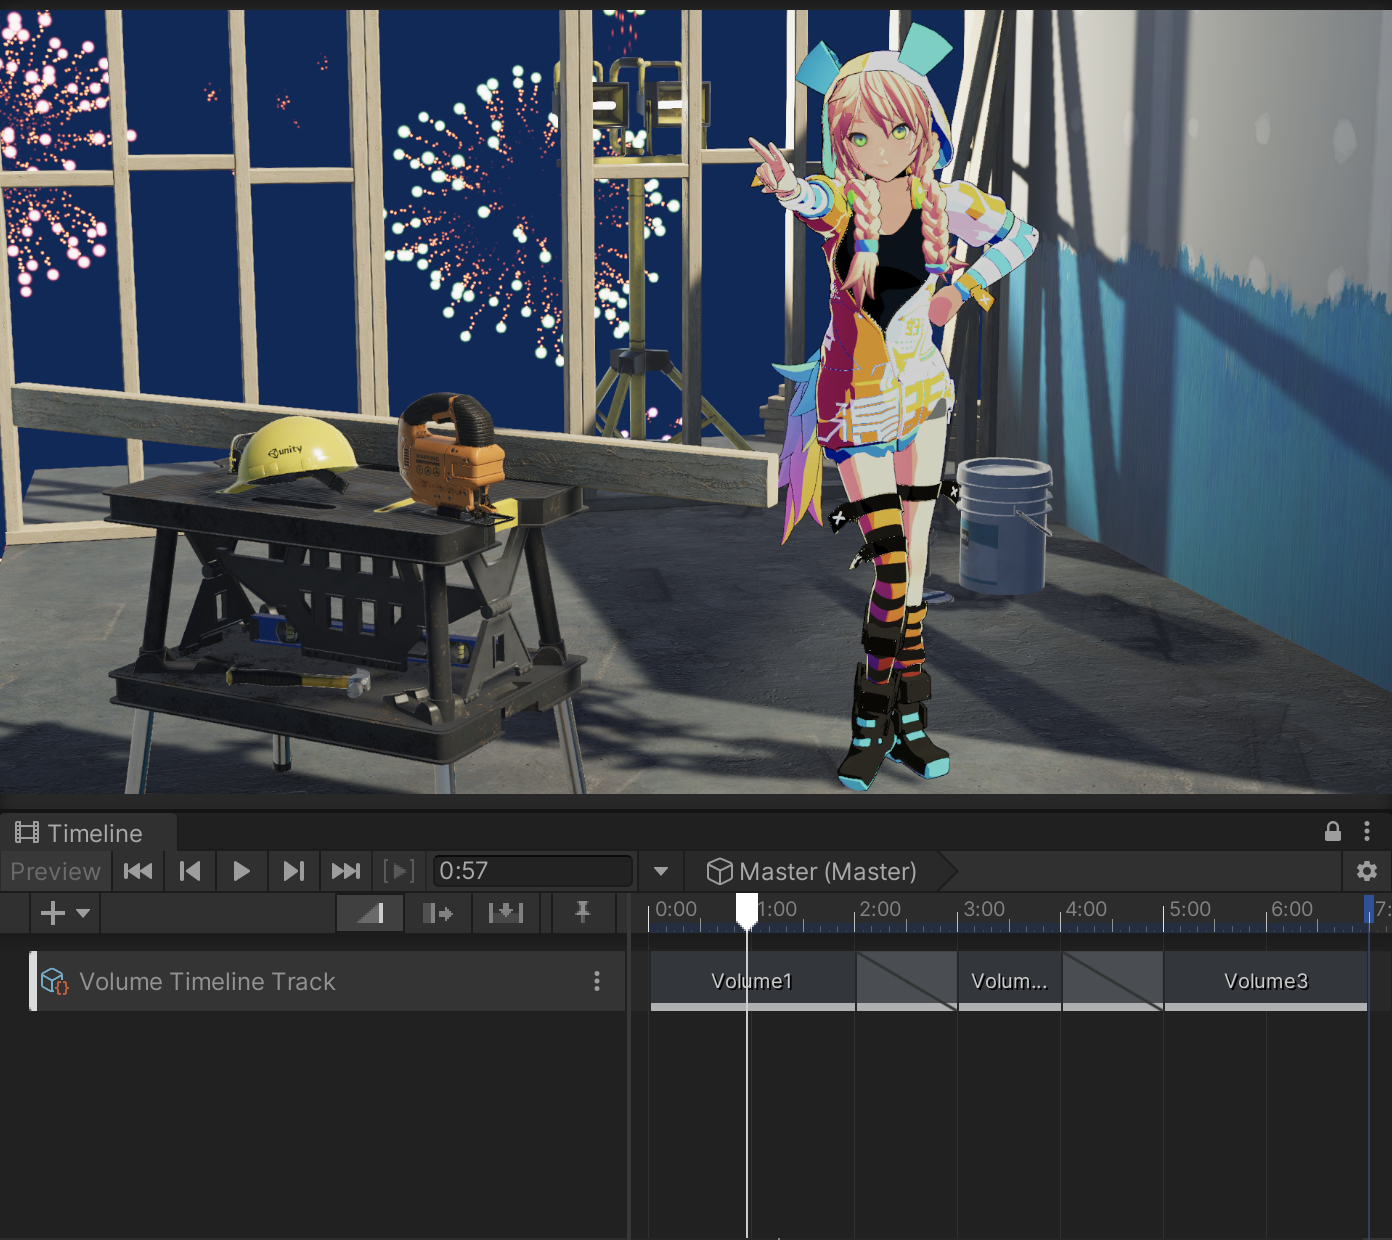
タイムラインが一番左のクリップの上にいる時は、目立つポストエフェクトはかかりません
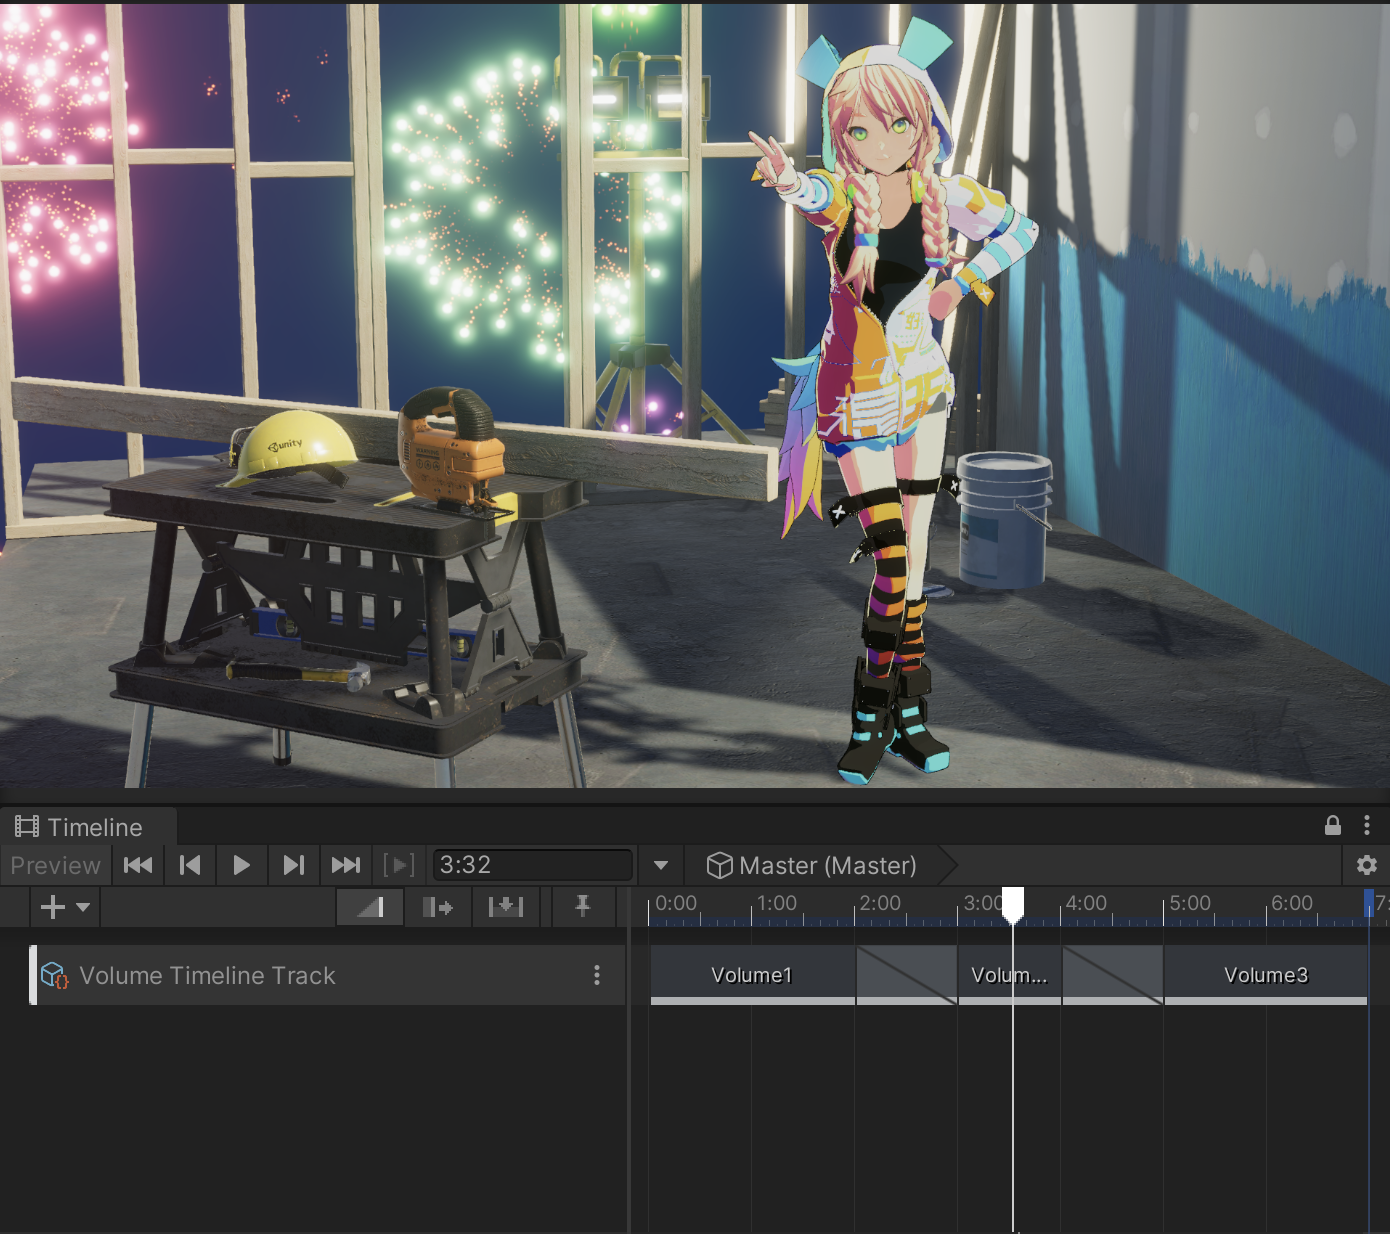
タイムラインが真ん中のクリップの上にいる時は、Bloomエフェクトがかかり、後ろの花火が綺麗に見えます
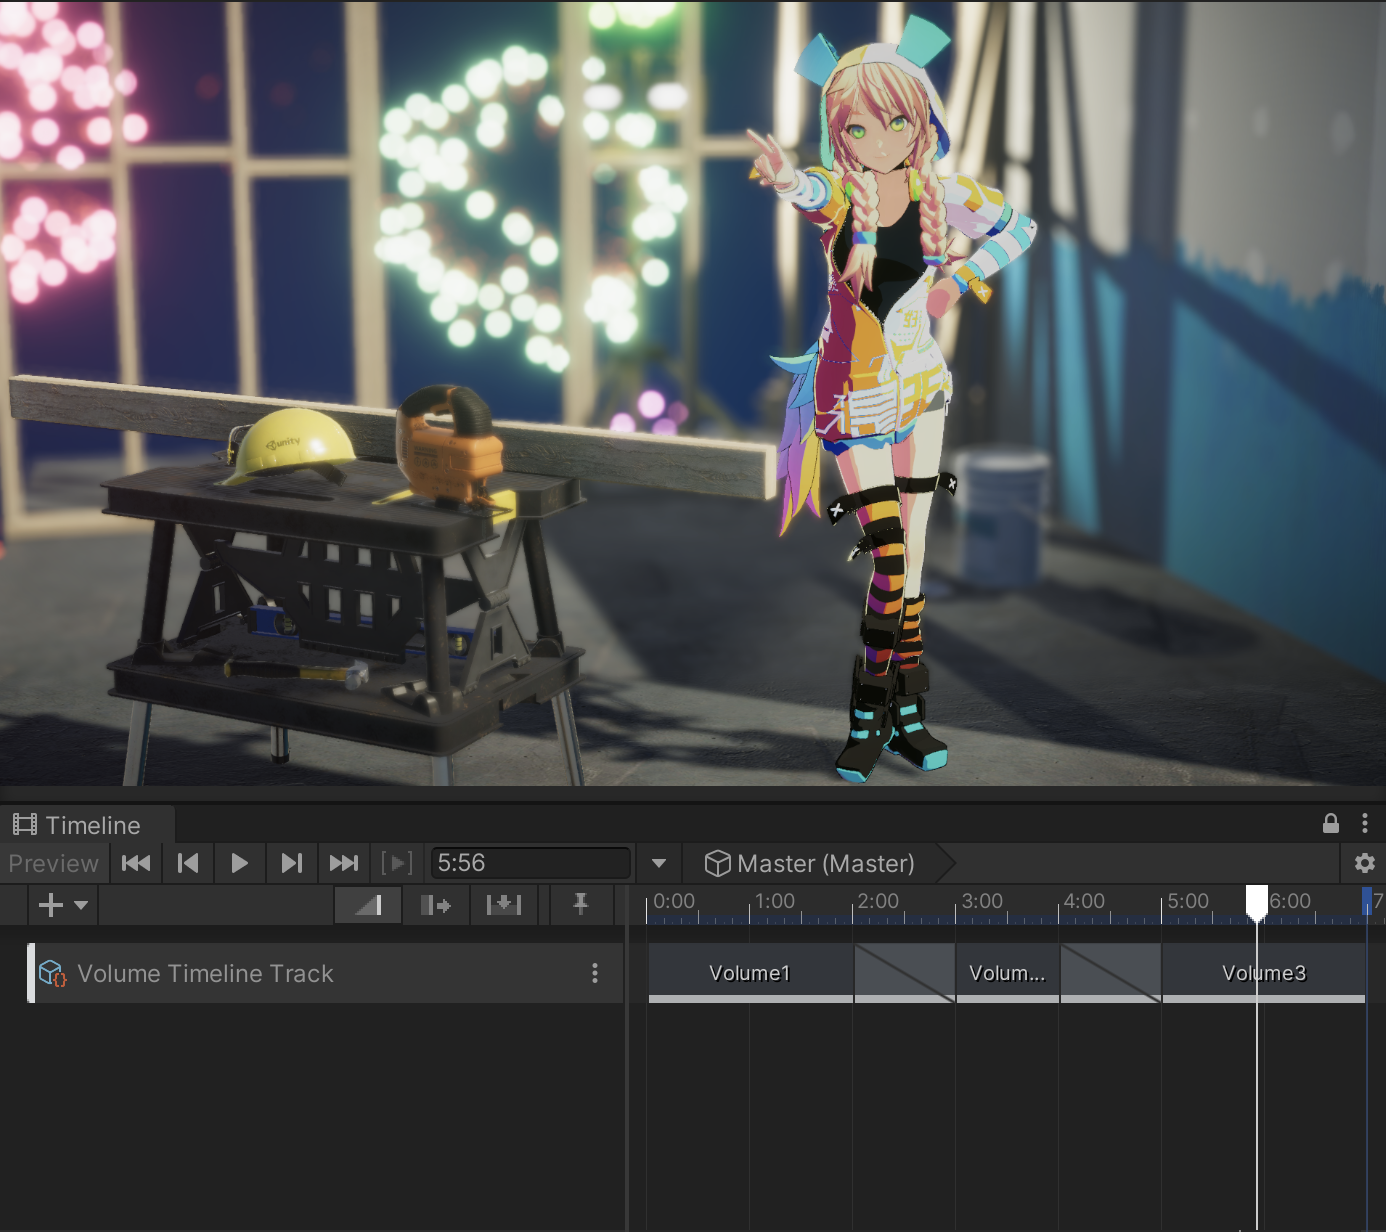
タイムラインが右のクリップの上にいる時は、Depth of Fieldエフェクトがかかり、Unityちゃんがフォーカスされ、後ろの背景がボケて見えます
環境
- Unity 2020.1.15f
- Universal Render Pipeline
UniversalRenderPipelineについて
この記事の環境はUniversalRenderPipeline(以下URP)を使用します。
URPはUnityが新たに設計してるグラフィクスパイプラインで、従来のグラフィクスパイプラインとは互換性がありません。
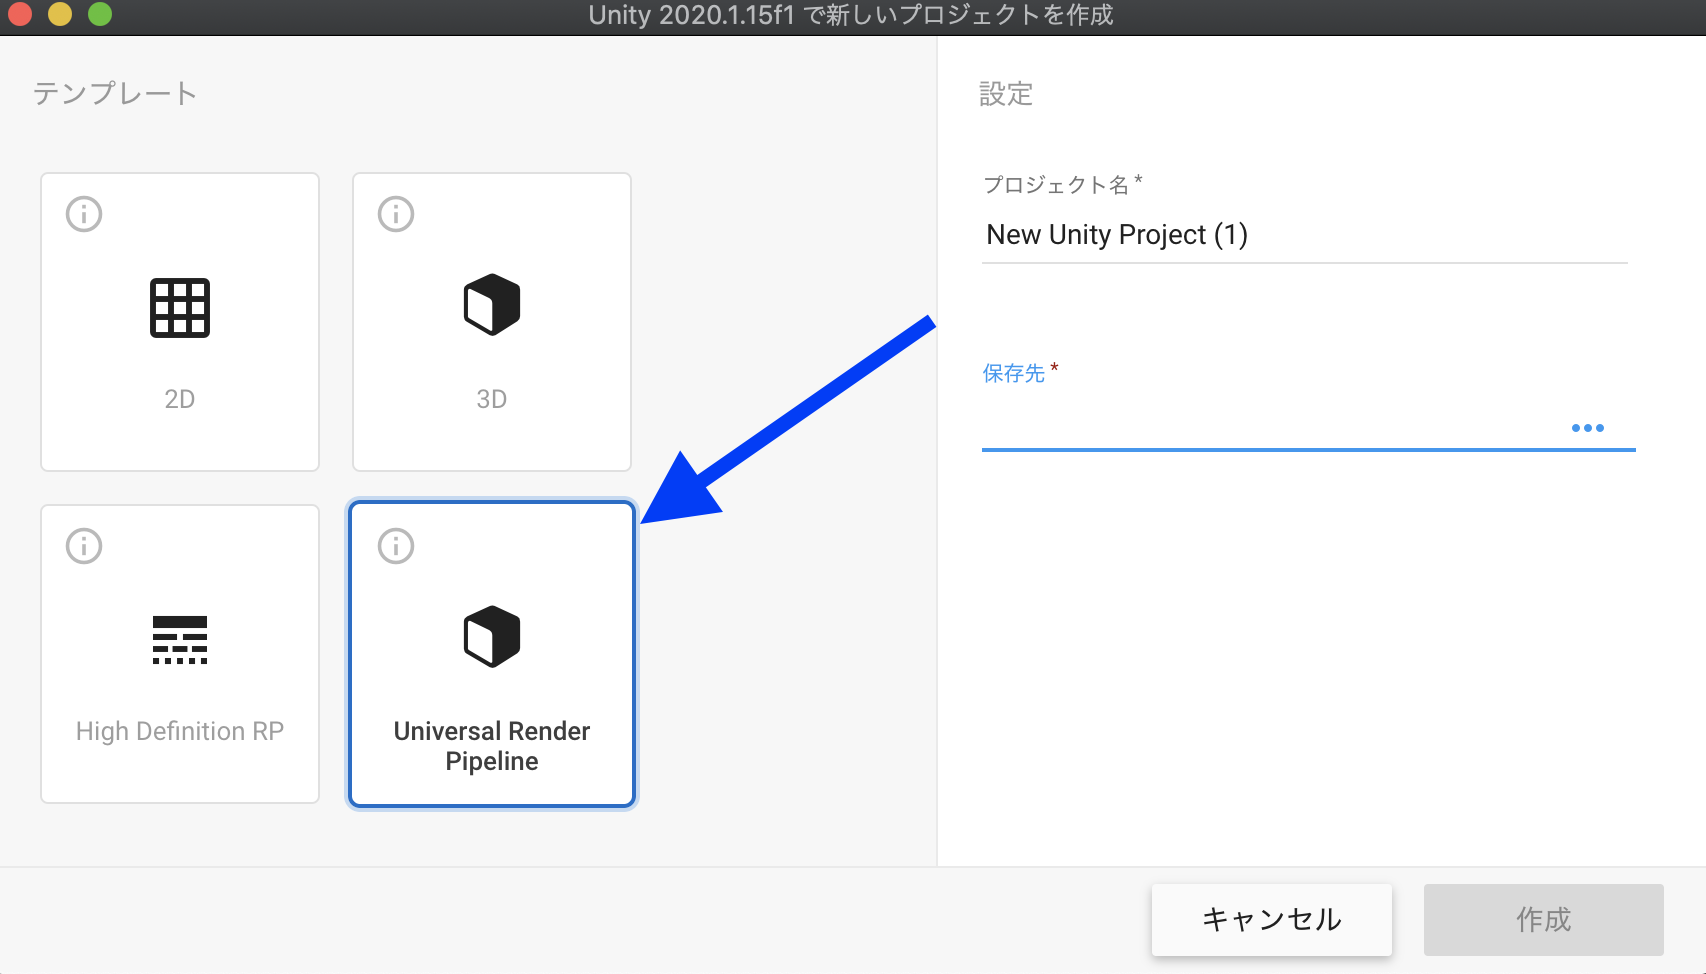
この記事と同じ手順でタイムラインを作成する場合はプロジェクト作成時にUniversal Render Pipelineを選択してください。
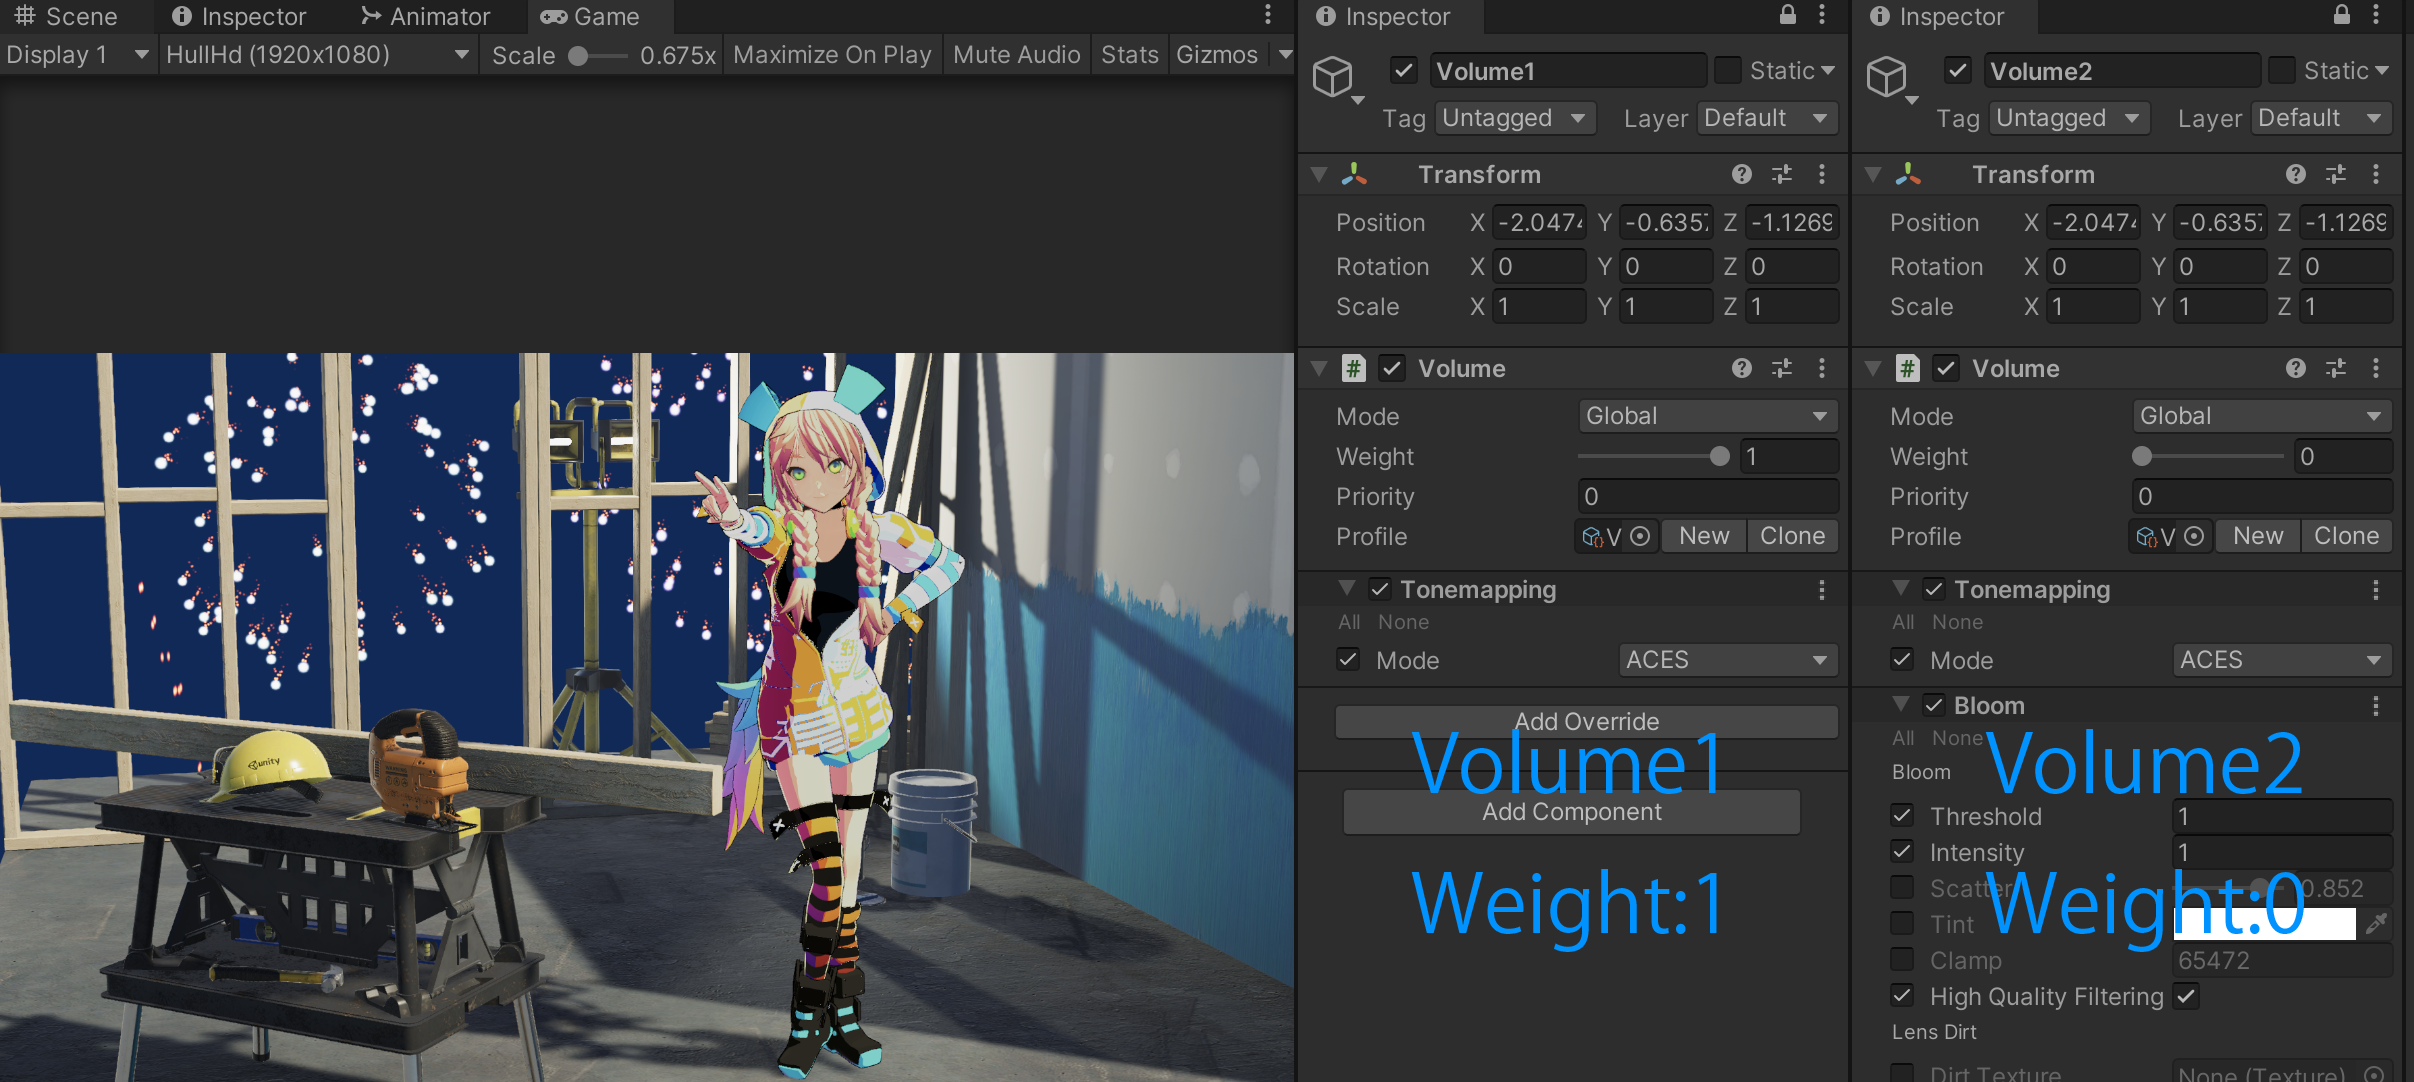
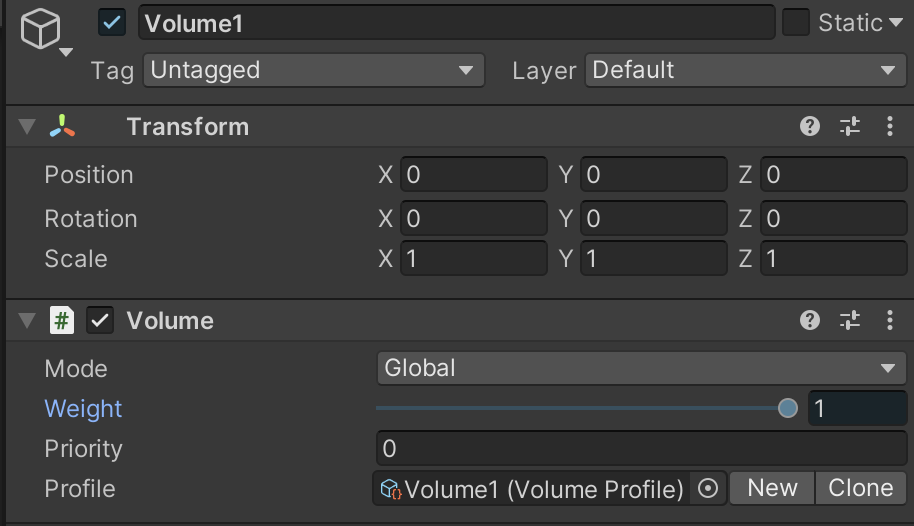
検証用のポストエフェクトを用意する
Unityではポストエフェクトの設定データをVolumeと呼びます。
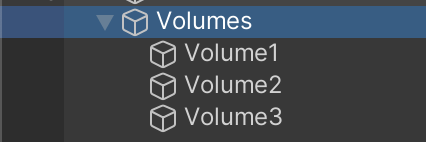
今回は3つのVolumeを用意しました
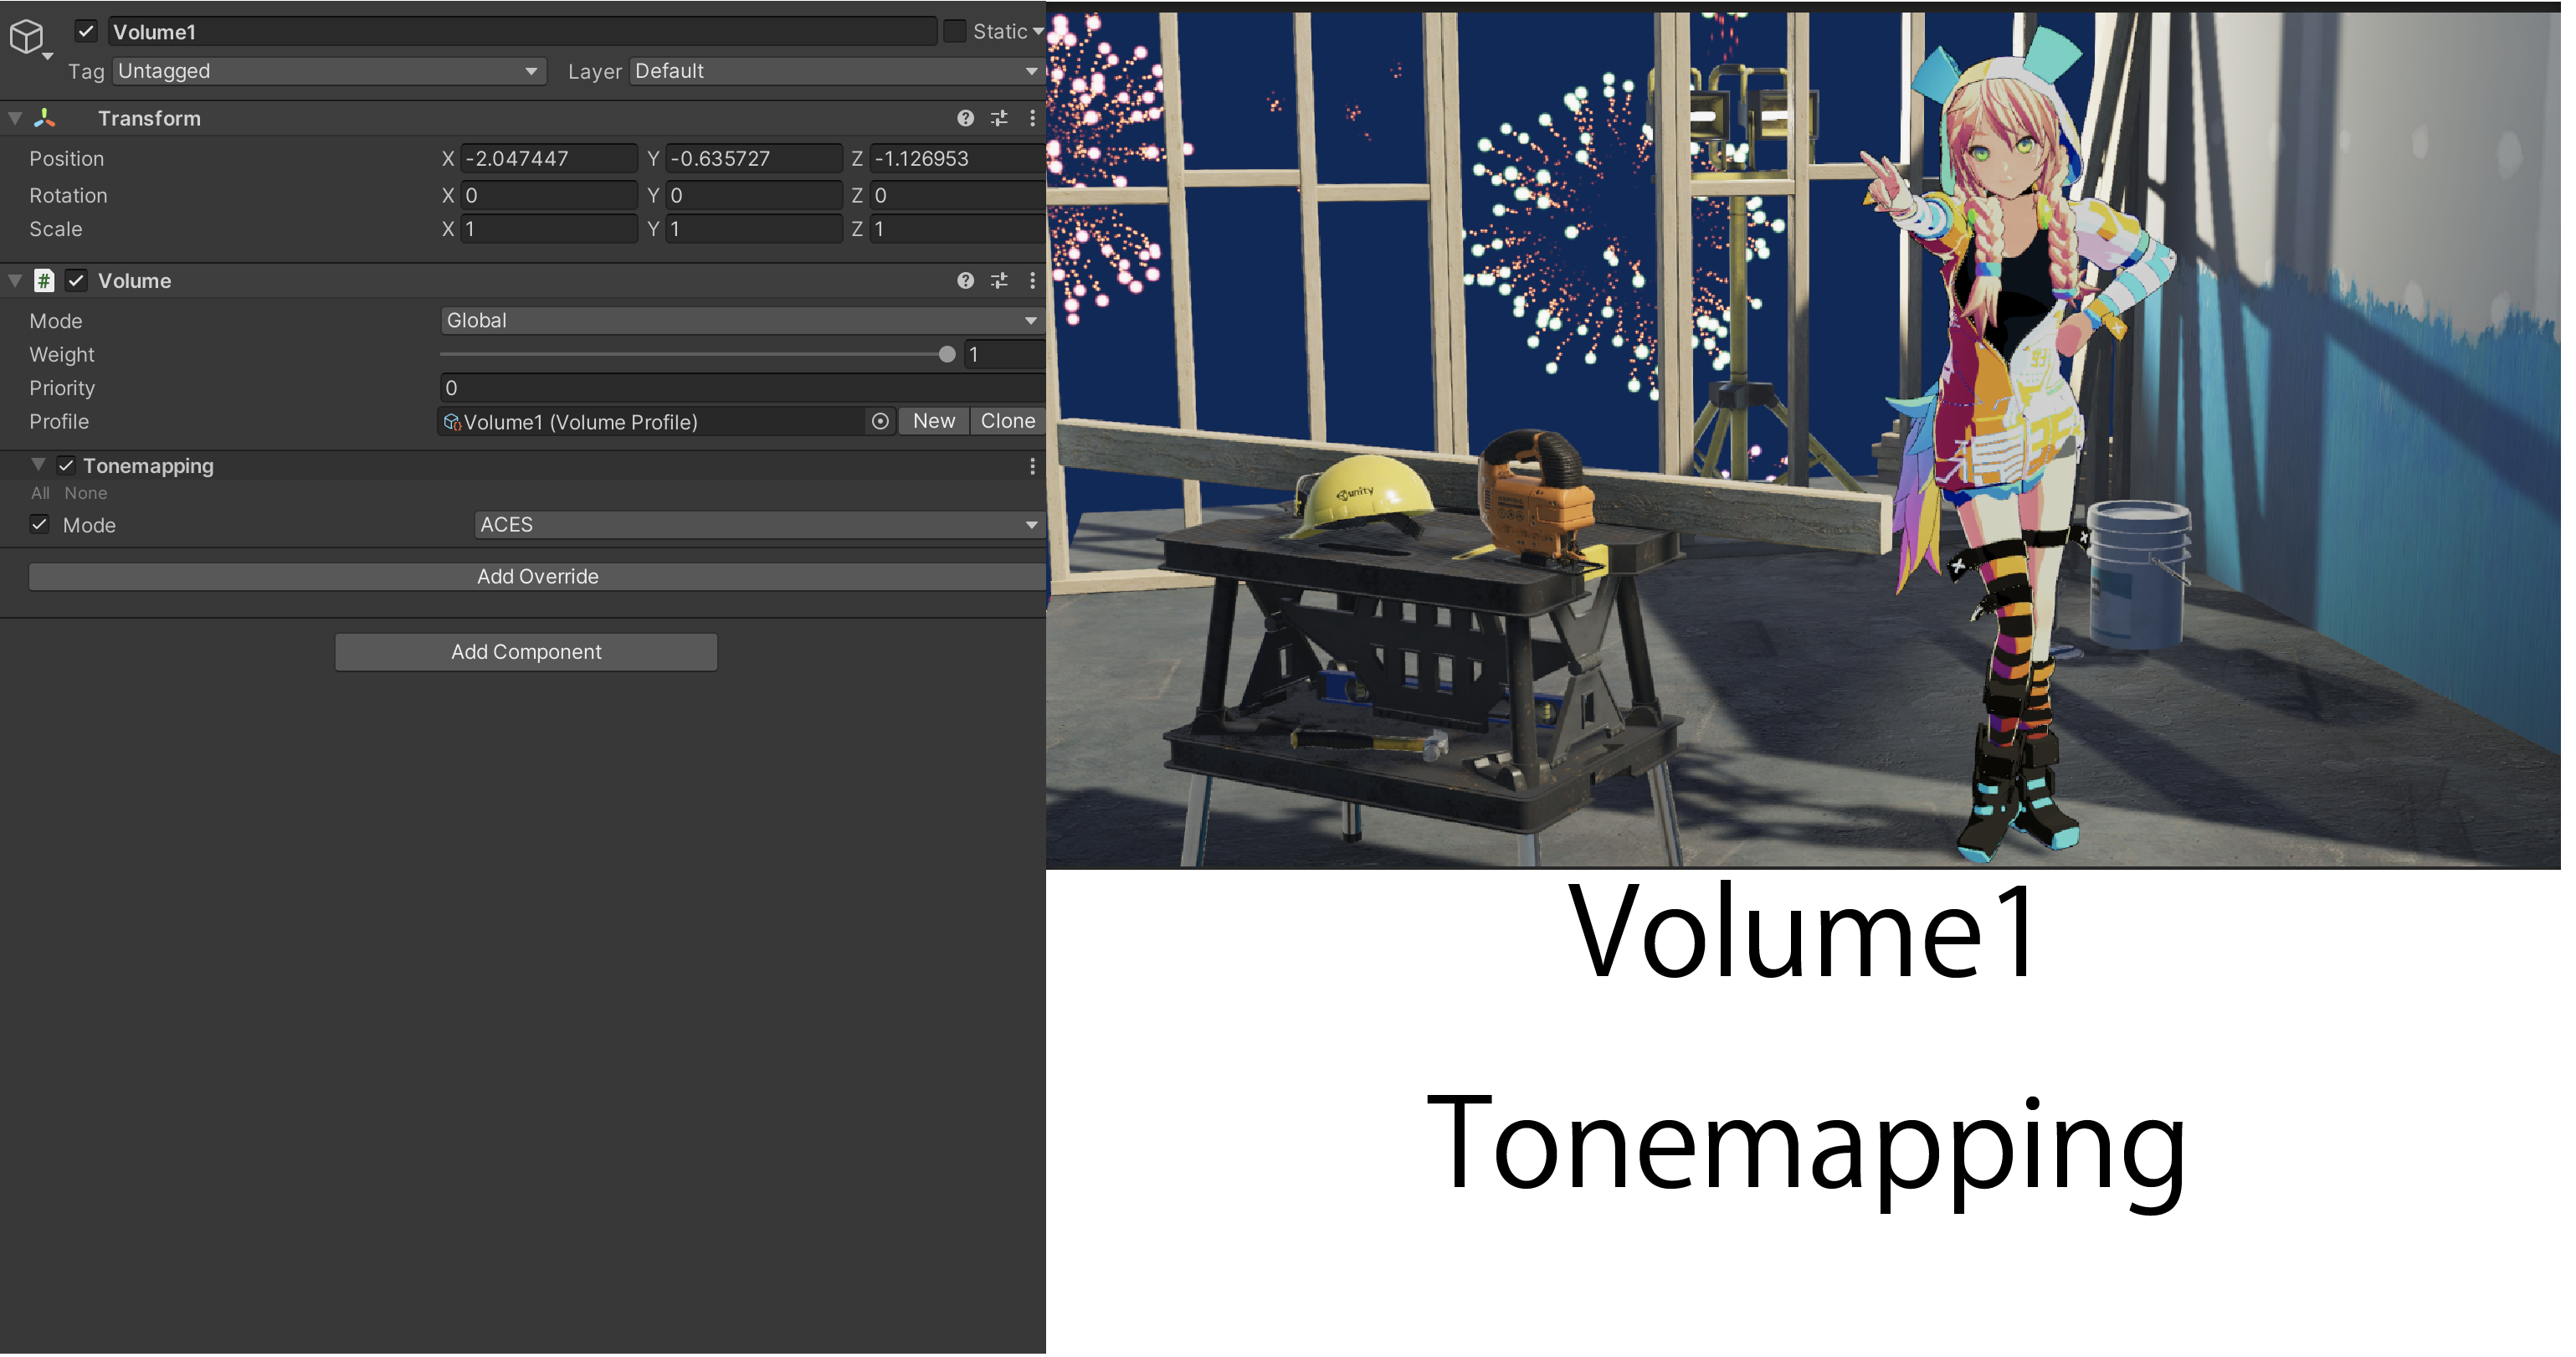
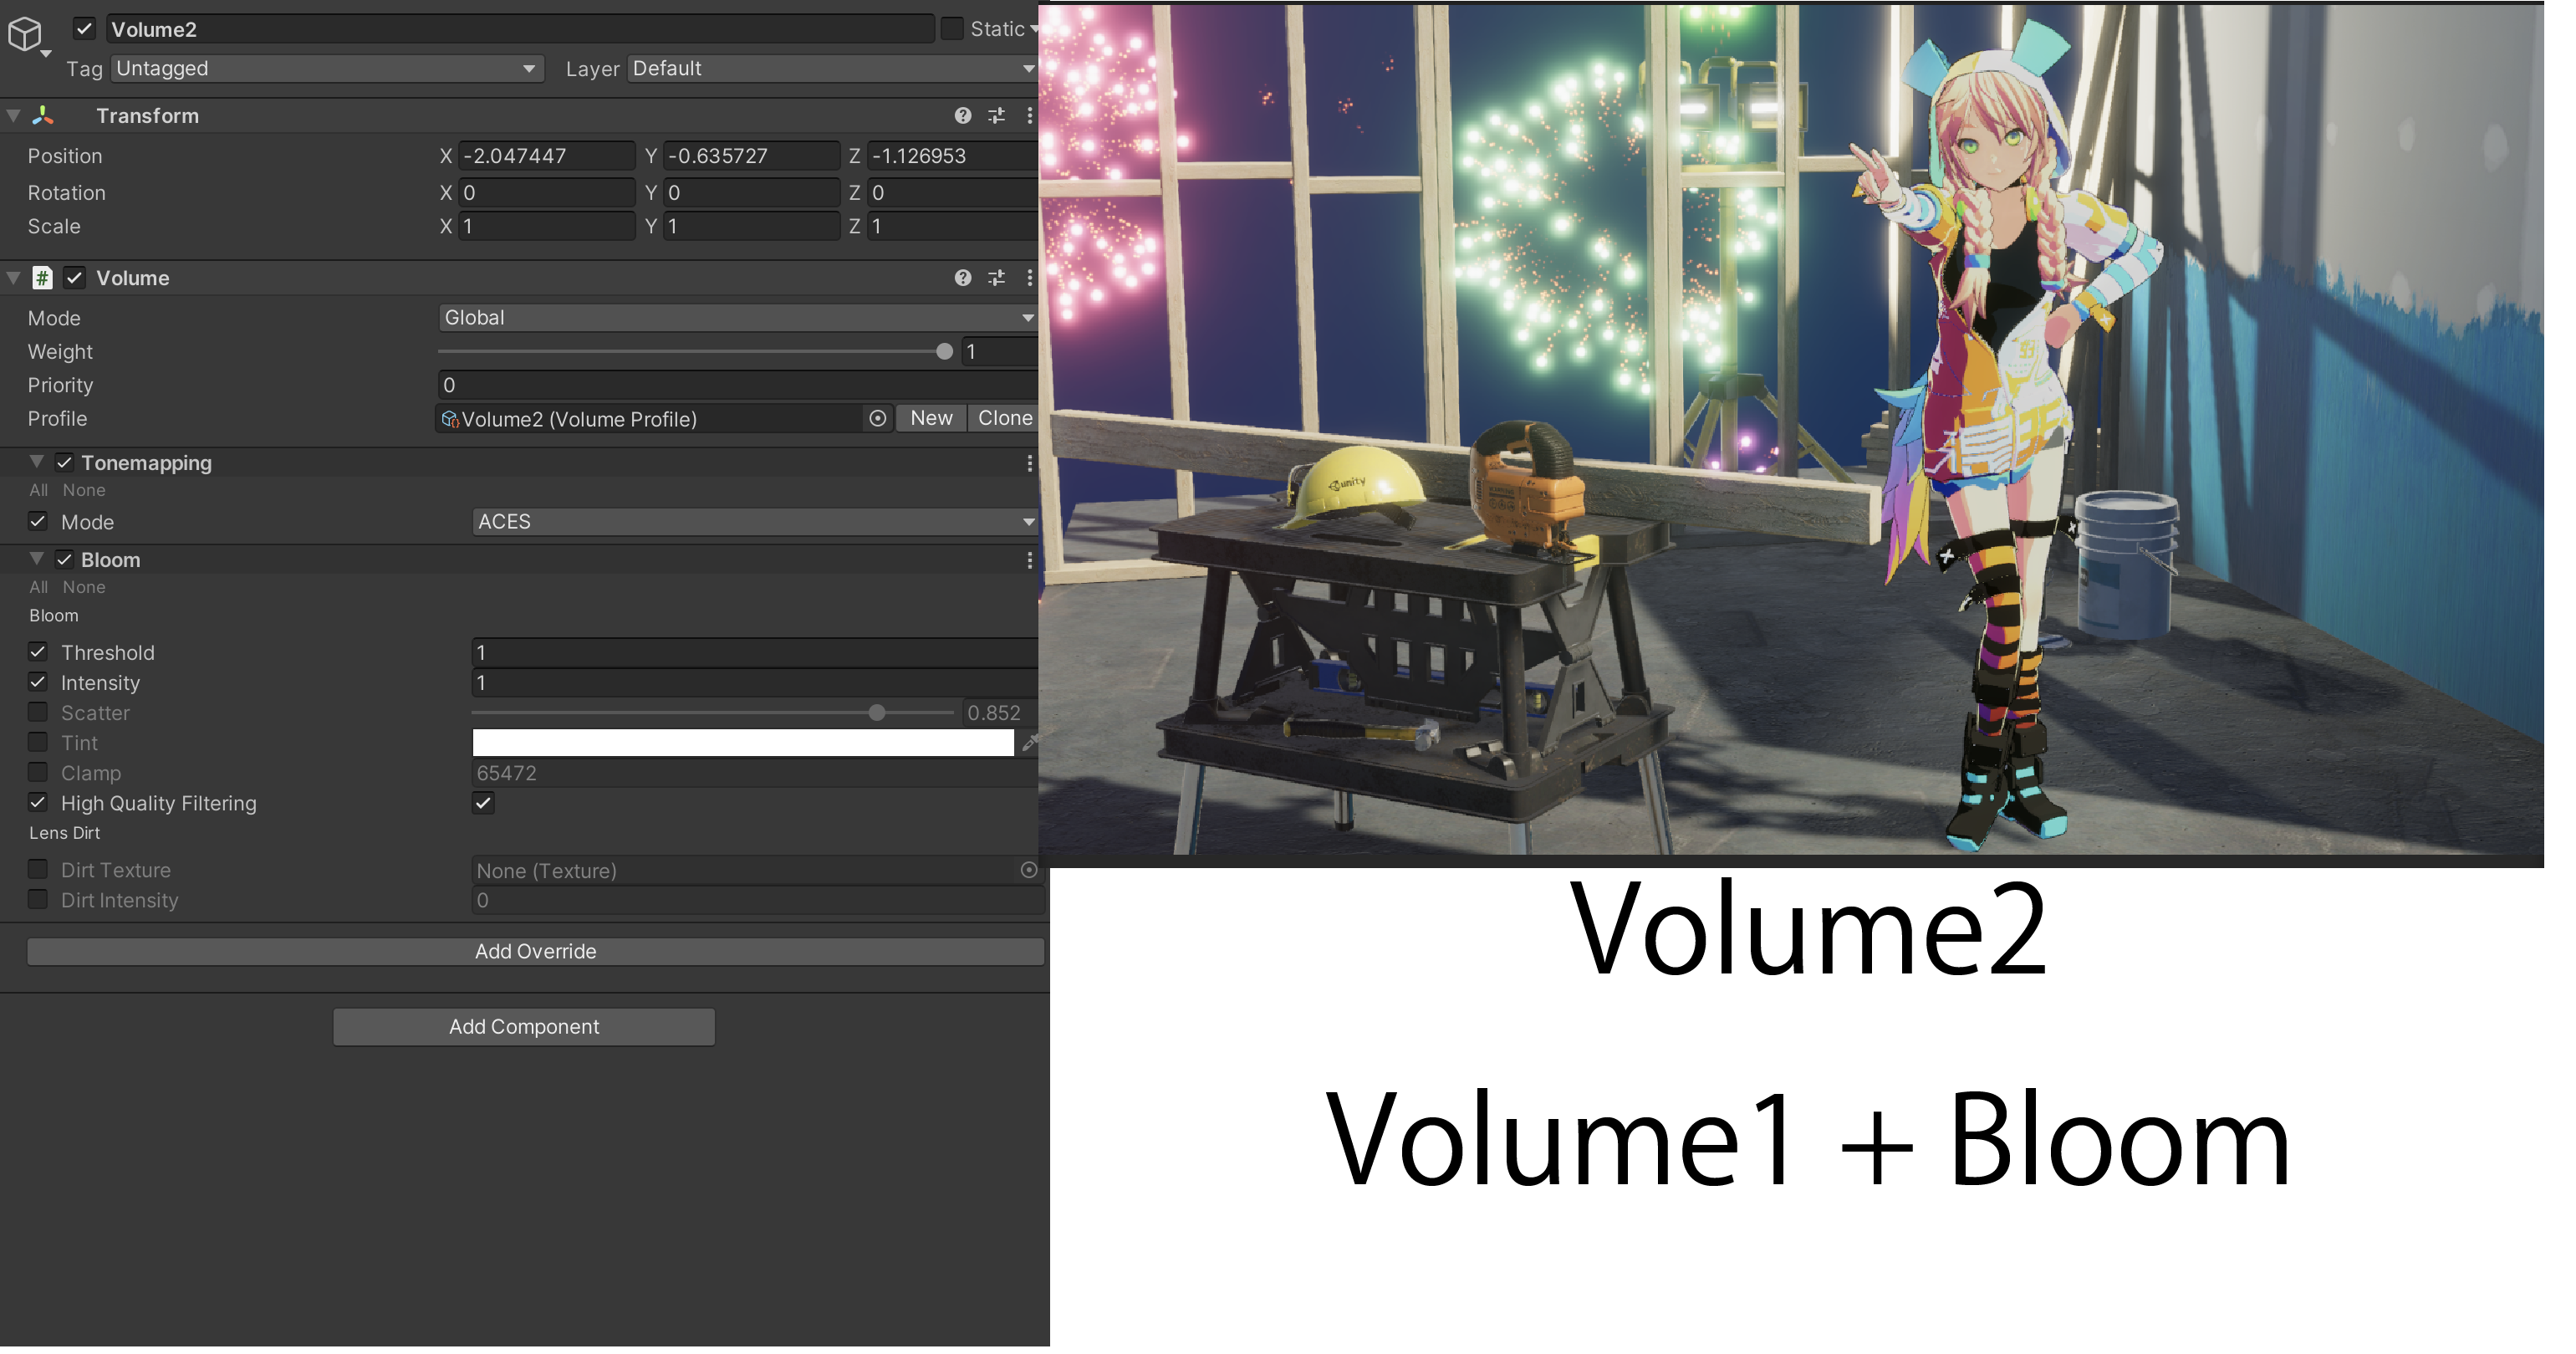

それぞれのパラメーターについては触れませんが、Volume1よりもVolume2が、Volume2よりもVolume3が華やかに見えるような設定にしました。
これらのVolumeは同名のゲームオブジェクトを作成しヒエラルキーに配置します。
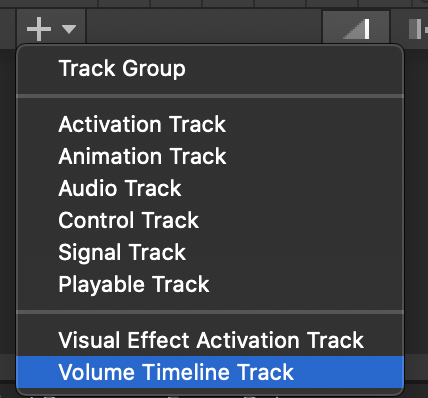
タイムライントラックを自作する
VolumeTimelineTrackという名前のトラックを作成します。このトラックを使ってポストエフェクトを制御します。
タイムラインを作るには3つのクラスが必要になります。
[Serializable]
public class VolumeTimelineAsset : PlayableAsset
{
    public override Playable CreatePlayable(PlayableGraph graph, GameObject owner)
    {
        return Playable.Null;
    }
}
public class VolumeTimelineBehaviour : PlayableBehaviour
{
}
[Serializable]
[TrackClipType(typeof(VolumeTimelineAsset), false)]
public class VolumeTimelineTrack : PlayableTrack
{
}
これらのクラスを作成することでタイムラインにVolume Timeline Trackを作成できるようになります。
それぞれのクラスの役割
現時点ではクリップの配置やVolumeの設定はできませんが、それぞれのクラスの役割を完成したタイムラインを使って説明します。
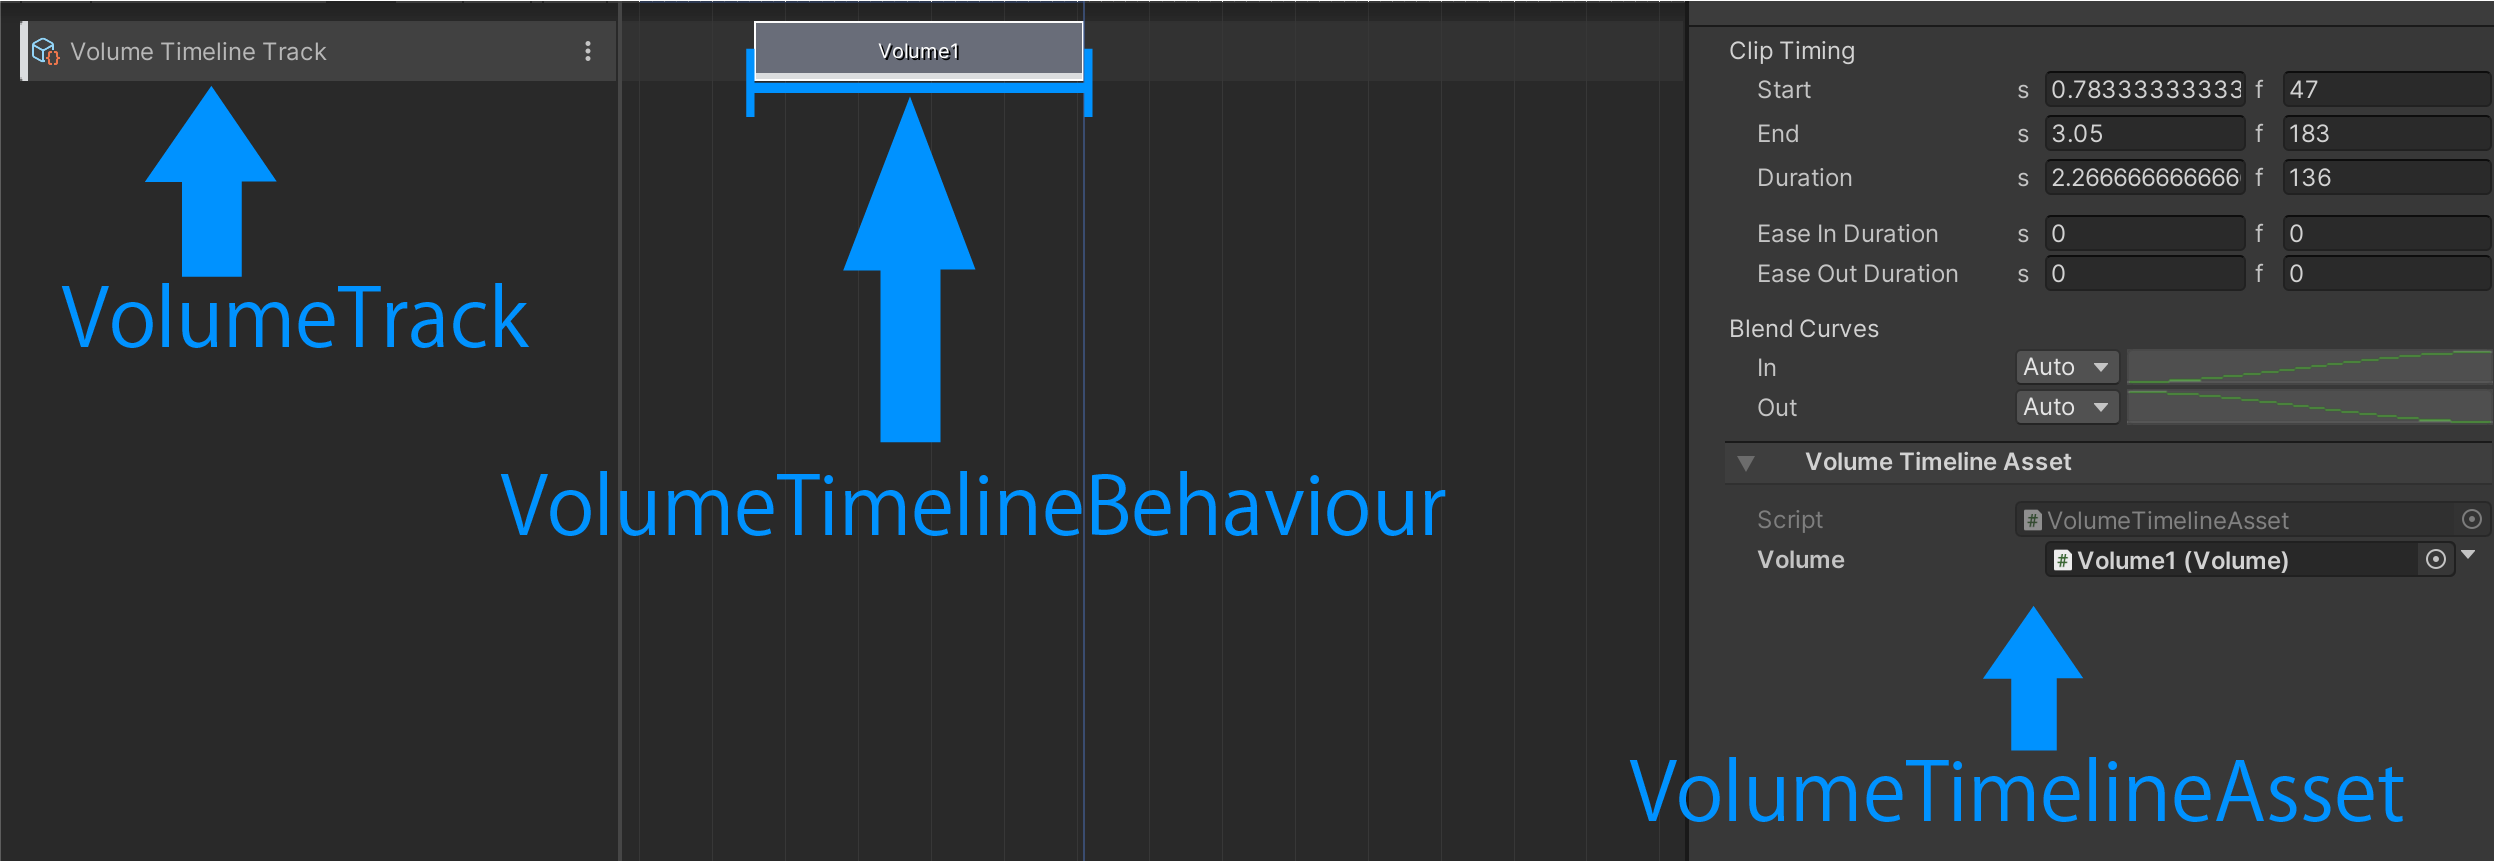
VolumeTrack
VolumeTrackはトラックの設定に関するクラスで、具体的には以下のような処理を担当します。
- トラック上に作れるクリップの種類を制限する
- トラック上にクリップが作られた時の挙動を設定する
- トラックの名前を変更する
VolumeTimelineBehaviour
VolumeTimelineBehaviourはクリップの振る舞いを制御するクラスで、具体的には以下のような処理を担当します。
- クリップが再生された時の挙動を設定する
- クリップが再生中の挙動を設定する
- クリップが再生終了した時の挙動を設定する
VolumeTimelineAsset
VolumeTimelineAssetはVolumeTimelineBehaviourを作るためのクラスで、具体的には以下のような処理を担当します。
- クリップが参照するオブジェクトを設定する
- 参照したオブジェクトをVolumeTimelineBehaviourに渡す
実装方針
これらの役割を踏まえて、以下のような実装方針を建てます。
- トラック上にクリップを作れるようにする
- クリップを再生している時にVolumeをアクティブにし、それ以外は非アクティブにする
- タイムラインで制御するVolumeを指定できるようにする
1. トラック上にクリップを作れるようにする
これはすでにTrackClipTypeアトリビュートで設定されているため、追加の実装は不要です。
2. クリップを再生している時にVolumeをアクティブにし、それ以外は非アクティブにする
この動作はActivationTrackとまったく同じものになります。
そのためActivationControlPlayableを継承することで実装が可能です。
public class VolumeTimelineBehaviour : ActivationControlPlayable
{
    public void SetTarget(Volume volume, PostPlaybackState postPlaybackState)
    {
        gameObject = volume.gameObject;
        postPlayback = postPlaybackState;
    }
}
SetTargetメソッドを作り以下の情報を外部から渡せるようにします
- アクティブ・非アクティブを切り替えるゲームオブジェクト
- クリップの再生終了時にオブジェクトをどの状態にするか
3. タイムラインで制御するVolumeを指定できるようにする
画像のVolumeの指定欄を作るためのスクリプトを作成します。
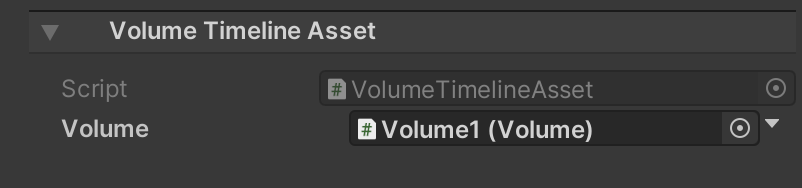
[Serializable]
public class VolumeTimelineAsset : PlayableAsset
{
    public ExposedReference<Volume> volume;

    public override Playable CreatePlayable(PlayableGraph graph, GameObject owner)
    {
        Volume resolvedVolume = volume.Resolve(graph.GetResolver());
        if (resolvedVolume == null)
        {
            return default;
        }

        VolumeTimelineBehaviour behaviour = new VolumeTimelineBehaviour();
        behaviour.SetTarget(resolvedVolume, ActivationControlPlayable.PostPlaybackState.Inactive);
        return ScriptPlayable<VolumeTimelineBehaviour>.Create(graph, behaviour);
    }
}
ExporsedReferenceについて
ExporsedReferenceはシーンにあるオブジェクトをタイムラインから参照する仕組みです。
似たような仕組みとして [SerializeField]がありますが、Timelineはアセットのためシーンのオブジェクトを参照できません。
(Prefabの[SerializeField]にシーン上のオブジェクトを指定できない挙動と同じものになります)
そのため実行時にシーンにあるオブジェクトを動的に取得する必要がありExporsedReferenceはそれを行うための仕組みです。
ExposedReferenceの詳しい仕組みはこちらの記事を参考にしてください。
動的に取得したオブジェクトにアクセスする為にはResolveメソッドを使用します。
VolumeTimelineBehaviourにVolumeを渡す
自作したSetTargetメソッドにVolumeを渡します。ここでActivationControlPlayable.PostPlaybackState.Inactiveを指定することで、クリップの再生が終了時にgameObjectが非アクティブになります。
ScriptPlayableを生成して返す
ScriptPlayabeはPlayableGraphでグラフのノード生成に必要なクラスです。
タイムラインはPlayableGraphを利用するため、ScriptPlayableを生成する必要があります。TimelineとPlayableGraphの詳細についてはUnityのマニュアルを参考にしてください。
これで、タイムラインが再生されている時だけVolumeがアクティブになります。
自作トラックを再生してみる
VolumeTimelineTrackを作って、Volumeを配置します。

再生してみます。

Volumeを切り替えるトラックを作成することができました。
フェードを実装する
これまでの実装でVolumeを切り替えることができたので、次はクリップが重なってる部分をフェードする処理を実装します。
実装方針
画像の通り、VolumeはWeightを操作することで、2つのパラメーターをブレンドできます。
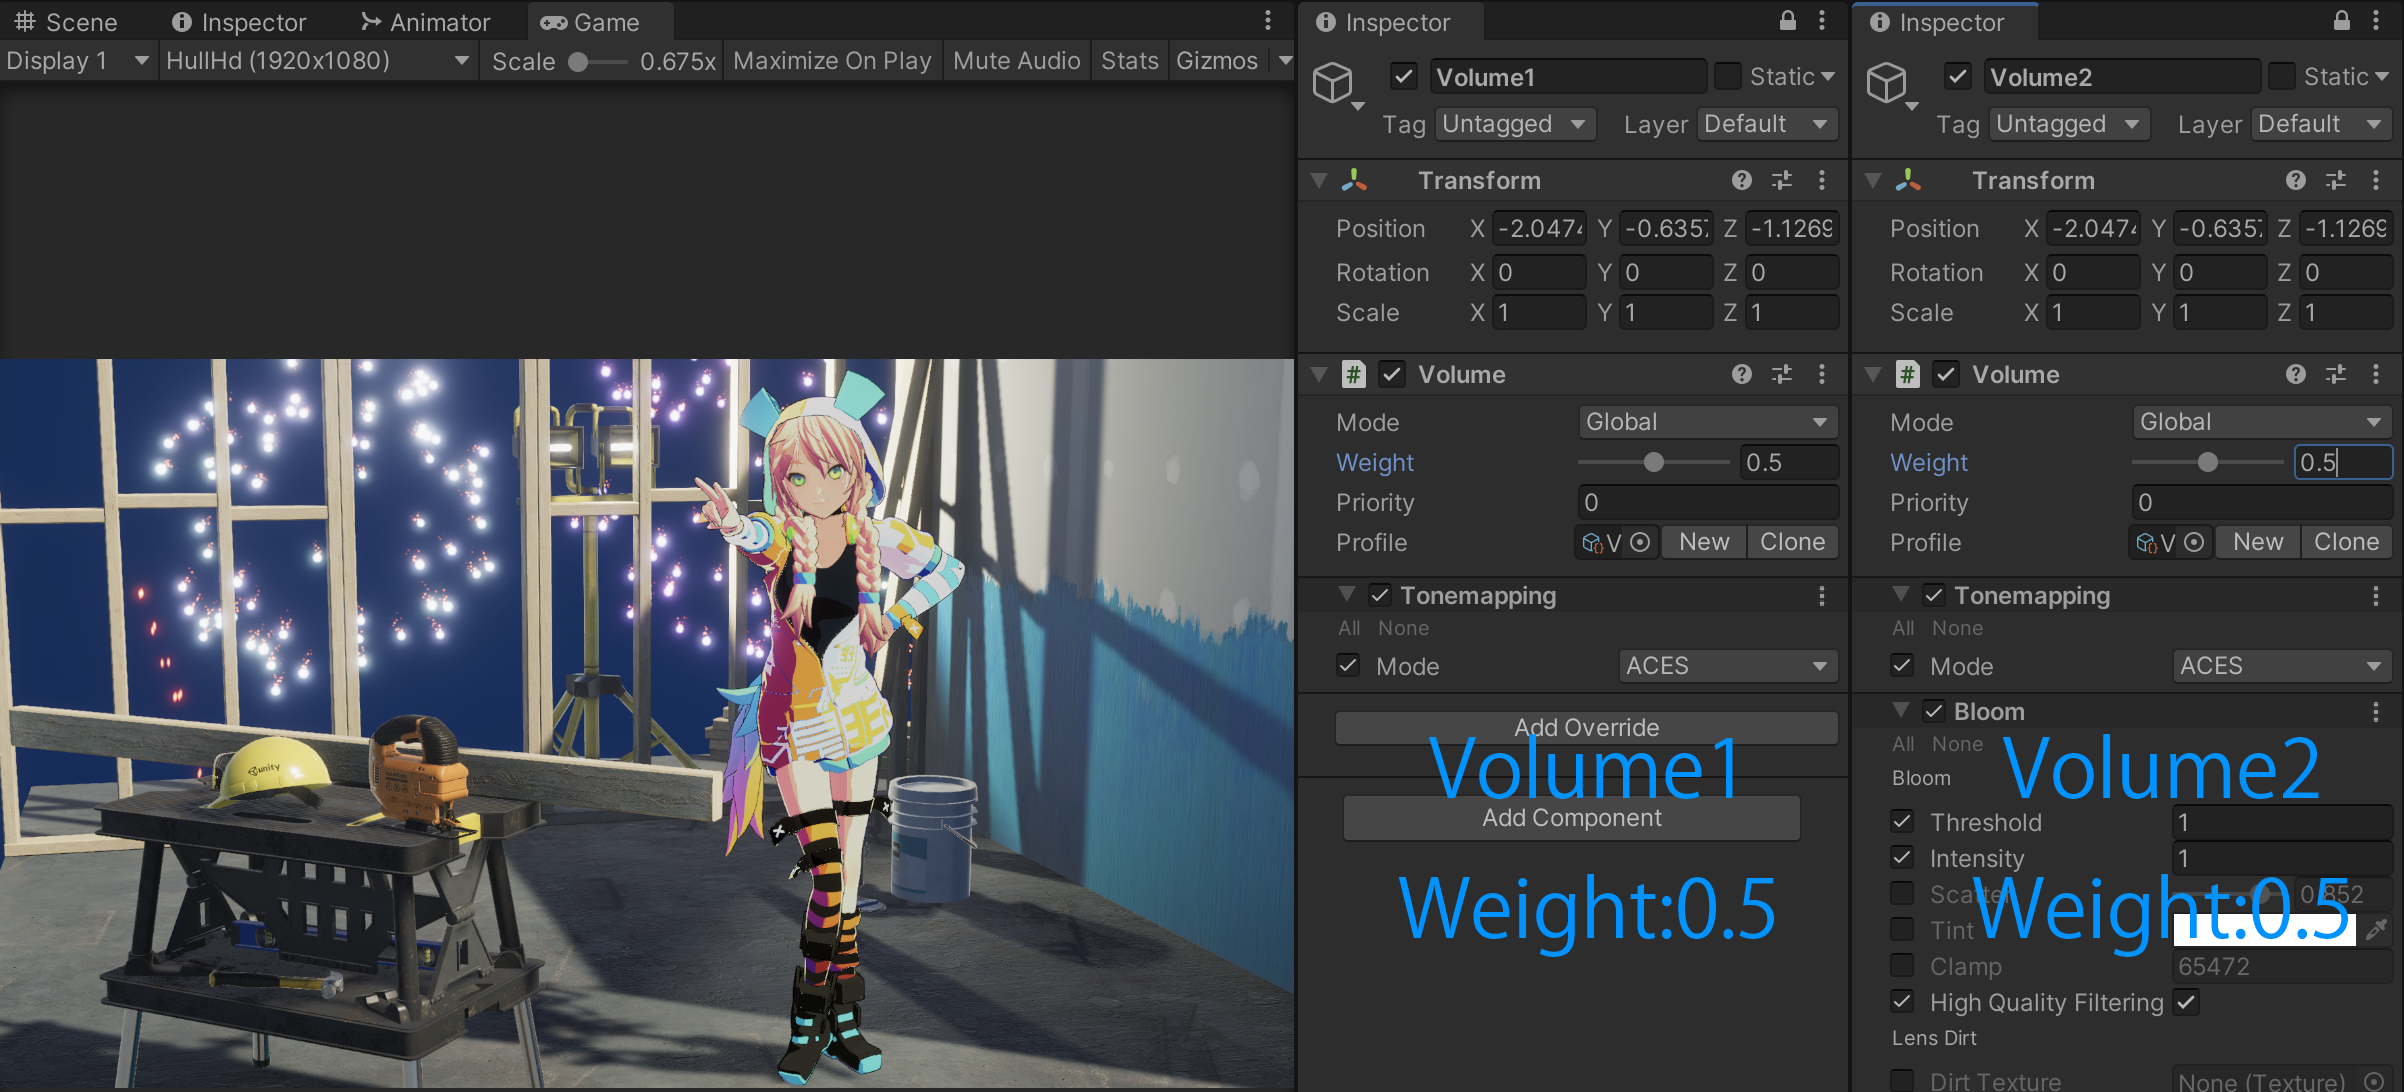

以下の実装方針を建てます
- VolumeTimelineBehaviourからVolumeのWeight設定できるようにする
- タイムラインのクリップの重なり合いを取得しVolumeのWeightに設定する
1. VolumeTimelineBehaviourからVolumeのWeight設定できるようにする
VolumeTimelineBehaviourを以下のように変更してVolumeTimelineBehaviourからVolumeのWeightを設定できるようにします。
public class VolumeTimelineBehaviour : ActivationControlPlayable
{
    private Volume _volume;

    public void SetTarget(Volume volume, PostPlaybackState postPlaybackState)
    {
        _volume = volume;
        gameObject = volume.gameObject;
        postPlayback = postPlaybackState;
    }

    public void SetWeight(float weight)
    {
        if (_volume != null)
        {
            _volume.weight = weight;
        }
    }
}
- タイムラインのクリップの重なり合いを取得しVolumeのWeightに設定する
タイムラインのクリップの重なり合いを取得する為にVolumeTimelineMixerBehaviourクラスを作成します。
public class VolumeTimelineMixerBehaviour : PlayableBehaviour
{
    public override void ProcessFrame(Playable playable, FrameData info, object playerData)
    {
        int inputCount = playable.GetInputCount();
        for (int i = 0; i < inputCount; i++)
        {
            var inputPlayable = (ScriptPlayable<VolumeTimelineBehaviour>) playable.GetInput(i);
            float inputWeight = playable.GetInputWeight(i);
            if (inputWeight > 0)
            {
                inputPlayable.GetBehaviour().SetWeight(inputWeight);
            }
        }
    }
}
ProcessFrame内の処理について
ProcessFrameはタイムライン再生中に毎フレーム呼び出されます。
playable.GetInput()メソッドにより、トラックに存在するクリップの情報を取得し、これをScriptPlayable<VolumeTimelineBehaviour>にキャストする事で、VolumeTimelineBehaviour を取得します。
取得したクリップのWeightをVolumeTimelineBehaviour.SetWeight()メソッドに渡す事で、VolumeのWeightを設定します。
VolumeTimelineMixerBehaviourの役割

VolumeTimelineMixerBehaviourはトラック全体の振る舞いを設定します。
VolumeTimelineMixerBehaviourはトラック全体の振る舞いを制御するクラスで、具体的には以下のような処理を担当します。
- クリップのWeightを取得する
- 再生中に毎フレーム呼ばれるメソッドで処理を実装する
VolumeTimelineMixerBehaviourを使うように設定する
VolumeTimelineTrackクラスを変更して、VolumeTimelineMixerBehaviourが呼び出されるように設定します。
[Serializable]
[TrackClipType(typeof(VolumeTimelineAsset), false)]
public class VolumeTimelineTrack : PlayableTrack
{
    public override Playable CreateTrackMixer(PlayableGraph graph, GameObject go, int inputCount)
    {
        return ScriptPlayable<VolumeTimelineMixerBehaviour>.Create (graph, inputCount);
    }
}
再生する
クリップの切り替わり時にフェードするトラックが実装できました!

再生終了時に変更したパラメーターを元に戻す
最後に、再生終了後にタイムラインが変更したパラメーターが自動で戻るようにGatherPropertiesを設定します。
public class VolumeTimelineAsset : PlayableAsset, IPropertyPreview
{
    public ExposedReference<Volume> volume;

    public override Playable CreatePlayable(PlayableGraph graph, GameObject owner)
    {
        Volume resolvedVolume = volume.Resolve(graph.GetResolver());
        if (resolvedVolume == null)
        {
            return default;
        }

        VolumeTimelineBehaviour behaviour = new VolumeTimelineBehaviour();
        behaviour.SetTarget(resolvedVolume, ActivationControlPlayable.PostPlaybackState.Inactive);
        return ScriptPlayable<VolumeTimelineBehaviour>.Create(graph, behaviour);
    }

    public void GatherProperties(PlayableDirector director, IPropertyCollector driver)
    {
        // Volumeのweightとenabledをタイムライン終了時に戻す
        Volume resolvedVolume = director.GetReferenceValue(volume.exposedName, out var isValid) as Volume;
        if (isValid)
        {
            driver.AddFromName(resolvedVolume, "weight");
            if (resolvedVolume != null)
            {
                driver.AddFromName(resolvedVolume.gameObject, "m_IsActive");
            }
        }
    }
}
GatherPropertiesについて
GatherPropertiesを使用するためにIPropertyPreviewインターフェイスを実装します。driver.AddFromNameメソッドは元に戻すパラメーターのシリアライズ名を入力します。このメソッドを作成する事で、タイムラインが変更を加えたパラメーターが自動で元に戻ります。
またGatherPropertiesを設定したパラメーターは青色になり、インスペクターから確認する事ができます。
補足)最終的なコード
[Serializable]
public class VolumeTimelineAsset : PlayableAsset
{
    public ExposedReference<Volume> volume;

    public override Playable CreatePlayable(PlayableGraph graph, GameObject owner)
    {
        Volume resolvedVolume = volume.Resolve(graph.GetResolver());
        if (resolvedVolume == null)
        {
            return default;
        }

        VolumeTimelineBehaviour behaviour = new VolumeTimelineBehaviour();
        behaviour.SetTarget(resolvedVolume, ActivationControlPlayable.PostPlaybackState.Inactive);
        return ScriptPlayable<VolumeTimelineBehaviour>.Create(graph, behaviour);
    }
}
public class VolumeTimelineBehaviour : ActivationControlPlayable
{
    private Volume _volume;

    public void SetTarget(Volume volume, PostPlaybackState postPlaybackState)
    {
        _volume = volume;
        gameObject = volume.gameObject;
        postPlayback = postPlaybackState;
    }

    public void SetWeight(float weight)
    {
        if (_volume != null)
        {
            _volume.weight = weight;
        }
    }
}
public class VolumeTimelineMixerBehaviour : PlayableBehaviour
{
    public override void ProcessFrame(Playable playable, FrameData info, object playerData)
    {
        int inputCount = playable.GetInputCount();
        for (int i = 0; i < inputCount; i++)
        {
            var inputPlayable = (ScriptPlayable<VolumeTimelineBehaviour>) playable.GetInput(i);
            float inputWeight = playable.GetInputWeight(i);
            if (inputWeight > 0)
            {
                inputPlayable.GetBehaviour().SetWeight(inputWeight);
            }
        }
    }
}
[Serializable]
[TrackClipType(typeof(VolumeTimelineAsset), false)]
public class VolumeTimelineTrack : PlayableTrack
{
    public override Playable CreateTrackMixer(PlayableGraph graph, GameObject go, int inputCount)
    {
        return ScriptPlayable<VolumeTimelineMixerBehaviour>.Create (graph, inputCount);
    }
}