こんにちは。らむねです。
別のサイト(https://qiita.com/ramunedayo/items/5e79be6e51446c03c3e5
でつくった成果物に関して、成果物に関する詳細を記述します。
成果物の概要
バッチファイルを以下のように作成後、
@echo off
cd /d "C:\Users\user\Downloads"
python qiita_Autologin.py
pythonコードを以下の様に作成しました。
# seleniumの基本的な更新
from selenium import webdriver
from selenium.webdriver.common.keys import Keys
from selenium.webdriver.common.by import By
from selenium.webdriver.chrome.service import Service
from webdriver_manager.chrome import ChromeDriverManager

#Chromeドライバマネジャーの更新
service = Service(ChromeDriverManager().install)
driver = webdriver.Chrome(service=service)

#新たにChromeのWEBサイトにアクセスする
driver =webdriver.Chrome()
driver.get("https://qiita.com/login?callback_action=login_or_signup&redirect_to=%2F&realm=qiita")

#ユーザー名とパスワードの欄を探す
identity = driver.find_element(By.ID, "identity")
password = driver.find_element(By.ID, "password")

#ユーザー名、パスワードを入力 (※your_username,your_passwordは、ご自身のユーザー名とパスワードに書き換えてください)
identity.send_keys("your_username")
password.send_keys("your_password")

#ログインする
login_button = driver.find_element(By.XPATH, "//input[@type='submit']")
login_button.click()
成果物の作成過程
まずはClaudeに聞いてみます。

そうすると、Selenium(WEBブラウザの自動化モジュール)を用いたPythonコードやバッチファイルが出力されました。
PythonのSeleniumに関する自動化について調べていくと、コードを使ってPCにさせる手順としては、
新たにChromeなどからリンクへのアクセス → フォームからID、パスワードの入力フォームを探す → そこに指定のワードを入力 → ログインボタンぽち ってことらしいです
(参考:https://nuco.co.jp/blog/article/E6HsPYPl)
でなんだかんだこのサイトにたどり着く。
https://qiita.com/xi_guisheng/items/ca84349eded666f5cf94
とりあえずコードをコピペし、メモを調べながら転記していく。
その時が下記コード
# seleniumの基本的な更新
from selenium import webdriver
from selenium.webdriver.common.keys import Keys
from selenium.webdriver.common.by import By
from selenium.webdriver.chrome.service import Service
from webdriver_manager.chrome import ChromeDriverManager

#Chromeドライバマネジャーの更新
service = Service(ChromeDriverManager().install)
driver = webdriver.Chrome(service=service)

#新たにChromeのWEBサイトにアクセスする
driver =webdriver.Chrome()
driver.get("https://qiita.com/login?callback_action=login_or_signup&redirect_to=%2F&realm=qiita")

#ユーザー名とパスワードの欄を探す
identity = driver.find_element(By.ID, "identity")
password = driver.find_element(By.ID, "password")

#ユーザー名、パスワードを入力 (※your_username,your_passwordは、ご自身のユーザー名とパスワードに書き換えてください)
identity.send_keys("your_username")
password.send_keys("your_password")

#ログインする
login_button = driver.find_element(By.XPATH, "//input[@type='submit']")
login_button.click()
で、注目してほしいのがここです。
#ユーザー名とパスワードの欄を探す
identity = driver.find_element(By.ID, "identity") # ⇦ 注目!
実際、Qiitaのログインページで「左クリック→検証」で確認してみると、、
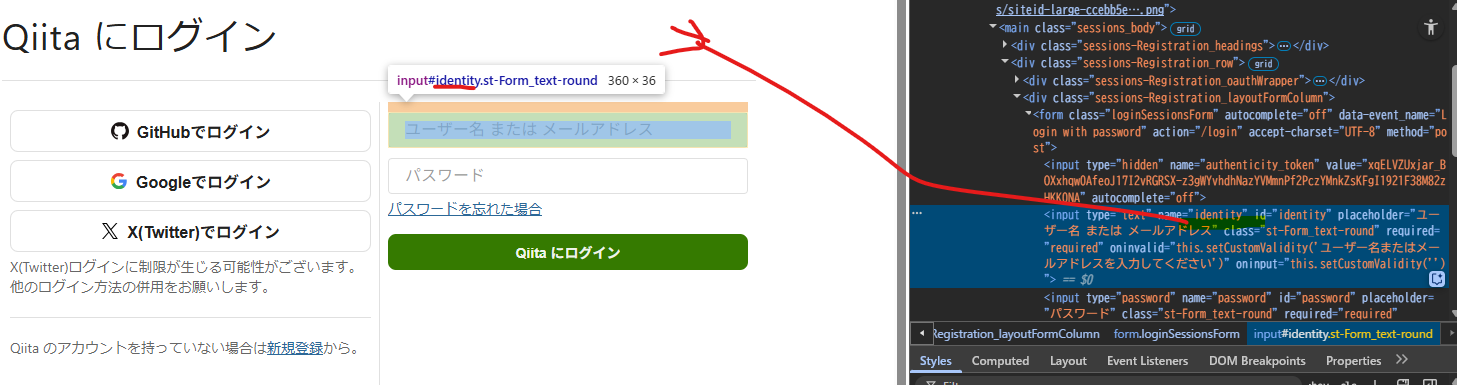
そう、ユーザーIDが「identity」になってるんです。
なので、もともとusernameだったところをidentityに変更。
結果、上記コードが完成。
さて、次にWindows環境で、PCが付いたときこのコードが実行されればよいのだが、、
Claudeに聞いてみる。
すると、バッチファイル(.bat)というファイルをメモ帳アプリから作り、
先のqiita.pyと同じ場所に保存すればできるらしい。
(※バッチファイル → Windowsでの操作を自動化する代表的なファイル。)
参考:https://kyozon.net/list/what-is-bat-file/
メモ帳アプリを開き、以下のようにコードを入力。

そして、「ファイル → 名前を付けて保存 → qiita.autologinとして、batファイルに変換」。
そうした後は、先のPythonファイルと同じ場所に保存する。
すると、実行される!(一瞬で実行されるのでスクショできませんでした💦)
以上です。
最後まで読んでくれてありがとうございます!