Fast APIアプリを構築するのに
少し手間取ってしまているので一旦まとめてみる。
ロードマップ
- アプリイメージ図
- 環境構築
- GET/POSTを受け取る最小アプリ例
- DBとの連携
- スキーマ(responce_model)
- Model定義例
- デコレーターの中のオプション
- 関数の中のオプション
0.ミニマムCRUDアプリリポジトリ
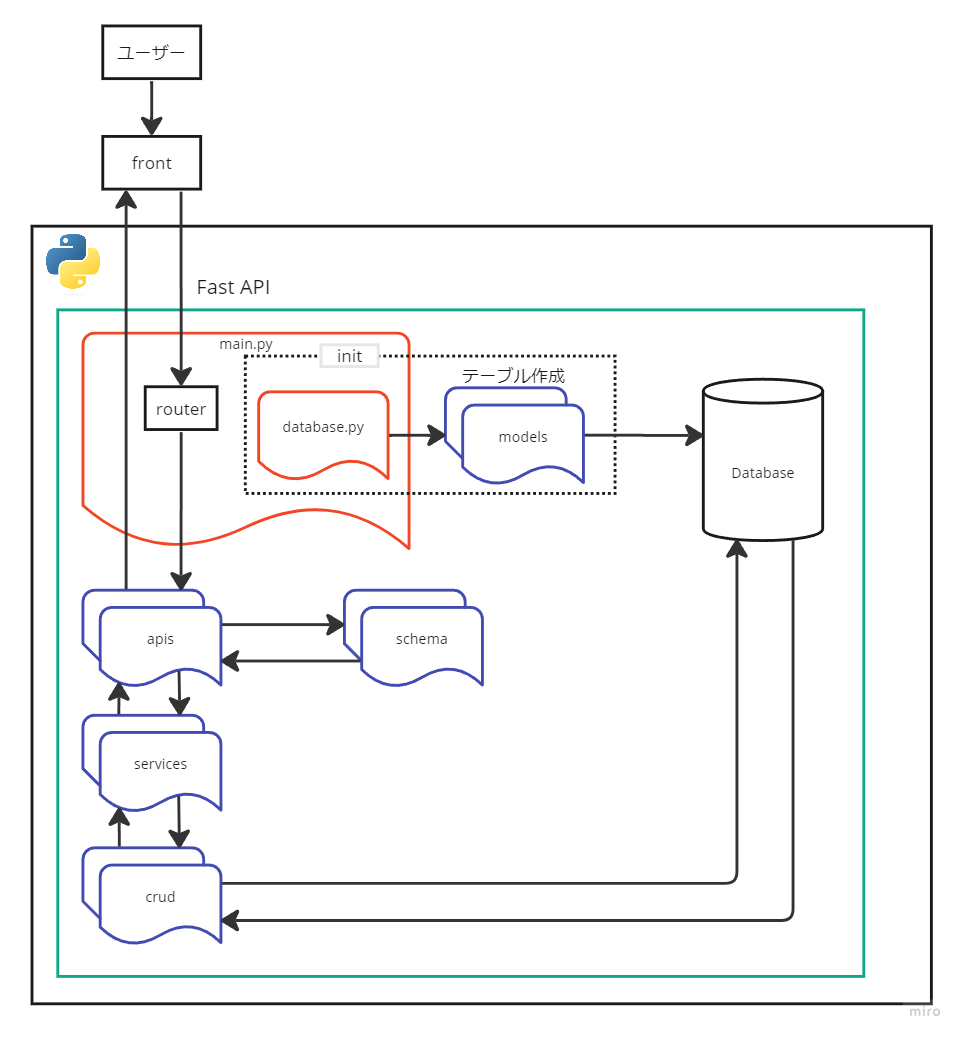
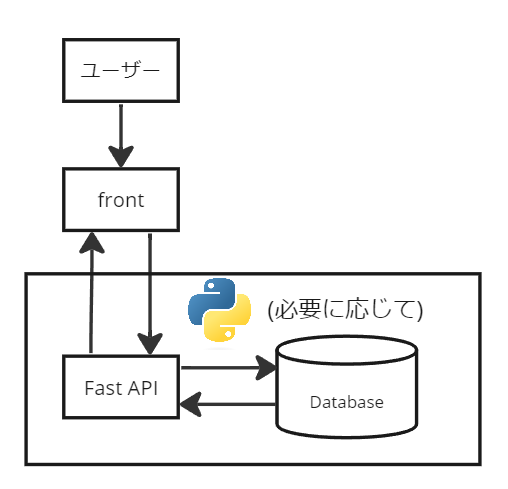
1. アプリイメージ図
ただ、よりオブジェクト指向を考慮して、
各機能毎にフォルダ分けをすることにする。
考えている機能としては、以下
API受付(/apis)
APIの受付部分。
ここではクエリのパラメータや
オプションパラメータなど、
APIの入り口として必要な処理を行う。
呼び出した際にschemasを利用し、
主にservicesのファイルを呼ぶ
メイン処理(/services)
apisから呼び出されたメインの処理。
ここではクエリ等を活用して実際に処理を行う。
必要に応じてcrudを呼び出す。
スキーマ(/schemas)
response_modelに格納するクラスを定義。
response_modelはapisにて設定する。
DB定義(/models)
テーブル定義を作成。
1ファイル1テーブルが好ましい。
DB操作(/crud)
実際にCRUDを行う。
主にservicesから呼ばれる
これらを踏まえてアプリイメージ図を
細かく分けると以下のようになる。

「router」はURLに応じて振り分ける箇所、
main.pyに記載しておく。
「database.py」はsqlalchemyの
Sessionを作成するファイル。
厳密には作成したSessionを処理内で使いまわすのだが、
いちいち気にしていないので一旦この箇所に記載。
2. 環境構築
最小のアプリとしては以下をpip installすれば
問題なさそう。
・fastapi
・sqlalchemy
…DB操作のために必要。ORM
・uvicorn
…サーバーを起動するために必要
この3つをinstallして
pip freeze > requirements.txt
を行った結果がこちら
annotated-types==0.6.0
anyio==3.7.1
click==8.1.7
colorama==0.4.6
exceptiongroup==1.2.0
fastapi==0.105.0
greenlet==3.0.3
h11==0.14.0
idna==3.6
pydantic==2.5.3
pydantic_core==2.14.6
sniffio==1.3.0
SQLAlchemy==2.0.23
starlette==0.27.0
typing_extensions==4.9.0
uvicorn==0.25.0
3. GET/POSTを受け取る最小アプリ例
手順
①仮想環境を作成
python -m venv venv
②アクティベート
venv/Scripts/activate
③requirements.txtを作成、
上記をコピペし
pip install -r requirements.txt
GET
④main.pyを作成し、下記記載
from fastapi import FastAPI

app = FastAPI()

@app.get("/")
def read_root():
    return {"Hello": "World"}
⑤サーバー起動
uvicorn main:app --reload
上記はほっとリロードが可能なコマンド
無事起動できました。
公式ドキュメントのリクエスト例
@app.get("/items/{item_id}")
async def read_item(item_id: str, q: Union[str, None] = None):
    if q:
        return {"item_id": item_id, "q": q}
    return {"item_id": item_id}
警告
Union : 「str or int」のように「いくつかのある型のうちいずれか」にマッチすればOKという型ヒント。
この場合、あったらstr、なかったらNoneという意味合い?
POST
from fastapi import FastAPI
from pydantic import BaseModel

app = FastAPI()

class Item(BaseModel):
    item: str

@app.post("/itemsa/")
async def create_item(item: Item):
    return item
Postの場合はクラスでパラメータを
受け取らねばいけないらしい。
ここではPydantec(ピダンテック)というモデルを使用する。
ちなみにGETでもモデルを宣言する方法があるが
以下に示しておく。
例としてEnumとかを宣言しているが、
詳細は後述するとしよう。。
4.DBとの連携
DB接続の準備。
例ではsqliteで想定しているが、
Postgresを使う場合はコメントアウトを解除
from sqlalchemy import create_engine
from sqlalchemy.ext.declarative import declarative_base
from sqlalchemy.orm import sessionmaker

SQLALCHEMY_DATABASE_URL = "sqlite:///./sql_app.db"
# SQLALCHEMY_DATABASE_URL = "postgresql://user:password@postgresserver/db"

engine = create_engine(
    SQLALCHEMY_DATABASE_URL, connect_args={"check_same_thread": False}
)
SessionLocal = sessionmaker(autocommit=False, autoflush=False, bind=engine)

Base = declarative_base()
Base.metadata.create_all(bind=engine)

# Dependency
def get_db():
    db = SessionLocal()
    try:
        yield db
    finally:
        db.close()
リクエストを受け取り箇所でget_dbをimportする
from fastapi import APIRouter, Depends
from sqlalchemy.orm import Session

from src.models import database

@app.post("/users/", response_model=schemas.User)
def create_user(user: schemas.UserCreate, db: Session = Depends(database.get_db)):
    db_user = crud.get_user_by_email(db, email=user.email)
    if db_user:
        raise HTTPException(status_code=400, detail="Email already registered")
    return crud.create_user(db=db, user=user)
dbで接続するDBを決定している
db: Session = Depends(database.get_db)
user: schemas.UserCreateの箇所では
リクエストのボディの中身の定義を行う。
BaseModelを継承しているschemasを参照して
何を渡せばいいのかがわかる。
下記jsonをリクエストボディに含めると成功する。
{
  "email": "string",
  "password": "string"
}
高度なクエリについてはこちら
簡単なクエリについては冒頭のリポジトリに
記載しているのでそちらを参照
メモ
DBのカラム名を修正
alter table t_saving_history rename column price to amount;
5.スキーマ(responce_model)
参考記事
スキーマクラスを作成
class Item(BaseModel):
    name: str
    description: str | None = None
    price: float
    tax: float | None = None
    tags: list[str] = []

@app.post("/items/", response_model=Item)
async def create_item(item: Item) -> Any:
    return item


@app.get("/items/", response_model=list[Item])
async def read_items() -> Any:
    return [
        {"name": "Portal Gun", "price": 42.0},
        {"name": "Plumbus", "price": 32.0},
    ]
(FastAPIのUnion型とOptional型についてはこちら)
FastAPIでは、Pythonの型ヒントを利用してAPIのリクエストとレスポンスを定義します。この中で、Union型とOptional型は特に重要な役割を果たします。
Union 型
Unionは、Pythonの標準ライブラリ typing の一部で、複数の型を許容する場合に使用されます。FastAPIにおいてUnionを使用すると、指定されたいずれかの型に一致するデータを受け入れることができます。
例えば、文字列または整数を受け入れるAPIエンドポイントを定義する場合、以下のようにUnionを使用できます:
from typing import Union
from fastapi import FastAPI

app = FastAPI()

@app.get("/items/{item_id}")
async def read_item(item_id: Union[int, str]):
    return {"item_id": item_id}
この例では、エンドポイント/items/{item_id}は、item_idとして整数または文字列のいずれかを受け入れます。
Optional 型
Optional型もtypingライブラリの一部で、ある変数が特定の型、またはNoneを取ることができることを示します。これは、パラメータが省略可能であるか、または値が存在しない場合があることを意味します。
例えば、あるパラメータが提供されない場合にNoneを許容するAPIエンドポイントを定義する場合、以下のようにOptionalを使用できます:
from typing import Optional
from fastapi import FastAPI

app = FastAPI()

@app.get("/items/")
async def read_item(name: Optional[str] = None):
    return {"name": name}
この例では、nameパラメータは省略可能で、提供されない場合はNoneになります。Optional[str]はUnion[str, None]のショートカットとして機能します。
FastAPIにおける型ヒントの利用
FastAPIでは、これらの型ヒントを利用してリクエストの検証やドキュメントの自動生成を行います。UnionやOptionalを使用すると、エンドポイントが複数の入力タイプを受け入れることや、一部のパラメータが省略可能であることを明示的に示すことができます。
また、これらの型ヒントは、エディタやIDEでの自動補完やエラーチェックにも役立ちます。これにより、開発者はAPIの仕様に合わせて正しい型のデータを提供しているかどうかを簡単に確認できます。
レスポンス型定義
レスポンスの方の定義を行う。
上記例だと、responce_modelで宣言したItemクラスの
型でAPIの応答が返ってくる。
リクエスト型定義
create_item( item: Item )
リクエストパラメーターや、ボディなどの
型定義をクラスにて行う
6.Model定義例
参考
-
tablename
テーブル名を記載。
PgAdminのようなDB操作ツールで
どのようにテーブル名を表示するか -
table_args
文字コードや複数ユニークなどを指定できる
__table_args__ = (
            (UniqueConstraint('personid', 'address', name='unique_idx_personid_address')),
            {"mysql_charset": "utf8mb4"})
DB定義例
from sqlalchemy import Column, Integer, String, ForeignKey
from sqlalchemy.orm import relationship

from api.db import Base


class Task(Base):
    __tablename__ = "tasks"

    id = Column(Integer, primary_key=True)
    title = Column(String(1024))

    done = relationship("Done", back_populates="task", cascade="delete")


class Done(Base):
    __tablename__ = "dones"

    id = Column(Integer, ForeignKey("tasks.id"), primary_key=True)

    task = relationship("Task", back_populates="done")
主に使いそうなジェネリック型
| Object Name | Description |
|---|---|
| Boolean | A bool datatype. |
| Date | A type for datetime.date() objects. |
| DateTime | A type for datetime.datetime() objects. |
| Enum | Generic Enum Type. |
| Float | Type representing floating point types, such as FLOAT or REAL. |
| Integer | A type for int integers. |
| String | The base for all string and character types. |
| Text | A variably sized string type.(文字数がかなり多いようだったらText推奨) |
※それぞれ使用する際はimportする
7.デコレーターの中のオプション
- responce_model
レスポンス型を定義する。
8.関数の中のオプション
- リクエスト型の定義
作者メモ:ツリー構造取得
import os

IGNORE_DIR = [
    'venv',
    '__pycache__',
    '.git'
    ]

IGNORE_FILE = [
    '__init__.py',
    '.gitignore',
    'get_folder_tree.py',
]

def print_directory_structure(startpath = os.getcwd()):
    for root, dirs, files in os.walk(startpath, topdown=True):
        dirs[:] = [d for d in dirs if d not in IGNORE_DIR]  # 不要なディレクトリを除外
        files = [f for f in files if f not in IGNORE_FILE]  # 不要なファイルを除外

        level = root.replace(startpath, '').count(os.sep)
        indent = ' ' * 4 * level
        print(f'{indent}└─ {os.path.basename(root)}/')
        subindent = ' ' * 4 * (level + 1)
        for f in files:
            print(f'{subindent}├─ {f}')


if __name__ == "__main__":
    print_directory_structure()
上記を実行するとツリー構造を出力できる
└─ FastApi_minimum/
    ├─ README.md
    ├─ requirements.txt
    ├─ test.py
    └─ src/
        ├─ database.py
        ├─ main.py
        └─ apis/
            ├─ test.py
        └─ models/
        └─ services/
...ちょっといまいち不十分な感じはあるが、、

