はじめに
少し前にOpenStack Kollaの構築手順(http://qiita.com/lychee3/items/e0a57c833450654006a5 )を記事にまとめました。が、どうもバイナリイメージを用いた構築だと失敗する確率が高いようなので、より成功率が高いと思われるソースからイメージをビルドして構築する手順を紹介します。
・参考にしたURL
公式ドキュメント
https://docs.openstack.org/kolla-ansible/latest/
2017-11-18追記
Pike版だとデプロイ中にエラーが発生します。こちらの手順の方が成功率が高いです。
環境構成
MACのVirtualBox上に作成したCentOS7.3のVMに、AllInOne構成で構築しました。
VMは以下の条件で作成しました。
・VM名:Kolla_Ocata
・CPU数:2CPU
・メモリ:8GB(最低条件として8GB必要)
・仮想ハードディスク:100GB(最低条件として40GB必要)
・ネットワーク:以下の2つを作成(最低条件として2つ必要)
(1)「ブリッジアダプター」・・・ダッシュボードアクセス用
(CentOSインストール時に192.168.0.159を設定)
(2)「内部ネットワーク」・・・Publicネットワーク用
(IPアドレスなし)
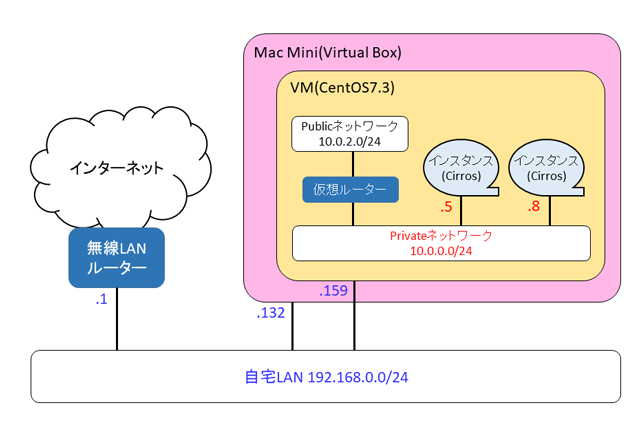
Kolla構築の最後の手順で、OpenStack Novaが生成するインスタンスにSSH接続できるようにします。
構築メモ
1. VMにCentOS7.3をインストール
余計なものは入れず、最小限のインストールを行う。
インストーラ上では主に以下の設定を行った。
・SECURITY POLICY:Apply security policyをオフ
・ソフトウェアの選択は「最小限のインストール」(何もチェックを付けない)
・ネットワークとホスト名
・イーサネット(enp0s3)をオン、方式=手動、192.168.0.159を設定(ダッシュボードアクセス用)
・イーサネット(enp0s8)をオン、方式=手動、IPアドレス設定なし(Publicネットワーク用)
・DNSサーバは8.8.8.8を設定
・ホスト名:kolla
2. インストール前準備
以降の作業はrootで行います。
2.1 ファイアウォールの無効化
# systemctl disable firewalld
# systemctl stop firewalld
2.2 英語ロケール設定
# vi /etc/environment
LANG=en_US.utf-8
LC_ALL=en_US.utf-8
# reboot
2.3 yumのアップデート
# yum update -y
:
Complete!
2.4 gitのインストール
# cd /root
# yum install -y git
:
Complete!
2.5 EPELとPIPのインストール
# yum install -y epel-release
:
Complete!
# yum install -y python-pip
:
Complete!
# pip install -U pip
:
Successfully installed pip-9.0.1
# yum install -y python-devel libffi-devel gcc openssl-devel
:
Complete!
2.6 percona-serverのインストール
Kollaソースビルド時に必要となるpercona-serverをインストールする。
# yum install -y http://www.percona.com/downloads/percona-release/redhat/0.1-4/percona-release-0.1-4.noarch.rpm
:
Complete!
# yum install -y Percona-Server-server-57
:
Complete!
2.7 IPv4フォワーディング設定を有効化する
こちらもKollaソースビルド時に要求されるため事前に実施しておく。
# sysctl -w net.ipv4.ip_forward=1
net.ipv4.ip_forward = 1
# cat << __EOF__ >> /etc/sysctl.d/10-ipv4.conf
net.ipv4.ip_forward = 1
__EOF__
2.8 Ansibleのインストールとアップグレード
# yum install -y ansible
:
Complete!
# pip install -U ansible
:
Successfully installed MarkupSafe-1.0 PyYAML-3.12 ansible-2.3.2.0 asn1crypto-0.22.0 bcrypt-3.1.3 cffi-1.10.0 cryptography-2.0.3 enum34-1.1.6 idna-2.6 ipaddress-1.0.18 jinja2-2.9.6 paramiko-2.2.1 pyasn1-0.3.2 pycparser-2.18 pynacl-1.1.2 setuptools-36.2.7 six-1.10.0
バージョンが2.0以上であることを確認する。
# ansible --version
ansible 2.3.2.0
  config file = /etc/ansible/ansible.cfg
  configured module search path = Default w/o overrides
  python version = 2.7.5 (default, Nov  6 2016, 00:28:07) [GCC 4.8.5 20150623 (Red Hat 4.8.5-11)]
2.9 Dockerのインストール
# curl -sSL https://get.docker.io | bash
:
If you would like to use Docker as a non-root user, you should now consider
adding your user to the "docker" group with something like:

  sudo usermod -aG docker your-user

Remember that you will have to log out and back in for this to take effect!

WARNING: Adding a user to the "docker" group will grant the ability to run
         containers which can be used to obtain root privileges on the
         docker host.
         Refer to https://docs.docker.com/engine/security/security/#docker-daemon-attack-surface
         for more information.
2.10 Dockerをsystemdに登録
# mkdir -p /etc/systemd/system/docker.service.d
# tee /etc/systemd/system/docker.service.d/kolla.conf <<-'EOF'
[Service]
MountFlags=shared
EOF
Dockerを再起動する。
# systemctl daemon-reload
# systemctl enable docker
Created symlink from /etc/systemd/system/multi-user.target.wants/docker.service to /usr/lib/systemd/system/docker.service.
# systemctl restart docker
2.11 Docker Pythonのインストールとアップグレード
# yum install -y python-docker-py
:
Complete!
# pip install -U docker-py
:
Successfully installed certifi-2017.7.27.1 chardet-3.0.4 requests-2.18.4 urllib3-1.22 websocket-client-0.44.0
2.12 NTPのインストール
# yum install -y ntp
:
Complete!
# systemctl enable ntpd.service
Created symlink from /etc/systemd/system/multi-user.target.wants/ntpd.service to /usr/lib/systemd/system/ntpd.service.
# systemctl start ntpd.service
# ntpq -p
     remote           refid      st t when poll reach   delay   offset  jitter
==============================================================================
 timpany.srv.jre 133.243.238.164  2 u    1   64    1   11.894   -6.137   4.640
 laika.paina.net 131.113.192.40   2 u    -   64    1    8.019   -1.743   0.235
 hachi.paina.net 131.113.192.40   2 u    1   64    1   15.505   -7.932   0.000
 chobi.paina.net 131.113.192.40   2 u    -   64    1    8.137   -1.115   0.000
2.13 libvirtdが動いていたら止める
Failedと出る場合はlibvirtはすでに動いていないので問題ない。
# systemctl stop libvirtd.service
Failed to stop libvirtd.service: Unit libvirtd.service not loaded.
# systemctl disable libvirtd.service
Failed to execute operation: Access denied
3. Kollaのインストール
Kolla関連は最新のモジュールを用い、ソースからビルドを行う。
3.1 kolla-ansibleのインストール
# cd /root
# git clone https://github.com/openstack/kolla-ansible
:
done.
# cd kolla-ansible/
# pip install -r requirements.txt
:
Successfully installed Babel-2.3.4 backports.ssl-match-hostname-3.5.0.1 debtcollector-1.17.0 docker-2.4.2 funcsigs-1.0.2 iso8601-0.1.12 monotonic-1.3 netaddr-0.7.19 netifaces-0.10.6 oslo.config-4.11.0 oslo.i18n-3.17.0 oslo.utils-3.28.0 pbr-3.1.1 pyparsing-2.2.0 pytz-2017.2 rfc3986-1.1.0 stevedore-1.25.0 wrapt-1.10.11
# python setup.py install
:
Installing kolla-mergepwd script to /usr/bin
Installing kolla-genpwd script to /usr/bin
# cp -r /usr/share/kolla-ansible/etc_examples/kolla /etc/kolla/
# cp /usr/share/kolla-ansible/ansible/inventory/* .
3.2 kollaのインストール
# cd /root
# git clone https://github.com/openstack/kolla
:
done.
# cd kolla
# pip install -r requirements.txt
:
Successfully installed GitPython-2.1.5 gitdb-0.6.4 gitdb2-2.0.2 smmap-0.9.0 smmap2-2.0.3
# python setup.py install
:
Installing kolla-build script to /usr/bin
3.3 コンフィグ編集
※ハイライト行の行頭の+は行をハイライトするためのものなので、+は実際には書かないこと。
# vi /etc/kolla/globals.yml
・HA設定を無効化する設定を追加する。
:
###################
# Kolla options
###################
+enable_haproxy: "no"
:
・Linuxディストリビューションの設定をcentosに、またソースからインストールする設定を行う。
:
# Valid options are [ centos, oraclelinux, ubuntu ]
+kolla_base_distro: "centos"

# Valid options are [ binary, source ]
+kolla_install_type: "source"

# Valid option is Docker repository tag
# openstack_release: ""

# Location of configuration overrides
# node_custom_config: "/etc/kolla/config"
:
kolla_internal_vip_addressにはダッシュボードアクセス用のIPアドレスを設定する。
:
# This should be a VIP, an unused IP on your network that will float between
# the hosts running keepalived for high-availability. When running an All-In-One
# without haproxy and keepalived, this should be the first IP on your
# 'network_interface' as set in the Networking section below.
+kolla_internal_vip_address: "192.168.0.159"

# This is the DNS name that maps to the kolla_internal_vip_address VIP. By
# default it is the same as kolla_internal_vip_address.
# kolla_internal_fqdn: "{{ kolla_internal_vip_address }}"

# This should be a VIP, an unused IP on your network that will float between
# the hosts running keepalived for high-availability. It defaults to the
# kolla_internal_vip_address, allowing internal and external communication to
# share the same address.  Specify a kolla_external_vip_address to separate
# internal and external requests between two VIPs.
# kolla_external_vip_address: "{{ kolla_internal_vip_address }}"

# The Public address used to communicate with OpenStack as set in the public_url
# for the endpoints that will be created. This DNS name should map to
# kolla_external_vip_address.
# kolla_external_fqdn: "{{ kolla_external_vip_address }}"
:
・「network_interface」のコメントアウトを外し、ダッシュボードアクセス用のインターフェース名を指定する。
:
###############################
# Neutron - Networking Options
###############################
# This interface is what all your api services will be bound to by default.
# Additionally, all vxlan/tunnel and storage network traffic will go over this
# interface by default. This interface must contain an IPv4 address.
# It is possible for hosts to have non-matching names of interfaces - these can
# be set in an inventory file per host or per group or stored separately, see
#     http://docs.ansible.com/ansible/intro_inventory.html
# Yet another way to workaround the naming problem is to create a bond for the
# interface on all hosts and give the bond name here. Similar strategy can be
# followed for other types of interfaces.
+network_interface: "enp0s3"
:
・「neutron_external_interface」にはPublicネットワーク用のインターフェース名を指定する。
:
# This is the raw interface given to neutron as its external network port. Even
# though an IP address can exist on this interface, it will be unusable in most
# configurations. It is recommended this interface not be configured with any IP
# addresses for that reason.
+neutron_external_interface: "enp0s8"
:
・構築するOpenStackコンポーネントについてyesを設定する。今回の例ではTackerをyesとし、関連して必要となるコンポーネント(aodh、ceilometer、gnocchi、mistral、mongodb)もyesとしました。またログ分析を行うcentral_loggingもyesとしました。
####################
# OpenStack options
####################
# Use these options to set the various log levels across all OpenStack projects
# Valid options are [ True, False ]
# openstack_logging_debug: "False"

# Valid options are [ novnc, spice ]
# nova_console: "novnc"

# OpenStack services can be enabled or disabled with these options
+enable_aodh: "yes"
# enable_barbican: "no"
+enable_ceilometer: "yes"
+enable_central_logging: "yes"
# enable_ceph: "no"
# enable_ceph_rgw: "no"
# enable_chrony: "no"
# enable_cinder: "no"
# enable_cinder_backup: "yes"
# enable_cinder_backend_hnas_iscsi: "no"
# enable_cinder_backend_hnas_nfs: "no"
# enable_cinder_backend_iscsi: "no"
# enable_cinder_backend_lvm: "no"
# enable_cinder_backend_nfs: "no"
# enable_cloudkitty: "no"
# enable_collectd: "no"
# enable_congress: "no"
# enable_designate: "no"
# enable_destroy_images: "no"
# enable_etcd: "no"
# enable_freezer: "no"
+enable_gnocchi: "yes"
# enable_grafana: "no"
# enable_heat: "yes"
# enable_horizon: "yes"
# enable_horizon_cloudkitty: "{{ enable_cloudkitty | bool }}"
# enable_horizon_designate: "{{ enable_designate | bool }}"
# enable_horizon_freezer: "{{ enable_freezer | bool }}"
# enable_horizon_ironic: "{{ enable_ironic | bool }}"
# enable_horizon_karbor: "{{ enable_karbor | bool }}"
# enable_horizon_magnum: "{{ enable_magnum | bool }}"
# enable_horizon_manila: "{{ enable_manila | bool }}"
# enable_horizon_mistral: "{{ enable_mistral | bool }}"
# enable_horizon_murano: "{{ enable_murano | bool }}"
# enable_horizon_neutron_lbaas: "{{ enable_neutron_lbaas | bool }}"
# enable_horizon_sahara: "{{ enable_sahara | bool }}"
# enable_horizon_searchlight: "{{ enable_searchlight | bool }}"
# enable_horizon_senlin: "{{ enable_senlin | bool }}"
# enable_horizon_solum: "{{ enable_solum | bool }}"
# enable_horizon_tacker: "{{ enable_tacker | bool }}"
# enable_horizon_trove: "{{ enable_trove | bool }}"
# enable_horizon_watcher: "{{ enable_watcher | bool }}"
# enable_horizon_zun: "{{ enable_zun | bool }}"
# enable_hyperv: "no"
# enable_influxdb: "no"
# enable_ironic: "no"
# enable_karbor: "no"
# enable_kuryr: "no"
# enable_magnum: "no"
# enable_manila: "no"
# enable_manila_backend_generic: "no"
# enable_manila_backend_hnas: "no"
+enable_mistral: "yes"
+enable_mongodb: "yes"
# enable_murano: "no"
# enable_multipathd: "no"
# enable_neutron_bgp_dragent: "no"
# enable_neutron_dvr: "no"
# enable_neutron_lbaas: "no"
# enable_neutron_fwaas: "no"
# enable_neutron_qos: "no"
# enable_neutron_agent_ha: "no"
# enable_neutron_vpnaas: "no"
# enable_neutron_sfc: "no"
# enable_nova_serialconsole_proxy: "no"
# enable_octavia: "no"
# enable_opendaylight: "no"
# enable_openvswitch: "{{ neutron_plugin_agent != 'linuxbridge' }}"
# enable_ovs_dpdk: "no"
# enable_osprofiler: "no"
# enable_panko: "no"
# enable_qdrouterd: "no"
# enable_rally: "no"
# enable_sahara: "no"
# enable_searchlight: "no"
# enable_senlin: "no"
# enable_skydive: "no"
# enable_solum: "no"
# enable_swift: "no"
# enable_telegraf: "no"
+enable_tacker: "yes"
# enable_tempest: "no"
# enable_trove: "no"
# enable_vmtp: "no"
# enable_watcher: "no"
# enable_zun: "no"
:
・Virtualboxで動作させる場合は、nova_compute_virt_typeをqemuに変更する。
:
#########################
# Nova - Compute Options
#########################
# nova_backend_ceph: "{{ enable_ceph }}"

# Valid options are [ qemu, kvm, vmware ]
+nova_compute_virt_type: "qemu"
:
3.4 パスワードファイル作成
# kolla-genpwd
ハッシュ暗号化された各種パスワードが/etc/kolla/passwords.ymlに作成される。
3.5 kolla.confの編集
# vi /etc/systemd/system/docker.service.d/kolla.conf
以下のように編集して保存する。
[Service]
MountFlags=shared
ExecStart=
ExecStart=/usr/bin/dockerd
Dockerを再起動する。
# systemctl daemon-reload
# systemctl restart docker
3.6 ソースのビルド
# cd /etc/kolla
# kolla-build --base centos --type source
:
INFO:kolla.image.build:=========================
INFO:kolla.image.build:Successfully built images
INFO:kolla.image.build:=========================
INFO:kolla.image.build:aodh-api
INFO:kolla.image.build:aodh-base
:
INFO:kolla.image.build:===========================
INFO:kolla.image.build:Images that failed to build
INFO:kolla.image.build:===========================
ERROR:kolla.image.build:kafka Failed with status: error
ERROR:kolla.image.build:ovsdpdk Failed with status: error
ERROR:kolla.image.build:ovsdpdk-db Failed with status: matched
ERROR:kolla.image.build:ovsdpdk-vswitchd Failed with status: matched
自分の環境では1時間20分かかりました。
また今回作成の環境ではDPDK関係がビルドに失敗するようです。
3.7 デプロイ
デプロイ前のプリチェックを行う。
# cd /root/kolla-ansible/
# kolla-ansible prechecks -i all-in-one
:
localhost                  : ok=73   changed=0    unreachable=0    failed=0
プリチェックでエラーにならなければデプロイする。
# kolla-ansible deploy -i all-in-one
:
localhost                  : ok=319  changed=202  unreachable=0    failed=0
デプロイ完了後、ポストデプロイを実行する。
# kolla-ansible post-deploy
:
localhost                  : ok=2    changed=1    unreachable=0    failed=0
3.8 OpenStack環境の初期設定
OpenStack Clientをインストールする。
# pip install python-openstackclient
:
Successfully installed PrettyTable-0.7.2 appdirs-1.4.3 cliff-2.8.0 cmd2-0.7.6 deprecation-1.0.1 functools32-3.2.3.post2 jsonpatch-1.16 jsonpointer-1.10 jsonschema-2.6.0 keystoneauth1-3.1.0 msgpack-python-0.4.8 openstacksdk-0.9.17 os-client-config-1.28.0 osc-lib-1.7.0 oslo.serialization-2.20.0 positional-1.2.1 pyOpenSSL-17.2.0 pyperclip-1.5.27 python-cinderclient-3.1.0 python-glanceclient-2.8.0 python-keystoneclient-3.13.0 python-novaclient-9.1.0 python-openstackclient-3.12.0 requestsexceptions-1.3.0 simplejson-3.11.1 unicodecsv-0.14.1 warlock-1.2.0
続けて以下を実行する。
(途中で聞かれるパスフレーズは何も入力せずエンターキー押下しても問題ないです)
# . /etc/kolla/admin-openrc.sh
# cd /usr/share/kolla-ansible
# ./init-runonce
初期設定完了後、以下を実行してログインパスワードを確認する。
# env | grep OS_
OS_REGION_NAME=RegionOne
OS_USER_DOMAIN_NAME=Default
OS_PROJECT_NAME=admin
OS_IDENTITY_API_VERSION=3
OS_PASSWORD=X7R0Vw5JomqRMun8Zg76BVHr74Z6jxwalCj1d29M
OS_AUTH_URL=http://192.168.0.159:35357/v3
OS_USERNAME=admin
OS_TENANT_NAME=admin
OS_INTERFACE=internal
OS_PROJECT_DOMAIN_NAME=Default
4. 動作確認
(ここからは以前の記事の使いまわしです)
4.1 ダッシュボードにログイン
ブラウザでダッシュボード(http://192.168.0.159 )を開き、adminでログインする。
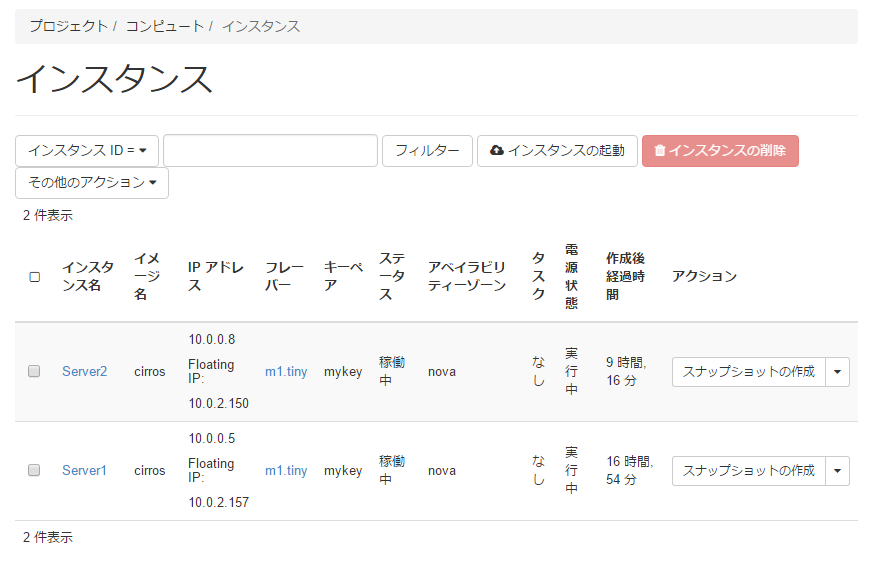
4.2 テスト用インスタンス生成
プロジェクト→コンピュート→インスタンスを選択し、「インスタンスの起動」をクリック。
以下の設定を行い、「インスタンスの起動」をクリックしてインスタンスを作成する。
・詳細タブのインスタンス名:Server1
・ソースタブのイメージ:cirrosを選択
・フレーバータブ:m1.tinyを選択
・ネットワークタブ:demo-netを選択
インスタンス作成後、Floating IPもインスタンスに設定する。
以下のようにテスト用にインスタンスを2個作成しました。
4.3 Publicネットワーク設定
構築直後はPublicネットワークへのアクセス用のブリッジが未設定のため、ホストOS上で以下を設定する。
# ip addr add 10.0.2.1/24 dev br-ex
# ip link set br-ex up
# ip route add 10.0.2.0/24 dev br-ex
しばらくすると、ホストOS上からインスタンスのFloating IPへのpingが通るようになる。
# ping 10.0.2.157
PING 10.0.2.157 (10.0.2.157) 56(84) bytes of data.
64 bytes from 10.0.2.157: icmp_seq=1 ttl=63 time=2.20 ms
64 bytes from 10.0.2.157: icmp_seq=2 ttl=63 time=0.540 ms
64 bytes from 10.0.2.157: icmp_seq=3 ttl=63 time=0.565 ms
64 bytes from 10.0.2.157: icmp_seq=4 ttl=63 time=0.583 ms
5. Tackerの動作確認
ここからは、コンフィグで使用するコンポーネントとして指定したTackerの動作確認を行います。Tackerの概要はこちらを参照してください。
5.1 CLIコマンドのインストール
# pip install python-tackerclient
:
Successfully installed oslo.context-2.17.0 oslo.log-3.30.0 oslosphinx-4.15.1 pyinotify-0.9.6 python-dateutil-2.6.1 python-tackerclient-0.10.0
5.2 VNFのデプロイ確認
# cd /root/kolla-ansible/contrib/demos/tacker
# sh deploy-tacker-demo
以上で構築完了です。
今後は、最新イメージへの更新手順や、ログ確認方法などを取り上げてみたいと思います。