はじめに
OpenStack(Pikeバージョン)のリリース後、今までのkolla-ansible手順でOpenStack環境しようとするとエラーが発生するようになってしまいました。いろいろな手順を試したところ、ミラーリポジトリを作成してデプロイすると成功したため、その手順をまとめました。
参考サイト(中国語)
http://www.chenshake.com/kolla-installation/
2017.3.21 更新
2018.3.21現在、本手順での構築が不可となりました。
(2.7章でダウンロードするPike版レジストリが非公開となったため)
⇒以下の記事に、別の方法でKollaを構築する手順をまとめました。
kolla-ansibleでOpenStack(stable/queens)を構築する
OpenStack Kollaとは(おさらい)
NovaやNeutronといったOpenStackの各コンポーネントをDockerコンテナの形態でデプロイするプロジェクトです。
通常のデプロイ手順だと、OpenStackのバージョンアップ等で再インストールする場合にホストのOS再インストールから必要になりますが、Dockerコンテナの形態だとホストOSの再イントールを必要とせず、コンテナのイメージを入れ替えるだけでバージョンアップが可能となります(ホストが汚れなくてすむ)。
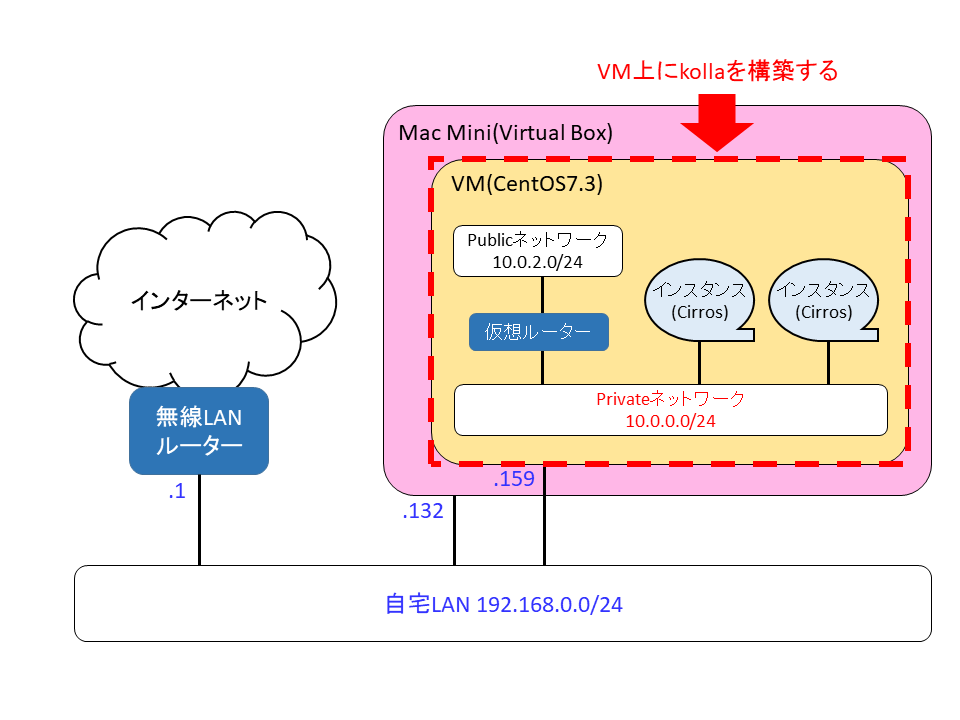
環境構成
MACのVirtualBox上に作成したCentOS7.3のVMに、AllInOne構成で構築しました。
VMは以下の条件で作成しました。
・VM名:Kolla
・CPU数:2CPU
・メモリ:8GB(最低条件として8GB必要)
・仮想ハードディスク:100GB(最低条件として40GB必要)
・ネットワーク:以下の2つを作成(最低条件として2つ必要)
(1)「ブリッジアダプター」・・・ダッシュボードアクセス用
⇒CentOSインストール時に固定IPアドレス(192.168.0.159)を設定
※192.168.0.159は各自のネットワーク環境のIPアドレスを設定してください。
(2)「内部ネットワーク」・・・Publicネットワーク用
⇒IPアドレスなし
構築メモ
1. VMにCentOS7.3をインストール
余計なものは入れず、最小限のインストールを行います。
インストーラ上では主に以下の設定を行いました。
・ソフトウェアの選択は「最小限のインストール」(何もチェックを付けない)
・ネットワークとホスト名
・イーサネット(enp0s3)をオン、方式=手動、192.168.0.159を設定(ダッシュボードアクセス用)
・イーサネット(enp0s8)をオン、方式=手動、IPアドレス設定なし(Publicネットワーク用)
・DNSサーバは8.8.8.8を設定
・ホスト名:kolla
2. インストール前準備
以降の作業はrootアカウントで行います。
2.1 ファイアウォールの無効化
# systemctl disable firewalld
# systemctl stop firewalld
2.2 英語ロケール設定
# vi /etc/environment
以下の2行を追加します。
LANG=en_US.utf-8
LC_ALL=en_US.utf-8
いったんホストをrebootしておきます。
2.3 yumのアップデート
# yum update -y
:
Complete!
2.4 必要パッケージのインストール
# yum install -y epel-release
:
Installed:
  epel-release.noarch 0:7-9

Complete!
# yum install -y git wget ansible gcc python-devel python-pip yum-utils
:
Installed:
  ansible.noarch 0:2.4.0.0-5.el7    gcc.x86_64 0:4.8.5-16.el7      git.x86_64 0:1.8.3.1-12.el7_4     python-devel.x86_64 0:2.7.5-58.el7
  python2-pip.noarch 0:8.1.2-5.el7  wget.x86_64 0:1.14-15.el7_4.1  yum-utils.noarch 0:1.1.31-42.el7

Dependency Installed:
:
Complete!
2.5 Dockerのインストール
# yum-config-manager --add-repo https://download.docker.com/linux/centos/docker-ce.repo
:
adding repo from: https://download.docker.com/linux/centos/docker-ce.repo
grabbing file https://download.docker.com/linux/centos/docker-ce.repo to /etc/yum.repos.d/docker-ce.repo
repo saved to /etc/yum.repos.d/docker-ce.repo
# yum install -y docker-ce
:
Installed:
  docker-ce.x86_64 0:17.09.0.ce-1.el7.centos

Dependency Installed:
:
Complete!
# mkdir /etc/systemd/system/docker.service.d
# tee /etc/systemd/system/docker.service.d/kolla.conf << 'EOF'
[Service]
MountFlags=shared
EOF
2.6 Dockerの設定追加
ミラーリポジトリにはHTTPSではなくHTTPで通信を行うため、--insecure-registryの設定を追加します。
# vi /usr/lib/systemd/system/docker.service
以下のように書き換えます。
# ExecStart=/usr/bin/dockerd
ExecStart=/usr/bin/dockerd --insecure-registry 192.168.0.159:4000
書き換え後、Dockerを再起動します。
# systemctl daemon-reload
# systemctl enable docker
# systemctl restart docker
2.7 Pike版レジストリのダウンロード
# cd /root
# wget http://tarballs.openstack.org/kolla/images/centos-source-registry-pike.tar.gz
2.8 ミラーリポジトリの作成
# mkdir /opt/registry
# tar xf centos-source-registry-pike.tar.gz -C /opt/registry
# docker run -d -p 4000:5000 --restart=always --name registry -v /opt/registry:/var/lib/registry registry
動作確認として、以下のcurl実行がエラーにならなければOKです。
# curl http://192.168.0.159:4000/v2/lokolla/centos-source-memcached/tags/list
{"name":"lokolla/centos-source-memcached","tags":["5.0.1"]}
3. kollaのデプロイ
3.1 kolla-ansibleのインストール
# cd /opt
# git clone https://github.com/openstack/kolla-ansible.git -b stable/pike
:
done.
# cd kolla-ansible
# pip install -r requirements.txt
:
Successfully installed Babel-2.5.1 Jinja2-2.10 MarkupSafe-1.0 backports.ssl-match-hostname-3.5.0.1 certifi-2017.11.5 chardet-3.0.4 debtcollector-1.18.0 docker-2.6.1 docker-pycreds-0.2.1 funcsigs-1.0.2 iso8601-0.1.12 monotonic-1.4 netaddr-0.7.19 netifaces-0.10.6 oslo.config-5.0.0 oslo.i18n-3.18.0 oslo.utils-3.31.0 pbr-3.1.1 pyparsing-2.2.0 pytz-2017.3 requests-2.18.4 rfc3986-1.1.0 setuptools-36.7.2 stevedore-1.27.1 urllib3-1.22 websocket-client-0.44.0 wrapt-1.10.11
# python setup.py install
:
Installing kolla-mergepwd script to /usr/bin
Installing kolla-genpwd script to /usr/bin
# cp -r /usr/share/kolla-ansible/etc_examples/kolla /etc/kolla/
# cp /usr/share/kolla-ansible/ansible/inventory/* .
3.2 パスワードファイル作成
# kolla-genpwd
ハッシュ暗号化された各種パスワードが/etc/kolla/passwords.ymlに作成されます。
以下のように、ログイン用パスワードだけは覚えやすいパスワードに変えておくと便利です。
# vi /etc/kolla/passwords.yml
例としてログイン用パスワードを「password」に変更します。
keystone_admin_password: password
3.3 コンフィグ編集
※ハイライト行の行頭の+は行をハイライトするためのものなので、+は実際には書かないこと。
# vi /etc/kolla/globals.yml
:
# Valid options are [ centos, oraclelinux, ubuntu ]
+kolla_base_distro: "centos"

# Valid options are [ binary, source ]
+kolla_install_type: "source"

# Valid option is Docker repository tag
+openstack_release: "5.0.1"

# Location of configuration overrides
# node_custom_config: "/etc/kolla/config"
:
kolla_internal_vip_addressにはダッシュボードアクセス用のIPアドレスを設定します。
:
# This should be a VIP, an unused IP on your network that will float between
# the hosts running keepalived for high-availability. When running an All-In-One
# without haproxy and keepalived, this should be the first IP on your
# 'network_interface' as set in the Networking section below.
+kolla_internal_vip_address: "192.168.0.159"
ミラーリポジトリを参照する設定を追加します。
################
# Docker options
################
# Below is an example of a private repository with authentication. Note the
# Docker registry password can also be set in the passwords.yml file.

+docker_registry: "192.168.0.159:4000"
+docker_namespace: "lokolla"
# docker_registry_username: "sam"
# docker_registry_password: "correcthorsebatterystaple"
「network_interface」のコメントアウトを外し、ダッシュボードアクセス用のインターフェース名を指定します。
:
###############################
# Neutron - Networking Options
###############################
# This interface is what all your api services will be bound to by default.
# Additionally, all vxlan/tunnel and storage network traffic will go over this
# interface by default. This interface must contain an IPv4 address.
# It is possible for hosts to have non-matching names of interfaces - these can
# be set in an inventory file per host or per group or stored separately, see
#     http://docs.ansible.com/ansible/intro_inventory.html
# Yet another way to workaround the naming problem is to create a bond for the
# interface on all hosts and give the bond name here. Similar strategy can be
# followed for other types of interfaces.
+network_interface: "enp0s3"
:
「neutron_external_interface」にはPublicネットワーク用のインターフェース名を指定します。
:
# This is the raw interface given to neutron as its external network port. Even
# though an IP address can exist on this interface, it will be unusable in most
# configurations. It is recommended this interface not be configured with any IP
# addresses for that reason.
+neutron_external_interface: "enp0s8"
:
以降は機能の有効/無効を設定します。
まず、今回はシングル構成のOpenStack環境を作成するため、haproxyはnoとします。
基本的なOpenStack環境であれば上記の設定だけで十分です。
あとはお好みとなりますが、今回は例として、Tackerコンポーネントをyesとし、関連して必要となるコンポーネント(aodh、barbican、ceilometer、gnocchi、mistral、mongodb、neutron_sfc、redis)もyesとしました。またログ収集を行うcentral_loggingもyesとしました。
# OpenStack services can be enabled or disabled with these options
+enable_aodh: "yes"
+enable_barbican: "yes"
+enable_ceilometer: "yes"
+enable_central_logging: "yes"
# enable_ceph: "no"
# enable_ceph_rgw: "no"
# enable_chrony: "no"
# enable_cinder: "no"
# enable_cinder_backup: "yes"
# enable_cinder_backend_hnas_iscsi: "no"
# enable_cinder_backend_hnas_nfs: "no"
# enable_cinder_backend_iscsi: "no"
# enable_cinder_backend_lvm: "no"
# enable_cinder_backend_nfs: "no"
# enable_cloudkitty: "no"
# enable_collectd: "no"
# enable_congress: "no"
# enable_designate: "no"
# enable_destroy_images: "no"
# enable_etcd: "no"
# enable_freezer: "no"
+enable_gnocchi: "yes"
# enable_grafana: "no"
+enable_haproxy: "no"
# enable_heat: "yes"
# enable_horizon: "yes"
# enable_horizon_cloudkitty: "{{ enable_cloudkitty | bool }}"
# enable_horizon_designate: "{{ enable_designate | bool }}"
# enable_horizon_freezer: "{{ enable_freezer | bool }}"
# enable_horizon_ironic: "{{ enable_ironic | bool }}"
# enable_horizon_karbor: "{{ enable_karbor | bool }}"
# enable_horizon_magnum: "{{ enable_magnum | bool }}"
# enable_horizon_manila: "{{ enable_manila | bool }}"
# enable_horizon_mistral: "{{ enable_mistral | bool }}"
# enable_horizon_murano: "{{ enable_murano | bool }}"
# enable_horizon_neutron_lbaas: "{{ enable_neutron_lbaas | bool }}"
# enable_horizon_sahara: "{{ enable_sahara | bool }}"
# enable_horizon_searchlight: "{{ enable_searchlight | bool }}"
# enable_horizon_senlin: "{{ enable_senlin | bool }}"
# enable_horizon_solum: "{{ enable_solum | bool }}"
# enable_horizon_tacker: "{{ enable_tacker | bool }}"
# enable_horizon_trove: "{{ enable_trove | bool }}"
# enable_horizon_watcher: "{{ enable_watcher | bool }}"
# enable_horizon_zun: "{{ enable_zun | bool }}"
# enable_hyperv: "no"
# enable_influxdb: "no"
# enable_ironic: "no"
# enable_karbor: "no"
# enable_kuryr: "no"
# enable_magnum: "no"
# enable_manila: "no"
# enable_manila_backend_generic: "no"
# enable_manila_backend_hnas: "no"
+enable_mistral: "yes"
+enable_mongodb: "yes"
# enable_murano: "no"
# enable_multipathd: "no"
# enable_neutron_bgp_dragent: "no"
# enable_neutron_dvr: "no"
# enable_neutron_lbaas: "no"
# enable_neutron_fwaas: "no"
# enable_neutron_qos: "no"
# enable_neutron_agent_ha: "no"
# enable_neutron_vpnaas: "no"
+enable_neutron_sfc: "yes"
# enable_nova_serialconsole_proxy: "no"
# enable_octavia: "no"
# enable_opendaylight: "no"
# enable_openvswitch: "{{ neutron_plugin_agent != 'linuxbridge' }}"
# enable_ovs_dpdk: "no"
# enable_osprofiler: "no"
# enable_panko: "no"
# enable_qdrouterd: "no"
# enable_rally: "no"
+enable_redis: "yes"
# enable_sahara: "no"
# enable_searchlight: "no"
# enable_senlin: "no"
# enable_skydive: "no"
# enable_solum: "no"
# enable_swift: "no"
# enable_telegraf: "no"
+enable_tacker: "yes"
# enable_tempest: "no"
# enable_trove: "no"
# enable_vmtp: "no"
# enable_watcher: "no"
# enable_zun: "no"
今回のようにVM上でKollaを動作させる場合は、nova_compute_virt_typeをqemuに変更します。
:
#########################
# Nova - Compute Options
#########################
# nova_backend_ceph: "{{ enable_ceph }}"

# Valid options are [ qemu, kvm, vmware ]
+nova_compute_virt_type: "qemu"
:
3.4 デプロイ
デプロイ前のプリチェックを行います。(エラー発生時は6章を参照)
# cd /opt/kolla-ansible/
# kolla-ansible prechecks -i all-in-one
:
localhost                  : ok=83   changed=0    unreachable=0    failed=0
プリチェックでエラーにならなければデプロイします。(エラー発生時は6章を参照)
# kolla-ansible deploy -i all-in-one
:
localhost                  : ok=371  changed=235  unreachable=0    failed=0
デプロイ完了後、ポストデプロイを実行します。
# kolla-ansible post-deploy
:
localhost                  : ok=2    changed=1    unreachable=0    failed=0
3.5 OpenStack環境の初期設定
OpenStack Clientをインストールします。
# pip install python-openstackclient
:
Successfully installed PrettyTable-0.7.2 appdirs-1.4.3 asn1crypto-0.23.0 cffi-1.11.2 cliff-2.9.1 cmd2-0.7.8 cryptography-2.1.3 deprecation-1.0.1 functools32-3.2.3.post2 idna-2.6 jsonpatch-1.16 jsonpointer-1.14 jsonschema-2.6.0 keystoneauth1-3.2.0 msgpack-python-0.4.8 openstacksdk-0.9.19 os-client-config-1.28.0 osc-lib-1.7.0 oslo.serialization-2.21.2 positional-1.2.1 pyOpenSSL-17.3.0 pyperclip-1.6.0 python-cinderclient-3.2.0 python-glanceclient-2.8.0 python-keystoneclient-3.13.0 python-novaclient-9.1.1 python-openstackclient-3.12.0 requestsexceptions-1.3.0 simplejson-3.12.0 unicodecsv-0.14.1 warlock-1.2.0
続けて以下を実行します。
(途中で聞かれるパスフレーズは何も入力せずエンターキー押下しても問題ないです)
# . /etc/kolla/admin-openrc.sh
# cd /usr/share/kolla-ansible
# ./init-runonce
4. 動作確認
4.1 ダッシュボードにログイン
ブラウザでダッシュボード(http://192.168.0.159 )にアクセスします。
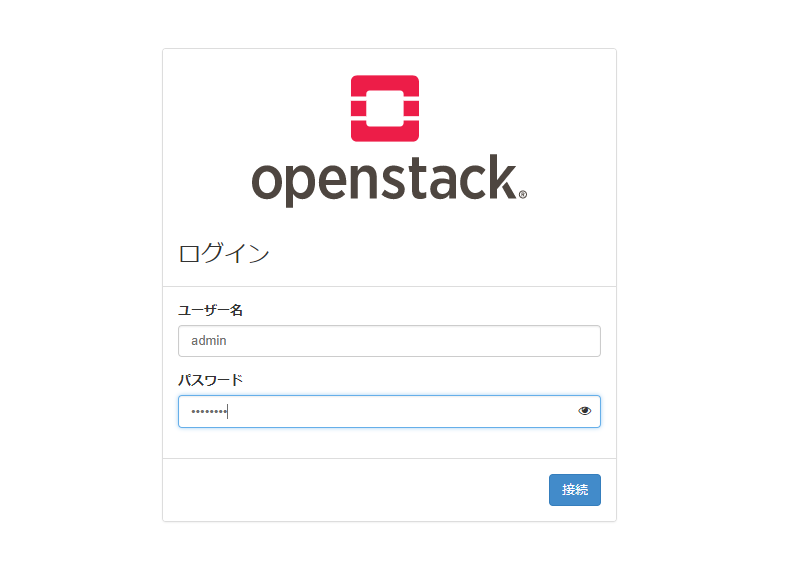
adminでログインできれば動作確認OKです。
4.2 Publicネットワークの追加設定
構築直後はPublicネットワークへのアクセス用のブリッジが未設定のため、ホストOS上で以下を設定します。
これにより、ホストOSからフローティングIPアドレスへのpingやsshが可能になります。
# ip addr add 10.0.2.1/24 dev br-ex
# ip link set br-ex up
# ip route add 10.0.2.0/24 dev br-ex
また、OpenStackのインスタンスからインターネットにアクセスできるようにするために、ホストOS側にソースNATの設定を追加します。
(Publicネットワークから送られてきたパケットはソースNATしてenp0s3のインタフェースから送信する設定)
# iptables -t nat -A POSTROUTING -o enp0s3 -s 10.0.2.0/24 -j MASQUERADE
5. Tacker用の追加設定
今回の例ではTackerコンポーネントを導入しているので、Tacker用の追加設定を行います。
(Tackerを導入していない場合は実施不要です)
Tackerの概要はこちらを参照してください。
5.1 CLIコマンドのインストール
# pip install python-tackerclient
:
Successfully installed oslo.context-2.19.3 oslo.log-3.33.0 oslosphinx-4.17.0 pyinotify-0.9.6 python-dateutil-2.6.1 python-tackerclient-0.10.0
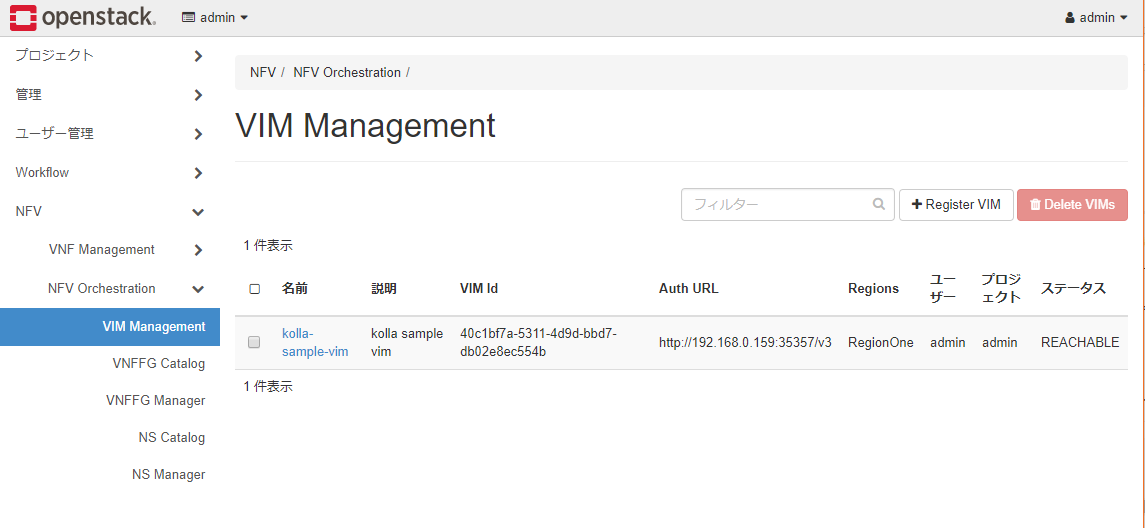
5.2 Tackerの初期設定
VIM登録とサンプルVNFの起動を行います。
# cd /opt/kolla-ansible/contrib/demos/tacker
# sh deploy-tacker-demo
実行後、以下のようにVIMが登録されているはずです。
6. トラブルシューティング
6.1 プリチェック時のエラー対処
- プリチェックで「Hostname has to resolve to IP address of api_interface」エラーとなった場合
以下の手順にしたがって、ansibleのバージョンを2.2にすると成功する可能性があります。
# pip uninstall ansible
# pip install ansible==2.2
- プリチェックの「Checking Docker version」で「while scanning for the next token\nfound character '\t' 」エラーとなった場合
Dockerのバージョン情報に「\t」が含まれているためにエラーになっている模様(Version:\t17.12.0-ceのように)。以下の手順にしたがって、するチェック処理をコメントアウトするとチェックをスキップできます。
# vi /usr/share/kolla-ansible/ansible/roles/prechecks/tasks/service_checks.yml
「Checking Docker version」の「failed_when」をコメントアウトします。
---
- name: Checking Docker version
  command: docker version
  register: result
  changed_when: false
  when: inventory_hostname in groups['baremetal']
#  failed_when: result | failed
#               or (result.stdout | from_yaml).Server.Version | regex_replace('(\\d+\\.\\d+\\.\\d+).*', '\\1') | version_compare(docker_version_min, '<')

- name: Checking empty passwords in passwords.yml. Run kolla-genpwd if this task fails
  local_action: command grep '^[^#].*:\s*$' "{{ CONFIG_DIR | default('/etc/kolla') }}/passwords.yml"
  run_once: True
  register: result
  changed_when: false
  failed_when: result.stdout | regex_replace('(.*ssh_key.*)', '') | search(":")
6.2 デプロイ時のエラー対処
- 「http: server gave HTTP response to HTTPS client」エラーとなった場合
以下の手順にしたがって、insecure-registriesの設定を追加します。
# tee /etc/docker/daemon.json << EOF
{"insecure-registries": ["0.0.0.0/0"]}
EOF
おわりに
kollaはコミュニティ公式手順をそのまま実行するとたいてい失敗するのですが、他の方がどんな手順で構築されているのか気になるところです。。