はじめに
以前こちらのページにてstable/pike版の構築手順をまとめましたが、2018年2月末にOpenStackの新しいバージョン(Queens)がリリースされたタイミングでこちらの構築手順が使えなくなってしまいました(*1)。
代わりの手順として、2018年3月時点の公式手順を少しカスタマイズすることでKolla環境の構築が成功しましたので、今回はその手順を紹介します。
(*1)ローカルリポジトリを立てる際に使用していたtarballがダウンロードできなくなったため。
2018.6.14 更新
2.1 ファイアウォール無効化手順を削除しました。(無効化しなくても構築は成功したため)
OpenStack Kollaとは(おさらい)
NovaやNeutronといったOpenStackの各コンポーネントをDockerコンテナの形態でデプロイするプロジェクトです。
通常のデプロイ手順だと、OpenStackのバージョンアップ等で再インストールする場合にホストのOS再インストールから必要になりますが、Dockerコンテナの形態だとホストOSの再イントールを必要とせず、コンテナのイメージを入れ替えるだけでバージョンアップが可能となります(ホストが汚れなくてすむ)。
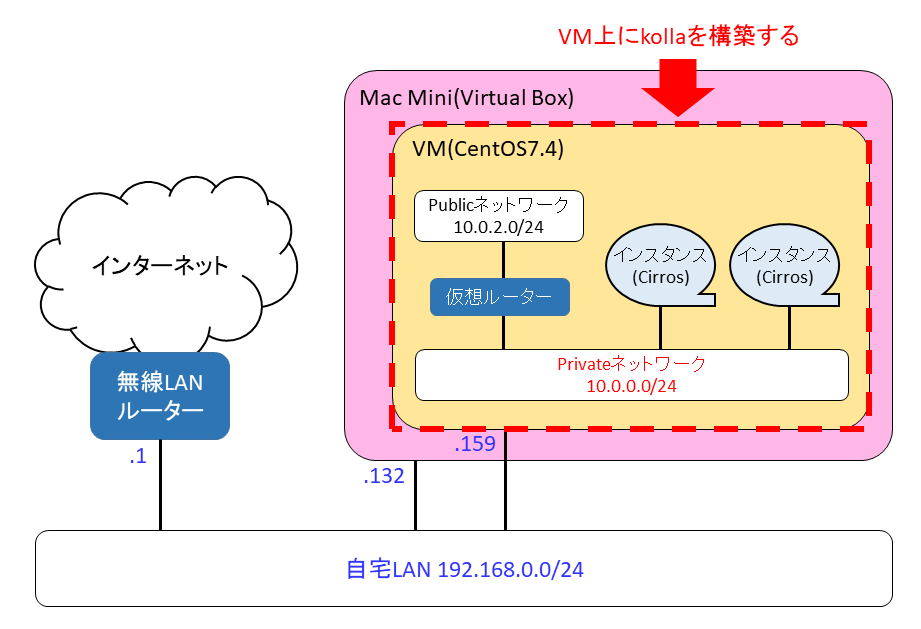
環境構成
MACのVirtualBox上に作成したCentOS7.4のVMに、AllInOne構成でOpenStack kollaを構築しました。
VMは以下の条件で作成しました。
・VM名:Kolla
・CPU数:2CPU
・メモリ:8GB(最低条件として8GB必要)
・仮想ハードディスク:100GB(最低条件として40GB必要)
・ネットワーク:以下の2つを作成(最低条件として2つ必要)
(1)「ブリッジアダプター」・・・ダッシュボードアクセス用
⇒CentOSインストール時に固定IPアドレス(192.168.0.159)を設定
※192.168.0.159は各自のネットワーク環境のIPアドレスを設定してください。
(2)「内部ネットワーク」・・・Publicネットワーク用
⇒IPアドレスなし
構築メモ
1. VMにCentOS7.4をインストール
余計なものは入れず、最小限のインストールを行います。
インストーラ上では主に以下の設定を行いました。
・ソフトウェアの選択は「最小限のインストール」(何もチェックを付けない)
・ネットワークとホスト名
・イーサネット(enp0s3)をオン、方式=手動、192.168.0.159を設定(ダッシュボードアクセス用)
・イーサネット(enp0s8)をオン、方式=自動、IPアドレス設定なし(Publicネットワーク用)
・DNSサーバは8.8.8.8を設定
・ホスト名:kolla
2. インストール前準備
以降の作業はrootアカウントで行います。
## 2.1 ファイアウォールの無効化
2.2 yumのアップデート
# yum update -y

(実行結果)
:
完了しました!
2.3 必要パッケージのインストール
- EPEL
# yum install -y epel-release

(実行結果)
:
インストール:
  epel-release.noarch 0:7-9

完了しました!
- python-pip
# yum install -y python-pip

(実行結果)
:
インストール:
  python2-pip.noarch 0:8.1.2-5.el7

依存性関連をインストールしました:
  python-backports.x86_64 0:1.0-8.el7  python-backports-ssl_match_hostname.noarch 0:3.4.0.2-4.el7  python-setuptools.noarch 0:0.9.8-7.el7

完了しました!
- pip
# pip install -U pip

(実行結果)
:
Installing collected packages: pip
  Found existing installation: pip 8.1.2
    Uninstalling pip-8.1.2:
      Successfully uninstalled pip-8.1.2
Successfully installed pip-9.0.2
- 開発用モジュール
# yum install -y python-devel libffi-devel gcc openssl-devel libselinux-python

(実行結果)
:
インストール:
  gcc.x86_64 0:4.8.5-16.el7_4.2 libffi-devel.x86_64 0:3.0.13-18.el7 openssl-devel.x86_64 1:1.0.2k-8.el7 python-devel.x86_64 0:2.7.5-58.el7

依存性関連をインストールしました:
  cpp.x86_64 0:4.8.5-16.el7_4.2                   glibc-devel.x86_64 0:2.17-196.el7_4.2        glibc-headers.x86_64 0:2.17-196.el7_4.2
  kernel-headers.x86_64 0:3.10.0-693.21.1.el7     keyutils-libs-devel.x86_64 0:1.5.8-3.el7     krb5-devel.x86_64 0:1.15.1-8.el7
  libcom_err-devel.x86_64 0:1.42.9-10.el7         libkadm5.x86_64 0:1.15.1-8.el7               libmpc.x86_64 0:1.0.1-3.el7
  libselinux-devel.x86_64 0:2.5-11.el7            libsepol-devel.x86_64 0:2.5-6.el7            libverto-devel.x86_64 0:0.2.5-4.el7
  mpfr.x86_64 0:3.1.1-4.el7                       pcre-devel.x86_64 0:8.32-17.el7              zlib-devel.x86_64 0:1.2.7-17.el7

完了しました!
- git
# yum install -y git

(実行結果)
:
インストール:
  git.x86_64 0:1.8.3.1-12.el7_4

依存性関連をインストールしました:
  libgnome-keyring.x86_64 0:3.12.0-1.el7       perl.x86_64 4:5.16.3-292.el7               perl-Carp.noarch 0:1.26-244.el7
  perl-Encode.x86_64 0:2.51-7.el7              perl-Error.noarch 1:0.17020-2.el7          perl-Exporter.noarch 0:5.68-3.el7
  perl-File-Path.noarch 0:2.09-2.el7           perl-File-Temp.noarch 0:0.23.01-3.el7      perl-Filter.x86_64 0:1.49-3.el7
  perl-Getopt-Long.noarch 0:2.40-2.el7         perl-Git.noarch 0:1.8.3.1-12.el7_4         perl-HTTP-Tiny.noarch 0:0.033-3.el7
  perl-PathTools.x86_64 0:3.40-5.el7           perl-Pod-Escapes.noarch 1:1.04-292.el7     perl-Pod-Perldoc.noarch 0:3.20-4.el7
  perl-Pod-Simple.noarch 1:3.28-4.el7          perl-Pod-Usage.noarch 0:1.63-3.el7         perl-Scalar-List-Utils.x86_64 0:1.27-248.el7
  perl-Socket.x86_64 0:2.010-4.el7             perl-Storable.x86_64 0:2.45-3.el7          perl-TermReadKey.x86_64 0:2.30-20.el7
  perl-Text-ParseWords.noarch 0:3.29-4.el7     perl-Time-HiRes.x86_64 4:1.9725-3.el7      perl-Time-Local.noarch 0:1.2300-2.el7
  perl-constant.noarch 0:1.27-2.el7            perl-libs.x86_64 4:5.16.3-292.el7          perl-macros.x86_64 4:5.16.3-292.el7
  perl-parent.noarch 1:0.225-244.el7           perl-podlators.noarch 0:2.5.1-3.el7        perl-threads.x86_64 0:1.87-4.el7
  perl-threads-shared.x86_64 0:1.43-6.el7      rsync.x86_64 0:3.0.9-18.el7

完了しました!
2.4 Ansibleのインストール
- Ansibleのインストール
# yum install -y ansible

(実行結果)
:
インストール:
  ansible.noarch 0:2.4.2.0-2.el7

依存性関連をインストールしました:
  PyYAML.x86_64 0:3.10-11.el7                        libyaml.x86_64 0:0.1.4-11.el7_0             python-babel.noarch 0:0.9.6-8.el7
  python-cffi.x86_64 0:1.6.0-5.el7                   python-enum34.noarch 0:1.0.4-1.el7          python-httplib2.noarch 0:0.9.2-1.el7
  python-idna.noarch 0:2.4-1.el7                     python-ipaddress.noarch 0:1.0.16-2.el7      python-jinja2.noarch 0:2.7.2-2.el7
  python-markupsafe.x86_64 0:0.11-10.el7             python-paramiko.noarch 0:2.1.1-2.el7        python-passlib.noarch 0:1.6.5-2.el7
  python-ply.noarch 0:3.4-11.el7                     python-pycparser.noarch 0:2.14-1.el7        python-six.noarch 0:1.9.0-2.el7
  python2-cryptography.x86_64 0:1.7.2-1.el7_4.1      python2-jmespath.noarch 0:0.9.0-3.el7       python2-pyasn1.noarch 0:0.1.9-7.el7
  sshpass.x86_64 0:1.06-2.el7

完了しました!
- Ansibleのコンフィグ設定
# vi /etc/ansible/ansible.cfg
[defaults]の直下に以下の4行を追加します。
host_key_checking=False
pipelining=True
forks=100
validate_certs=False
3. kollaのデプロイ
3.1 kolla-ansibleのインストール
- kolla-ansibleのダウンロード
# cd /opt
# git clone https://github.com/openstack/kolla-ansible -b stable/queens

(実行結果)
:
Receiving objects: 100% (68003/68003), 10.50 MiB | 734.00 KiB/s, done.
Resolving deltas: 100% (43578/43578), done.
- 依存パッケージのインストール
# cd kolla-ansible
# pip install -r requirements.txt

(実行結果)
:
Successfully installed Babel-2.5.3 Jinja2-2.10 MarkupSafe-1.0 asn1crypto-0.24.0 backports.ssl-match-hostname-3.5.0.1 certifi-2018.1.18 cffi-1.11.5 chardet-3.0.4 cryptography-2.2.1 debtcollector-1.19.0 docker-3.1.3 docker-pycreds-0.2.2 funcsigs-1.0.2 iso8601-0.1.12 monotonic-1.4 netaddr-0.7.19 netifaces-0.10.6 oslo.config-5.2.0 oslo.i18n-3.20.0 oslo.utils-3.36.0 pbr-3.1.1 pyparsing-2.2.0 pytz-2018.3 requests-2.18.4 rfc3986-1.1.0 setuptools-39.0.1 six-1.11.0 stevedore-1.28.0 urllib3-1.22 websocket-client-0.47.0 wrapt-1.10.11
- kolla-ansibleのインストール
# python setup.py install

(実行結果)
:
Installing kolla-mergepwd script to /usr/bin
Installing kolla-genpwd script to /usr/bin
- デプロイで使用するファイルのコピー
# cd /opt
# cp -r kolla-ansible/etc/kolla /etc/kolla/
# cp kolla-ansible/ansible/inventory/* .
3.2 パスワードファイル作成
# kolla-genpwd
ハッシュ暗号化された各種パスワードが/etc/kolla/passwords.ymlに作成されます。
以下のように、ログイン用パスワードだけは覚えやすいパスワードに変えておくと便利です。
# vi /etc/kolla/passwords.yml
例としてログイン用パスワードを「password」に変更します。
keystone_admin_password: password
3.3 コンフィグ編集
※ハイライト行の行頭の+は行をハイライトするためのものなので、+は実際には書かないこと。
# vi /etc/kolla/globals.yml
kolla_internal_vip_addressにはダッシュボードアクセス用のIPアドレスを設定します(各自の環境に合わせて設定してください)。
:
###############
# Kolla options
###############
# Valid options are [ COPY_ONCE, COPY_ALWAYS ]
# config_strategy: "COPY_ALWAYS"

# Valid options are ['centos', 'debian', 'oraclelinux', 'rhel', 'ubuntu']
+kolla_base_distro: "centos"

# Valid options are [ binary, source ]
+kolla_install_type: "source"

# Valid option is Docker repository tag
+openstack_release: "queens"

# Location of configuration overrides
# node_custom_config: "/etc/kolla/config"

# This should be a VIP, an unused IP on your network that will float between
# the hosts running keepalived for high-availability. If you want to run an
# All-In-One without haproxy and keepalived, you can set enable_haproxy to no
# in "OpenStack options" section, and set this value to the IP of your
# 'network_interface' as set in the Networking section below.
+kolla_internal_vip_address: "192.168.0.159"
:
Docker Hubのリポジトリを参照するよう設定します。
:
################
# Docker options
################
# Below is an example of a private repository with authentication. Note the
# Docker registry password can also be set in the passwords.yml file.

+docker_registry: ""
+docker_namespace: "kolla"
# docker_registry_username: "sam"
# docker_registry_password: "correcthorsebatterystaple"
:
「network_interface」のコメントアウトを外し、ダッシュボードアクセス用のインターフェース名を指定します。「neutron_external_interface」にはPublicネットワーク用のインターフェース名を指定します。
:
##############################
# Neutron - Networking Options
##############################
# This interface is what all your api services will be bound to by default.
# Additionally, all vxlan/tunnel and storage network traffic will go over this
# interface by default. This interface must contain an IPv4 address.
# It is possible for hosts to have non-matching names of interfaces - these can
# be set in an inventory file per host or per group or stored separately, see
#     http://docs.ansible.com/ansible/intro_inventory.html
# Yet another way to workaround the naming problem is to create a bond for the
# interface on all hosts and give the bond name here. Similar strategy can be
# followed for other types of interfaces.
+network_interface: "enp0s3"

# These can be adjusted for even more customization. The default is the same as
# the 'network_interface'. These interfaces must contain an IPv4 address.
# kolla_external_vip_interface: "{{ network_interface }}"
# api_interface: "{{ network_interface }}"
# storage_interface: "{{ network_interface }}"
# cluster_interface: "{{ network_interface }}"
# tunnel_interface: "{{ network_interface }}"
# dns_interface: "{{ network_interface }}"

# This is the raw interface given to neutron as its external network port. Even
# though an IP address can exist on this interface, it will be unusable in most
# configurations. It is recommended this interface not be configured with any IP
# addresses for that reason.
+neutron_external_interface: "enp0s8"

# Valid options are [ openvswitch, linuxbridge, vmware_nsxv, vmware_dvs, opendaylight ]
# neutron_plugin_agent: "openvswitch"
:
OpenStack optionsでは機能の有効/無効を設定します。今回はOpenStackの基本機能のみ使用するため、そのままとします。
なお、デフォルトでクラスタ設定が有効化されているため、haproxyをnoに設定します。
:
###################
# OpenStack options
###################
# Use these options to set the various log levels across all OpenStack projects
# Valid options are [ True, False ]
# openstack_logging_debug: "False"
:
+enable_haproxy: "no"
:
今回のようにVM上でKollaを動作させる場合は、nova_compute_virt_typeをqemuに変更します。
:
########################
# Nova - Compute Options
########################
# nova_backend_ceph: "{{ enable_ceph }}"

# Valid options are [ qemu, kvm, vmware, xenapi ]
+nova_compute_virt_type: "qemu"

# The number of fake driver per compute node
# num_nova_fake_per_node: 5
:
3.4 デプロイ
構築に必要なパッケージ(Docker等)をインストールします。
# cd /opt
# kolla-ansible -i all-in-one bootstrap-servers

(実行結果)
:
PLAY RECAP ********************************************************************************************************************************
localhost                  : ok=39   changed=24   unreachable=0    failed=0
デプロイ前のプリチェックを行います。
# kolla-ansible -i all-in-one prechecks

(実行結果)
:
PLAY RECAP ********************************************************************************************************************************
localhost                  : ok=58   changed=1    unreachable=0    failed=0
プリチェックでエラーにならなければデプロイします。
# kolla-ansible -i all-in-one deploy

(実行結果)
:
PLAY RECAP ********************************************************************************************************************************
localhost                  : ok=225  changed=141  unreachable=0    failed=0
デプロイ完了後、ポストデプロイを実行します。
# kolla-ansible post-deploy

(実行結果)
:
PLAY RECAP ********************************************************************************************************************************
localhost                  : ok=2    changed=1    unreachable=0    failed=0
3.5 OpenStack環境の初期設定
OpensStackのコマンドをインストールします。
# pip install python-openstackclient python-glanceclient python-neutronclient

(実行結果)
:
Successfully installed PrettyTable-0.7.2 PyYAML-3.12 appdirs-1.4.3 cliff-2.11.0 cmd2-0.8.1 contextlib2-0.5.5 deprecation-2.0 dogpile.cache-0.6.5 functools32-3.2.3.post2 futures-3.2.0 jsonpatch-1.21 jsonpointer-2.0 jsonschema-2.6.0 keystoneauth1-3.4.0 msgpack-0.5.6 munch-2.2.0 openstacksdk-0.12.0 os-client-config-1.29.0 os-service-types-1.2.0 osc-lib-1.10.0 oslo.serialization-2.25.0 packaging-17.1 pyOpenSSL-17.5.0 pyperclip-1.6.0 python-cinderclient-3.5.0 python-glanceclient-2.9.1 python-keystoneclient-3.15.0 python-neutronclient-6.7.0 python-novaclient-10.1.0 python-openstackclient-3.14.0 requestsexceptions-1.4.0 subprocess32-3.2.7 unicodecsv-0.14.1 warlock-1.3.0
続けて以下を実行します。
(途中で聞かれるパスフレーズは何も入力せずエンターキー押下しても問題ないです)
# . /etc/kolla/admin-openrc.sh
# . /usr/share/kolla-ansible/init-runonce
4. 動作確認
4.1 インスタンスの生成
CLIを使用して、動作確認用のインスタンスを生成します。下記のような実行結果が出力されれば生成OKです。
# openstack server create \
    --image cirros \
    --flavor m1.tiny \
    --key-name mykey \
    --network demo-net \
    demo1

(実行結果)
+-------------------------------------+-----------------------------------------------+
| Field                               | Value                                         |
+-------------------------------------+-----------------------------------------------+
| OS-DCF:diskConfig                   | MANUAL                                        |
| OS-EXT-AZ:availability_zone         |                                               |
| OS-EXT-SRV-ATTR:host                | None                                          |
| OS-EXT-SRV-ATTR:hypervisor_hostname | None                                          |
| OS-EXT-SRV-ATTR:instance_name       |                                               |
| OS-EXT-STS:power_state              | NOSTATE                                       |
| OS-EXT-STS:task_state               | scheduling                                    |
| OS-EXT-STS:vm_state                 | building                                      |
| OS-SRV-USG:launched_at              | None                                          |
| OS-SRV-USG:terminated_at            | None                                          |
| accessIPv4                          |                                               |
| accessIPv6                          |                                               |
| addresses                           |                                               |
| adminPass                           | GFpfRg4nbUY4                                  |
| config_drive                        |                                               |
| created                             | 2018-03-21T05:32:04Z                          |
| flavor                              | m1.tiny (1)                                   |
| hostId                              |                                               |
| id                                  | f940abe0-b677-448f-af26-00dfb188a81d          |
| image                               | cirros (442a4411-f88f-4f6e-a646-782be6fb542e) |
| key_name                            | mykey                                         |
| name                                | demo1                                         |
| progress                            | 0                                             |
| project_id                          | a9cffece38a44fab8b27fbc1fc63a0e4              |
| properties                          |                                               |
| security_groups                     | name='default'                                |
| status                              | BUILD                                         |
| updated                             | 2018-03-21T05:32:04Z                          |
| user_id                             | 1e6f12adbdf3453884092b422be8a6ef              |
| volumes_attached                    |                                               |
+-------------------------------------+-----------------------------------------------+
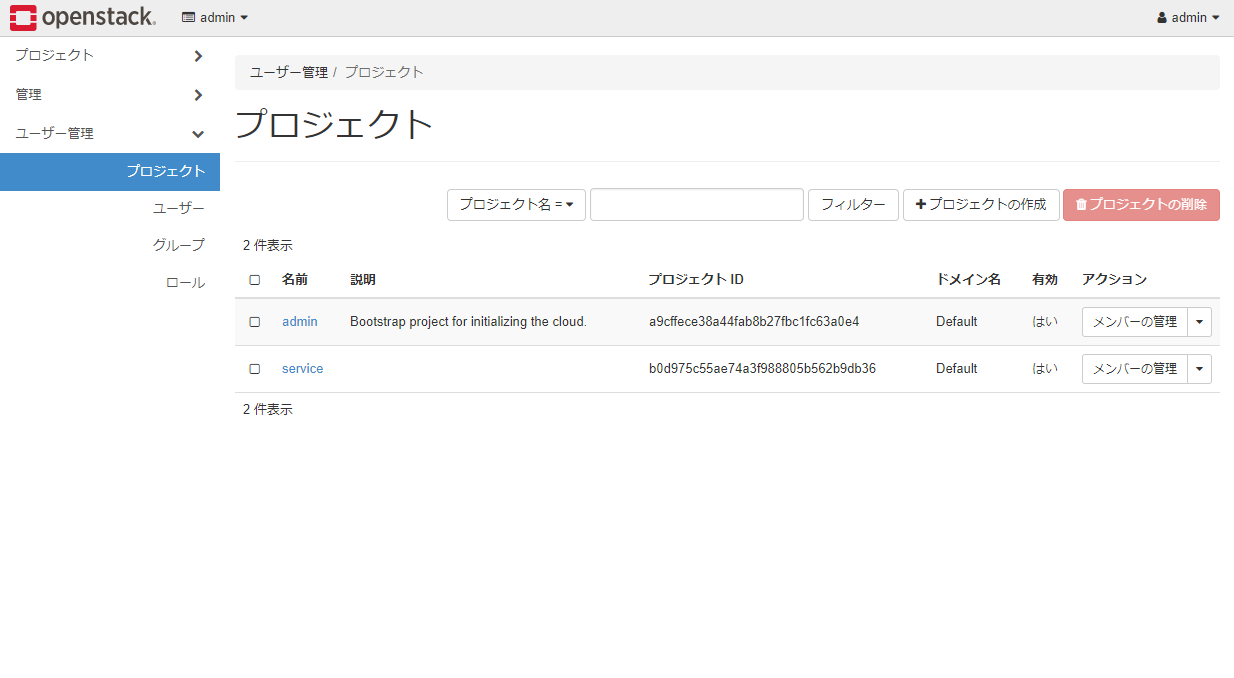
4.2 ダッシュボードにログイン
ブラウザでダッシュボード(http://192.168.0.159 )にアクセスします。
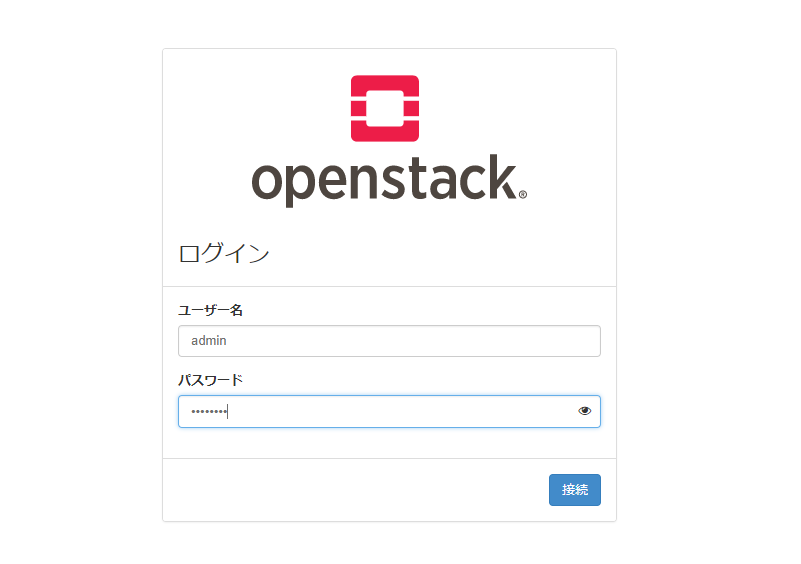
adminでログインできればGUIも動作確認OKです。
4.3 Publicネットワークの追加設定
構築直後はPublicネットワーク(10.0.2.0/24)へのアクセス用のブリッジが未設定のため、ホストOS上で以下を設定します。
これにより、Publicネットワーク上のフローティングIPアドレスに対して、ホストからpingやsshが可能になります。
# ip addr add 10.0.2.1/24 dev br-ex
# ip link set br-ex up
# ip route add 10.0.2.0/24 dev br-ex
また、OpenStack上のインスタンスからインターネットにアクセスできるようにするために、ホストOS側にソースNATの設定を追加します。
(Publicネットワークから送られてきたパケットはソースNATしてenp0s3のインタフェースから送信する設定)
# iptables -t nat -A POSTROUTING -o enp0s3 -s 10.0.2.0/24 -j MASQUERADE
おわりに
Kollaのインストール手順もだいぶ安定し、比較的利用しやすくなったと思います。別の機会にでもマルチノード構成の手順もまとめてみたいと思います。