
企業の自動化レポート、教材のバッチ生成、データ可視化出力などのシーンでは、コードによる動的な PowerPoint ドキュメントの生成によって、作業効率を大幅に向上させることができます。本記事では、.NET プラットフォーム上で Free Spire.Presentation コンポーネントを使用し、C# コードで PPTX ドキュメントを作成・編集する方法を、スライド管理、テキスト、画像、図形などの主要要素の操作方法を含めて紹介します。
1. 環境準備
1.1 コンポーネントのインストール
Visual Studio では、NuGet パッケージマネージャーを使用してコンポーネントを導入することをお勧めします。パッケージマネージャーコンソールで以下のコマンドを実行します。
Install-Package FreeSpire.Presentation
または .NET CLI を使用します。
dotnet add package FreeSpire.Presentation
インストール完了後、コードファイルの先頭で必要な名前空間をインポートします。
using Spire.Presentation;
using Spire.Presentation.Drawing;
using System.Drawing;
1.2 コアオブジェクトモデル
コンポーネントの API は PowerPoint のネイティブオブジェクトモデルに対応するように設計されており、主に以下のコアクラスを含みます。
-
Presentation:プレゼンテーションドキュメント全体を表し、すべての操作のエントリポイントです。 -
ISlide:1 枚のスライドを表し、Presentation.Slidesコレクションからアクセスします。 -
IAutoShape:図形オブジェクトを表し、テキストコンテンツはTextFrameプロパティで保持されます。 -
IEmbedImage:スライドに埋め込まれた画像オブジェクトを表します。
2. プレゼンテーションの作成とスライド管理
2.1 新しい空白プレゼンテーションの作成
Presentation オブジェクトをインスタンス化すると、デフォルトで 1 枚の空白スライドが含まれます。ゼロからスライドコレクションを構築する場合は、最初にデフォルトのスライドを削除できます。
// プレゼンテーションインスタンスの作成
Presentation ppt = new Presentation();

// デフォルトの空白スライドを削除(オプション)
ppt.Slides.RemoveAt(0);
2.2 スライドの追加と挿入
// 末尾に空白スライドを追加
ISlide slide1 = ppt.Slides.Append();

// 指定したインデックス位置にスライドを挿入(インデックスは 0 から開始)
ISlide slide2 = ppt.Slides.Insert(1);

// スライド総数を取得
int slideCount = ppt.Slides.Count;
2.3 スライドサイズの設定
デフォルトのスライドサイズは標準の 16:9 ワイド画面です。必要に応じて調整できます。
// 4:3 比率に設定
ppt.SlideSize.Type = SlideSizeType.Screen4x3;

// カスタムサイズ(単位:ポンド)
ppt.SlideSize.Size = new SizeF(1024, 768);
3. テキストコンテンツの追加
PowerPoint 内のテキストは図形内に保持され、四角形の図形を追加してそのテキストフレームを設定することでテキストボックスを実現できます。
3.1 基本的なテキストボックス
// 最初のスライドを取得
ISlide slide = ppt.Slides[0];

// テキストボックスの位置とサイズを定義 (x, y, 幅, 高さ)
RectangleF textRect = new RectangleF(100, 100, 500, 80);

// 四角形の図形をテキストボックスとして追加
IAutoShape textShape = slide.Shapes.AppendShape(ShapeType.Rectangle, textRect);

// 図形の塗りつぶしなし、枠線なしに設定
textShape.Fill.FillType = FillFormatType.None;
textShape.ShapeStyle.LineColor.Color = Color.Transparent;

// テキストコンテンツを設定
textShape.TextFrame.Text = "C# プログラミングで PowerPoint プレゼンテーションを作成";
3.2 テキスト書式の設定
// テキスト範囲オブジェクトを取得
TextRange textRange = textShape.TextFrame.TextRange;

// フォントを設定
textRange.LatinFont = new TextFont("メイリオ");
textRange.FontHeight = 32;
textRange.IsBold = TriState.True;

// 文字色を設定
textRange.Fill.FillType = FillFormatType.Solid;
textRange.Fill.SolidColor.Color = Color.FromArgb(30, 80, 160);

// 配置を設定
textShape.TextFrame.Paragraphs[0].Alignment = TextAlignmentType.Center;
3.3 複数段落のテキスト
複数の段落を含むコンテンツは、段落コレクションで管理できます。
TextFrame textFrame = textShape.TextFrame;
textFrame.Paragraphs.Clear();

// 最初の段落を追加
TextParagraph para1 = new TextParagraph();
para1.Text = "1 段落目の内容";
para1.Alignment = TextAlignmentType.Left;
textFrame.Paragraphs.Append(para1);

// 2 番目の段落を追加
TextParagraph para2 = new TextParagraph();
para2.Text = "2 段落目の内容";
para2.FirstLineIndent = 30; // 先頭行の字下げ
textFrame.Paragraphs.Append(para2);
4. 画像の挿入
4.1 ローカル画像の埋め込み
// 画像表示領域を定義
RectangleF imageRect = new RectangleF(150, 200, 400, 250);

// ローカルファイルから画像を埋め込み
IEmbedImage image = slide.Shapes.AppendEmbedImage(
    ShapeType.Rectangle,
    @"C:\images\sample.png",
    imageRect
);

// 画像の枠線を削除
image.Line.FillFormat.FillType = FillFormatType.None;
4.2 スライド背景の設定
// 背景タイプをカスタムに設定
slide.SlideBackground.Type = BackgroundType.Custom;
slide.SlideBackground.Fill.FillType = FillFormatType.Picture;
slide.SlideBackground.Fill.PictureFill.FillType = PictureFillType.Stretch;

// 背景画像を読み込み
Image bgImage = Image.FromFile(@"C:\images\background.jpg");
slide.SlideBackground.Fill.PictureFill.Picture.EmbedImage =
    ppt.Images.Append(bgImage);
5. 保存とエクスポート
5.1 PPTX 形式で保存
// PowerPoint 2019 形式で保存
ppt.SaveToFile("output.pptx", FileFormat.Pptx2019);
5.2 他の形式にエクスポート
// PDF にエクスポート
ppt.SaveToFile("output.pdf", FileFormat.PDF);

// 1 枚のスライドを画像としてエクスポート
Image slideImage = ppt.Slides[0].SaveAsImage();
slideImage.Save("slide_0.png", System.Drawing.Imaging.ImageFormat.Png);
6. 完全なサンプル
以下は、表紙ページとコンテンツページを含むプレゼンテーションを作成する総合サンプルです。
using Spire.Presentation;
using Spire.Presentation.Drawing;
using System;
using System.Drawing;

namespace PptGenerator
{
    class Program
    {
        static void Main(string[] args)
        {
            using (Presentation ppt = new Presentation())
            {
                ppt.Slides.RemoveAt(0);

                // ===== 1 ページ目:表紙 =====
                ISlide coverSlide = ppt.Slides.Append();

                // ----- メインタイトル -----
                IAutoShape titleShape = coverSlide.Shapes.AppendShape(
                    ShapeType.Rectangle,
                    new RectangleF(120, 180, 520, 80)
                );
                titleShape.Fill.FillType = FillFormatType.None;          // 図形を透明に
                titleShape.ShapeStyle.LineColor.Color = Color.Transparent;
                titleShape.TextFrame.Text = "技術提案報告";

                TextRange titleRange = titleShape.TextFrame.TextRange;
                titleRange.LatinFont = new TextFont("メイリオ");
                titleRange.EastAsianFont = new TextFont("メイリオ");
                titleRange.FontHeight = 44;
                titleRange.IsBold = TriState.True;
                // テキストの塗りつぶしタイプを明示的に単色に設定し、色を指定
                titleRange.Fill.FillType = FillFormatType.Solid;
                titleRange.Fill.SolidColor.Color = Color.FromArgb(30, 60, 120);
                titleShape.TextFrame.Paragraphs[0].Alignment = TextAlignmentType.Center;

                // ----- サブタイトル -----
                IAutoShape subtitleShape = coverSlide.Shapes.AppendShape(
                    ShapeType.Rectangle,
                    new RectangleF(120, 280, 520, 50)
                );
                subtitleShape.Fill.FillType = FillFormatType.None;
                subtitleShape.ShapeStyle.LineColor.Color = Color.Transparent;
                subtitleShape.TextFrame.Text = "——.NET プラットフォームに基づく自動化ソリューション";

                TextRange subRange = subtitleShape.TextFrame.TextRange;
                subRange.LatinFont = new TextFont("メイリオ");
                subRange.EastAsianFont = new TextFont("メイリオ");
                subRange.FontHeight = 20;
                subRange.Fill.FillType = FillFormatType.Solid;
                subRange.Fill.SolidColor.Color = Color.Gray;              // グレー
                subtitleShape.TextFrame.Paragraphs[0].Alignment = TextAlignmentType.Center;

                // ===== 2 ページ目:コンテンツページ =====
                ISlide contentSlide = ppt.Slides.Append();

                // ----- ページタイトル -----
                IAutoShape pageTitle = contentSlide.Shapes.AppendShape(
                    ShapeType.Rectangle,
                    new RectangleF(50, 40, 600, 50)
                );
                pageTitle.Fill.FillType = FillFormatType.None;
                pageTitle.ShapeStyle.LineColor.Color = Color.Transparent;
                pageTitle.TextFrame.Text = "コア機能モジュール";

                TextRange pageTitleRange = pageTitle.TextFrame.TextRange;
                pageTitleRange.LatinFont = new TextFont("メイリオ");
                pageTitleRange.EastAsianFont = new TextFont("メイリオ");
                pageTitleRange.FontHeight = 28;
                pageTitleRange.IsBold = TriState.True;
                pageTitleRange.Fill.FillType = FillFormatType.Solid;
                pageTitleRange.Fill.SolidColor.Color = Color.Black;       // 黒

                // ----- 項目リスト(4 項目)-----
                string[] items = { "データ収集モジュール", "分析処理エンジン", "可視化出力", "レポート自動生成" };
                for (int i = 0; i < items.Length; i++)
                {
                    IAutoShape itemShape = contentSlide.Shapes.AppendShape(
                        ShapeType.Rectangle,
                        new RectangleF(80, 120 + i * 50, 500, 40)
                    );
                    itemShape.Fill.FillType = FillFormatType.None;
                    itemShape.ShapeStyle.LineColor.Color = Color.Transparent;
                    itemShape.TextFrame.Text = $"•  {items[i]}";

                    TextRange itemRange = itemShape.TextFrame.TextRange;
                    itemRange.LatinFont = new TextFont("メイリオ");
                    itemRange.EastAsianFont = new TextFont("メイリオ");
                    itemRange.FontHeight = 20;
                    itemRange.Fill.FillType = FillFormatType.Solid;
                    itemRange.Fill.SolidColor.Color = Color.DarkSlateGray; // 濃いグレーで可読性を確保
                }

                ppt.SaveToFile("presentation_demo.pptx", FileFormat.Pptx2019);
                Console.WriteLine("PPT の生成に成功しました:presentation_demo.pptx");
            }
        }
    }
}
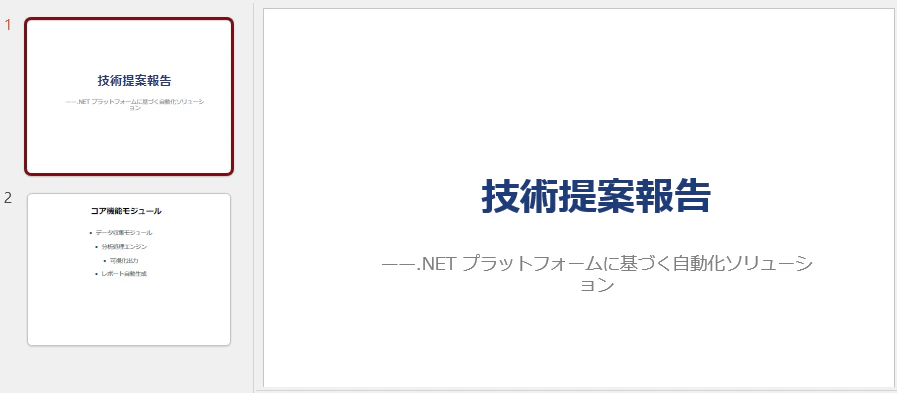
上記の方法により、Microsoft Office をインストールしない環境でも、純粋なコードで PowerPoint ドキュメントの作成・編集が可能となり、サーバーサイドでのバッチ生成や自動レポート出力などのシーンに適しています。実際のプロジェクトでは、ビジネスデータと組み合わせて、テンプレート置換やグラフの動的バインディングなどの機能をさらに拡張することができます。