本内容を利用した場合の一切の責任を私は負いません。
はじめに。
自分は描かせることが目的ではないので、出力画像のサイズを犠牲にしてます。
バージョン
- OS
OS 名: Microsoft Windows 10 Home
OS バージョン: 10.0.19043 N/A ビルド 19043
システムの種類: x64-based PC - グラボドライバー
30.0.15.1295 - Stable Diffusion(フォーク版 https://github.com/basujindal/stable-diffusion )
commit 487a0f46f6d4b82a7a7d9704e6800ccdde02cd3e - Stable Diffusion(非フォーク版 https://github.com/CompVis/stable-diffusion )
commit 69ae4b35e0a0f6ee1af8bb9a5d0016ccb27e36dc - モデル( https://huggingface.co/CompVis/stable-diffusion-v-1-4-original )
commit 55d673a02e26c365a19e474c84f62f75c750f39f
手順
基本は下記の方法です。
[話題のStable Diffusionがオープンソース化されたのでローカルで動かしてみる]
https://zenn.dev/koyoarai_/articles/02f3ed864c6127bb2049
で、他にすることは下記です。
- メモリが当然足りないため、上記のページのフォーク版を使いますが、まず実行すると下記のエラーが出ます。
ModuleNotFoundError: No module named 'taming'
これは非フォーク版では出ず、また、grepするとsrcの下にあるものが該当するようなので、非フォーク版のsrcフォルダをフォルダごと同様の階層になるようにフォーク版に置きます。
て、非フォーク版のリポジトリを見たらsrcフォルダなんてない。
始めに非フォーク版を実行したので、その時に作られたのかも。 - フォーク版のREADME.mdを見ると、HオプションとWオプションが出力サイズっぽいので、これを512から256にします。
(ちなみにn_iterオプション(iterator)は繰り返し回数っぽいです。)
下記が実行ログです。
(ldm) >python optimizedSD/optimized_txt2img.py --prompt "Cyberpunk style Tokyo landscape" --H 256 --W 256 --seed 27 --n_iter 1 --n_samples 10 --ddim_steps 50
init_seed =  27
Global seed set to 27
Loading model from models/ldm/stable-diffusion-v1/model.ckpt
Global Step: 470000
UNet: Running in eps-prediction mode
CondStage: Running in eps-prediction mode
Some weights of the model checkpoint at openai/clip-vit-large-patch14 were not used when initializing CLIPTextModel: ['vision_model.encoder.layers.1.self_attn.out_proj.weight', 'vision_model.encoder.layers.12.layer_norm1.weight', 'vision_model.encoder.layers.18.mlp.fc2.bias', 'vision_model.encoder.layers.20.layer_norm2.bias', 'vision_model.encoder.layers.9.self_attn.k_proj.bias', 'vision_model.encoder.layers.10.layer_norm1.bias', 'vision_model.encoder.layers.18.mlp.fc1.weight', 'vision_model.encoder.layers.22.self_attn.k_proj.bias', 'vision_model.encoder.layers.15.layer_norm2.bias', 'vision_model.encoder.layers.17.self_attn.q_proj.bias', 'vision_model.encoder.layers.14.self_attn.q_proj.weight', 'vision_model.encoder.layers.22.mlp.fc1.bias', 'vision_model.encoder.layers.17.self_attn.out_proj.bias', 'vision_model.encoder.layers.6.layer_norm2.bias',
略 'vision_model.encoder.layers.15.self_attn.v_proj.weight', 'vision_model.encoder.layers.19.self_attn.v_proj.bias', 'vision_model.encoder.layers.2.self_attn.k_proj.bias', 'vision_model.encoder.layers.19.layer_norm2.weight', 'vision_model.encoder.layers.3.layer_norm2.weight', 'vision_model.encoder.layers.7.mlp.fc2.weight', 'vision_model.encoder.layers.9.self_attn.q_proj.weight', 'vision_model.encoder.layers.13.layer_norm1.weight', 'vision_model.encoder.layers.18.self_attn.out_proj.weight', 'vision_model.encoder.layers.9.self_attn.v_proj.bias', 'vision_model.encoder.layers.0.self_attn.out_proj.weight', 'vision_model.encoder.layers.5.layer_norm2.weight', 'vision_model.encoder.layers.23.self_attn.q_proj.bias', 'vision_model.encoder.layers.4.self_attn.out_proj.bias', 'vision_model.encoder.layers.6.self_attn.q_proj.bias']
- This IS expected if you are initializing CLIPTextModel from the checkpoint of a model trained on another task or with another architecture (e.g. initializing a BertForSequenceClassification model from a BertForPreTraining model).
- This IS NOT expected if you are initializing CLIPTextModel from the checkpoint of a model that you expect to be exactly identical (initializing a BertForSequenceClassification model from a BertForSequenceClassification model).
FirstStage: Running in eps-prediction mode
making attention of type 'vanilla' with 512 in_channels
Working with z of shape (1, 4, 32, 32) = 4096 dimensions.
making attention of type 'vanilla' with 512 in_channels
Sampling:   0%|                                                                                  | 0/1 [00:00<?, ?it/s]Data shape for PLMS sampling is (10, 4, 32, 32)                                                   | 0/1 [00:00<?, ?it/s]
seeds used =  [27, 28, 29, 30, 31, 32, 33, 34, 35, 36]
Running PLMS Sampling with 50 timesteps
PLMS Sampler: 100%|████████████████████████████████████████████████████████████████████| 50/50 [07:09<00:00,  8.60s/it]
saving images
memory_final =  6.025216███████████████████████████████████████████████████████████████| 50/50 [07:09<00:00,  8.33s/it]
data: 100%|█████████████████████████████████████████████████████████████████████████████| 1/1 [07:38<00:00, 458.53s/it]
Sampling: 100%|█████████████████████████████████████████████████████████████████████████| 1/1 [07:38<00:00, 458.53s/it]
Your samples are ready in 9.13 minutes and waiting for you here
outputs/txt2img-samples\Cyberpunk_style_Tokyo_landscape

(ldm) >
nvidia-smiコマンドの出力は下記です。
>nvidia-smi
Sun Aug 28 05:06:02 2022
+-----------------------------------------------------------------------------+
| NVIDIA-SMI 512.95       Driver Version: 512.95       CUDA Version: 11.6     |
|-------------------------------+----------------------+----------------------+
| GPU  Name            TCC/WDDM | Bus-Id        Disp.A | Volatile Uncorr. ECC |
| Fan  Temp  Perf  Pwr:Usage/Cap|         Memory-Usage | GPU-Util  Compute M. |
|                               |                      |               MIG M. |
|===============================+======================+======================|
|   0  NVIDIA GeForce ... WDDM  | 00000000:01:00.0  On |                  N/A |
| 30%    0C    P8     1W /  38W |    104MiB /  2048MiB |      0%      Default |
|                               |                      |                  N/A |
+-------------------------------+----------------------+----------------------+

+-----------------------------------------------------------------------------+
| Processes:                                                                  |
|  GPU   GI   CI        PID   Type   Process name                  GPU Memory |
|        ID   ID                                                   Usage      |
|=============================================================================|
|    0   N/A  N/A       532    C+G   ...y\ShellExperienceHost.exe    N/A      |
|    0   N/A  N/A      3568    C+G   ...5n1h2txyewy\SearchApp.exe    N/A      |
|    0   N/A  N/A     11644    C+G   C:\Windows\explorer.exe         N/A      |
|    0   N/A  N/A     11896    C+G   ...2txyewy\TextInputHost.exe    N/A      |
+-----------------------------------------------------------------------------+

>
備考
- PYTORCH_CUDA_ALLOC_CONF環境変数
実行前にsetコマンドで設定すれば反映されるようです。
ただ、下記のように20が最低のようです。
(20を設定すると下記の中のソースにあるエラーメッセージが出ます。)
http://fruitsoflife.sblo.jp/article/189004809.html - VRAMの解放
下記ですることもできるようです。
https://tetsumag.com/2022/07/13/283/ - VRAM不足のエラー時
PLMS Samplerの時点で0%から進まずにエラーになります。 - 繰り返し数
n_iterオプションの値を10にして実行しても、少なくとも3回の30コは出力されたので、VRAM確保量には関わっていないもよう。
※追記(2022/08/29)
改造して512でできないか悪あがき。
まず、現状解析で領域関係の動作を追う。
1
2
3
4

5
6
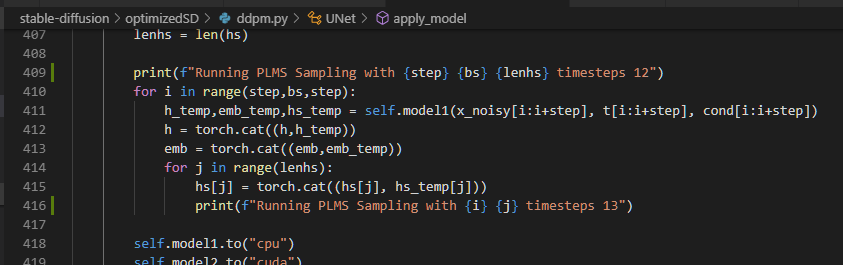
異常終了する直前のログが下記。
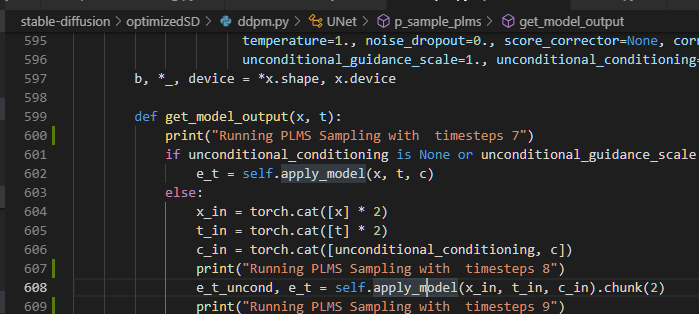
Running PLMS Sampling with timesteps 7
Running PLMS Sampling with timesteps 8
Running PLMS Sampling with timesteps 10
Running PLMS Sampling with timesteps 11
Running PLMS Sampling with 1 2 12 timesteps 12
Running PLMS Sampling with 1 0 timesteps 13
Running PLMS Sampling with 1 1 timesteps 13
Running PLMS Sampling with 1 2 timesteps 13
Running PLMS Sampling with 1 3 timesteps 13
Running PLMS Sampling with 1 4 timesteps 13
Running PLMS Sampling with 1 5 timesteps 13
Running PLMS Sampling with 1 6 timesteps 13
Running PLMS Sampling with 1 7 timesteps 13
Running PLMS Sampling with 1 8 timesteps 13
Running PLMS Sampling with 1 9 timesteps 13
Running PLMS Sampling with 1 10 timesteps 13
Running PLMS Sampling with 1 11 timesteps 13
PLMS Sampler: 0%| | 0/50 [00:13<? ?it/s]
data: 0%| | 0/1 [00:33<? ?it/s]
Sampling: 0%| | 0/1 [00:33<? ?it/s]
Traceback (most recent call last):
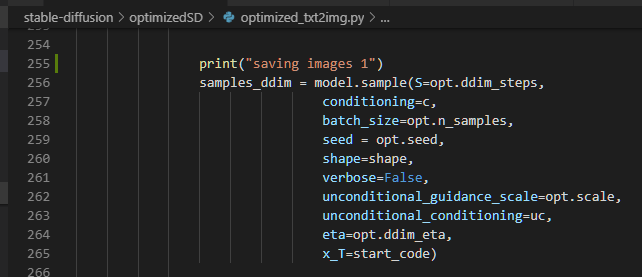
File "optimizedSD/optimized_txt2img.py" line 256 in <module>
samples_ddim = model.sample(S=opt.ddim_steps
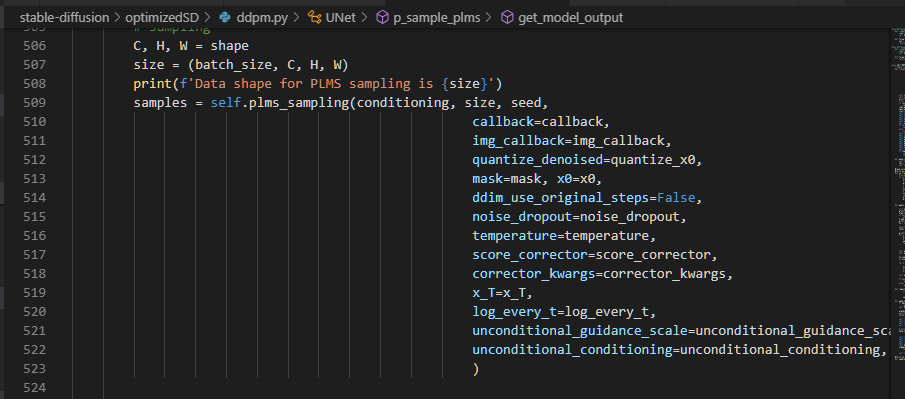
3の引数のts前で下記のようにtorch領域を確保(torch.full())してる。
([torch.full()]
https://pytorch.org/docs/stable/generated/torch.full.html?highlight=torch%20full)
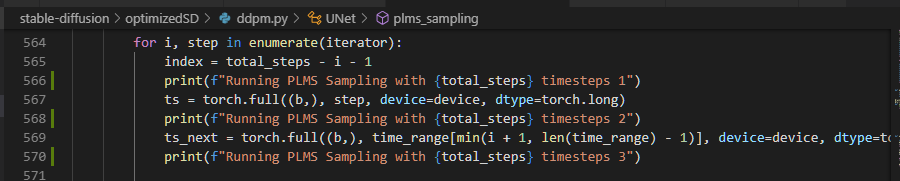
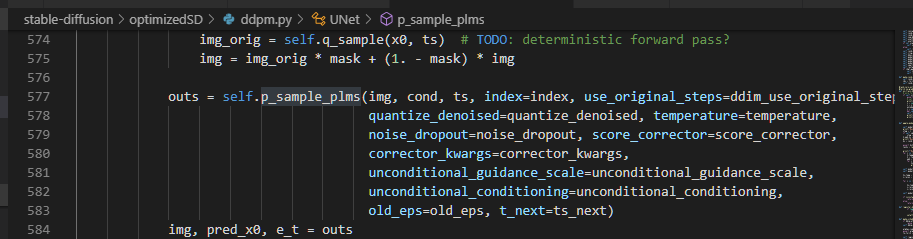
これを、6で拡張(torch.cat())みたいなことをしてる。
deviceがcudaなのでcudaに依存しててダメそう(^^;
([torch.cat()]
https://pytorch.org/docs/stable/generated/torch.cat.html?highlight=torch%20cat)
少し気になるのは、フォーク版にはoptimizedSD/diffusers_txt2img.pyというファイルでオプションを指定する方法(ソースにfrom-fileというオプションがある)があって、この中に「torch_device="cpu"」というのがある。
torch=cudaというわけじゃないから、もしかしたら速さを犠牲にしたりしてcuda以外でできるのかも。
ただ、ソースの中がcuda固定で書かれてる部分が多いし素人なので簡単にはできない(^^;
画像になる前に一旦言葉になるんじゃないかと思ったけど、いきなり像をいじってるっぽいからそれもダメっぽい(^^;
と書いたところで下記に気づいた。
cpuにしてみた。
が、当然動かず(笑)
ま、ソースに固定でcudaとあるとこが多いからねぇ。
ちなみにエラーは下記。
  File "~\anaconda3\envs\ldm\lib\site-packages\torch\nn\functional.py", line 2486, in layer_norm
    return torch.layer_norm(input, normalized_shape, weight, bias, eps, torch.backends.cudnn.enabled)
RuntimeError: "LayerNormKernelImpl" not implemented for 'Half'
LayerNormやLayerNormKernelImplの検索を見てもわからず。
現時点ではここまで。
※追記(2022/08/30)
512でできた。
githubにLayerNormKernelImplのissueがいくつかあったため、途上段階かもとチェックしてた。
そしたら、フォーク版にこんなコミットがあった。
[added support for specifying GPU and CPU]
https://github.com/basujindal/stable-diffusion/commit/1aadebc919f6e7ae6b88426120e6af425ef21a39
対応されたのかもとpullし、現在のソースはこの状態になった。
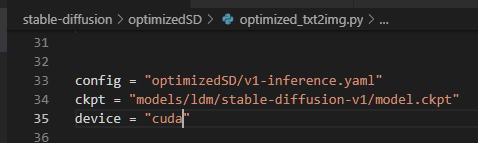
コミットの内容を見ると、「"cuda"」が変数に置き換えられてる。
正式リリースではないっぽく、まだREADME.mdは更新されてないので、ソースから方法を追った。
deviceというオプションが追加されてる。
実行に「--device cpu」を追加したらできた。
ちなみに自分のPCメモリは8GB。
もしも全くcudaを使わなくなったのなら、cuda環境のインストールもいらないかもしれない。
※追記(2022/09/04)
cpu駆動ならcudaをアンインストールしてもできた。