この投稿は「エンジニアが海外イベントへ参加する際に気を付けるべき点」のおまけ記事です。
チューリング完全な独自言語インタプリタを作ってみた
8つの命令形のみで完結したプログラミング言語、Brainfuckです。
デザインからコードまで手をかけて実装しています。ぜひ触ってみてください![]()
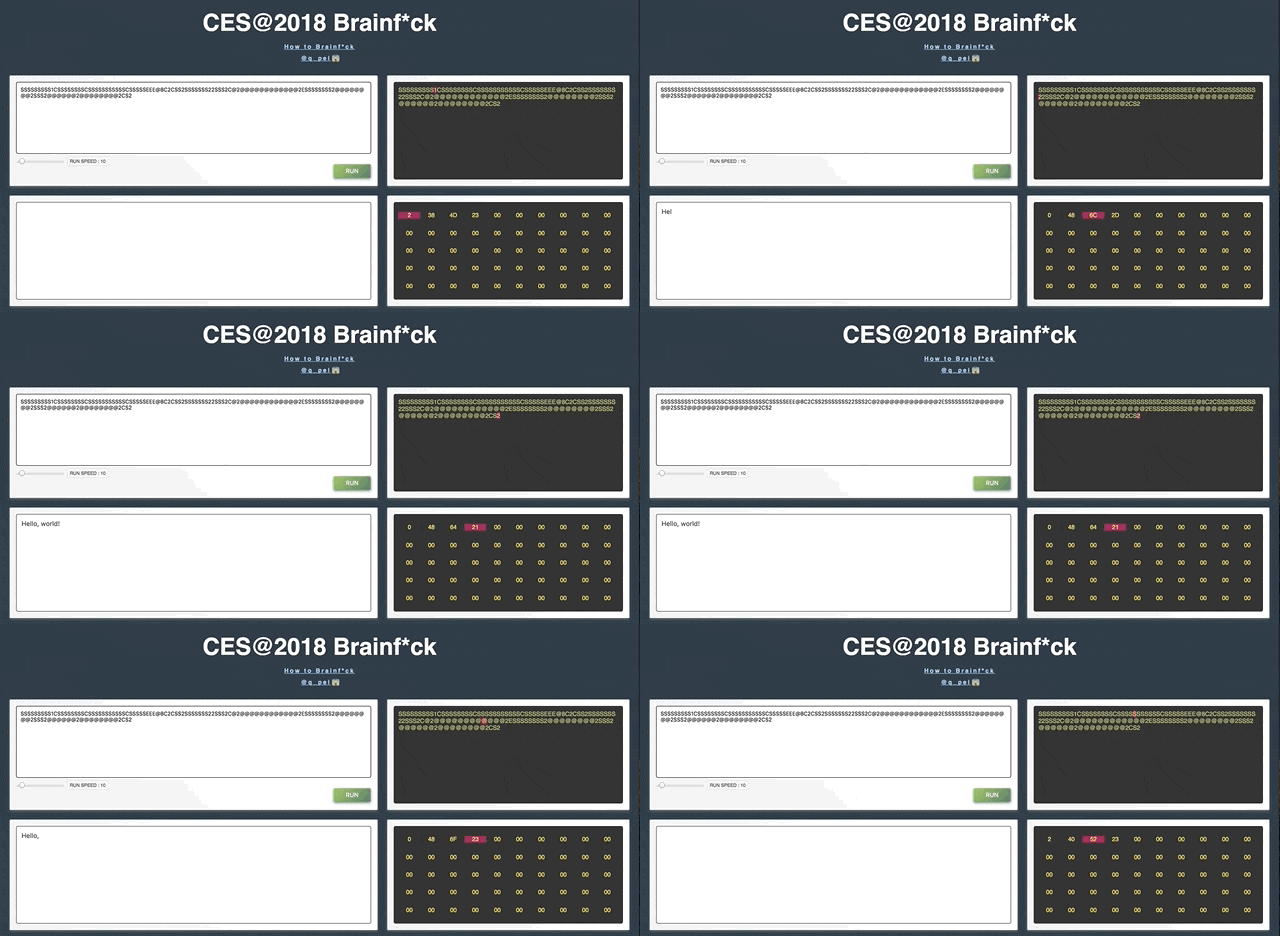
CES@2018 Brainf*ck 
詳しい技術スタック
ES6 Javascriptで動作する独自Brainfuckを、HTML, CSSでビジュアライズしました。
自分はC, C++エンジニアでは無いため、正直なところ、メモリ・ポインタに疎い部分がありました。
そのため手探りで少しづつ実装を進めることになり大変でしたが、作ってみたことでWikipediaの記載内容が簡単に理解できるようになっています![]()
実際に作ってみると理解が進む
Wikipediaから引用
>ポインタをインクリメントする。ポインタをptrとすると、C言語の「ptr++;」に相当する。
<ポインタをデクリメントする。C言語の「ptr--;」に相当。
+ポインタが指す値をインクリメントする。C言語の「(*ptr)++;」に相当。
-ポインタが指す値をデクリメントする。C言語の「(*ptr)--;」に相当。
.ポインタが指す値を出力に書き出す。C言語の「putchar(*ptr);」に相当。
,入力から1バイト読み込んで、ポインタが指す先に代入する。C言語の「*ptr=getchar();」に相当。
[ポインタが指す値が0なら、対応する]の直後にジャンプする。C言語の「while(*ptr){」に相当。
]ポインタが指す値が0でないなら、対応する[(の直後[1])にジャンプする。C言語の「}」に相当
実際の大まかな動きは、下記のような形です。
- オブジェクト変数上に、添え字を使ってアクセス。
- オブジェクトに保存された数値をASCIIコードに当てはめて出力。
> < [ ]は添え字の変更
+ - ,は数値の代入
.は数値を取り出してPrint
という動きです。こうしてみると滅茶苦茶簡単ですね!
今回は、> < + - . , [ ]をそれぞれC E S @ 2 0 1 8に割り当ててインタプリタを組んでみました。
実際のソースコード
このページでリアルタイムに修正が出来ます
/* Const */
// インタプリタに対応する文字コードは定数化しています。
const commands = ['C', 'E', 'S', '@', '2', '0', '1', '8']
// const commands = ['>', '<', '+', '-', '.', ',', '[', ']']


/* Global Variables */
let input = ""     //読み込んだBrainfuckコード
let output = ""    //生成した文字コード
let memory = []    //メモリー配列
let pointer = 0    //ポインタ位置
let code_location = 0  //処理中のコード文字
let print_queue = 0  //コード・メモリの可視化を遅延して実施するためのキュー管理変数
let queue_speed = 0 //可視化の速度 (大きくすればゆっくりと動きを追えます)
let timer_list = [] //コードを再実行した際に、キュー管理をリセットするためのタイマーID配列

/* Dom Nodes */
// DOMとJavascriptの連動用処理
let getChildNodesByIndex = (node, index) => { return node.childNodes[index] }
let getChildenByIndex = (node, index) => { return node.children[index] }
let run_button = document.querySelector('.input button')
let input_node = document.querySelector('.input textarea')
let output_node = document.querySelector('.output textarea')
let code_box_node = document.querySelector('.code-box')
let memory_box_node = document.querySelector('.memory-box')
let queue_speed_node = document.querySelector('.input .queue-speed')
let date_node = document.getElementById('date')
let getCurrentCodeNode = () => { return document.querySelector('.code-box > .current') }
let getCurrentMemoryNode = () => { return document.querySelector('.memory-box > .current') }
let getCodeNodeByIndex = (index) => { return getChildenByIndex(code_box_node, index) }
let getMemoryNodeByIndex = (index) => { return getChildenByIndex(memory_box_node, index) }


/* Functions */
// ログ関数
let log = (value) =>  {
    console.log({ info : "LOG", time: new Date(), value: JSON.stringify(value) })
}
// 初期化関数。RUNボタンを押すたびに実行
let reset = () => {
    log("start reset")
    /* Deleted Timer */
    //前回の可視化処理でまだ残っているものがあれば消去。
    for(let i = 0; i < timer_list.length; ++i) { clearTimeout(timer_list[i]) }
    /* Reseted & Insert Variables */
    //入力コードの末尾改行空白は取り除く
    input = input_node.value.replace(/[\n\s]+$/g,'')
    output = ""
    //ポインタでアクセスがあるメモリは初期化
    for (let i = 0; i < 50; ++i) { memory[i] = 0 }
    pointer = 0
    code_location = 0
    print_queue = 0
    queue_speed = queue_speed_node.value
    timer_list = []
    /* Printed Code */
    //入力されたBrainfuckコードを別枠に表示する
    let code_html = ""
    for (let i=0; i<input.length; i++) { code_html += '<span>' + input.charAt(i) + '</span>' }
    code_box_node.innerHTML = code_html
}
// コード・メモリの可視化関数。
let print = (payload) => {
    /* Code highlight */
    let current_code_node = getCurrentCodeNode()
    if (current_code_node) { current_code_node.classList.remove('current') }
    getCodeNodeByIndex(payload.code_location).classList.add("current")

    /* Printed Memory */
    let byte = payload.memory_pointer.toString(16).toUpperCase()
    if (byte.length == 1) { byte = "0" + byte }
    getMemoryNodeByIndex(payload.pointer).innerHTML = byte

    /* Memory highlight */
    let current_memory_node = getCurrentMemoryNode()
    if (current_memory_node) { current_memory_node.classList.remove('current') }
    getMemoryNodeByIndex(payload.pointer).classList.add("current")

    /* Printed Output */
    output_node.innerHTML = payload.output

    /* Next */
    //可視化処理が終わったら遅延用のキューを一つ消す
    print_queue--
}
// Printの遅延実施関数
let delayPrint = (payload) => {
    log("start queuePrint")
    print_queue++
    timer_list.push(setTimeout(() => { print(payload) }, queue_speed*print_queue))
}
// ポインタ位置のBrainfuckコードを処理するメインの関数
let exec = () => {
    log("start exec")
    let command = input.charAt(code_location)
    switch(command) {
        // ポインタの移動
        case commands[0]/* > */ : pointer++; break
        case commands[1]/* < */ : pointer--; break
        // 値の増減
        case commands[2]/* + */ : memory[pointer]++; break
        case commands[3]/* - */ : memory[pointer]--; break
        // ポインタ位置の結果を出力
        case commands[4]/* . */ : output += String.fromCharCode(memory[pointer]); break
        // ユーザの入力から1Byte分を受け取り、ポインタ位置にインサートする
        case commands[5]/* , */ :
            let user_char = prompt("It accepts one byte input and stores the value in the memory of the data pointer.")
            if (!user_char) { user_char= "0" }
            memory[pointer] = user_char.charAt(0).charCodeAt(0)
            break
        // ポインタ位置の値に応じて、繰り返し処理を実施する
        case commands[6]/* [ */ :
            if (memory[pointer] == 0) {
                let braces_stack = 0
                for (code_location; code_location < input.length; code_location++) {
                    command = input.charAt(code_location)
                    if (command == commands[7] && braces_stack == 0) { break }
                    else if (command == commands[6]) { braces_stack++ }
                    else if (command == commands[7]) { braces_stack-- }
                }
            }
            break
        case commands[7]/* ] */ :
            if (memory[pointer] > 0) {
                let braces_stack = 0
                for (code_location--; code_location > 0; code_location--) {
                    command = input.charAt(code_location)
                    if (command == commands[6] && braces_stack == 0) { break }
                    else if (command == commands[7]) { braces_stack++ }
                    else if (command == commands[6] && braces_stack > 0) { braces_stack-- }
                }
            }
            break
    }
    // ポインタは0〜49、メモリは0〜255で推移するように調整
    /* Overflow Countermeasure */
    if (memory[pointer] > 255) { memory[pointer] = 0 }
    if (memory[pointer] < 0) { memory[pointer] = 255 }
    if (pointer > 49) { pointer = 0 }
    if (pointer < 0) { pointer = 49 }
    /* Print */
    // 遅延を掛けてプリント。メイン処理と平行して実施させる。
    delayPrint({
        code_location: code_location,
        pointer: pointer,
        memory_pointer: memory[pointer],
        output: output
    })
    /* Next */
    // ポインタ位置を進める。
    code_location++
}

/* RUN */
run_button.addEventListener("click", () => {
    reset()
    delayPrint({
        code_location: code_location,
        pointer: pointer,
        memory_pointer: memory[pointer],
        output: output
    })
    while (code_location < input.length) { exec() }
})

// お遊び要素として、ユーザの時刻をダミーコンソールに表示する
(window.onload = () => {
    date_node.innerHTML = String(new Date()).replace(/(\d\d:\d\d:\d\d).+$/g,'$1')
})()
CES@2018 Brainf*ck で動かせます!
通常のBrainfuckプログラムは、下記スクリプトでコンバートできます。
"><+-.,[]".replace(/>/g,'C').replace(/</g,'E').replace(/\+/g,'S').replace(/\-/g,'@').replace(/\./g,'2').replace(/,/g,'0').replace(/\[/g,'1').replace(/\]/g,'8')
デザイン部分の勘所
デザインはめっきりなので、注意したポイントを上げていきます。
PCレイアウト・スマホレイアウト
GridレイアウトとFlexレイアウトを兼用して作成してみました。
Gridに対応していない場合の処理@supports not (display: grid)も記述しましたが、本当に必要かは怪しいところがあります。
Gridレイアウトは本来のDOMの並び順に関係なく再配置が可能になります。
この機能を活かし、スマホとPCでレイアウトの順序を変えてみました。ぜひ確認してみて下さい!
input type"range"のデザイン
CSSが膨らみがちなこのデザイン。少し凝ろうとしたりとするとコード量が膨れ上がり、javascriptでゴリゴリ書かないといけないのが辛いです。
出来る限り最小限のCSSで、お洒落で使い心地がよくなるように心がけています。
DIV要素
負荷はかかりますが、ほぼ全ての要素に、丸み付けのborder-radius、グラデーションのlinear-gradient、薄く発光させるbox-shadowを付けています。
負荷の許容範囲にもよりますが、手軽に全体の質を底上げできるのでオススメです。
ハイライト
並んだspanやp要素に、一部classを付けてカラーが付くようにしています。
視線誘導・動的な変化を盛り入れています。
サイトにリッチ感を出しますし、体験性の向上にも重要な要素だと思います。
全体的な色合い
マテリアルデザインのカラーパレットを利用しています。
こちらのサイトはワンクリックでコピペ出来るので、とても楽に利用できます。
また、GoogleChromeのDevツールからCSS適用エレメントを開き、カラーのアイコンをクリックするとインタラクティブに修正が可能です。
基準となるカラーパレットを用いることで、全体のトンマナを苦労せず合わせることが出来ますし、色の変更を気軽に試せるようになります。
サイズ調整
細かいマージンやシャドウ以外は、画面の大きさに比例してサイズが変わる単位(vh, em)を利用しています。
横幅に応じてフォントサイズが変わるような仕掛けも導入してみました。
動かしている感
ボタンの影や、ツールチップ、可視化など、目に見えて動く部分を多く作ったりした他、
デザインにお遊びの要素を入れることで、全体像を理解したユーザーが満足感を得られるようにデザインを考えてみました。
単純にプレーンなフォームとテキスト表示を作るよりも、皆様にとって、少しでも面白いサイトになっていると嬉しいです。
作ってみて
少し特殊な言語仕様ですが、これ以上無いほどコンパクトで、初めて触るインタプリンタとしては最適な題材だと感じました。
好きな文字で言語を作れる!という楽しさがあるのも、いいポイントだと思います。
javascriptでの実装だったことも関係しているのかもしれませんが、
C言語の「*ptr=getchar();」に相当する,の利用用途があまり思い浮かびませんでした。
またの機会に別の言語で実装してみて、使いどころを探ってみたいと思います。

