概要
以前、ATOM-S3 を使ったCAN通信について記事を書きましたが
シンプルで分かりやすいライブラリを見つけましたので記事にしたいと思います。
今回はPCとATOM-S3 間はシリアル通信を行い、ATOM-S3とM5StackBasic間で
CAN通信を行っています。
PCからデータを送信すると同一のデータがコールバックされます。
CANデータのIDは2バイト、データは8バイトとしています。
データの流れとしては
PC→(シリアル通信)→ATOM-S3→(CAN通信)→M5stackBASIC→(CAN通信)→
ATOM-S3→(シリアル通信)→PC
となっています。
環境など
<マイコン側>
エディタ:VisualStudioCode(PlatformIO IDE):マイコン用
マイコン:ATOM-S3、M5Stack Basic
CANライブラリ:
・ESP32-TWAI-CAN.hpp(ATOM-S3用)
https://github.com/handmade0octopus/ESP32-TWAI-CAN
https://www.arduino.cc/reference/en/libraries/esp32-twai-can/
・mcp_can.h (M5Stack Basic用)
https://github.com/coryjfowler/MCP_CAN_lib/tree/master
CANコンバータ:
M5Stack用CAN-BUSユニット(CA-IS3050G):ATOM-S3 側
M5Stack Commuモジュール [M011]:M5Stack Basic側
<PC側>
エディタ:VisualStudioC# PC用
Nugetにてインストール:System.IO.Ports、System.Management

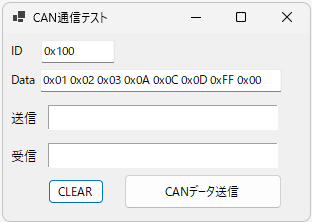
動作確認
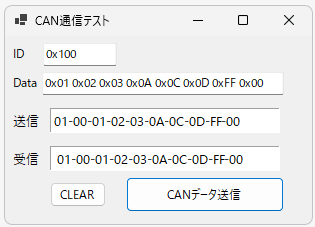
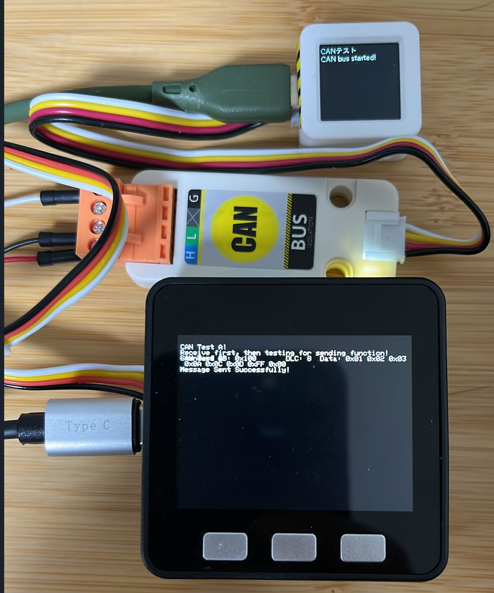
②ATOM-S3 を通してCANデータがM5StackBasicに送信されます。
M5StackBasicは同じデータを返信しています。

③コールバックされたデータが受信データとして表示されています。

AtomS3 コード
#include <Arduino.h>
#include <M5AtomDisplay.h>
#include <M5Unified.h>
#include <ESP32-TWAI-CAN.hpp>

// for AtomS3
#define CAN_TX		2
#define CAN_RX		1

CanFrame rxFrame;
byte data[8];

// CANデータ送信
void send_CAN(int ID,byte value[]){
  CanFrame obdFrame = { 0 };
  obdFrame.identifier = ID;//ID設定
  obdFrame.extd = 0;
	obdFrame.data_length_code = 8;
  for (int i = 0; i < 8; i++) {
    obdFrame.data[i] = value[i];
  }
    ESP32Can.writeFrame(obdFrame);  // timeout defaults to 1 ms
}

// CAN受信データをPCへ転送
void receive_CAN(){

  // IDを2byte配列へ格納
  int32_t data = rxFrame.identifier;
  uint8_t ID_H = (uint8_t)((data & 0x0000FF00) >>  8);
  uint8_t ID_L = (uint8_t)((data & 0x000000FF) >>  0);

  // データ送信
  USBSerial.write(ID_H);//ID_H送信
  USBSerial.write(ID_L);//ID_L送信
  for(int i=0;i<8;i++)
  {
    USBSerial.write(rxFrame.data[i]);//データ送信
  }
}

void setup() {

    // Setup USBSerial for debbuging.
    USBSerial.begin(115200);

    // Display設定
    M5.Display.init();
    M5.Display.setRotation(3);
    M5.Display.setFont(&fonts::lgfxJapanGothicP_12);
    M5.Display.setTextColor(WHITE, BLACK);

    // Title表示
    M5.Display.setCursor(0,0);
    M5.Display.println("CANテスト");

    // Start CAN@500kbps
    if(ESP32Can.begin(ESP32Can.convertSpeed(500), CAN_TX, CAN_RX, 10, 10)) {
        M5.Display.println("CAN bus started!");
    } else {
        M5.Display.println("CAN bus failed!");
    }
}

void loop() {

    // CANデータ受信 You can set custom timeout
    if(ESP32Can.readFrame(rxFrame, 10)) {
        receive_CAN();
    }

    // USBシリアルデータ受信
    if(USBSerial.available() > 0) {
        byte buf[10];
        USBSerial.readBytes(buf, 10); //byte配列受信(10byte:ID2byte、data8byte)
        int ID=buf[0]*256+buf[1]; //CAN ID
        data[0]=buf[2];  //D1
        data[1]=buf[3];  //D2
        data[2]=buf[4];  //D3
        data[3]=buf[5];  //D4
        data[4]=buf[6];  //D5
        data[5]=buf[7];  //D6
        data[6]=buf[8];  //D7
        data[7]=buf[9];  //D8
        send_CAN(ID,data); //CANデータ送信(ID,Value)
    }
}
M5Stack Basic コード
#include <Arduino.h>
#include <M5Stack.h>
#include <mcp_can.h>
//#include "m5_logo.h"

/**
 * variable for loop
 */

byte data[8] = {0x00, 0x01, 0x02, 0x03, 0x04, 0x05, 0x06, 0x07};


/**
 * variable for CAN
 */
long unsigned int rxId;
unsigned char len = 0;
unsigned char rxBuf[8];
char msgString[128];                        // Array to store serial string

#define CAN0_INT 15                              // Set INT to pin 2
MCP_CAN CAN0(12);                               // Set CS to pin 10

void init_can();
void test_can();

void setup() {
  M5.begin();
  Serial.begin(9600);
  Serial2.begin(9600, SERIAL_8N1, 16, 17);

  //M5.Lcd.pushImage(0, 0, 320, 240, (uint16_t *)gImage_logoM5);
  delay(500);
  M5.Lcd.setTextColor(WHITE);
  M5.Lcd.setTextSize(1);

  init_can();
  Serial.println("Test CAN...");
}

void loop() {
  if(M5.BtnA.wasPressed())
  {
    M5.Lcd.clear();
    M5.Lcd.printf("CAN Test A!\n");
    //M5.Lcd.pushImage(0, 0, 320, 240, (uint16_t *)gImage_logoM5);
    init_can();
    Serial.println("Test CAN...");
  }
  test_can();
  M5.update();
}

void init_can(){
  M5.Lcd.setTextSize(1);
  M5.Lcd.setCursor(0, 10);
  //M5.Lcd.pushImage(0, 0, 320, 240, (uint16_t *)gImage_logoM5);
  delay(500);

  M5.Lcd.printf("CAN Test A!\n");
  M5.Lcd.printf("Receive first, then testing for sending function!\n");

  // Initialize MCP2515 running at 16MHz with a baudrate of 500kb/s and the masks and filters disabled.
  if(CAN0.begin(MCP_ANY, CAN_500KBPS, MCP_8MHZ) == CAN_OK)
    Serial.println("MCP2515 Initialized Successfully!");
  else
    Serial.println("Error Initializing MCP2515...");

  CAN0.setMode(MCP_NORMAL);                     // Set operation mode to normal so the MCP2515 sends acks to received data.

  pinMode(CAN0_INT, INPUT);                            // Configuring pin for /INT input

  Serial.println("MCP2515 Library Receive Example...");
}

void test_can(){
  if(!digitalRead(CAN0_INT))                         // If CAN0_INT pin is low, read receive buffer
  {
    CAN0.readMsgBuf(&rxId, &len, rxBuf);      // Read data: len = data length, buf = data byte(s)

    if((rxId & 0x80000000) == 0x80000000)     // Determine if ID is standard (11 bits) or extended (29 bits)
      sprintf(msgString, "Extended ID: 0x%.8lX  DLC: %1d  Data:", (rxId & 0x1FFFFFFF), len);
    else
      sprintf(msgString, "Standard ID: 0x%.3lX       DLC: %1d  Data:", rxId, len);

    Serial.print(msgString);
    M5.Lcd.printf(msgString);
    if((rxId & 0x40000000) == 0x40000000){    // Determine if message is a remote request frame.
      sprintf(msgString, " REMOTE REQUEST FRAME");
      Serial.print(msgString);
    } else {
      for(byte i = 0; i<len; i++){
        sprintf(msgString, " 0x%.2X", rxBuf[i]);
        Serial.print(msgString);
        M5.Lcd.printf(msgString);
      }
    }
    M5.Lcd.printf("\n");
    Serial.println();


    // CANデータ返信
    byte sndStat = CAN0.sendMsgBuf(rxId, 0, 8, rxBuf);
    if(sndStat == CAN_OK){
      Serial.println("Message Sent Successfully!");
      M5.Lcd.printf("Message Sent Successfully!\n");
    } else {
      Serial.println("Error Sending Message...");
      M5.Lcd.printf("Error Sending Message...\n");
    }


  }
}
PCソフトC#コード
using System.IO.Ports;
using System.Text;
using System.Xml.Linq;

namespace _20240405_CAN通信テスト
{
    public partial class Form1 : Form
    {
        public Form1()
        {
            InitializeComponent();
        }

        SerialPort serialPort = new SerialPort();

        private void Form1_Load(object sender, EventArgs e)
        {
            // シリアル通信設定
            serialPort.BaudRate = 115200;
            serialPort.Parity = Parity.None;
            serialPort.DataBits = 8;
            serialPort.StopBits = StopBits.One;
            serialPort.Handshake = Handshake.None;
            serialPort.PortName = "COM5";
        }

        private void send_can_Click(object sender, EventArgs e)
        {
            tbx_Data.Update();
            tbx_ID.Update();

            //シリアル通信コールバックイベントハンドラー登録
            serialPort.DataReceived += new SerialDataReceivedEventHandler(DataReceivedHandler);

            //ポートオープン
            serialPort.Open();

            //受信バッファクリア
            serialPort.DiscardInBuffer();

            byte[] tx_data = new byte[10];
            int req_id = Convert.ToInt16(tbx_ID.Text.TrimStart('0', 'x'), 16);

            tx_data[0] = (byte)(req_id >> 8);
            tx_data[1] = (byte)req_id;


            // テキストボックスから入力された文字列
            string inputText = tbx_Data.Text;

            // スペースで分割して16進数の文字列を取得
            string[] hexStrings = inputText.Split(' ');

            // 16進数の文字列をバイト配列に変換
            byte[] byteArray = new byte[hexStrings.Length];
            for (int i = 0; i < hexStrings.Length; i++)
            {
                tx_data[2 + i] = Convert.ToByte(hexStrings[i], 16);
            }

            lab_Send.Text = BitConverter.ToString(tx_data);
            serialPort.Write(tx_data, 0, tx_data.Length);

        }

        private void DataReceivedHandler(object sender, SerialDataReceivedEventArgs e)
        {
            //受信バッファにデータが溜まるまでのウェイト(時間はざっくり)
            System.Threading.Thread.Sleep(50);

            SerialPort sp = (SerialPort)sender;

            //データ受信
            byte[] receivedBytes = new byte[10];
            Array.Clear(receivedBytes, 0, receivedBytes.Length);
            int ret = sp.Read(receivedBytes, 0, 10); //10byte受信

            //受信データ表示
            string msg = BitConverter.ToString(receivedBytes);
            this.Invoke(new Action(() => { lab_Receive.Text = msg; }));//スレッド外処理実行

            //シリアル通信コールバックイベントハンドラー解除
            serialPort.DataReceived -= new SerialDataReceivedEventHandler(DataReceivedHandler);

            serialPort.Close();

        }

        // テキストボックスクリア
        private void button1_Click(object sender, EventArgs e)
        {
            lab_Send.Text = "";
            lab_Receive.Text = "";
        }
    }
}

