Windowsには、キー配置を変更するためのツールがありますが、Altキーを押しながらF4キーや、Winキーを押しながらLキーなど、装飾キーとの組み合わせのキーボードショートカットが欲しい時があります。たいてい、ショートカットキーは、アプリをインストールして常駐させることが多いように思います。
それじゃあ、ESP32で作ってしまおうと。
・ESP32をBLEペリフェラルのHIDデバイスにする。
・ESP32に物理ボタンを接続して、押下を契機に、あらかじめ決めておいたキーの組み合わせを送信する。
今回は、ESP32としてM5StickCを採用し、物理ボタンとしてGroveで接続可能なデュアルボタンユニットを使います。
M5Stack用デュアルボタンユニット
https://www.switch-science.com/catalog/4048/
キーの割り当て
以下の3つのボタンを使います。
| IO | 割り当てキー |
|---|---|
| G32 | Win+Ctrl+→(仮想ディスクトップ切り替え+) |
| G33 | Win+Ctrl+←(仮想ディスクトップ切り替えー) |
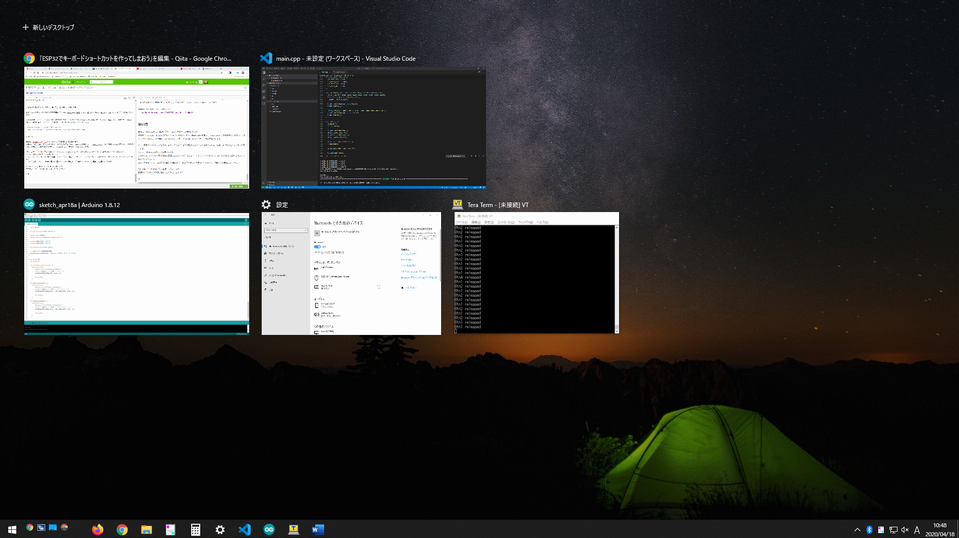
| ボタンA | Win+TAB(タスクビュー表示) |
要は、仮想ディスクトップの切り替えです。
Arduinoコーディング
ソースコードはこんな感じです。あとで、カスタマイズ方法を示します。
//#include <Arduino.h>
# include <M5StickC.h>
# include <BLEDevice.h>
# include <BLEUtils.h>
# include <BLEServer.h>
# include "BLE2902.h"
# include "BLEHIDDevice.h"
# include "HIDTypes.h"
# include "HIDKeyboardTypes.h"

# define BLE_PASSKEY 123456
# define PIN_BTN1  32
# define PIN_BTN2  33

/*
 * BLEデバイス処理
 */
BLEHIDDevice* hid;
BLECharacteristic* input;
BLECharacteristic* output;

bool connected = false;

class MyCallbacks : public BLEServerCallbacks {
  void onConnect(BLEServer* pServer){
    connected = true;
    BLE2902* desc = (BLE2902*)input->getDescriptorByUUID(BLEUUID((uint16_t)0x2902));
    desc->setNotifications(true);

    M5.Lcd.fillScreen(BLACK);
    M5.Lcd.setCursor(0, 0);
    M5.Lcd.setTextSize(2);
    M5.Lcd.println("Connected");
  }

  void onDisconnect(BLEServer* pServer){
    connected = false;
    BLE2902* desc = (BLE2902*)input->getDescriptorByUUID(BLEUUID((uint16_t)0x2902));
    desc->setNotifications(false);

    M5.Lcd.fillScreen(BLACK);
    M5.Lcd.setCursor(0, 0);
    M5.Lcd.setTextSize(2);
    M5.Lcd.println("Disconnected");
  }
};

// ペアリング処理用
class MySecurity : public BLESecurityCallbacks {
  bool onConfirmPIN(uint32_t pin){
    return false;
  }

  uint32_t onPassKeyRequest(){
    Serial.println("ONPassKeyRequest");
    return BLE_PASSKEY;
  }

  void onPassKeyNotify(uint32_t pass_key){
    // ペアリング時のPINの表示
    Serial.println("onPassKeyNotify number");
    Serial.println(pass_key);

    M5.Lcd.fillScreen(BLACK);
    M5.Lcd.setCursor(0, 0);
    M5.Lcd.setTextSize(2);
    M5.Lcd.println("PIN");
    M5.Lcd.println(pass_key);
  }

  bool onSecurityRequest(){
    Serial.println("onSecurityRequest");
    return true;
  }

  void onAuthenticationComplete(esp_ble_auth_cmpl_t cmpl){
    Serial.println("onAuthenticationComplete");
    if(cmpl.success){
      // ペアリング完了
      Serial.println("auth success");
    }else{
      // ペアリング失敗
      Serial.println("auth failed");
    }
  }
};

// BLEデバイスの起動
void taskServer(void*){
  BLEDevice::init("KeyShortcut");

  BLEDevice::setEncryptionLevel(ESP_BLE_SEC_ENCRYPT_MITM);
  BLEDevice::setSecurityCallbacks(new MySecurity());

  BLEServer *pServer = BLEDevice::createServer();
  pServer->setCallbacks(new MyCallbacks());

  hid = new BLEHIDDevice(pServer);
  input = hid->inputReport(1); // <-- input REPORTID from report map
  output = hid->outputReport(1); // <-- output REPORTID from report map

  std::string name = "Poruruba";
  hid->manufacturer()->setValue(name);

  hid->pnp(0x02, 0xe502, 0xa111, 0x0210);
  hid->hidInfo(0x00,0x02);

  BLESecurity *pSecurity = new BLESecurity();
  pSecurity->setKeySize(16);

  pSecurity->setAuthenticationMode(ESP_LE_AUTH_BOND);
  pSecurity->setCapability(ESP_IO_CAP_OUT);
  pSecurity->setInitEncryptionKey(ESP_BLE_ENC_KEY_MASK | ESP_BLE_ID_KEY_MASK);

  uint32_t passkey = BLE_PASSKEY;
  esp_ble_gap_set_security_param(ESP_BLE_SM_SET_STATIC_PASSKEY, &passkey, sizeof(uint32_t));

    const uint8_t report[] = {
      USAGE_PAGE(1),      0x01,       // Generic Desktop Ctrls
      USAGE(1),           0x06,       // Keyboard
      COLLECTION(1),      0x01,       // Application
      REPORT_ID(1),       0x01,        //   Report ID (1)
      USAGE_PAGE(1),      0x07,       //   Kbrd/Keypad
      USAGE_MINIMUM(1),   0xE0,
      USAGE_MAXIMUM(1),   0xE7,
      LOGICAL_MINIMUM(1), 0x00,
      LOGICAL_MAXIMUM(1), 0x01,
      REPORT_SIZE(1),     0x01,       //   1 byte (Modifier)
      REPORT_COUNT(1),    0x08,
      HIDINPUT(1),           0x02,       //   Data,Var,Abs,No Wrap,Linear,Preferred State,No Null Position
      REPORT_COUNT(1),    0x01,       //   1 byte (Reserved)
      REPORT_SIZE(1),     0x08,
      HIDINPUT(1),           0x01,       //   Const,Array,Abs,No Wrap,Linear,Preferred State,No Null Position
      REPORT_COUNT(1),    0x06,       //   6 bytes (Keys)
      REPORT_SIZE(1),     0x08,
      LOGICAL_MINIMUM(1), 0x00,
      LOGICAL_MAXIMUM(1), 0x65,       //   101 keys
      USAGE_MINIMUM(1),   0x00,
      USAGE_MAXIMUM(1),   0x65,
      HIDINPUT(1),           0x00,       //   Data,Array,Abs,No Wrap,Linear,Preferred State,No Null Position
      REPORT_COUNT(1),    0x05,       //   5 bits (Num lock, Caps lock, Scroll lock, Compose, Kana)
      REPORT_SIZE(1),     0x01,
      USAGE_PAGE(1),      0x08,       //   LEDs
      USAGE_MINIMUM(1),   0x01,       //   Num Lock
      USAGE_MAXIMUM(1),   0x05,       //   Kana
      HIDOUTPUT(1),          0x02,       //   Data,Var,Abs,No Wrap,Linear,Preferred State,No Null Position,Non-volatile
      REPORT_COUNT(1),    0x01,       //   3 bits (Padding)
      REPORT_SIZE(1),     0x03,
      HIDOUTPUT(1),          0x01,       //   Const,Array,Abs,No Wrap,Linear,Preferred State,No Null Position,Non-volatile
      END_COLLECTION(0)
    };

  hid->reportMap((uint8_t*)report, sizeof(report));
  hid->startServices();

  BLEAdvertising *pAdvertising = pServer->getAdvertising();
  pAdvertising->setAppearance(HID_KEYBOARD);
  pAdvertising->addServiceUUID(hid->hidService()->getUUID());
  pAdvertising->start();
  hid->setBatteryLevel(7);

//  Serial.println("Advertising started!");
  delay(portMAX_DELAY);
};

bool Btn1_released(void){
  static int prev = 0;

  int val = digitalRead(PIN_BTN1);
  if( prev != val ){
    prev = val;
    return (val == 0);
  }
  return false;
}

bool Btn2_released(void){
  static int prev = 0;

  int val = digitalRead(PIN_BTN2);
  if( prev != val ){
    prev = val;
    return (val == 0);
  }
  return false;
}

enum KEY_MODIFIER_MASK {
  KEY_MASK_CTRL = 0x01,
  KEY_MASK_SHIFT = 0x02,
  KEY_MASK_ALT = 0x04,
  KEY_MASK_WIN = 0x08
};

void sendKeys(uint8_t mod, uint8_t *keys, uint8_t num_key = 1){
  uint8_t msg[] = {mod, 0x00, 0x00, 0x00, 0x00, 0x00, 0x00, 0x00};
  for( int i = 0 ; i < num_key ; i++ )
    msg[2 + i] = keys[i];

  input->setValue(msg, sizeof(msg));
  input->notify();

  uint8_t msg1[] = {0x00, 0x00, 0x00, 0x00, 0x00, 0x00, 0x00, 0x00};
  input->setValue(msg1, sizeof(msg1));
  input->notify();
}

void setup() {
  M5.begin();
  M5.IMU.Init();

  M5.Axp.ScreenBreath(9);
  M5.Lcd.setRotation(3);
  M5.Lcd.fillScreen(BLACK);
  M5.Lcd.setTextSize(2);

  M5.Lcd.println("[M5StickC]");
  delay(1000);

  M5.Lcd.println("start Serial");

  Serial.begin(9600);
  Serial.println("Starting KeyShortcut!");

  pinMode(PIN_BTN1, INPUT);
  pinMode(PIN_BTN2, INPUT);

  M5.Lcd.println("start BLE");

  // BLEデバイスの起動処理の開始
  xTaskCreate(taskServer, "server", 20000, NULL, 5, NULL);
}

void loop() {
  M5.update();

  if( M5.BtnA.wasReleased() ){
    if(connected){
        Serial.println("BtnA released");
        uint8_t keys[] = { 0x2B /* TAB */};
        sendKeys(KEY_MASK_WIN, keys, 1);

        delay(20);
    }
  }
  if( Btn1_released() ){
    if(connected){
        Serial.println("Btn1 released");
        uint8_t keys[] = { 0x50 /* LEFT Arrow */};
        sendKeys(KEY_MASK_CTRL | KEY_MASK_WIN, keys, 1);

        delay(20);
    }
  }
  if( Btn2_released() ){
    if(connected){
        Serial.println("Btn2 released");
        uint8_t keys[] = { 0x4F /* RIGHT Arrow */,};
        sendKeys(KEY_MASK_CTRL | KEY_MASK_WIN, keys, 1);

        delay(20);
    }
  }
}
カスタマイズ
WindowsからESP32を検索するときに表示される名前を変更する場合には、以下を変更してください。
BLEDevice::init("KeyShortcut");
Windowsに本ESP32をHIDとして登録する際に、PIN入力が必要なようにしています。
その時のPINを「123456」固定にしています。もし変える場合には、以下の部分を変更してください。
# define BLE_PASSKEY 123456
また、固定ではなく、毎回ランダムに変える場合には、以下の部分をコメントアウトしてください。ランダムPINは、M5StickCのLCDに表示されるようにしています。
  uint32_t passkey = BLE_PASSKEY;
  esp_ble_gap_set_security_param(ESP_BLE_SM_SET_STATIC_PASSKEY, &passkey, sizeof(uint32_t));
物理ボタンのスイッチが接続されたポート番号を変える場合には、以下を変更してください。
# define PIN_BTN1  32
# define PIN_BTN2  33
2つのボタンを想定していますが、増やすのはたやすいかと思います。
BLEでショートカットキーを送る処理は関数 void sendKeys(uint8_t mod, uint8_t *keys, uint8_t num_key = 1) で実装しています。
modに装飾キーとして enum KEY_MODIFIER_MASK をORでつなげて指定します。実際のキーは、keysに指定します。複数のキーを指定可能です。以下のページを参考に、USB HID Usageの列のID になります。
Japanese Keyboard (layout and scancode)
http://hp.vector.co.jp/authors/VA003720/lpproj/others/kbdjpn.htm
使い方
最初に、WindowsPCに、BLEキーボードとして登録する必要があります。
通常通り、「Bluetoothまたはその他のデバイスを追加する」 から、Bluetoothを検索します。「KeyShortcut」が発見されると思いますので、それを選択し、途中PIN入力を求められますが、「123456」と入力すれば、登録が完了します。
次に、仮想ディスクトップを作成します。おそらく、まだ仮想ディスクトップを使っていない方が多いと思いますので、まだ作成されていない場合は、M5StickCのボタンAを押下します。
そうすると、ウィンドウ切り替えの画面になるのですが、左上に「+新しいディスクトップ」というのがあると思いますのでそれをクリックします。
これで準備完了です。
それでは、2つの物理ボタンを押してみましょう。
仮想ディスクトップが切り替わりましたでしょうか?
参考情報
以下を参考にさせていただきました。
T-vK/ESP32-BLE-Keyboard
M5Stick-Cでパスワード記憶装置 兼 自動入力装置を作る
こちらが続編です。
ESP32でキーボーショートカットを作ってしまおう:改良版
以上

