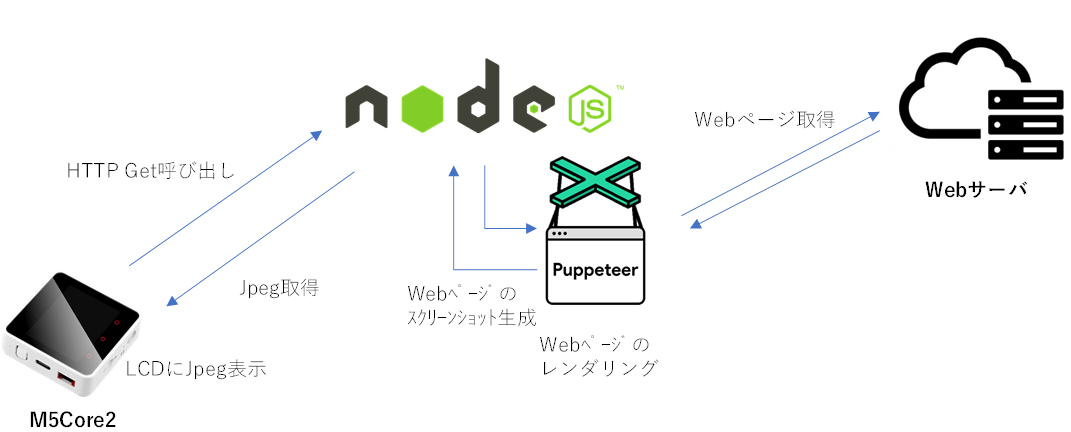
M5Core2のLCDにいろんな情報を表示する際に、画面レイアウトを試行錯誤しながらコンパイル・書き込み・実行を繰り返すのは手間なので、HTMLで画面を作成してそのスクリーンショットをM5Core2のLCDに表示するようにします。
もろもろのソースコードをGitHubに上げておきました。
poruruba/WebSnapshot
https://github.com/poruruba/WebSnapshot
スクリーンショット生成
スクリーンショットには「puppeteer」を使います。
puppeteer/puppeteer
https://github.com/puppeteer/puppeteer
(参考)呼び出し方
https://github.com/puppeteer/puppeteer/blob/v5.5.0/docs/api.md
サーバの実装は以下の通りです。
'use strict';

const HELPER_BASE = process.env.HELPER_BASE || '../../helpers/';
const Response = require(HELPER_BASE + 'response');
const BinResponse = require(HELPER_BASE + 'binresponse');

const { URL, URLSearchParams } = require('url');
const fetch = require('node-fetch');
const Headers = fetch.Headers;

const puppeteer = require('puppeteer');

exports.handler = async (event, context, callback) => {
	if( event.path == '/screenshot' ){
		var url = event.queryStringParameters.url;
		var wait = 0;
		var width = 640;
		var height = 480;
		var scale = 1.0;
		var type = event.queryStringParameters.type || 'png'; // png or jpeg
		if( event.queryStringParameters.width )
			width = parseInt(event.queryStringParameters.width);
		if( event.queryStringParameters.height )
			height = parseInt(event.queryStringParameters.height);
		if( event.queryStringParameters.scale )
			scale = parseFloat(event.queryStringParameters.scale);
		if( event.queryStringParameters.wait )
			wait = parseInt(event.queryStringParameters.wait);
		console.log(width, height, scale, url);

		var browser = await puppeteer.launch();
		var page = await browser.newPage();
		await page.setViewport({
			width: width,
			height: height,
			deviceScaleFactor: scale,
		});
		await page.goto(url, { waitUntil: "load" });
		if( event.queryStringParameters.waitfor ){
			try{
				await page.waitForFunction("vue.render.loaded");
			}catch(error){
				console.log(error);
			}
		}
		if( wait > 0 )
			await page.waitForTimeout(wait);
		var buffer = await page.screenshot({ type: type });
		browser.close();

		return new BinResponse('image/' + type, buffer);
	}else
	if( event.path == '/screenshot-weather'){
		var location = parseInt(event.queryStringParameters.location);
		var weather = await do_get_weather(location);

		return new Response({ weather });
	}
};

/* location: 13:東京、14:神奈川 */
function do_get_weather(location){
	return fetch('https://www.drk7.jp/weather/json/' + location + '.js', {
			method : 'GET'
	})
	.then((response) => {
			return response.text();
	})
	.then(text =>{
			text = text.trim();
			if( text.startsWith('drk7jpweather.callback(') )
					text = text.slice(23, -2);
			return JSON.parse(text);
	});
}
少し解説します。
puppeteerは、内部的にはChrome(またはFirefox)を使っています。
以下の部分で、ブラウザの起動と、ページタブの生成をしています。
var browser = await puppeteer.launch();
var page = await browser.newPage();
この部分で、ブラウザの表示サイズを変更しています。
		await page.setViewport({
			width: width,
			height: height,
			deviceScaleFactor: scale,
		});
M5Core2は、320×240であるため、width=320、height=240、scale=1.0で良いかと思います。場合によっては、解像度が小さすぎてHTMLレイアウトが難しい場合は、例えば、width=640、height=480、scale=0.5 のようにして、いったん大きい画面でレンダリングしたのち、縮小表示して320×240に合わせるというやり方も可能です。
以下の部分でURLで示されるWebページを取得しレンダリングします。
		await page.goto(url, { waitUntil: "load" });

		if( event.queryStringParameters.waitfor ){
			try{
				await page.waitForFunction("vue.render.loaded");
			}catch(error){
				console.log(error);
			}
		}
		if( wait > 0 )
			await page.waitForTimeout(wait);
その中で、必要に応じてwaitFor*** を呼び出しています。
Javascriptで画面を制御している場合、Javascriptの処理が終わった後に画面キャプチャするためのものです。
waitForTimeoutはウェイト時間を決めてその時間経過後に画面キャプチャするもので、waitForFunctionはWebページ中のJavascriptの条件式で待ち終了させます。
waitForFunctionの方は、WebページのJavascriptの実装に依存するので、お好みで変えてください。
以下の部分が、画面キャプチャする部分です。
var buffer = await page.screenshot({ type: type });
JpegかPNGが選べます。
最後に、ブラウザを閉じて終わりです
browser.close();
この画像バイナリを呼び出し元に返します。
class BinResponse{
    constructor(content_type, context){
        this.statusCode = 200;
        this.headers = {'Access-Control-Allow-Origin' : '*', 'Cache-Control' : 'no-cache', 'Content-Type': content_type };
        this.isBase64Encoded = true;
        if( context )
            this.set_body(context);
        else
            this.body = "";
    }

    set_filename(fname){
        this.headers['Content-Disposition'] = 'attachment; filename="' + fname + '"';
        return this;
    }

    set_error(error){
        this.body = JSON.stringify({"err": error});
        return this;
    }

    set_body(content){
        this.body = content.toString('base64');
        return this;
    }

    get_body(){
        return Buffer.from(this.body, 'base64');
    }
}

module.exports = BinResponse;
以下の部分は、スクリーンショット生成には関係しませんが、のちほどスクリーンショット対象のWebページで使っているものです。
var weather = await do_get_weather(location);
M5Core2の実装
M5Core2側の実装です。
# include <WiFi.h>
# include "M5Lite.h"
# include <HTTPClient.h>

const char* wifi_ssid = "【WiFiアクセスポイントのSSID】";
const char* wifi_password = "【WiFiアクセスポイントのパスワード】";

const char* screenshot_url = "【Node.jsサーバのURL】/screenshot";
const char* target_url = "【スクリーンショット対象のWebページのURL】";

# define SCREENSHOT_INTERVAL   (10 * 60 * 1000) //スクリーンショット取得の間隔
# define DISPLAY_WIDTH   320  //LCDの横解像度
# define DISPLAY_HEIGHT  240 //LCDの縦解像度
# define SCREENSHOT_SCALE  1.0 //スクリーンショットの表示倍率
# define BUFFER_SIZE   20000 //画像受信のバッファサイズ

unsigned char buffer[BUFFER_SIZE];

void wifi_connect(const char *ssid, const char *password);
String urlencode(String str);
long doHttpGet(String url, uint8_t *p_buffer, unsigned long *p_len, unsigned short timeout);

void setup() {
  M5Lite.begin();
  Serial.begin(9600);
  Serial.println("setup");

  wifi_connect(wifi_ssid, wifi_password);
  Serial.println("connected");
}

void loop() {
  M5Lite.update();

  String url = screenshot_url;
  url += "?type=jpeg&width=" + String((int)(DISPLAY_WIDTH / SCREENSHOT_SCALE)) + "&height=" + String((int)(DISPLAY_HEIGHT / SCREENSHOT_SCALE)) + "&scale=" + String(SCREENSHOT_SCALE);
//  url += "&waitfor=true";
  url += "&wait=5000";
  url += "&url=" + urlencode(target_url);
  Serial.println(url);
  unsigned long length = sizeof(buffer);
  long ret = doHttpGet(url, buffer, &length, 5000);
  if( ret == 0 ){
    M5Lite.Lcd.drawJpg(buffer, length);
  }

  delay(SCREENSHOT_INTERVAL);
}

void wifi_connect(const char *ssid, const char *password){
  Serial.println("");
  Serial.print("WiFi Connenting");
  M5Lite.Lcd.println("WiFi Connectiong");

  WiFi.begin(ssid, password);
  while (WiFi.status() != WL_CONNECTED) {
    Serial.print(".");
    M5Lite.Lcd.print(".");
    delay(1000);
  }
  Serial.println("");
  Serial.print("Connected : ");
  Serial.println(WiFi.localIP());
  M5Lite.Lcd.println("");
  M5Lite.Lcd.print("Connected : ");
  M5Lite.Lcd.println(WiFi.localIP());
}

String urlencode(String str){
    String encodedString = "";
    char c;
    char code0;
    char code1;
//    char code2;
    for (int i = 0 ; i < str.length() ; i++){
      c = str.charAt(i);
      if (c == ' '){
        encodedString += '+';
      } else if (isalnum(c)){
        encodedString += c;
      } else{
        code1 = (c & 0xf) + '0';
        if ((c & 0xf) > 9){
            code1 = (c & 0xf) - 10 + 'A';
        }
        c = (c >> 4) & 0xf;
        code0 = c + '0';
        if (c > 9){
            code0 = c - 10 + 'A';
        }
//        code2 = '\0';
        encodedString += '%';
        encodedString += code0;
        encodedString += code1;
        //encodedString+=code2;
      }
      yield();
    }
    return encodedString;
}

long doHttpGet(String url, uint8_t *p_buffer, unsigned long *p_len, unsigned short timeout){
  HTTPClient http;

  http.setTimeout(timeout + 5000);

  Serial.print("[HTTP] GET begin...\n");
  // configure traged server and url
  http.begin(url);

  Serial.print("[HTTP] GET...\n");
  // start connection and send HTTP header
  int httpCode = http.GET();
  unsigned long index = 0;

  // httpCode will be negative on error
  if(httpCode > 0) {
      // HTTP header has been send and Server response header has been handled
      Serial.printf("[HTTP] GET... code: %d\n", httpCode);

      // file found at server
      if(httpCode == HTTP_CODE_OK) {
        // get tcp stream
        WiFiClient * stream = http.getStreamPtr();

        // get lenght of document (is -1 when Server sends no Content-Length header)
        int len = http.getSize();
        Serial.printf("[HTTP] Content-Length=%d\n", len);
        if( len != -1 && len > *p_len ){
          Serial.printf("[HTTP] buffer size over\n");
          http.end();
          return -1;
        }

        // read all data from server
        while(http.connected() && (len > 0 || len == -1)) {
            // get available data size
            size_t size = stream->available();

            if(size > 0) {
                // read up to 128 byte
                if( (index + size ) > *p_len){
                  Serial.printf("[HTTP] buffer size over\n");
                  http.end();
                  return -1;
                }
                int c = stream->readBytes(&p_buffer[index], size);

                index += c;
                if(len > 0) {
                    len -= c;
                }
            }
            delay(1);
        }
      }else{
        http.end();
        return -1;
      }
  } else {
    http.end();
    Serial.printf("[HTTP] GET... failed, error: %s\n", http.errorToString(httpCode).c_str());
    return -1;
  }

  http.end();
  *p_len = index;

  return 0;
}
大した処理はしていないです。
なぜならば、ESP32 Lite Pack Library に含まれているLovyanGFXがすべてをやってくれているからです。
本来であれば、M5Core2の回路を見てLCDに表示できるようにしたり、Jpegを解析したりと、いろいろやらないといけないのですが、機種判別やらJpegのLCD表示やらをすべてやってくれているからです。
以下は、環境に合わせて以下を変更してください。
const char* wifi_ssid = "【WiFiアクセスポイントのSSID】";
const char* wifi_password = "【WiFiアクセスポイントのパスワード】";

const char* screenshot_url = "【Node.jsサーバのURL】/screenshot";
const char* target_url = "【スクリーンショット対象のWebページのURL】";

# define SCREENSHOT_INTERVAL   (10 * 60 * 1000) //スクリーンショット取得の間隔
# define DISPLAY_WIDTH   320  //LCDの横解像度
# define DISPLAY_HEIGHT  240 //LCDの縦解像度
# define SCREENSHOT_SCALE  1.0 //スクリーンショットの表示倍率
# define BUFFER_SIZE   20000 //画像受信のバッファサイズ
platformio.iniは以下にしました。
[env:m5stack-core2]
platform = espressif32
board = m5stack-fire
framework = arduino
upload_port = COM8
monitor_port = COM8
lib_deps =
  https://github.com/m5stack/M5Core2.git
  tanakamasayuki/ESP32 Lite Pack Library@^1.3.2
M5Core2に表示するWebページの作成
HTMLはもちろん、CSSやJavascriptも使えますので、通常のWebページ作成時の要領と同じです。
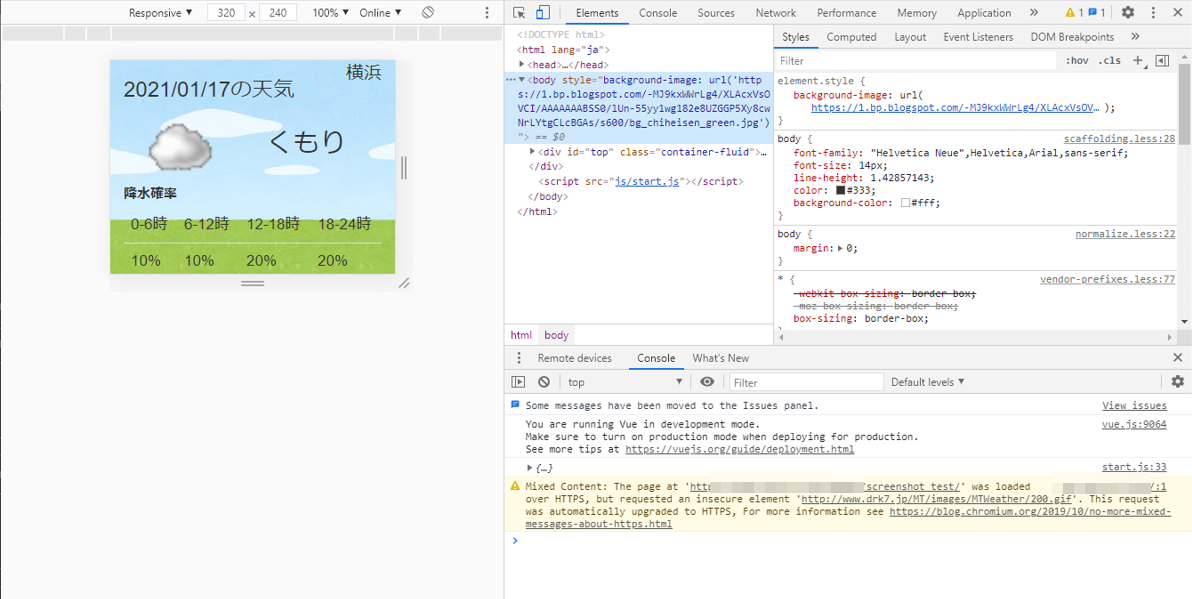
ただし、小さい解像度である320x240では表示が崩れてしまう可能性大なので、Chromeブラウザ上で試行錯誤したいところ。
Chromeの開発ツールを使えばよいです。
F12キーを押して開発ツールを表示させ、Elementsタブの左にある□2つのアイコンをクリックします。
次に、以下の部分でResponsiveが選択された状態にすると、表示領域の縦横の解像度を変更できるようになるので、ここで320x240とします。
これで、Webページのレイアウト作成がやりやすくなるかと思います。
完成したら、同じURLをM5Core2からNode.jsサーバに渡すとChromeの開発ツールで見えている状態のままのJpeg画像が取得され表示されます。
おまけ
似てるけど、ちょっと違ったバージョンもあります。
ESP32で作るBeebotteダッシュボード
ESP32でお気に入りの写真チェンジャーを作る
以上


