M5StickCで置き時計を作ります。
今回はちょっとがんばって、可能な限り、ソースコードにコメントを入れたので、実装内容を理解できるようにしてみました。
以下、完成した状態です。
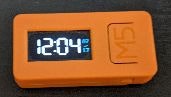
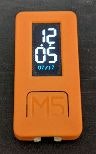
時間の表示と月日の表示があります。
また、M5StickCの端末の向きに合わせて、表示も縦向き、横向きに切り替えるようにしています。
これ以外に、おまけ機能として以下もあります。M5StickCのボタンを押すたびに表示が切り替わります。
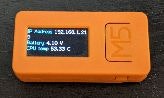
- システムビュー:M5StickCのIPアドレスや内蔵バッテリーの電圧、CPUの温度を表示します。
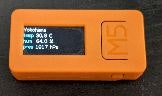
- 天気ビュー:OpenWeatherMapから指定した場所の温度・湿度・気圧を表示します。
- ルーチンビュー:体力づくりなど一日一回実施したい日課を表示します。LEDが点灯するので日課が終わったらボタンを押してLEDを消しましょう。
ソースコードもろもろは以下に置いておきました。
poruruba/Esp32TableClock
開発環境
開発環境としては、お決まりのVisual Studio Code+PlatformIOを使っています。
Visual Studio Code
PlatformIO
M5StickCのUSBシリアルドライバをインストールしておきます。インストール後リブートも忘れずに。
M5StickCの世代により、いずれかのドライバをインストール
https://ftdichip.com/drivers/vcp-drivers/
https://jp.silabs.com/developers/usb-to-uart-bridge-vcp-drivers
platformio.iniの編集
環境に合わせて変更してください。
[env:m5stick-c]
platform = espressif32
board = m5stick-c
framework = arduino
upload_port = COM4
monitor_port = COM4
monitor_speed = 115200
board_build.partitions = no_ota.csv
lib_deps =
    m5stack/M5StickC@^0.2.1
    bblanchon/ArduinoJson@^6.18.1
    lovyan03/LovyanGFX@^0.4.1
    tanakamasayuki/efont Unicode Font Data@^1.0.4
M5StickCが接続されたCOMポートです。
upload_port = COM4
monitor_port = COM4
以下の部分の補足です。
monitor_speed = 115200
M5StickC側は115200bpsで通信するようにしたため、それに合わせています。
board_build.partitions = no_ota.csv
WiFiを使うとかなりのROM容量を消費して足りなくなるので、OTAのための領域を削除して容量を稼いでいます。
以下のライブラリを使わせていただいています。参考となる記事も併せて載せておきます。(このおかげで非常に助かりました)
ArduinoJson
https://arduinojson.org
https://arduinojson.org/v6/doc/
LovyanGFX
https://github.com/lovyan03/LovyanGFX
https://lang-ship.com/blog/work/lovyangfx-2-font/
efont Unicode BDF Font Data
https://github.com/tanakamasayuki/efont
https://lang-ship.com/blog/work/lovyangfx-2-font/
OpenWeatherMapのアカウント取得
今回、天気ビューでの温度・湿度・気圧の取得に、OpenWeatherMapを利用させていただいています。
OpenWeatherMap
このサイトでSignUpしてアカウントを作成すると、APIのKeyが払い出されます。32文字の乱数です。これをメモっておきます。
ソースコードの環境依存部の変更
以下の部分を変更します。
const char *wifi_ssid = "【WiFiアクセスポイントのSSID】"; // WiFiアクセスポイントのSSID
const char *wifi_password = "【WiFiアクセスポイントのパスワード】"; // WiFiアクセスポイントのパスワード
const char *weather_appid = "【OpenWeatherMapのKey】"; // OpenWeatherMapのKey
const char *weather_location = "【OpenWeatherMapの取得ロケーション名】"; // OpenWeatherMapの取得ロケーション名
OpenWeatherMapのKey は、先ほど取得した32文字のKeyです。
OpenWeatherMapの取得ロケーション名には、天気情報を取得したい都市名を指定します。例えば横浜の場合は、yokohamaと入力します。
あとは、コンパイルして書き込めば動くはずです。
setup()
それでは、ソースコードを解説していきます。
今後も使うであろう機能が多いので、ぜひ諦めずに読め進めるのが良いと思います。
Arduinoのsetup()です。
void setup()
{
  M5.begin(); // M5StickCの初期化
  Serial.begin(115200);
  Serial.println("Starting setup");
  setCpuFrequencyMhz(80); // CPUをWiFiが動く最低の周波数に変更

  M5.Imu.Init(); // M5StickCの加速度センサの初期化

  lcd.init(); // M5StickCのLCDの初期化
  lcd.setBrightness(LCD_BRIGHTNESS);
  resetDisplay(0); // LCD表示の初期化

  pinMode(GPIO_LED, OUTPUT); // LEDのPINの出力設定
  digitalWrite(GPIO_LED, HIGH); // LEDの消灯

  ipaddr = wifi_connect(wifi_ssid, wifi_password); // WiFiアクセスポイントへの接続とIPアドレスの記憶
  configTzTime("JST-9", "ntp.nict.jp", "ntp.jst.mfeed.ad.jp"); // NTPサーバとタイムゾーンの設定

  // 初期値設定
  getLocalTime(&last_time);
  last_time_interval = millis();

  Serial.println("Finished setup");
}
お決まりの処理が多いのですが、いくつか補足します。
・setCpuFrequencyMhz(80)
CPUの周波数を下げています。通常はあまり気にすることはなかったのですが、今回は消費電力をケアしています。もっと下げられるのですが、WiFiを使う場合これが限界だそうです。
・M5.Imu.Init(); // M5StickCの加速度センサの初期化
端末のローテーション(向き)の検出に使っています。
・lcd.setBrightness(LCD_BRIGHTNESS);
これも、消費電力を抑えるために変更しています。64にしていますが、お好みで変更してください。0から255の間です。
・pinMode(GPIO_LED, OUTPUT); // LEDのPINの出力設定
・digitalWrite(GPIO_LED, HIGH); // LEDの消灯
LEDが接続されたPINの初期設定です。HIGHにすると消灯します。
・ipaddr = wifi_connect(wifi_ssid, wifi_password); // WiFiアクセスポイントへの接続とIPアドレスの記憶
WiFiアクセスポイントに接続します。この処理はお決まりなので、関数化しています。気になる方は、関数の中身を見てみてください。
・configTzTime("JST-9", "ntp.nict.jp", "ntp.jst.mfeed.ad.jp"); // NTPサーバとタイムゾーンの設定
時計として日時を表示するため、NTPサーバと同期させています。
loop()の処理の流れ
大きく分けて以下のような流れになっています。
loop(){
 ①M5StickCの状態の更新
 ②ボタンが押されたかの処理
 ③端末の向きの検出
 ④自動表示更新の必要性の確認
 ⑤表示ビューの更新
 ⑥少しウエイト
}
①M5StickCの状態の更新
これはお決まりの処理で、M5.update()を呼び出すことです。ボタンなどM5StickCにはいくつかの周辺デバイスが備わっていますがそれらを更新しているようです。
②ボタンが押されたかの処理
ボタンAが押された場合には、現在表示しているビューから次のビューに切り替えます。
また、ボタンBが押された場合には、ルーチンビューが表示されている場合に限り、ルーチンの実施が完了したものとして処理をします。
③端末の向きの検出
以下の関数を呼び出しています。
uint8_t getRotate(float *p_az)
{
  float ax, ay, az;
  M5.Imu.getAccelData(&ax, &ay, &az); // 端末の加速度を取得

  // 端末ローテーションの決定
  uint8_t rotate = 0;
  if (abs(ax * 100) > abs(ay * 100)){
    // 端末が横方向の場合
    if (ax >= 0.0){
      rotate = 1;
    }else{
      rotate = 3;
    }
  }else{
    // 端末が縦方向の場合
    if (ay >= 0.0){
      rotate = 0;
    }else{
      rotate = 2;
    }
  }

  if (p_az != NULL)
    *p_az = az; // Z方向の加速度を返却

  return rotate;
}
向きの検出には、X方向とY方向の加速度を利用しています。X方向とY方向どちらが大きいかで、横向きか縦向きかがわかります。
ただし、M5StickCを平置きしている状態(LCDが上を向いている状態)では、X方向とY方向の値が小さく差が微妙なので、表示がころころ変わってしまいます。この状態となっているときはZ方向の加速度が大きいです。そこで、Z方向の加速度も返してあげるようにして、呼び出し側で向きを信頼するかどうかを判断できるようにしています。
④自動表示更新の必要性の確認
自動表示更新は、以下の3つがあります。
・表示している時・分が現在の時・分と変わっているかもしれないチェックのための更新
・時刻ビュー以外の表示ビューが長く表示されている場合の時刻ビューへの切り替え
・毎日のルーチンのリセット
1番目については、loop()ごとに表示している時・分を切り替えてもよいのですが、ちらつきが出るため、あまり時刻の制度は求めなかったので5秒おきの更新にしています。
2番目は、特に操作がなければ時刻ビューに戻したかったための処理です。
3番目は、毎日のルーチンのリセットのための処理です。毎日5時に、新しいルーチンを選択し、「本日未実施」状態にしています。
⑤表示ビューの更新
これが表示ビューの更新処理です。
各表示ビュー用の関数を作成しています。
⑥少しウエイト
loop()をウェイトなしでぶん回すより、少しウェイトを入れた方が消費電力が多少抑えられるそうです。delay(1)を入れているだけです。
時刻ビューの表示処理
以下の関数で実装しています。
long updateTimeView(int rotate, const struct tm timeInfo)
表示文字や図形の位置の微調整が面倒でしたが、作ってしまえば、内容は単純です。
システムビューの表示処理
以下の関数で実装しています。
long updateSystemView(int rotate, String ipaddr)
大事なのは以下ですね。
float vbat = M5.Axp.GetBatVoltage(); // 現在バッテリ電圧の取得
float cpu = temperatureRead(); // CPU温度の取得
天気ビューの表示処理
以下の関数で実装しています。
long updateWeatherView(int rotate)
天気情報として、指定したロケーションの温度・湿度・気圧を取得し表示しています。
取得には、HTTP Get呼び出しで行い、レスポンスはJSONで帰ってきます。
HTTP呼び出しにはHTTP Client、JSONのパースにはArduinoJsonを使っています。
HTTP Get呼び出しのパラメータは以下で定義されています。
Current weather data
このHTTP Get処理はよく使うので、関数化しておきました。
long do_get(const char *p_endpoint, JsonDocument *p_output)
{
  HTTPClient http;
  http.begin(p_endpoint);

  Serial.println("http.GET");
  int status_code = http.GET();
  Serial.printf("status_code=%d\r\n", status_code);
  if (status_code != 200){
    http.end();
    return status_code;
  }

  Stream *resp = http.getStreamPtr();
  DeserializationError err = deserializeJson(*p_output, *resp);
  http.end();

  if (err){
    Serial.println("Error: deserializeJson");
    return -1;
  }

  return 0;
}
ついでに、これまたよく使うHTTP POST(JSON)呼び出しで、レスポンスとしてJSONが返ってくる関数も用意しておきました。
long do_post(const char *p_endpoint, JsonDocument *p_input, JsonDocument *p_output)
{
  HTTPClient http;
  http.begin(p_endpoint);
  http.addHeader("Content-Type", "application/json");

  size_t len = serializeJson(*p_input, json_buffer, sizeof(json_buffer));
  if( len < 0 || len >= sizeof(json_buffer) ){
    Serial.println("Error: serializeJson");
    return -1;
  }

  Serial.println("http.POST");
  int status_code = http.POST((uint8_t *)json_buffer, len);
  Serial.printf("status_code=%d\r\n", status_code);
  if (status_code != 200){
    http.end();
    return status_code;
  }

  Stream *resp = http.getStreamPtr();
  DeserializationError err = deserializeJson(*p_output, *resp);
  http.end();

  if( err ){
    Serial.println("Error: deserializeJson");
    return -1;
  }

  return 0;
}
JSONのパースには、メモリを消費するため、足りない場合には以下の部分で調整してください。
// HTTP POST(JSON)のリクエスト用ArduinoJson変数
const int capacity_request = JSON_OBJECT_SIZE(20);
StaticJsonDocument<capacity_request> json_request;
// HTTP POST/GETのレスポンス用ArduinoJson変数
const int capacity_response = JSON_OBJECT_SIZE(256);
StaticJsonDocument<capacity_response> json_response;
// ArduinoJsonのパース用バッファ
char json_buffer[2048];
ルーチンビューの表示処理
以下の関数で実装しています。
long updateRoutineView(int rotate)
特に難しい処理はしていないです。
1点だけ。ここだけ日本語を表示したいため、「efont Unicode Font Data」のフォントを設定しています。
lcd.setFont(&fonts::efont); // 漢字対応フォントに変更
ルーチンの内容を変えたい場合は以下の部分を変更してください。
const char *routine_menu[] = {
  "膝つき腕立て伏せ 10回",
  "リバースプッシュアップ 10回",
  "スクワット 10回",
  "レッグランジ 10回",
  "バイシクルクランチ 10回",
  "レッグレイズ 10回",
  "休息日"
};
ソースコード全体
最後に、ソースコード全体を示しておきます。399ステップ(コメント含まず)でした。
#include <M5StickC.h>
#include <WiFi.h>
#include <HTTPClient.h>
#include <ArduinoJson.h>
#include <efontEnableJa.h>
#include <efontFontData.h>
#define LGFX_AUTODETECT
#include <LovyanGFX.hpp>

const char *wifi_ssid = "【WiFiアクセスポイントのSSID】"; // WiFiアクセスポイントのSSID
const char *wifi_password = "【WiFiアクセスポイントのパスワード】"; // WiFiアクセスポイントのパスワード
const char *weather_appid = "【OpenWeatherMapのKey】"; // OpenWeatherMapのKey
const char *weather_location = "【OpenWeatherMapの取得ロケーション名】"; // OpenWeatherMapの取得ロケーション名

#define GPIO_LED 10 // LEDのPIN番号
#define LCD_BRIGHTNESS  64  // LCDのバックライトの輝度(0~255)
#define FORE_COLOR TFT_WHITE  // LCD表示文字の色
#define FORE2_COLOR TFT_CYAN  // LCD表示文字の色(2番目)
#define BACK_COLOR TFT_BLACK  // LCDの背景色
#define SCAN_TIME_INTERVAL 5000   // 時刻ビューの表示更新間隔(msec)
#define VIEW_OTHER_TIMEOUT 10000  // 時刻ビュー以外の表示ビューの表示期間(msec)
#define ROUTINE_RESET_HOUR 5  // ルーチンのリセット時刻(Hour)
#define WEATHER_UPDATE_INTERVAL (10 * 60 * 1000) // 天気情報の最短取得間隔

// ルーチン内容のリスト
const char *routine_menu[] = {
  "膝つき腕立て伏せ 10回",
  "リバースプッシュアップ 10回",
  "スクワット 10回",
  "レッグランジ 10回",
  "バイシクルクランチ 10回",
  "レッグレイズ 10回",
  "休息日"
};
const uint8_t routine_menu_num = sizeof(routine_menu) / sizeof(const char *); // ルーチン内容のリストの数

// 表示ビューの表示順序
enum VIEW_STATE
{
  VIEW_TIME = 0, // 時刻ビュー
  VIEW_SYSTEM, // システムビュー
  VIEW_WEATHER, // 天気ビュー
  VIEW_ROUTINE, // ルーチンビュー

  NUM_OF_VIEW // 最後は表示ビューの数
};

// グローバル変数宣言
static LGFX lcd; // for LovyanGFX

// HTTP POST(JSON)のリクエスト用ArduinoJson変数
const int capacity_request = JSON_OBJECT_SIZE(20);
StaticJsonDocument<capacity_request> json_request;
// HTTP POST/GETのレスポンス用ArduinoJson変数
const int capacity_response = JSON_OBJECT_SIZE(256);
StaticJsonDocument<capacity_response> json_response;
// ArduinoJsonのパース用バッファ
char json_buffer[2048];

uint8_t current_view = VIEW_TIME; // 現在の表示ビュー
struct tm last_time; // 最後に時刻ビューを切り替えた日時
uint8_t last_rotate = 0xff; // 最後に表示ビューを切り替えた時の端末ローテーション
String ipaddr; // 自身の端末のIPアドレス
int last_time_interval = 0; // 最後に表示ビューを切り替えた時間
int last_other_view; // 最後に時刻ビュー以外に切り替えた時間
bool routine_done = true; // 本日のルーチンを完了したかどうか
uint8_t routine_selected = 0xff; // 本日のルーチンの内容のインデックス
struct tm last_routine; // 本日のルーチンの日時

// 関数宣言
long do_post(const char *p_endpoint, JsonDocument *p_input, JsonDocument *p_output);
long do_get(const char *p_endpoint, JsonDocument *p_output);
String wifi_connect(const char *ssid, const char *password);
void set_digit(char *p_digit, uint8_t num, bool zero = true);
long updateTimeView(int rotate, const struct tm timeInfo);
long updateSystemView(int rotate, String ipaddr);
long updateWeatherView(int rotate);
long updateRoutineView(int rotate);
uint8_t getRotate(float *p_az = NULL);
void resetDisplay(int rotate);

void setup()
{
  M5.begin(); // M5StickCの初期化
  Serial.begin(115200);
  Serial.println("Starting setup");
  setCpuFrequencyMhz(80); // CPUをWiFiが動く最低の周波数に変更

  M5.Imu.Init(); // M5StickCの加速度センサの初期化

  lcd.init(); // M5StickCのLCDの初期化
  lcd.setBrightness(LCD_BRIGHTNESS);
  resetDisplay(0); // LCD表示の初期化

  pinMode(GPIO_LED, OUTPUT); // LEDのPINの出力設定
  digitalWrite(GPIO_LED, HIGH); // LEDの消灯

  ipaddr = wifi_connect(wifi_ssid, wifi_password); // WiFiアクセスポイントへの接続とIPアドレスの記憶
  configTzTime("JST-9", "ntp.nict.jp", "ntp.jst.mfeed.ad.jp"); // NTPサーバとタイムゾーンの設定

  // 初期値設定
  getLocalTime(&last_time);
  last_time_interval = millis();

  Serial.println("Finished setup");
}

void loop()
{
  /*
  /* ①M5StickCの状態の更新
  */
  M5.update(); // M5StickCの状態更新

  bool update = false; // 表示を更新するかどうかの初期値設定

  /*
  /* ②ボタンが押されたかの処理
  */
  if( M5.BtnB.wasPressed()){
    // M5StickCのBtnBが押された場合
    if( current_view == VIEW_ROUTINE ){
      // 現在の表示ビューがルーチンビューの場合
      if( !routine_done ){
        // まだ本日のルーチンが完了していない場合
        routine_done = true; // ルーチン完了状態に設定
        digitalWrite(GPIO_LED, HIGH); // LEDを消灯
        update = true; // 表示を更新に設定
      }
    }
  }

  if (M5.BtnA.wasPressed()){
    // M5StickCのBtnAが押された場合
    // 表示ビューを次のビューに切り替え
    current_view++;
    if( current_view >= NUM_OF_VIEW )
      current_view = 0; // 先頭の表示ビューに設定

    update = true; // 表示を更新に設定
  }

  /*
  /* ③端末の向きの検出
  */
  float az;
  uint8_t rotate = getRotate(&az); // 端末のローテーションを取得
  if (last_rotate != rotate){
    // 以前表示したときのローテーションと異なる場合
    if( last_rotate == 0xff || az < 0.9 ){
      // 初めて表示する場合または端末が上方向に向いていない場合(上方向に向いている場合、ローテーションの向きが安定しないため)
      last_rotate = rotate;
      update = true; // 表示を更新に設定
    }
  }

  /*
  /* ④自動表示更新の必要性の確認
  */
  int now = millis(); // 現在時間を取得
  if( !update ){
    if ((current_view != VIEW_TIME) && (now - last_other_view >= VIEW_OTHER_TIMEOUT)){
      // 現在時刻ビューではなく、かつ、VIEW_OTHER_TIMEOUT を経過していた場合
      current_view = VIEW_TIME; // 時刻ビューに切り替え
      update = true; // 表示を更新に設定
    }
  }
  if( !update ){
    if( now - last_time_interval < SCAN_TIME_INTERVAL ){
      // SCAN_TIME_INTERVALを経過していない場合、何もしない
      delay(100);
      return;
    }
  }
  last_time_interval = now;

  struct tm timeInfo;
  getLocalTime(&timeInfo); // 現在ローカル時刻を取得

  if (last_routine.tm_mday != timeInfo.tm_mday && timeInfo.tm_hour == ROUTINE_RESET_HOUR){
    // ルーチンをまだリセットしておらず、今がリセット時刻の場合
    last_routine = timeInfo;
    // ランダムにルーチンを切り替える場合はこちら
    routine_selected = random(0, routine_menu_num); // ルーチンの内容をランダムに選択
    // 順番にルーチンを切り替える場合はこちら
//    routine_selected++;
//    if( routine_selected >= routine_menu_num )
//      routine_selected = 0;
    routine_done = false; // まだルーチンを完了していない状態に変更
    digitalWrite(GPIO_LED, LOW); // LEDを点灯
  }

  /*
  /* ⑤表示ビューの更新
  */
  if (current_view == VIEW_TIME){
    // 現在時刻ビューの場合
    if (last_time.tm_hour != timeInfo.tm_hour || last_time.tm_min != timeInfo.tm_min){
      // 最後に表示した時刻ビューの時または分が変わった場合
      last_time = timeInfo;
      update = true; // 表示を更新に設定
    }

    if (update)
      updateTimeView(last_rotate, last_time); // 時刻ビューの表示を更新
  }else
  if (current_view == VIEW_SYSTEM){
    if (update){
      updateSystemView(last_rotate, ipaddr); // システムビューに表示を更新
      last_other_view = now; // 最後に時刻ビュー以外の表示にした時刻を更新
    }
  }else
  if (current_view == VIEW_WEATHER){
    if (update){
      updateWeatherView(last_rotate); // 天気ビューに表示を更新
      last_other_view = now; // 最後に時刻ビュー以外の表示にした時刻を更新
    }
  }else
  if( current_view == VIEW_ROUTINE ){
    if (update){
      updateRoutineView(last_rotate); // ルーチンビューに表示を更新
      last_other_view = now; // 最後に時刻ビュー以外の表示にした時刻を更新
    }
  }

  /*
  /* ⑥少しウエイト
  */
  delay(1);
}

// 端末ローテーションを取得
// p_az(out):Z方向の加速度
// return : 端末ローテーション(0~3)
uint8_t getRotate(float *p_az)
{
  float ax, ay, az;
  M5.Imu.getAccelData(&ax, &ay, &az); // 端末の加速度を取得

  // 端末ローテーションの決定
  uint8_t rotate = 0;
  if (abs(ax * 100) > abs(ay * 100)){
    // 端末が横方向の場合
    if (ax >= 0.0){
      rotate = 1;
    }else{
      rotate = 3;
    }
  }else{
    // 端末が縦方向の場合
    if (ay >= 0.0){
      rotate = 0;
    }else{
      rotate = 2;
    }
  }

  if (p_az != NULL)
    *p_az = az; // Z方向の加速度を返却

  return rotate;
}

// LCD表示を初期化
void resetDisplay(int rotate)
{
  lcd.fillScreen(BACK_COLOR); // LCD全体をBACK_COLORで塗りつぶし
  lcd.setRotation(rotate); // LCDの画面の向きを設定
  lcd.setFont(&fonts::Font2); // デフォルトのフォントに設定
  lcd.setTextColor(FORE_COLOR, BACK_COLOR); // フォアグラウンド/バックグラウンドの色を設定
  lcd.setCursor(0, 0); // カーソルを原点に設定
}

// ルーチンビューの表示に更新
// rotate(in):端末ローテーション
long updateRoutineView(int rotate)
{
  resetDisplay(rotate); // LCD表示を初期化
  lcd.setFont(&fonts::efont); // 漢字対応フォントに変更

  if (routine_selected == 0xff){
    // まだルーチンが設定されていない初期状態の場合
    lcd.println("開始前");
  }else{
    lcd.println(routine_done ? "実施済み" : "未実施"); // LCDにルーチン実施済みかどうかを表示
    lcd.setTextColor(FORE2_COLOR, BACK_COLOR); // フォアグラウンド色を変更
    lcd.println(routine_menu[routine_selected]); // LCDにルーチンの内容を表示
  }

  return 0;
}

// 天気ビューの表示に更新
// rotate(in):端末ローテーション
long updateWeatherView(int rotate)
{
  // 関数呼び出し後も記憶しておく変数
  static int last_weather = 0; // 最後に天気情報を取得した時間
  static float temp; // 最後に取得した温度
  static float humidity; // 最後に取得した湿度
  static int pressure; // 最後に取得した気圧
  static String location; // 最後に取得した天気情報のロケーション名

  resetDisplay(rotate); // LCD表示を初期化

  int now = millis();
  if (last_weather == 0 || now - last_weather >= WEATHER_UPDATE_INTERVAL)
  {
    // Current weather data取得のためのURLの生成
    String url = String("https://api.openweathermap.org/data/2.5/weather?units=metric&q=");
    url += weather_location;
    url += ",jp&appid=";
    url += weather_appid;

    lcd.println("Gathering");

    // Current weather dataの呼び出し
    long ret = do_get(url.c_str(), &json_response);
    if (ret != 0){
      Serial.println("Error: do_get");
      lcd.println("Error");
      return -1;
    }

    const char *name = json_response["name"]; // 天気情報のロケーション名の記憶
    location = String(name);

    temp = json_response["main"]["temp"]; // 温度の記憶
    humidity = json_response["main"]["humidity"]; // 湿度の記憶
    pressure = json_response["main"]["pressure"]; // 気圧の取得

    last_weather = now; // 最後に取得した時間の記憶
  }

  resetDisplay(rotate); // LCD表示を初期化

  lcd.println(location); // LCDに天気情報のロケーション名の表示

  // LCDに温度を表示
  lcd.setTextColor(FORE2_COLOR, BACK_COLOR);
  lcd.printf("temp ");
  if (rotate == 0 || rotate == 2) lcd.println(""); // 端末ローテーションが縦の場合に改行を挿入
  lcd.setTextColor(FORE_COLOR, BACK_COLOR);
  lcd.printf("%.1f C\n", temp);

  // LCDに湿度を表示
  lcd.setTextColor(FORE2_COLOR, BACK_COLOR);
  lcd.printf("hum  ");
  if (rotate == 0 || rotate == 2) lcd.println(""); // 端末ローテーションが縦の場合に改行を挿入
  lcd.setTextColor(FORE_COLOR, BACK_COLOR);
  lcd.printf("%.1f %%\n", humidity);

  // LCDに気圧を表示
  lcd.setTextColor(FORE2_COLOR, BACK_COLOR);
  lcd.printf("pres ");
  if (rotate == 0 || rotate == 2) lcd.println(""); // 端末ローテーションが縦の場合に改行を挿入
  lcd.setTextColor(FORE_COLOR, BACK_COLOR);
  lcd.printf("%d hPa\n", pressure);

  return 0;
}

// システムビューの表示に更新
// rotate(in):端末ローテーション
// ipaddr(in):端末のIPアドレス
long updateSystemView(int rotate, String ipaddr)
{
  resetDisplay(rotate); // LCD表示を初期化

  float vbat = M5.Axp.GetBatVoltage(); // 現在バッテリ電圧の取得
  float cpu = temperatureRead(); // CPU温度の取得

  // LCDに端末のIPアドレスを表示
  lcd.setTextColor(FORE2_COLOR, BACK_COLOR);
  lcd.printf("IP Address ");
  if (rotate == 0 || rotate == 2) lcd.println(""); // 端末ローテーションが縦の場合に改行を挿入
  lcd.setTextColor(FORE_COLOR, BACK_COLOR);
  lcd.printf("%s\n", ipaddr.c_str());

  // LCDにバッテリ電圧を表示
  lcd.setTextColor(FORE2_COLOR, BACK_COLOR);
  lcd.printf("Battery ");
  if (rotate == 0 || rotate == 2) lcd.println(""); // 端末ローテーションが縦の場合に改行を挿入
  lcd.setTextColor(FORE_COLOR, BACK_COLOR);
  lcd.printf("%.2f V\n", vbat);

  // LCDにCPU温度を表示
  lcd.setTextColor(FORE2_COLOR, BACK_COLOR);
  lcd.printf("CPU temp ");
  if (rotate == 0 || rotate == 2) lcd.println(""); // 端末ローテーションが縦の場合に改行を挿入
  lcd.setTextColor(FORE_COLOR, BACK_COLOR);
  lcd.printf("%.2f C\n", cpu);

  return 0;
}

// 時刻ビューの表示を更新
// rotate(in):端末ローテーション
// timeInfo(in):現在時刻
long updateTimeView(int rotate, const struct tm timeInfo)
{
  resetDisplay(rotate); // LCD表示を初期化

  char digit[3] = {0}; // 10進数2文字列用の変数

  if (rotate == 1 || rotate == 3)
  {
    // 端末ローテーションが横向きの場合
    int margin_x = 3;
    int margin_y = 16;
    int margin_x_date = 3;

    // 時:分 の表示
    lcd.setFont(&fonts::Font7);
    lcd.setCursor(margin_x, margin_y);
    set_digit(digit, timeInfo.tm_hour);
    lcd.print(digit);
    lcd.setCursor(margin_x + 32 * 2 + 6, margin_y);
    set_digit(digit, timeInfo.tm_min);
    lcd.print(digit);

    // : の表示
    lcd.fillCircle(margin_x + 32 * 2 + 2, margin_y + 12, 2, FORE_COLOR);
    lcd.fillCircle(margin_x + 32 * 2 + 2, margin_y + 12 + 24, 2, FORE_COLOR);

    // 月/日 の表示
    lcd.setTextColor(FORE2_COLOR, BACK_COLOR);
    lcd.setFont(&fonts::Font2);
    lcd.setCursor(margin_x + 32 * 4 + 6 + margin_x_date, margin_y + 4);
    set_digit(digit, timeInfo.tm_mon + 1);
    lcd.print(digit);
    lcd.setCursor(margin_x + 32 * 4 + 6 + margin_x_date, margin_y + 4 + 16 + 8);
    set_digit(digit, timeInfo.tm_mday);
    lcd.print(digit);

    // / の表示
    lcd.drawLine(margin_x + 32 * 4 + 6 + margin_x_date + 4 + 8, margin_y + 4 + 16 + 2,
                 margin_x + 32 * 4 + 6 + margin_x_date + 4, margin_y + 4 + 16 + 2 + 4, FORE2_COLOR);
  }
  else
  {
    // 端末ローテーションが縦向きの場合
    int margin_x = 8;
    int margin_y = 16;
    int margin_y_date = 5;

    // 時:分 の表示
    lcd.setFont(&fonts::Font7);
    lcd.setCursor(margin_x, margin_y);
    set_digit(digit, timeInfo.tm_hour);
    lcd.print(digit);
    lcd.setCursor(margin_x, margin_y + 48 + 9);
    set_digit(digit, timeInfo.tm_min);
    lcd.print(digit);

    // : の表示
    lcd.fillCircle(margin_x + 19, margin_y + 48 + 4, 2, FORE_COLOR);
    lcd.fillCircle(margin_x + 19 + 24, margin_y + 48 + 4, 2, FORE_COLOR);

    // 月/日 の表示
    lcd.setTextColor(FORE2_COLOR, BACK_COLOR);
    lcd.setFont(&fonts::Font2);
    lcd.setCursor(margin_x + 9, margin_y + 48 + 9 + 48 + margin_y_date);
    set_digit(digit, timeInfo.tm_mon + 1);
    lcd.print(digit);
    lcd.setCursor(margin_x + 9 + 8 * 2 + 12, margin_y + 48 + 9 + 48 + margin_y_date);
    set_digit(digit, timeInfo.tm_mday);
    lcd.print(digit);

    // / の表示
    lcd.drawLine(margin_x + 9 + 8 * 2 + 4, margin_y + 48 + 9 + 48 + margin_y_date + 4 + 8,
                 margin_x + 9 + 8 * 2 + 4 + 4, margin_y + 48 + 9 + 48 + margin_y_date + 4, FORE2_COLOR);
  }

  return 0;
}

// HTTP Get/JSONレスポンスの呼び出し
// p_endpoint(in):エンドポイントURL
// p_output(out):JSONレスポンス
long do_get(const char *p_endpoint, JsonDocument *p_output)
{
  HTTPClient http;
  http.begin(p_endpoint);

  Serial.println("http.GET");
  int status_code = http.GET();
  Serial.printf("status_code=%d\r\n", status_code);
  if (status_code != 200){
    http.end();
    return status_code;
  }

  Stream *resp = http.getStreamPtr();
  DeserializationError err = deserializeJson(*p_output, *resp);
  http.end();

  if (err){
    Serial.println("Error: deserializeJson");
    return -1;
  }

  return 0;
}

// HTTP POST(JSONリクエスト)/JSONレスポンスの呼び出し
// p_endpoint(in):エンドポイントURL
// p_input(in):JSONリクエストパラメータ
// p_output(out):JSONレスポンス
long do_post(const char *p_endpoint, JsonDocument *p_input, JsonDocument *p_output)
{
  HTTPClient http;
  http.begin(p_endpoint);
  http.addHeader("Content-Type", "application/json");

  size_t len = serializeJson(*p_input, json_buffer, sizeof(json_buffer));
  if( len < 0 || len >= sizeof(json_buffer) ){
    Serial.println("Error: serializeJson");
    return -1;
  }

  Serial.println("http.POST");
  int status_code = http.POST((uint8_t *)json_buffer, len);
  Serial.printf("status_code=%d\r\n", status_code);
  if (status_code != 200){
    http.end();
    return status_code;
  }

  Stream *resp = http.getStreamPtr();
  DeserializationError err = deserializeJson(*p_output, *resp);
  http.end();

  if( err ){
    Serial.println("Error: deserializeJson");
    return -1;
  }

  return 0;
}

// WiFiアクセスポイントへの接続
// ssid(in):WiFiアクセスポイントのSSID
// password(in):WiFiアクセスポイントのパスワード
// return:IPアドレス
String wifi_connect(const char *ssid, const char *password)
{
  Serial.println("");
  Serial.print("WiFi Connenting");
  lcd.print("WiFi Connenting");

  WiFi.begin(ssid, password);
  while (WiFi.status() != WL_CONNECTED){
    Serial.print(".");
    delay(1000);
  }

  Serial.println("");
  Serial.print("Connected : ");
  Serial.println(WiFi.localIP());

  return WiFi.localIP().toString();
}

// number(99まで)から10進数2文字列への変換
// p_digit(out):変換結果の文字列
// num(in):number
// zero(in):10の位を0フィルするか
void set_digit(char *p_digit, uint8_t num, bool zero)
{
  if( num / 10 == 0 && !zero ){
    p_digit[0] = ' ';
  }else{
    p_digit[0] = '0' + ((num / 10) % 10);
  }

  p_digit[1] = '0' + (num % 10);
  p_digit[2] = '\0';
}
以上