複数のメーカーのテレビに対応した赤外線リモコンが多数販売されており、ボタンが大きく、卓上に置いたまま使えるリモコンが増えてきました。
リモコンで、室内の家電を操作するのもありますが、一方で、WebAPIが一般化し、よくある家電のリモコンで、ボタン一つでWebAPI呼び出せるとよいなあと思いました。
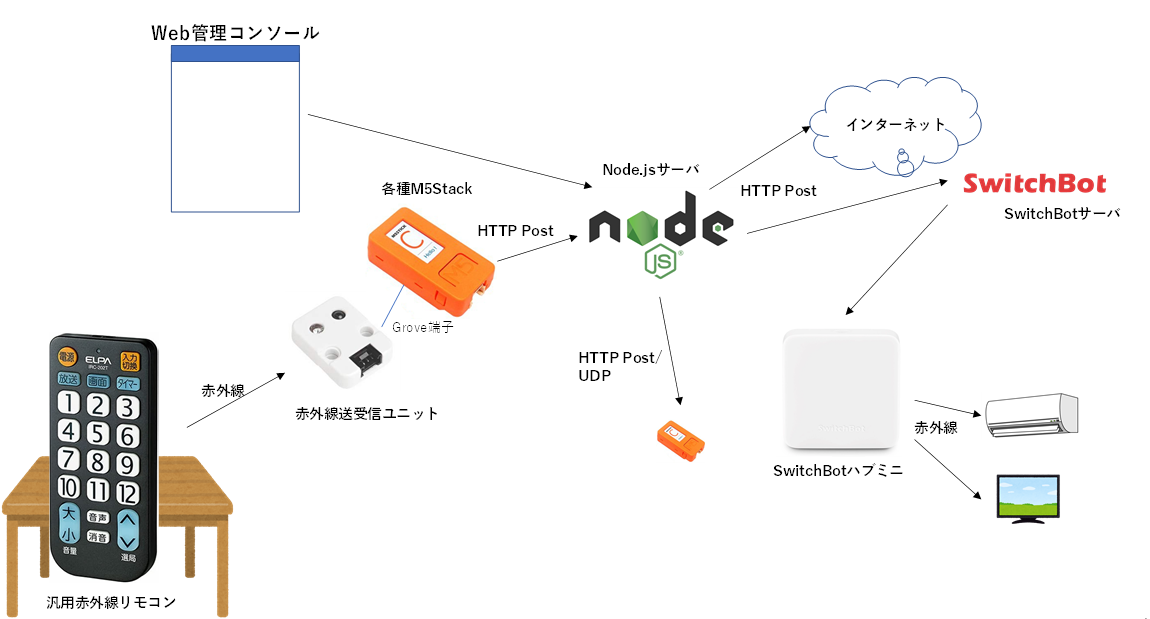
そこで、ボタンの大きなリモコンを机の上において、ボタン一つでいろいろなIoTを制御するスマートリモコンを作ります。
汎用赤外線リモコンは、学習リモコンである必要はありません。
見た目や操作性を重視すればよいです。
複数の国内メーカに対応したリモコンがよいですが、NEC式の赤外線信号プロトコルを使う場合は例えばパナソニックを選択します。
汎用赤外線リモコンでボタンを押下すると、パナソニックのテレビ用の信号が赤外線で送信されます。
赤外線は、M5Stack用の赤外線受信ユニットで受信します。赤外線受信ユニットがつながれたESP32のM5Stackでは、任意のNEC式赤外線信号プロトコルを受信するように実装します。
ESP32は受信した信号情報をそのままHTTP PostでNode.jsサーバにプッシュします。
Node.jsサーバでは、赤外線信号情報とそれに対応した動作する処理を記憶しておきます。
対応する動作としては、任意のURLへのHTTP Post(Json)呼び出しや、UDP送信のほかに、SwitchBotハブミニへの要求もできるようにしました。
SwitchBotへの要求ができるようにすることで、SwitchBotに登録した任意の赤外線信号の送信要求をすることができるようになります。
(もちろん、赤外線送受信ユニットに送信機能もあるのでそれを使うのもありですが、せっかくSwitchBotに機能を集約しているのであれば活用するのがよいでしょう)
また、汎用赤外線リモコンの赤外線信号の登録や、それに対応する動作の設定を行うためのWeb管理コンソールも用意しました。
赤外線信号の登録は、登録したいボタン表示名を選択した後、M5Stackのボタンを押して赤外線信号登録モードにして、登録したい汎用赤外線リモコン上のボタンを押すことで、完了します。
対応する動作の設定は、登録したボタン表示名を選択した後、SwitchBotサーバからSwitchBotハブミニに登録した赤外線機器の一覧を取得して表示することで、どの赤外線機器の赤外線送信に割り当てるかを選択することができます。
ソースコードもろもろは以下に置いておきました。
poruruba/IrRemoconForwarder
今回使った部品
汎用赤外線リモコン
赤外線送受信ユニット
SwitchBotハブミニ
M5Stackは、なんでもよいです。M5Atom LiteやM5StampC3がおすすめです。
SwitchBotのトークン払い出し
SwitchBotと連携したい場合は、トークンを払い出す必要があります。
こちらを参照ください。(手抜きですみません)
赤外線の受信(ESP32)
以下のライブラリを使わせていただきました。
<準備>
#include <IRrecv.h>
#include <IRremoteESP8266.h>
#include <IRutils.h>

static IRrecv irrecv(IR_RECV_PORT);
static decode_results results;

setup(){
  irrecv.enableIRIn();
}
<受信処理>
loop(){
  if (irrecv.decode(&results)) {
    long ret = process_ir_receive();

・・・

static long process_ir_receive(void)
{
  Serial.println("process_ir_receive");

  if(results.overflow){
    irrecv.resume();
    Serial.println("Overflow");
    return -1;
  }
  if( results.decode_type != decode_type_t::NEC || results.repeat ){
    irrecv.resume();
    Serial.println("not supported");
    return -1;
  }

  Serial.print(resultToHumanReadableBasic(&results));
  Serial.printf("address=%d, command=%d\n", results.address, results.command);

  jsonDoc.clear();
  jsonDoc["address"] = results.address;
  jsonDoc["command"] = results.command;
  jsonDoc["value"] = results.value;

  irrecv.resume();

  if( receiving ){
    long ret = httpPostJson(HTTP_POST_URL_REGISTER, jsonDoc);
    if( ret != 0 ){
      Serial.println("httpPostJson error");
      return ret;
    }
  }else{
    long ret = httpPostJson(HTTP_POST_URL_RECEIVE, jsonDoc);
    if( ret != 0 ){
      Serial.println("httpPostJson error");
      return ret;
    }
  }

  return 0;
}
ESP32に対して、HTTP Post(Json)で連携しています。
以下の感じです。JSON化のために、ArduinoJsonを使わせていただいています。
static long httpPost(const char *p_url, const char *p_payload)
{
  HTTPClient http;
  http.begin(p_url);
  http.addHeader("Content-Type", "application/json");
  int status_code = http.POST(p_payload);
  Serial.printf("status_code=%d\r\n", status_code);
  if( status_code != 200 ){
    http.end();
    return -1;
  }
  Serial.println(http.getString());
  http.end();

  return 0;
}

static long httpPostJson(const char *p_url, JsonDocument& jdoc)
{
  int size = measureJson(jdoc);

  char *p_buffer = (char*)malloc(size + 1);
  int len = serializeJson(jdoc, p_buffer, size);
  p_buffer[len] = '\0';
  long ret = httpPost(p_url, p_buffer);
  free(p_buffer);

  return ret;
}
対応する処理(Node.js)
Node.jsでは、受信した赤外線信号情報から一致する登録情報を参照し、対応する処理を実行しています。
	if( event.path == "/irremocon-receive" ){
		var list = await jsonfile.read_json(DATA_FILE, []);
		var item = list.find(item => item.ir.value == body.value );
		if( !item )
			throw new Error('item not found');
		if( !item.action )
			throw new Error('action not defined');

		var result = false;
		switch(item.action.type){
			case "switchbot": {
				console.log(item.action);
				switch(item.action.commandType){
					case 'command': {
						await switchbot.sendDeviceControlCommand(item.action.deviceId, 'command', item.action.command, 'default');
						result = true;
						break;
					}
					case 'customize': {
						await switchbot.sendDeviceControlCommand(item.action.deviceId, 'customize', item.action.command, 'default');
						result = true;
						break;
					}
				}
				break;
			}
			case "http": {
				switch(item.action.methodType){
					case 'post': {
						await do_post(item.action.url, { id: item.id });
						result = true;
						break;
					}
					case 'get': {
						await do_get(item.action.url, { id: item.id });
						result = true;
						break;
					}
				}
				break;
			}
			case "udp": {
				var payload = {
					id: item.id
				};
				udp.send(JSON.stringify(payload), item.action.port, item.action.host, (err, bytes) =>{
					if( err )
						console.error(error);
				});
				result = true;
				break;
			}
		}
		return new Response({ result: result });
	}
SwitchBot操作用のユーティリティクラスを作っておきました。
詳細は以下を参照してください。
以下のnpmモジュールを使ってます。バージョンは、2.6.7指定です。
"use strict";

const base_url = "https://api.switch-bot.com/v1.0";

const { URLSearchParams } = require('url');
const fetch = require('node-fetch');
const Headers = fetch.Headers;

class SwitchBot{
    constructor(token){
      this.authorization = token;
    }

    async getDeviceList(){
      var json = await do_get_with_authorization(base_url + "/devices", null, this.authorization);
      if( json.statusCode != 100 )
        throw new Error("statusCode is not 100");
      return json.body;
    }

    async getDeviceStatus(deviceId){
      var json = await do_get_with_authorization(base_url + "/devices/" + deviceId + "/status", null, this.authorization);
      if( json.statusCode != 100 )
        throw new Error("statusCode is not 100");
      return json.body;
    }

    async sendDeviceControlCommand(deviceId, commandType, command, parameter ){
      var params = {
        command: command,
        parameter: parameter,
        commandType: commandType
      };
      var json = await do_post_with_authorization(base_url + "/devices/" + deviceId + "/commands", params, this.authorization);
      if( json.statusCode != 100 )
        throw new Error("statusCode is not 100");
    }
}

module.exports = SwitchBot;

function do_get_with_authorization(url, qs, authorization) {
  const headers = new Headers({ Authorization: authorization });
  var params = new URLSearchParams(qs);

  var params_str = params.toString();
  var postfix = (params_str == "") ? "" : ((url.indexOf('?') >= 0) ? ('&' + params_str) : ('?' + params_str));
  return fetch(url + postfix, {
      method: 'GET',
      headers: headers
    })
    .then((response) => {
      if (!response.ok)
        throw new Error('status is not 200');
      return response.json();
    });
}

function do_post_with_authorization(url, body, authorization) {
  const headers = new Headers({ "Content-Type": "application/json", Authorization: authorization });

  return fetch(url, {
      method: 'POST',
      body: JSON.stringify(body),
      headers: headers
    })
    .then((response) => {
      if (!response.ok)
        throw new Error('status is not 200');
      return response.json();
    });
}
Node.jsサーバ側で用意しているWebAPIのエンドポイントの用途をまとめておきます。
・/irremocon-receive
ESP32から、受信した赤外線情報を受け取ります。
・/irremocon-list
Node.jsに登録している対応処理登録情報のリストを取得します。
・/irremocon-delete
Node.jsに登録している対応処理登録情報を削除します。
・/irremocon-update
Node.jsに登録している対応処理登録情報を更新します。
・/irremocon-start-register
Web管理コンソールからの要求で、赤外線信号の登録処理を開始します。以降の、ESP32からの/irremocon-register呼び出しを待ち受けます。
・/irremocon-register
ESP32から、登録のための赤外線情報を取得します。
・/irremocon-switchbot-devicelist
SwitchBotハブミニに登録済みの赤外線機器情報を取得します。
上記を利用して、Web管理コンソールを実現しています。
参考
M5Stackにせっかく赤外線がついているんだから、互いに送受信し合おう
以上