M5Stick-Cを使って、HTTP POSTします。当然、BodyにJSONを入れて、JSONが返ってくるやつです。
今回は、Arduino IDEを使います。
いろんな人が使っているので情報がたくさんありますが、JsonをPOSTするまで複数の情報を集めないと実現できなかったので、ここでまとめておきます。
使うもの
・M5Stack-C
ESP系CPUであれば大丈夫なのですが、M5Stack-CについているLCDを使っているのでそこだけ代替してください。
・Arduino IDE
https://docs.m5stack.com/#/ja/quick_start/m5stickc/m5stickc_quick_start
上記ページを参考に、ボードマネージャとライブラリマネージャよりM5StickCをインストールしておきます。
インストールが必要なライブラリ
・ArduinoJson
https://arduinojson.org/v6/doc/
JSONを簡単に扱えるようになります。Arduino IDEのライブラリマネージャからインストールしておいて下さい。
本投稿の最後に、M5Stick-Cについているジャイロ、バッテリー容量、GroveのBME680の環境センサ、NTP(時刻)、Ambientへのアップロードもろもろを組み込んだサンプルソースも載せておきます。
WiFiアクセスポイントに接続する
ESP系であれば、標準のライブラリでできます。setup()で準備します。
  WiFi.begin(ssid, password);
  while (WiFi.status() != WL_CONNECTED) {
    delay(100);
  }
  Serial.println(WiFi.localIP());
POSTするJsonを作成する
JSONの生成には、ArduinoJsonを使いました。
まずは定義。
const int capacity = JSON_OBJECT_SIZE(2);
StaticJsonDocument<capacity> json_request;
メモリの省エネを意識しているようで、あらかじめセットする予定の項目の数を指定する必要があります。JSON_OBJECT_SIZEの部分です。セットする項目が配列だったり、階層化されていたりする場合の計算方法もあるので、ArduinoJsonのHPを参考にしてください。
今回は2個の項目を設定します。
あるいは、必要な容量は以下のページでも計算してくれます。
ArduinoJson Assistant
https://arduinojson.org/v6/assistant/
Jsonの項目の設定はこんな感じ。
  json_request["counter"] = counter;
  json_request["tick"] = tick;
最後に、JSON文字列化(JSON.stringifyのことです)します。
出力先にバッファー(buffer)を用意しました。
char buffer[255];
serializeJson(json_request, buffer, sizeof(buffer));
JsonをPOSTする
POSTには、HTTPClientを使いました。
以下の感じです。
  HTTPClient http;
  http.begin(host);
  http.addHeader("Content-Type", "application/json");
  int status_code = http.POST((uint8_t*)buffer, strlen(buffer));
  if( status_code == 200 ){
    Stream* resp = http.getStreamPtr();

    DynamicJsonDocument json_response(255);
    deserializeJson(json_response, *resp);

    serializeJson(json_response, Serial);
    Serial.println("");
  }
  http.end();
http.POSTで、JSON文字列を載せてPOSTしています。
結果は、http.getStreamPtr()で取得します。
WiFiClient* が返ってくるのですが、Streamを継承しています。
POSTのレスポンスは、application/jsonであることを期待して、パースしています。
以下の部分で、JSON文字列をパースしています。
    DynamicJsonDocument json_response(255);
    deserializeJson(json_response, *resp);
(もちろん、DynamicJsonDocumentではなくStaticJsonDocumentを使っても構いません。)
値を取り出すときにはいったん変数に取り出すのが良いです。
そうすることで、変数の型に合わせて自動的に変換してくれます。
文字列を取り出すときには、constをつけるようにした方がメモリ効率上良いようです。
int status = json_response["status"];
const char* message = json_response["message"];
ソースコード
以上をまとめたソースコードは以下になります。
# include <M5StickC.h>
# include <WiFi.h>
# include <WiFiMulti.h>
# include <HTTPClient.h>
# include <ArduinoJson.h>

const char *ssid = "【WiFiアクセスポイントのSSID】";
const char *password = "【WiFiアクセスポイントのパスワード】";

const int capacity = JSON_OBJECT_SIZE(2);
StaticJsonDocument<capacity> json_request;
char buffer[255];

const char *host = "【POST接続するエンドポイント】";

unsigned long counter = 0;
unsigned long tick = 0;

void setup() {
  M5.begin();

  M5.Axp.ScreenBreath(9);
  M5.Lcd.setRotation(3);
  M5.Lcd.fillScreen(BLACK);
  M5.Lcd.setTextSize(2);

  M5.Lcd.println("[M5StickC]");
  delay(1000);

  M5.Lcd.println("start Serial");
  Serial.begin(9600);
  while (!Serial);
  delay(100);

  M5.Lcd.println("start WiFi");
  Serial.print("start Wifi");
  WiFi.begin(ssid, password);
  while (WiFi.status() != WL_CONNECTED) {
    Serial.print(".");
    delay(100);
  }
  Serial.println("");
  M5.Lcd.println("Connected");
}

void loop() {
  counter++;
  tick = millis();

  json_request["counter"] = counter;
  json_request["tick"] = tick;

  serializeJson(json_request, Serial);
  Serial.println("");

  serializeJson(json_request, buffer, sizeof(buffer));

  HTTPClient http;
  http.begin(host);
  http.addHeader("Content-Type", "application/json");
  int status_code = http.POST((uint8_t*)buffer, strlen(buffer));
  Serial.printf("status_code=%d\r\n", status_code);
  if( status_code == 200 ){
    Stream* resp = http.getStreamPtr();

    DynamicJsonDocument json_response(255);
    deserializeJson(json_response, *resp);

    serializeJson(json_response, Serial);
    Serial.println("");
  }
  http.end();

  delay(5000);
}
以下の部分は、各自の環境に合わせて変更してください。
【WiFiアクセスポイントのSSID】
【WiFiアクセスポイントのパスワード】
【POST接続するエンドポイント】
(参考)サンプルアプリ
ちょうど手元に、GroveのBME680があったので、つないでみました。
Grove - Temperature Humidity Pressure Gas Sensor(BME680)
http://wiki.seeedstudio.com/Grove-Temperature_Humidity_Pressure_Gas_Sensor_BME680/
また、せっかくなので、Ambientを使わせていただいて、可視化してみました。
Ambient
https://ambidata.io/
Arduino IDEに以下をインストールしておいて下さい。
https://github.com/AmbientDataInc/Ambient_ESP8266_lib
https://github.com/Seeed-Studio/Seeed_BME680
ソースコードは以下の通りです。
# include <M5StickC.h>
# include <WiFi.h>
# include <WiFiMulti.h>
# include <WiFiUdp.h>
# include <NTPClient.h>

# define BME6800

# ifdef BME6800

# include "seeed_bme680.h"

# include "Ambient.h"

WiFiClient client;
Ambient ambient;
unsigned int channelId = 【AmbientのチャネルID】;
const char* writeKey = "【Ambientのライトキー】";

# define BME_SCK 13
# define BME_MISO 12
# define BME_MOSI 11
# define BME_CS 10

# define IIC_ADDR  uint8_t(0x76)

/**  NOTE!!!!!!!!!!!!  Select the communication protocol correctly **/

Seeed_BME680 bme680(IIC_ADDR); /* IIC PROTOCOL */
//Seeed_BME680 bme680;             /* SPI PROTOCOL */
//Seeed_BME680 bme680(BME_CS, BME_MOSI, BME_MISO,  BME_SCK);/*SPI PROTOCOL*/

# define MAX_COUNT_ENV   5

# endif

const char *ssid = "【WiFiアクセスポイントのSSID】";
const char *password = "【WiFiアクセスポイントのパスワード】";

bool ntp_updated = false;
WiFiUDP ntpUDP;
NTPClient timeClient(ntpUDP, 9 * 60 * 60);

# define TIME_INTARVAL   1000
unsigned long next_time = TIME_INTARVAL;
unsigned long prev_time = 0;

# define MAX_COUNT_VBAT   10
unsigned long count = 0;
# define CHECK_COUNT(c,m)  (c != 0 && count < (m))

enum{
  MODE_GYRO = 0,
# ifdef BME6800
  MODE_ENV,
# endif
  MODE_VBAT,
  MODE_TIME,

  NUM_OF_MODE
};
unsigned char mode = MODE_GYRO;

void setup() {
  M5.begin();
  M5.IMU.Init();

  M5.Axp.ScreenBreath(9);
  M5.Lcd.setRotation(3);
  M5.Lcd.fillScreen(BLACK);
  M5.Lcd.setTextSize(2);

  M5.Lcd.println("[M5StickC]");
  delay(1000);

  M5.Lcd.println("start Serial");
  Serial.begin(9600);
  while (!Serial);
  delay(100);

  M5.Lcd.println("start WiFi");
  Serial.print("start Wifi");
  WiFi.begin(ssid, password);
  while (WiFi.status() != WL_CONNECTED) {
    Serial.print(".");
    delay(100);
  }
  Serial.println("");

  timeClient.begin();

# ifdef BME6800
  M5.Lcd.println("start BME680");
  while (!bme680.init()){
    Serial.println("bme680 init failed ! can't find device!");
    delay(10000);
  }

  ambient.begin(channelId, writeKey, &client);
# endif
}

void loop() {
  M5.update();

  if( !ntp_updated ){
    Serial.println("NTP updating");
    ntp_updated = timeClient.update();
    if( ntp_updated ){
      Serial.println("NTP updated");
    }
  }

  if( M5.BtnA.wasReleased() ){
    mode = (mode + 1) % NUM_OF_MODE;
    count = 0;
  }

  if( count > 0 ){
    unsigned long now = millis();
    if( ( ( next_time > prev_time ) && ( prev_time < now && now <= next_time ) ) ||
        ( ( next_time < prev_time ) && ( prev_time < now || now <= next_time ) ) )
      return;

    prev_time = next_time;
    next_time += TIME_INTARVAL;

    count++;
  }

  if( mode == MODE_GYRO ){
    int16_t accX, accY, accZ;
    int16_t gyroX, gyroY, gyroZ;
    M5.IMU.getGyroAdc(&gyroX, &gyroY, &gyroZ);
    M5.IMU.getAccelAdc(&accX, &accY, &accZ);

    M5.Lcd.fillScreen(BLACK);
    M5.Lcd.setCursor(0, 0);
    M5.Lcd.setTextSize(1);

    M5.Lcd.printf("gyrX: %.2f\n", ((float)gyroX) * M5.IMU.gRes);
    M5.Lcd.printf("gyrY: %.2f\n", ((float)gyroY) * M5.IMU.gRes);
    M5.Lcd.printf("gyrZ: %.2f\n", ((float)gyroZ) * M5.IMU.gRes);
    M5.Lcd.printf("accX: %.2f\n", ((float)accX) * M5.IMU.gRes);
    M5.Lcd.printf("accY: %.2f\n", ((float)accY) * M5.IMU.gRes);
    M5.Lcd.printf("accZ: %.2f\n", ((float)accZ) * M5.IMU.gRes);
  }else
# ifdef BME6800
  if( mode == MODE_ENV ){
    if(CHECK_COUNT(count, MAX_COUNT_ENV))
      return;

    if (bme680.read_sensor_data()){
      Serial.println("Failed to perform reading :(");
      return;
    }

    float tmp, hum, pres, gas;

    tmp = bme680.sensor_result_value.temperature;
    hum = bme680.sensor_result_value.humidity;
    pres = bme680.sensor_result_value.pressure / 100.0;
    gas = bme680.sensor_result_value.gas / 1000.0;

    Serial.printf("tmp: %2.1fC\r\n", tmp);
    Serial.printf("hum: %2.1f%%\r\n", hum);
    Serial.printf("prs: %3.0fhPa\r\n", pres);
    Serial.printf("gas: %2.0fKohm\r\n", gas);
    Serial.println("");

    M5.Lcd.fillScreen(BLACK);
    M5.Lcd.setCursor(0, 0);
    M5.Lcd.setTextSize(2);
    M5.Lcd.printf("tmp: %2.1fC\n", tmp);
    M5.Lcd.printf("hum: %2.1f%%\n", hum);
    M5.Lcd.printf("prs: %3.0fhPa\n", pres);
    M5.Lcd.printf("gas: %2.0fKohm\n", gas);

    ambient.set(1, String(tmp).c_str());
    ambient.set(2, String(hum).c_str());
    ambient.set(3, String(pres).c_str());
    ambient.set(4, String(gas).c_str());
    ambient.send();
  }else
# endif
  if( mode == MODE_VBAT ){
    if(CHECK_COUNT(count, MAX_COUNT_VBAT))
      return;

    M5.Lcd.fillScreen(BLACK);
    M5.Lcd.setCursor(0, 0);

    double vbat = M5.Axp.GetVbatData() * 1.1 / 1000;
    M5.Lcd.setTextSize(3);
    M5.Lcd.printf("v_bat:\r\n%4.2f", vbat);
  }else if( mode == MODE_TIME ){
    String time_str = timeClient.getFormattedTime();

    M5.Lcd.fillScreen(BLACK);
    M5.Lcd.setCursor(0, 0);
    M5.Lcd.setTextSize(3);

    M5.Lcd.println(time_str);
  }

  count = 1;
}
以下の部分は、各自の環境に合わせて変更してください。
【WiFiアクセスポイントのSSID】
【WiFiアクセスポイントのパスワード】
【POST接続するエンドポイント】
【AmbientのチャネルID】
【Ambientのライトキー】
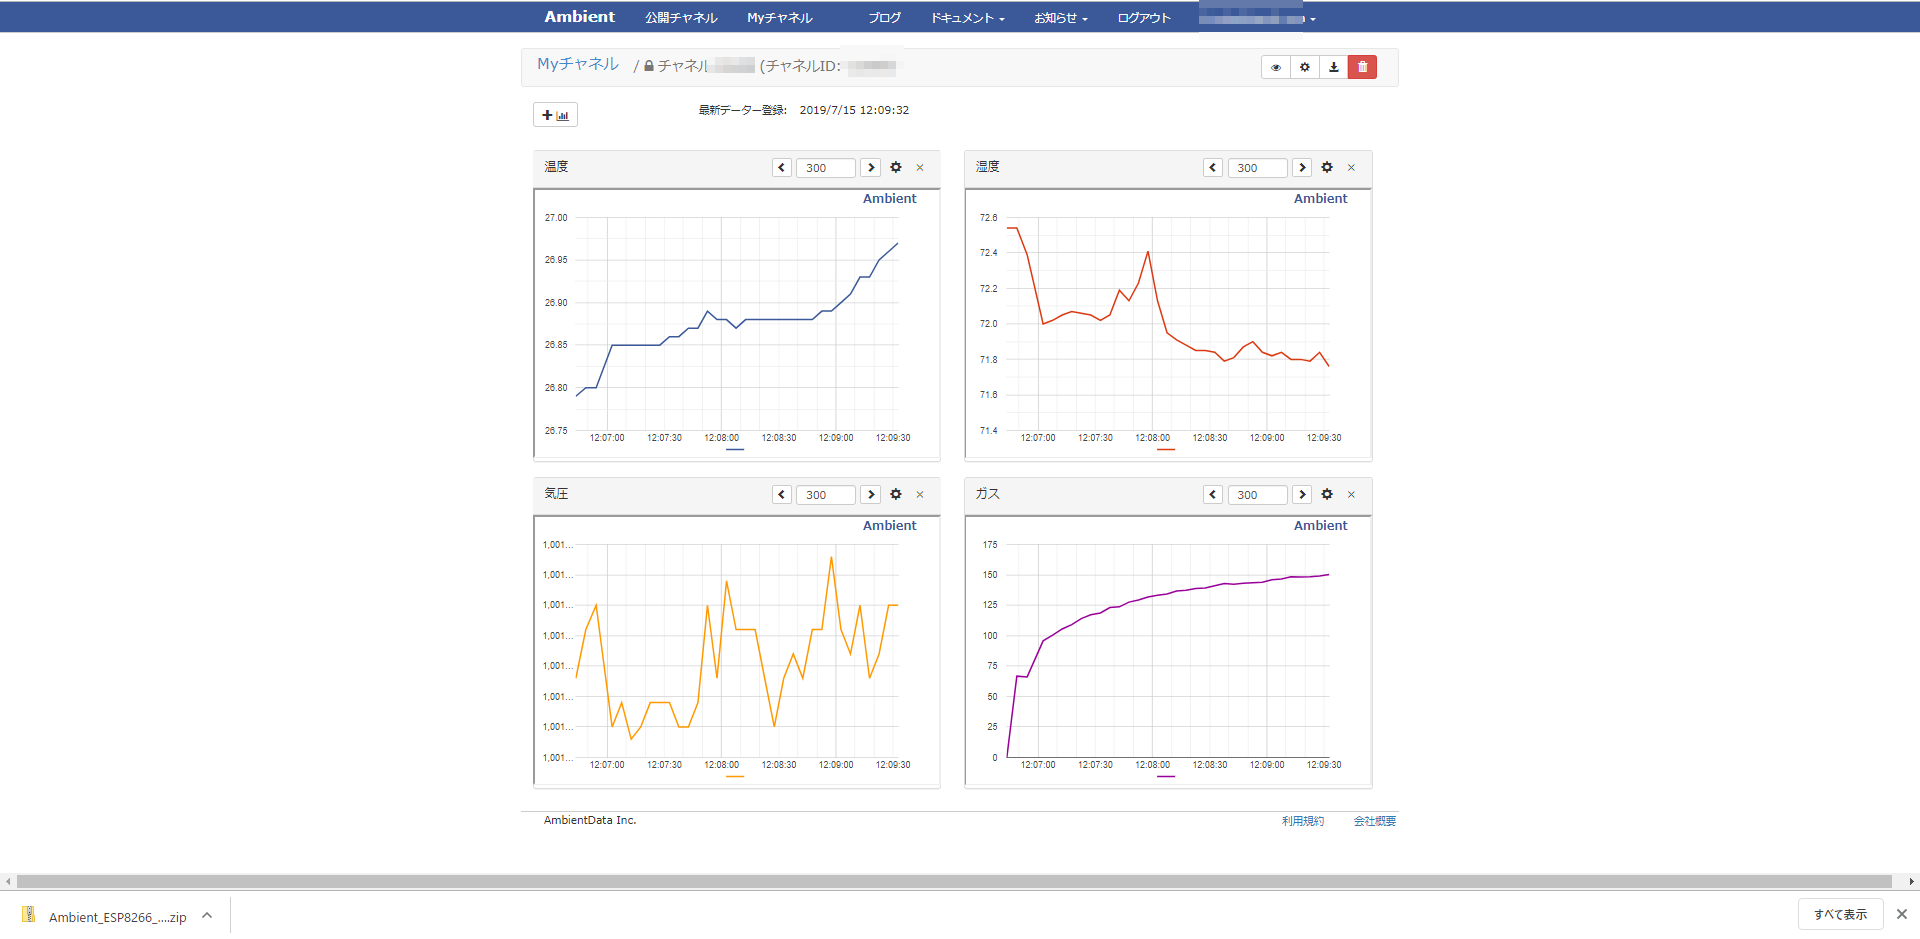
5秒ごとに、AmbientにBME680から取得した環境情報を上げています。
Ambientのページを見てみると、こんな感じで可視化されました。
以上