Obnizでラジコンを作ってみました。
いろいろ参考となる記事がたくさんあったので、自分でもできるかもしれないと思って、がんばって挑戦してみました。
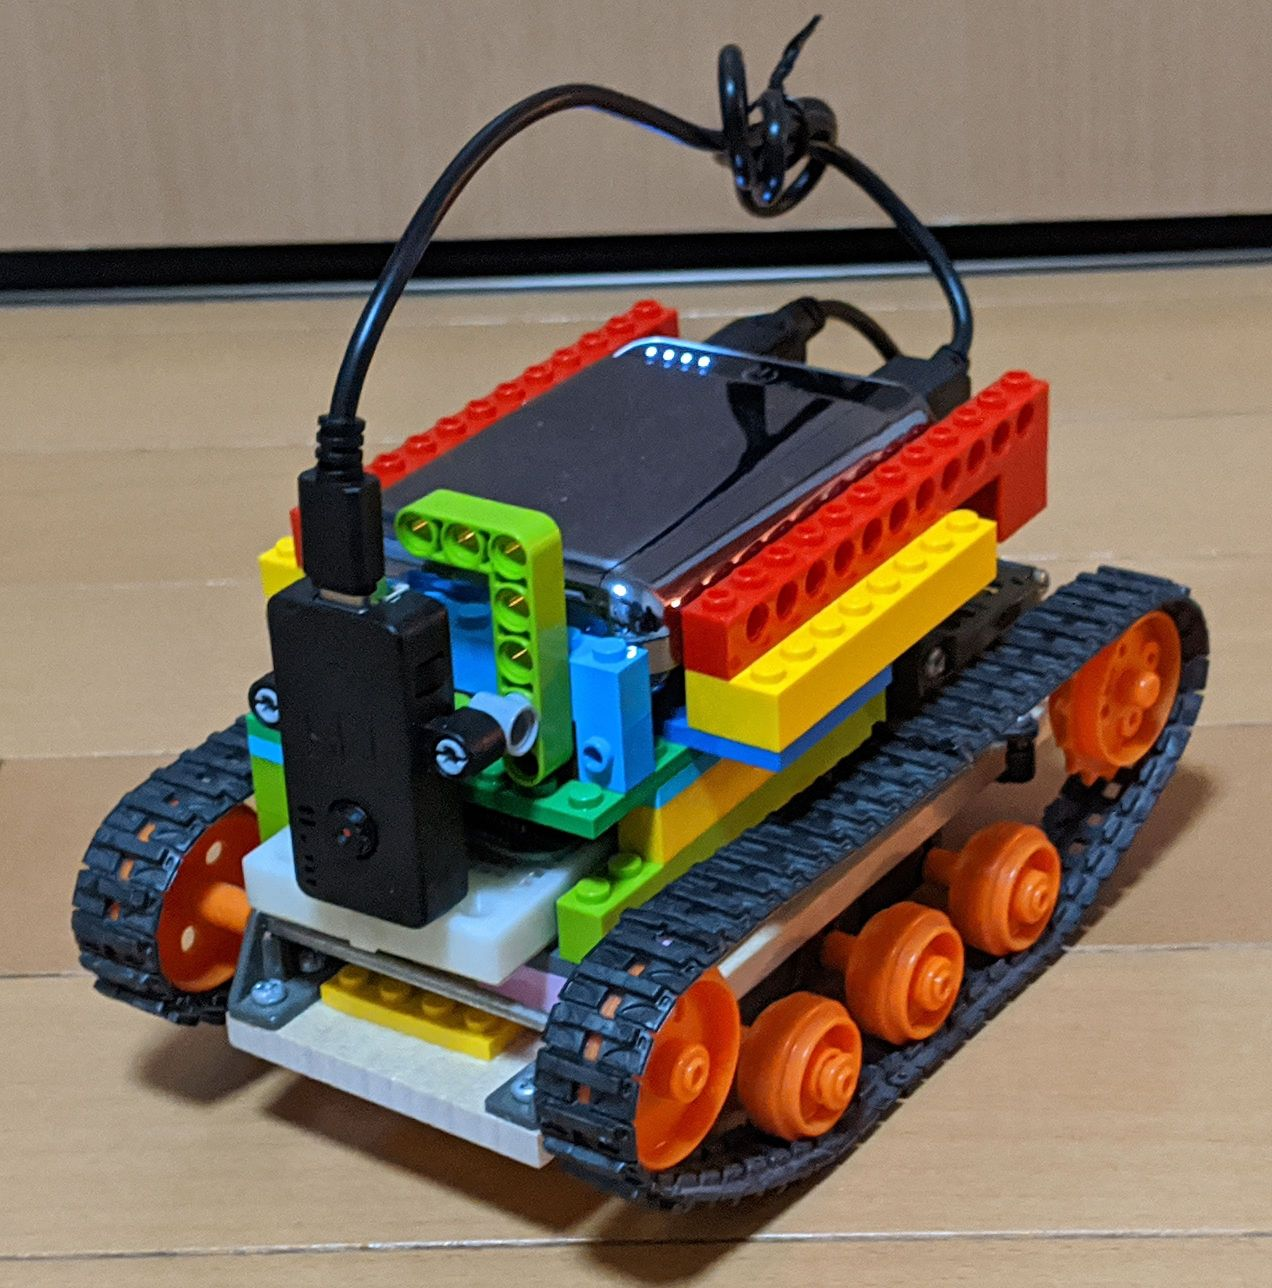
できたのがこれですっ!
そう、戦車です。
コントローラは、スマホを使います。なぜならば、マルチタッチ対応だからです。
(マルチタッチ非対応のPCから操作する場合は こちら をご参照ください。)
戦車は、右側のキャタピラと左側のキャタピラの両方を制御することで、左右に曲がることができるんです。
毎度の通り、GitHubに上げておきました。
https://github.com/poruruba/obniz_motor
以下からもページを参照できます。(Obnizにつながないと使えないですが)。
https://poruruba.github.io/obniz_motor/
※M5Cameraがhttp接続なので、https上にある上記ページからは解像度の変更ができないようです。
(続編もどうぞ)
戦車ラジコン:QRコードを倒す
戦車ラジコン:ブラウザ+GamePadで動かす
戦車ラジコン:QRコードに画像貼り付け
戦車ラジコン:大砲の照準を作る
使う部品
タミヤ:ダブルギヤボックス(左右独立4速タイプ)
https://www.tamiya.com/japan/products/70168/index.html
タミヤ:トラック&ホイールセット
https://tamiya.com/japan/products/70100/index.html
タミヤ:ユニバーサルプレートセット
https://tamiya.com/japan/products/70098/index.html
Obniz BoardまたはObniz Board 1Y
https://obniz.io/ja/doc/obniz_board_1y/hw_overview
ESP32のObnizOSでもできなくはないですが、Obnizほど電流容量は無いので無理です。間にモータ制御チップを介在させる必要があります。
Obnizのファームウェアは最新に上げておきましょう。
なるべく小さなモバイルバッテリー
1ポートでよいのですが、2ポートあれば、ObnizとM5Cameraの両方に給電できます。
USBケーブル
モバイルバッテリーとObnizやM5Cameraを接続します。
トラック&ホイールセットとユニバーサルプレートセットを別々に買うのではなく、以下でもよいです。
ただし、付属のモータは使いません。私はこちらを使いました。
タミヤ:タンク工作基本セット
https://www.tamiya.com/japan/products/70108/index.html
以下は、もしあれば。
M5Camera
必須ではないですが、戦車に乗っけることで、スマホからM5Cameraでの撮影画像を見ながら戦車をコントロールするができます。
https://www.switch-science.com/catalog/5207/
なるべく小さなブレッドボード
モータから直接Obnizに接続してもよいですし、ブレッドボードを間に挟むと配線の取り回しが楽になります。
例:https://www.yodobashi.com/product/100000001003914672/?gad1=&gad2=g&gad3=&gad4=56278881131&gad5=14692682459493758266&gad6=1o12&gclid=CjwKCAiA66_xBRBhEiwAhrMuLQsNvccSwFoVrlGymIlQejwZaBhlqjL5WYVoImEpNxsjFP2WWzQbrxoCds8QAvD_BwE&xfr=pla
レゴ
https://www.lego.com/ja-jp
キャタピラ台の上はごちゃごちゃしますので、レゴブロックで整理したり固定したりします。
組み立て
以下の順番で組み上げていきます。
-
ダブルギアボックスを組み立てる。
マニュアルを見ながらやります。半田・はんだごてと、プラスドライバが必要です。モータに配線を付ける際にはんだを使います。
ギア比は今回は、114.7:1にしました。 -
キャタピラを組み立てる
トラック&ホイールセットとユニバーサルプレートセット、またはタンク工作基本セットで、キャタピラを組み立てます。 -
キャタピラ台にモータを固定します。
-
Obnizにモータを配線します。
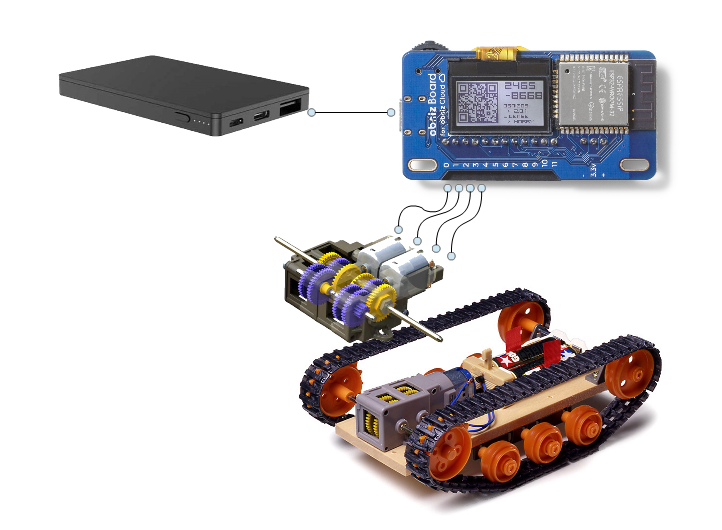
Obnizをキャタピラ台に配置し、モータから出ている配線をObnizに接続します。配線は以下の通りにしました。
IO0:右側モータのマイナス
IO1:右側モータのプラス
IO2:左側モータのマイナス
IO3:左側モータのプラス
右側か左側かは、動かしてからでないとわからないと思うのでその時直しましょう。 -
Obnizにモバイルバッテリを接続します。
キャタピラ台にモバイルバッテリを配置し、USBケーブルでモバイルバッテリとObnizを接続して給電します。
(補足)
・ギアボックスの組み立ては結構細かい作業が必要だったりします。イライラしないようにしましょう。
・私はタンク工作基本セットを使ったのですが、キャタピラ台に相当する部分が木なので、穴をあけたり、モータの幅に合わせるために多少切れ込みを入れる作業が必要でした。
結局、以下の感じでつながります。
操作画面
操作には、スマホのブラウザを使います。あらかじめObnizのidを覚えておきます。
あとで、ソースコードを示します。
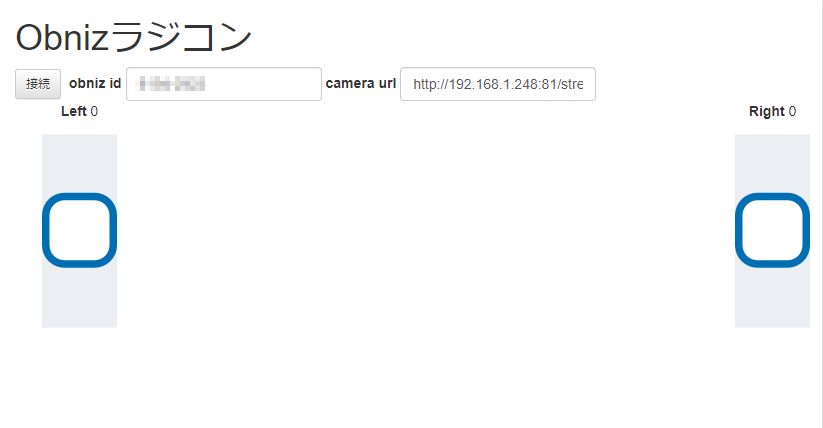
【Obniz接続前】
obniz idを入力して、「接続」ボタンを押下すると、Obnizとの接続を試行します。
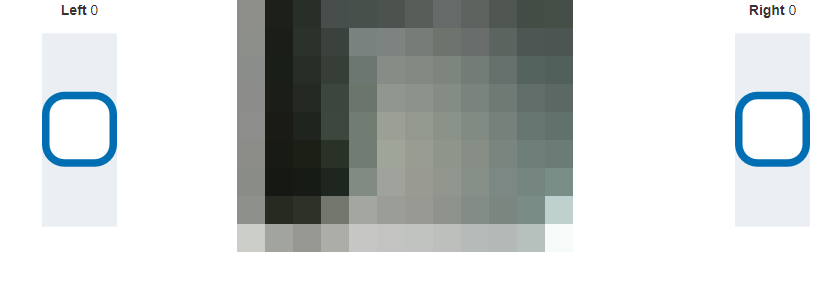
【Obniz接続後】(M5Camera画像にはモザイクをかけています)
あとは、左右のスライダーを前後に動かすことで戦車を動かします。
両方のスライダを上に動かすことで前進し、両方下に動かすと後退します。
左側のスライダが右側のスライダより上であれば右に曲がり、右側のスライダが左側のスライダより上であれば左に曲がります。
キャタピラなので、結構いろんな障害物でも走破できます。やりすぎると横転しますが。。。
ソースコード
まずはJavascriptから。
'use strict';

//var vConsole = new VConsole();

let obniz;
var motor_right;
var motor_left;
var power_left_sign;
var power_right_sign;

const COOKIE_EXPIRE = 365;
const POWER_MARGIN = 10;
const POWER_MAX = 30;

var vue_options = {
    el: "#top",
    data: {
        progress_title: '',

        obniz_id: '',
        obniz_connected: false,
        power_left: 0,
        power_right: 0,
        power_max: POWER_MAX + POWER_MARGIN,
        power_min: -(POWER_MAX + POWER_MARGIN),
        camera_url: 'http://192.168.1.248:81/stream',
    },
    computed: {
    },
    methods: {
        obniz_connect: function(){
            obniz = new Obniz(this.obniz_id);
            this.progress_open('接続試行中です。', true);

            obniz.onconnect = async () => {
                this.progress_close();
                Cookies.set('obniz_id', this.obniz_id, { expires: COOKIE_EXPIRE });
                this.obniz_connected = true;

                motor_left = obniz.wired("DCMotor", {forward:0, back:1});
                motor_right = obniz.wired("DCMotor", {forward:2, back:3});

                this.motor_reset();
            }
        },
        motor_reset: function(){
            if( this.obniz_connected ){
                motor_right.power(0);
                motor_right.move(true);
                motor_left.power(0);
                motor_left.move(true);
            }

            power_right_sign = 0;
            this.power_right = 0;
            power_left_sign = 0;
            this.power_left = 0;
        },
        motor_change_right: function(){
            if( !this.obniz_connected ){
                this.power_right = 0;
                return;
            }

            var sign = Math.sign(this.power_right);
            var power = Math.abs(this.power_right);
            if( power <= POWER_MARGIN )
                power = 0;
            else
                power -= POWER_MARGIN;

            motor_right.power(power);
            if( sign != power_right_sign ){
                motor_right.move(sign >= 0);
                power_right_sign = sign;
            }
        },
        motor_change_left: function(){
            if( !this.obniz_connected ){
                this.power_left = 0;
                return;
            }

            var sign = Math.sign(this.power_left);
            var power = Math.abs(this.power_left);
            if( power <= POWER_MARGIN )
                power = 0;
            else
                power -= POWER_MARGIN;

            motor_left.power(power);
            if( sign != power_left_sign ){
                motor_left.move(sign >= 0);
                power_left_sign = sign;
            }
        },
        motor_end_right: function(){
            if( !this.obniz_connected ){
                this.power_right = 0;
                return;
            }

            motor_right.power(0);
            motor_right.move(true);
            power_right_sign = 0;
            this.power_right = 0;
        },
        motor_end_left: function(){
            if( !this.obniz_connected ){
                this.power_left = 0;
                return;
            }
            motor_left.power(0);
            motor_left.move(true);
            power_left_sign = 0;
            this.power_left = 0;
        },
    },
    created: function(){
    },
    mounted: function(){
        proc_load();

        this.obniz_id = Cookies.get('obniz_id');
    }
};
vue_add_methods(vue_options, methods_utils);
var vue = new Vue( vue_options );
DCMotorというパーツライブラリを使わせていただきました。
DCMotor
https://obniz.io/ja/sdk/parts/DCMotor/README.md
接続するポート番号を変える場合は以下の部分を変更してください。
        motor_left = obniz.wired("DCMotor", {forward:0, back:1});
        motor_right = obniz.wired("DCMotor", {forward:2, back:3});
以下の部分は、お好みで変更してください。動かしだすまでに少しマージン(遊び)を入れています。また、マックスパワーの100にしてもよいのですが、すんごい早くて戦車を操作しにくかったので、30に抑えています。
const POWER_MARGIN = 10;
const POWER_MAX = 30;
HTMLです。
<!DOCTYPE html>
<html lang="ja">
<head>
<meta http-equiv="Content-Type" content="text/html; charset=UTF-8">
<meta http-equiv="Content-Security-Policy" content="default-src * data: gap: https://ssl.gstatic.com 'unsafe-eval' 'unsafe-inline'; style-src * 'unsafe-inline'; media-src *; img-src * data: content: blob:;">
<meta name="format-detection" content="telephone=no">
<meta name="msapplication-tap-highlight" content="no">
<meta name="apple-mobile-web-app-capable" content="yes" />
<meta name="viewport" content="user-scalable=no, initial-scale=1, maximum-scale=1, minimum-scale=1, width=device-width">
<!-- jQuery (necessary for Bootstrap's JavaScript plugins) -->
<script src="https://ajax.googleapis.com/ajax/libs/jquery/1.12.4/jquery.min.js"></script>
<!-- Latest compiled and minified CSS -->
<link rel="stylesheet" href="https://maxcdn.bootstrapcdn.com/bootstrap/3.3.7/css/bootstrap.min.css" integrity="sha384-BVYiiSIFeK1dGmJRAkycuHAHRg32OmUcww7on3RYdg4Va+PmSTsz/K68vbdEjh4u" crossorigin="anonymous">
<!-- Optional theme -->
<link rel="stylesheet" href="https://maxcdn.bootstrapcdn.com/bootstrap/3.3.7/css/bootstrap-theme.min.css" integrity="sha384-rHyoN1iRsVXV4nD0JutlnGaslCJuC7uwjduW9SVrLvRYooPp2bWYgmgJQIXwl/Sp" crossorigin="anonymous">
<!-- Latest compiled and minified JavaScript -->
<script src="https://maxcdn.bootstrapcdn.com/bootstrap/3.3.7/js/bootstrap.min.js" integrity="sha384-Tc5IQib027qvyjSMfHjOMaLkfuWVxZxUPnCJA7l2mCWNIpG9mGCD8wGNIcPD7Txa" crossorigin="anonymous"></script>
<title>Obnizラジコン</title>
<script src="js/methods_utils.js"></script>
<script src="js/vue_utils.js"></script>
<script src="dist/js/vconsole.min.js"></script>
<script src="https://cdn.jsdelivr.net/npm/js-cookie@2/src/js.cookie.min.js"></script>
<script src="https://cdn.jsdelivr.net/npm/vue/dist/vue.js"></script>
<script src="https://unpkg.com/obniz/obniz.js"></script>
<link rel="stylesheet" href="./css/index.css" />
</head>
<body>
<div id="top" class="container-fluid">
<div class="form-inline" v-if="!obniz_connected" >
<h1>Obnizラジコン</h1>
<button class="btn btn-default btn-sm" v-on:click="obniz_connect">接続</button>
<label>obniz id</label>
<input type="text" class="form-control" v-model="obniz_id">
<label>camera url</label>
<input type="text" class="form-control" v-model="camera_url">
</div>
<!--
<button class="btn btn-default btn-block" v-on:click="motor_reset">Stop</button>
-->
<div class="controller">
<div class="control" style="float: left;">
<center><label>Left</label> {{power_left}}</center>
<input id="motor_left" type="range" v-bind:min="power_min" v-bind:max="power_max" v-model.number="power_left" v-on:input="motor_change_left()" v-on:touchend="motor_end_left()"><br>
</div>
<div class="control" style="float: right;">
<center><label>Right</label> {{power_right}}</center>
<input id="motor_right" type="range" v-bind:min="power_min" v-bind:max="power_max" v-model.number="power_right" v-on:input="motor_change_right()" v-on:touchend="motor_end_right()"><br>
</div>
</div>
<img v-if="obniz_connected" v-bind:src="camera_url" style="margin:0 auto;" class="img-responsive">
<div class="modal fade" id="progress">
<div class="modal-dialog">
<div class="modal-content">
<div class="modal-header">
<h4 class="modal-title">{{progress_title}}</h4>
</div>
<div class="modal-body">
<center><progress max="100" /></center>
</div>
</div>
</div>
</div>
</div>
<script src="js/start.js"></script>
</body>
</html>
v-on:inputイベントで、スライダの位置の変化を即時モーターのパワーに同期しています。
v-on:touchendイベントで、スライダから指を話したら自動的にパワーを0にしています。(ちなみに、このイベントはタブレットやスマホなど、タッチに対応したブラウザしか対応していないはず)
CSSも使ってます。スライダの位置を調整しています。
.controller {
  position: absolute;
  width: 100%;
  margin: auto;
}

.controller input[type="range"] {
  transform: rotate(-90deg) scale(1.5);
  margin-top: 80px;
  background-color: rgb(235, 239, 244);
  -webkit-appearance: none;
}

.controller input[type="range"]::-webkit-slider-thumb {
  -webkit-appearance: none;
  height: 50px;
  width: 50px;
  background: rgb(255, 255, 255);
  border-radius: 15px;
  border: 5px solid rgb(0, 110, 179);
}
(参考) M5Cameraをつなげる
M5Cameraをつなげることで、より遠隔操作している感が出ます。
M5CameraはそのままではAPモードで動作しているので、STAモードで動作するようにします。
Obnizを操作するために、インターネット接続が必要であるためです。
Arduino IDEを使います。
こちらを参考にさせていただきました。
M5Cameraでスマホから操作できるWebカメラを作る(Windows10編)
プログラムを書き込んで起動するとWiFiアクセスポイントにSTAモードで接続しIPアドレスが割り当てられたかと思います。このIPアドレスを覚えておきます。
Obniz接続時に、camera urlに、「 http://IPアドレス:81/stream 」を指定すれば、Obnizに接続完了したときに、撮影動画が表示されるようにしています。
以上


