ESP32に赤外線送受信ユニットを繋げば、赤外線リモコンと同じ信号を送信したり受信したりすることができます。
さらに、Node-REDと連携させることで、Node-REDが持つたくさんの機能と連動させることができるようになります。
Node-REDとESP32との間の通信は、シンプルにUDPにしました。
また、Node-REDで扱いやすいように専用のカスタムノードも作成いたしました。
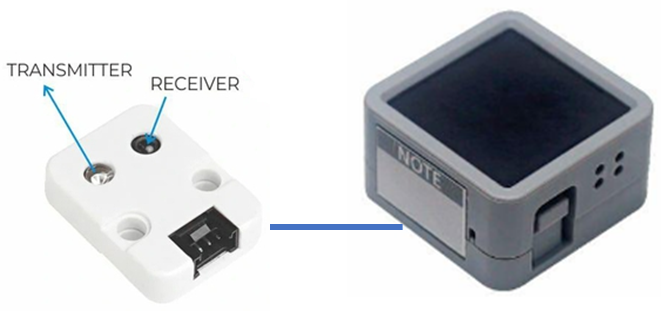
ESP32としてM5Atom Matricを採用しました。ボタン×1、Groveポート×1、RGB LED×25 がついています。Groveポートに、赤外線送受信ユニットを繋ぎます。M5Atom Matric本体にも赤外線送信LEDがついていますが、少々弱いので今回は使っていません。
ソースコードもろもろは以下のGitHubに上げておきました。
できること
Node-REDからみて、ESP32赤外線送受信ゲートウェイを使ってできることは以下の通りです。
・ESP32に任意の赤外線信号の送信を要求することができます。
・ESP32で受信した赤外線信号を受信することができます。
・ESP32でボタンが押下されたことを受信することができます。
・ESP32のRGB LEDにビットマップ表示を要求することができます。
ESP32で利用しているライブラリ
・m5stack/M5Atom@^0.0.9
M5Atom用のライブラリです。
・fastled/FastLED@^3.5.0
M5Atom用のライブラリを使うときに必要です。
・crankyoldgit/IRremoteESP8266@^2.8.2
ESP32で赤外線の送受信するために必要です。
・bblanchon/ArduinoJson@^6.19.4
UDPで送受信するデータをJSON形式にする際に必要です。
・adafruit/Adafruit NeoPixel@^1.10.5
M5Atom MatricにあるRGB LEDを制御するためのライブラリです。FastLEDライブラリもありますが、今回はこちらを使いました。お好みで。
WiFi接続
毎度の処理ですね。
#include <WiFi.h>

static long wifi_connect(const char *ssid, const char *password)
{
  Serial.println("");
  Serial.print("WiFi Connenting");

  if( ssid == NULL && password == NULL )
    WiFi.begin();
  else
    WiFi.begin(ssid, password);
  while (WiFi.status() != WL_CONNECTED){
    Serial.print(".");
    delay(500);
  }
  Serial.print("\nConnected : IP=");
  Serial.print(WiFi.localIP());
  Serial.print(" Mac=");
  Serial.println(WiFi.macAddress());

  return 0;
}
UDP送信
UDP送信部分の抜粋です。
WiFiの接続が完了している必要があります。
#include <WiFiUdp.h>
static WiFiUDP udp;

long udp_send(JsonDocument& json)
{
  int size = measureJson(json);
  char *p_buffer = (char*)malloc(size + 1);
  int len = serializeJson(json, p_buffer, size);
  p_buffer[len] = '\0';

  udp.beginPacket(UDP_HOST, UDP_SEND_PORT);
  udp.write((uint8_t*)p_buffer, len);
  udp.endPacket();

  free(p_buffer);

  return 0;
}
UDP送信先は以下のdefineで定義しています。
#define UDP_HOST  "【Node-RED稼働ホスト名またはIPアドレス】"
#define UDP_SEND_PORT 1401
送信するデータは、JSON形式として扱うため、ArduinoJsonの関数を使っています。
UDP受信
UDP受信部分の抜粋です。
#include <WiFiUdp.h>

#define UDP_RECV_PORT 1402
static WiFiUDP udp;

void setup() {
・・・
  udp.begin(UDP_RECV_PORT);
・・・

void loop() {
  int packetSize = udp.parsePacket();
  if( packetSize > 0 ){
    process_udp_receive(packetSize);
  }
赤外線受信
赤外線受信部分の抜粋です。
#include <IRrecv.h>
#include <IRremoteESP8266.h>
#include <IRutils.h>

#define IR_RECV_PORT 32

static IRrecv irrecv(IR_RECV_PORT);
static decode_results results;

void setup() {
・・・
  irrecv.enableIRIn();
・・・

void loop() {

  if (irrecv.decode(&results)) {
    process_ir_receive();
    irrecv.resume();
  }
赤外線送信
赤外線送信部分の抜粋です。
#include <IRsend.h>
#include <IRremoteESP8266.h>

#define IR_SEND_PORT 26

static IRsend irsend(IR_SEND_PORT);

void setup() {
・・・
  irsend.begin();
・・・
送信はいくつかのやり方がありますが、今回採用したNEC形式は以下の方法があります。
      irsend.sendNEC(value);

//または

      uint32_t value = irsend.encodeNEC(address, command);
      irsend.sendNEC(value);
RGB LED点灯
RGB LED点灯部分の抜粋です。
#include <Adafruit_NeoPixel.h>

#define NUM_OF_PIXELS 25
#define PIXELS_PORT 27

static Adafruit_NeoPixel pixels = Adafruit_NeoPixel(NUM_OF_PIXELS, PIXELS_PORT, NEO_GRB + NEO_KHZ800);

void setup() {
・・・
  pixels.begin();
  pixels.clear();
  pixels.show();
・・・

void loop(){
    for( int i = 0 ; i < NUM_OF_PIXELS ; i++ ){
      if( (p_bitmap[i / 8] >> (7 - (i % 8))) & 0x01 )
        pixels.setPixelColor(i, fore_color);
      else
        pixels.setPixelColor(i, back_color);
    }
    pixels.show();
ボタン押下
ボタン押下検知部分の抜粋です。
#include <M5Atom.h>

void setup() {
  M5.begin(true, true, false);
・・・

void loop() {
  M5.update();

  if( M5.Btn.wasPressed() ){
    process_button(0);
  }
ESP32側ソースコード
最終的なESP32側ソースコードは以下の感じになります。
#include <Arduino.h>
#include <M5Atom.h>

#include <IRsend.h>
#include <IRrecv.h>
#include <IRremoteESP8266.h>
#include <IRutils.h>

#include <WiFi.h>
#include <WiFiUdp.h>

#include <ArduinoJson.h>

#include <Adafruit_NeoPixel.h>

#define WIFI_SSID "【WiFiアクセスポイントのSSID 】"
#define WIFI_PASSWORD "【WiFIアクセスポイントのパスワード】"

#define UDP_HOST  "【Node-RED稼働ホスト名またはIPアドレス】"
#define UDP_SEND_PORT 1401
#define UDP_RECV_PORT 1402

#define IR_SEND_PORT 26
#define IR_RECV_PORT 32

#define NUM_OF_PIXELS 25
#define PIXELS_PORT 27

#define JSON_CAPACITY 512

static StaticJsonDocument<JSON_CAPACITY> jsonDoc;
static IRsend irsend(IR_SEND_PORT);
static IRrecv irrecv(IR_RECV_PORT);
static decode_results results;
static WiFiUDP udp;
static Adafruit_NeoPixel pixels = Adafruit_NeoPixel(NUM_OF_PIXELS, PIXELS_PORT, NEO_GRB + NEO_KHZ800);

static long wifi_connect(const char *ssid, const char *password);
static long process_ir_receive(void);
static long process_udp_receive(int packetSize);
static long process_button(uint8_t index);
uint8_t *parsehex(const char *p_message, uint32_t *p_len);

long udp_send(JsonDocument& json)
{
  int size = measureJson(json);
  char *p_buffer = (char*)malloc(size + 1);
  int len = serializeJson(json, p_buffer, size);
  p_buffer[len] = '\0';

  udp.beginPacket(UDP_HOST, UDP_SEND_PORT);
  udp.write((uint8_t*)p_buffer, len);
  udp.endPacket();

  free(p_buffer);

  return 0;
}

void setup() {
  // put your setup code here, to run once:
  M5.begin(true, true, false);

  irsend.begin();
  irrecv.enableIRIn();

  pixels.begin();
  pixels.clear();
  pixels.show();

  wifi_connect(WIFI_SSID, WIFI_PASSWORD);

  udp.begin(UDP_RECV_PORT);
}

void loop() {
  // put your main code here, to run repeatedly:

  M5.update();

  if (irrecv.decode(&results)) {
    process_ir_receive();
    irrecv.resume();
  }

  int packetSize = udp.parsePacket();
  if( packetSize > 0 ){
    process_udp_receive(packetSize);
  }

  if( M5.Btn.wasPressed() ){
    process_button(0);
  }
}

static long process_ir_receive(void)
{
  Serial.println("process_ir_receive");

  if(results.overflow){
    Serial.println("Overflow");
    return -1;
  }
  if( results.decode_type != decode_type_t::NEC || results.repeat ){
    Serial.println("not supported");
    return -1;
  }

  Serial.print(resultToHumanReadableBasic(&results));
  Serial.printf("address=%d, command=%d\n", results.address, results.command);

  jsonDoc.clear();
  jsonDoc["type"] = "ir_recv";
  jsonDoc["address"] = results.address;
  jsonDoc["command"] = results.command;
  jsonDoc["value"] = results.value;

  udp_send(jsonDoc);

  return 0;
}

static long process_udp_receive(int packetSize)
{
  Serial.println("process_udp_receive");

  char *p_buffer = (char*)malloc(packetSize + 1);
  if( p_buffer == NULL )
    return -1;

  int len = udp.read(p_buffer, packetSize);
  if( len <= 0 ){
    free(p_buffer);
    return -1;
  }
  p_buffer[len] = '\0';

  DeserializationError err = deserializeJson(jsonDoc, p_buffer);
  if (err) {
    Serial.print(F("deserializeJson() failed with code "));
    Serial.println(err.f_str());

    free(p_buffer);
    return -1;
  }

  const char *p_type = jsonDoc["type"];
  Serial.printf("type=%s\n", p_type);
  if( strcmp(p_type, "ir_send") == 0 ){
    if( jsonDoc.containsKey("value") ){
      uint32_t value = jsonDoc["value"];
      irsend.sendNEC(value);
    }else{
      uint16_t address = jsonDoc["address"];
      uint16_t command = jsonDoc["command"];
      uint32_t value = irsend.encodeNEC(address, command);
      irsend.sendNEC(value);
    }
  }else
  if( strcmp(p_type, "pixels_draw") == 0 ){
    const char *p_hex = jsonDoc["bitmap"];
    uint32_t bitmap_len;
    uint8_t *p_bitmap = parsehex(p_hex, &bitmap_len);
    if( p_bitmap == NULL ){
      Serial.println("parsehex error");
      free(p_buffer);
      return -1;
    }
    if( bitmap_len < ((NUM_OF_PIXELS + 7) / 8)){
      Serial.println("bitmap error");
      free(p_buffer);
      return -1;
    }

    uint32_t fore_color = jsonDoc["fore_color"];
    uint32_t back_color = jsonDoc["back_color"] | 0x000000;

    for( int i = 0 ; i < NUM_OF_PIXELS ; i++ ){
      if( (p_bitmap[i / 8] >> (7 - (i % 8))) & 0x01 )
        pixels.setPixelColor(i, fore_color);
      else
        pixels.setPixelColor(i, back_color);
    }
    pixels.show();

    free(p_bitmap);
  }else
  if( strcmp(p_type, "pixels_clear") == 0 ){
    pixels.clear();
    pixels.show();
  }else{
    Serial.println("Not supported");
    free(p_buffer);
    return -1;
  }

  free(p_buffer);

  return 0;
}

static long process_button(uint8_t index)
{
  Serial.println("process_button");

  jsonDoc.clear();
  jsonDoc["type"] = "button_pressed";
  jsonDoc["index"] = index;

  udp_send(jsonDoc);

  return 0;
}

static long wifi_connect(const char *ssid, const char *password)
{
  Serial.println("");
  Serial.print("WiFi Connenting");

  if( ssid == NULL && password == NULL )
    WiFi.begin();
  else
    WiFi.begin(ssid, password);
  while (WiFi.status() != WL_CONNECTED){
    Serial.print(".");
    delay(500);
  }
  Serial.print("\nConnected : IP=");
  Serial.print(WiFi.localIP());
  Serial.print(" Mac=");
  Serial.println(WiFi.macAddress());

  return 0;
}

static uint8_t toB(char c)
{
  if( c >= '0' && c <= '9' )
    return c - '0';
  if( c >= 'a' && c <= 'f')
    return c - 'a' + 10;
  if( c >= 'A' && c <= 'F')
    return c - 'A' + 10;

  return 0;
}

uint8_t *parsehex(const char *p_message, uint32_t *p_len)
{
  int len = strlen(p_message);
  if( len % 2 )
    return NULL;
  uint8_t *p_buffer = (uint8_t*)malloc(len / 2);
  if( p_buffer == NULL )
    return NULL;

  for( int i = 0 ; i < len ; i += 2 ){
    p_buffer[i / 2] = toB(p_message[i]) << 4;
    p_buffer[i / 2] |= toB(p_message[i + 1]);
  }

  *p_len = len / 2;

  return p_buffer;
}
各自の環境に合わせて以下の部分を変更してください。
#define WIFI_SSID "【WiFiアクセスポイントのSSID 】"
#define WIFI_PASSWORD "【WiFIアクセスポイントのパスワード】"

#define UDP_HOST  "【Node-RED稼働ホスト名またはIPアドレス】"
#define UDP_SEND_PORT 1401
#define UDP_RECV_PORT 1402

#define IR_SEND_PORT 33
#define IR_RECV_PORT 32
Node-REDのカスタムノード
カスタムノードを登録すると以下のように3つのノードが登録されます。
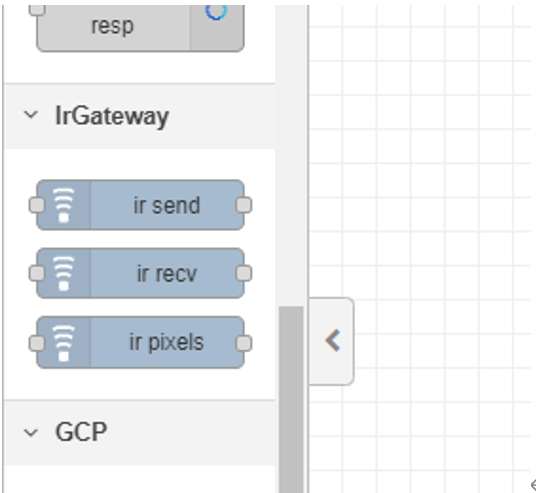
カスタムノードは、GitHubに上げてあるので、以下を実行することで、Node-REDに登録されます。
$ cd ~/.node-red
$ npm install https://github.com/poruruba/node-red-contrib-example-irgateway.git
複雑なノードではないので、説明は割愛します。GitHubから直接ご参照ください。
〇ir-send:赤外線送信ノード
赤外線データを送信します。
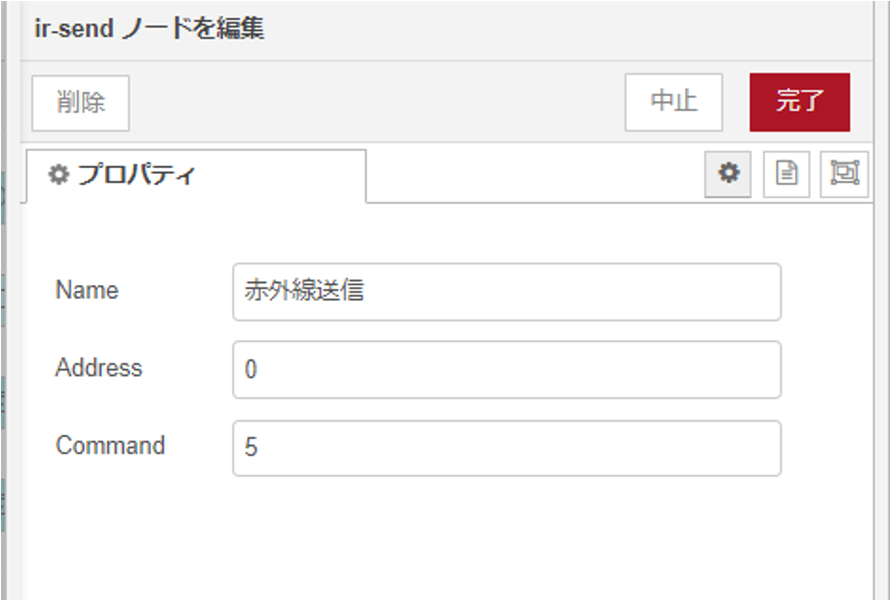
赤外線データのフォーマットにはいくつかの種類がありますが、今回はNEC形式を採用しています。addressとcommandの2つの数字で表現します。それぞれ16ビット長です。
ESP32にはUDPで送信する必要がありますが、UDP送信ノードに後続を繋いでください。

〇ir-recv:赤外線受信ノード
赤外線データを受信またはボタン押下イベントを受信します。
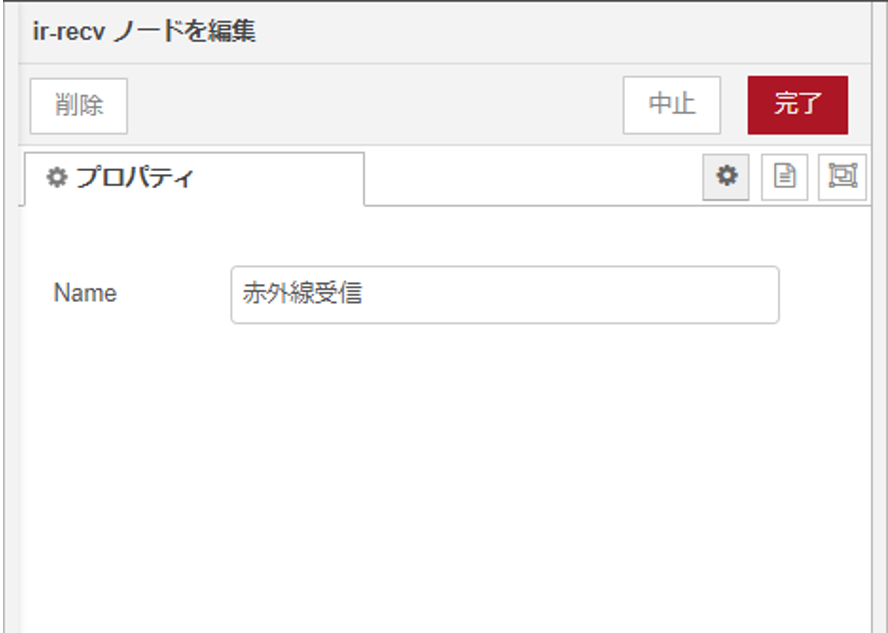
ESP32からのUDPを待ち受けますが、既存のUDP受信ノードを入り口につなぎます。

受信データは大きく2種類あります。
・ボタン押下イベント
・赤外線受信イベント
ESP32がボタン押下を検知したときには、以下のようなデータが下流に流れます。
topic: “button_pressed”,
payload: {
	type: “button_pressed”,
	index: 0
}
M5Atom Matricにはボタンが1つのみあり、indexは0です。
ESP32が赤外線を受信したときには、以下のようなデータが流れます。
topic: “ir_received”,
payload: {
	type: “ir_received”,
	address: 0,
	command: 7,
	value: 16769055
}
addressとcommandが受信した赤外線コードです。valueはそれの32ビット表現です。
〇ir-pixels:RGB LED点灯ノード
RGB LEDをビットマスク値で点灯します。

プロパティで、点灯させたいマトリクスの場所を指定します。ForeColorが点灯させる場所の色、BackColorが点灯させない場所の色を指定します。
赤外線送信ノードと同様に、UDP送信ノードを下流に接続します。

参考
Node-REDでQiitaのLGTM数を取得するノードを作成
以上