- 環境
- 接続元 : Windows10
- 踏み台 : AWS上のLinux
- 接続先 : AWS上のRed Hat Enterprise Linux Server release 5.11
- Putty 0.70
踏み台を設定する
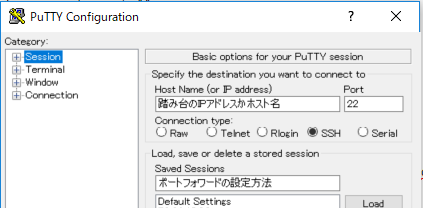
-

- [Connection type]に「SSH」を選択する
- [Port]には「22」を入力する
- [Host Name]に踏み台のIPアドレスかホスト名を入力する
-

- サイドメニューの[Connection] > [Data]を選択
- [Auto-login username]に踏み台のログインIDを入力する
-

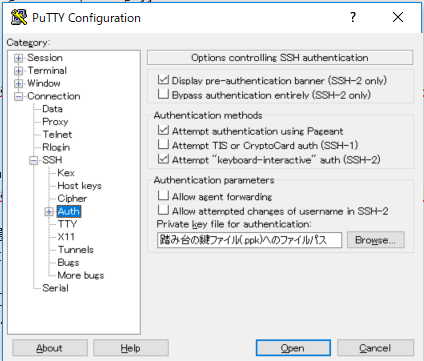
- サイドメニューの[Connection] > [SSH] > [Auth]を選択
- [Brows...]ボタンから踏み台のPutty用の鍵(.ppk)を選択する(.pemの場合はPuttygenで.ppkに変換する)
ポートフォワードを設定する
-

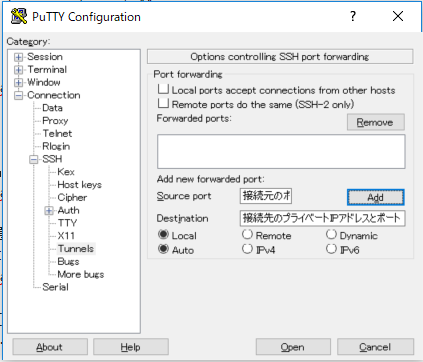
- サイドメニューの[Connection] > [SSH] > [Tunnel]を選択
- [Sour port]に接続元で使いたいポート(★)を入力する
- 詳細な説明は PuTTY を用いた SSH ポート転送の手順 参照
- [Destination]に接続先のプライベートIPアドレスとポートを入力する
- EC2インスタンスのプライベートIPアドレスはインスタンスの一覧でインスタンスを選択すると画面下部の[説明]タブの[プライベート IP]に表示されている
- [Add]ボタンで[Forwarded ports:]に追加する
設定を保存する
- サイドメニューの[Session]を選択
- [Saved Sessions]にわかる名前を入力する
- [Save]ボタンで保存する
接続する
- [Open]ボタンで接続する
- ブラウザでhttp://localhost:{[Sour port]に入力したポート(★)}で接続する