
前提
- Ubuntu ベースの Linux Mint を使っています
- ESP-IDF Installation Manager (EIM) はインストール済みとします
ESP-IDF v5.5.5 をインストールする
$ which eim
/usr/bin/eim
$ eim --version
eim 0.17.3
$ eim install -i v5.5.5
2026-08-03 14:35:59 -  2 - 08 - INFO - ESP-IDF JSON file already exists at: "/home/pojiro/.espressif/tools/eim_idf.json"
2026-08-03 14:36:00 -  2 - 08 - INFO - All prerequisites are satisfied!
...
2026-08-03 14:37:50 -  2 - 08 - INFO - Found git: /usr/bin/git
You have successfully installed ESP-IDF
for using the ESP-IDF tools inside the terminal, you will find activation scripts inside the base install folder
sourcing the activation script will setup environment in the current terminal session
============================================
to activate the environment, run the following command in your terminal:
       source "/home/pojiro/.espressif/tools/activate_idf_v5.5.5.sh"
============================================
2026-08-03 14:37:50 -  2 - 08 - INFO - Wizard result: Ok
2026-08-03 14:37:50 -  2 - 08 - INFO - Successfully installed IDF
2026-08-03 14:37:50 -  2 - 08 - INFO - Now you can start using IDF tools
esptool を使う
事前準備
USB TypeC-TYPEC で Linux と CORE S3 をつなぎます。つなぐことで /dev/ttyACM0 が作成されます。
$ ls -la /dev/ttyACM0
crw-rw---- 1 root dialout 166, 0  8月  3 14:28 /dev/ttyACM0
dialout group のデバイスなので USER を dialout group に所属させておくと以降使いやすいです。
どのように所属させるかは本筋から離れるので書きません。
$ groups
pojiro adm dialout cdrom sudo dip plugdev users lpadmin sambashare wireshark docker kvm
esptool を使えるように以下を実行します。
$ source "/home/pojiro/.espressif/tools/activate_idf_v5.5.5.sh"
$ type esptool
esptool は関数です
esptool ()
{
    "/home/pojiro/.espressif/tools/python/v5.5.5/venv/bin/python" "/home/pojiro/.espressif/v5.5.5/esp-idf/components/esptool_py/esptool/esptool.py" "$@"
}
flash や chip について調べる
$ esptool --port /dev/ttyACM0 --baud 115200 flash_id
esptool.py v4.12.0
Serial port /dev/ttyACM0
Connecting...
Detecting chip type... ESP32-S3
Chip is ESP32-S3 (QFN56) (revision v0.2)
Features: WiFi, BLE
Crystal is 40MHz
USB mode: USB-Serial/JTAG
MAC: 48:27:e2:00:00:00
Uploading stub...
Running stub...
Stub running...
Manufacturer: 20
Device: 4018
Detected flash size: 16MB
Flash type set in eFuse: quad (4 data lines)
Flash voltage set by a strapping pin to 3.3V
Hard resetting via RTS pin...
48:27:e2 は Espressif Inc のベンダー ID のようです。
$ esptool --port /dev/ttyACM0 --baud 115200 chip_id
esptool.py v4.12.0
Serial port /dev/ttyACM0
Connecting...
Detecting chip type... ESP32-S3
Chip is ESP32-S3 (QFN56) (revision v0.2)
Features: WiFi, BLE
Crystal is 40MHz
USB mode: USB-Serial/JTAG
MAC: 48:27:e2:66:d1:10
Uploading stub...
Running stub...
Stub running...
Warning: ESP32-S3 has no Chip ID. Reading MAC instead.
MAC: 48:27:e2:00:00:00
Hard resetting via RTS pin…
flash をダンプする
115200 だと遅いので 921600 にしています。
esptool --port /dev/ttyACM0 --baud 921600 read_flash 0x000000 0x1000000 flash_dump.bin
esptool.py v4.12.0
Serial port /dev/ttyACM0
Connecting...
Detecting chip type... ESP32-S3
Chip is ESP32-S3 (QFN56) (revision v0.2)
Features: WiFi, BLE
Crystal is 40MHz
USB mode: USB-Serial/JTAG
MAC: 48:27:e2:66:d1:10
Uploading stub...
Running stub...
Stub running...
Changing baud rate to 921600
Changed.
Configuring flash size...
16777216 (100 %)
16777216 (100 %)
Read 16777216 bytes at 0x00000000 in 229.5 seconds (584.9 kbit/s)...
Hard resetting via RTS pin...
$ ls -lah flash_dump.bin
-rw-rw-r-- 1 pojiro pojiro 16M  8月  3 14:28 flash_dump.bin
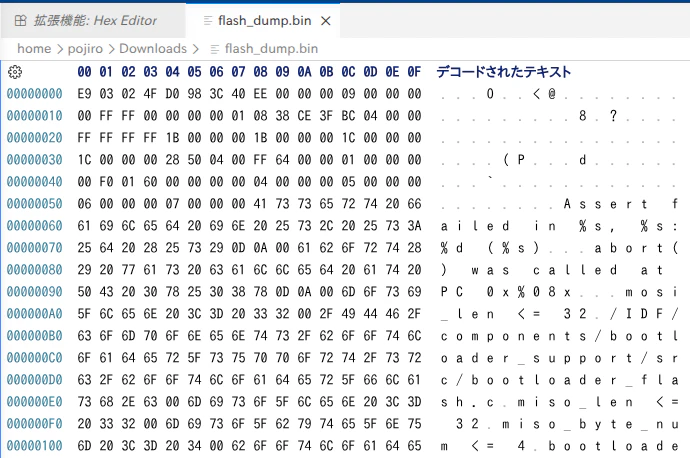
ダンプした bin を Hex Editor で読む
VS Code で Hex Editor を使えば読み書きができます。
flash の消去
esptool --chip auto --port /dev/ttyACM0 --baud 921600 erase_flash
esptool.py v4.12.0
Serial port /dev/ttyACM0
Connecting...
Detecting chip type... ESP32-S3
Chip is ESP32-S3 (QFN56) (revision v0.2)
Features: WiFi, BLE
Crystal is 40MHz
USB mode: USB-Serial/JTAG
MAC: 48:27:e2:66:d1:10
Uploading stub...
Running stub...
Stub running...
Changing baud rate to 921600
Changed.
Erasing flash (this may take a while)...
Chip erase completed successfully in 51.1 seconds.
Hard resetting via RTS pin...
今日はここまで。