macOS Sierra環境でOpenPoseをインストールした方法を忘れないように記録しようと思います。
▶︎参考サイト(ほとんど下記のサイトに沿って進めました)
TensorFlowでOpenPose(macでできるモーションキャプチャ)
https://qiita.com/ume1126/items/cc2ae610418296e6db22
MatplotlibでRuntimeError,ImportErrorが出てきた時の対処法
https://qiita.com/keroido/items/911c8fb4ca9a0836fdc8
Mac OS X - wgetコマンドをインストール(使えるようにする)
https://webkaru.net/dev/mac-wget-command-install/
1.仮想環境を作る
python3をインストールしたあと、virtualenvでopenposeの仮想環境を作ります。
仮想環境作り
どこで行ってもいいと思いますが、分かりやすいようにホームディレクトリで行いました。
$ /usr/bin/ruby -e "$(curl -fsSL https://raw.githubusercontent.com/Homebrew/install/master/install)"
$ brew install python3
$ pip3 install --upgrade virtualenv
$ virtualenv --system-site-packages -p python3 hoge
仮想環境(以降の作業場)に入る
MacBook-Pro:~ $ source hoge/bin/activate
(hoge) MacBook-Pro:~ $
のように、$ source hoge/bin/activate というコマンドを打って
左に(hoge)が出てればOKです。
2.諸々インストール
$ git clone https://github.com/ildoonet/tf-pose-estimation
$ cd tf-openpose
$ pip3 install -r requirements.txt
(結構時間かかります...)
$ pip3 install tensorflow
$ pip3 install matplotlib
$ cd models/graph/cmu
$ bash download.sh
私の場合ここで以下のエラーが出ました。
[download] model graph : cmu
download.sh: line 8: wget: command not found
download.sh: line 16: wget: command not found
[download] end
どうやらwgetコマンドが入っていなかったようです。
$ brew install wget
これで無事にグラフファイルもダウンロードできました。
3.いよいよ実行
長かった諸々のインストールが終わり、いよいよ実行の時です。
デスクトップに使いたい画像ファイルを置いて、
$ cd ../../..
$ python run.py --model=mobilenet_thin --resize=432x368 --image=../Desktop/soccer.jpg
すると、
Traceback (most recent call last):
  File "run.py", line 52, in <module>
    import matplotlib.pyplot as plt
  File "/Users/~/hoge/lib/python3.6/site-packages/matplotlib/pyplot.py", line 2374, in <module>
    switch_backend(rcParams["backend"])
  File "/Users/~/hoge/lib/python3.6/site-packages/matplotlib/pyplot.py", line 207, in switch_backend
    backend_mod = importlib.import_module(backend_name)
  File "/Users/~/hoge/lib/python3.6/importlib/__init__.py", line 126, in import_module
    return _bootstrap._gcd_import(name[level:], package, level)
  File "/Users/~/hoge/lib/python3.6/site-packages/matplotlib/backends/backend_macosx.py", line 14, in <module>
    from matplotlib.backends import _macosx
ImportError: Python is not installed as a framework. The Mac OS X backend will not be able to function correctly if Python is not installed as a framework. See the Python documentation for more information on installing Python as a framework on Mac OS X. Please either reinstall Python as a framework, or try one of the other backends. If you are using (Ana)Conda please install python.app and replace the use of 'python' with 'pythonw'. See 'Working with Matplotlib on OSX' in the Matplotlib FAQ for more information.
長ったらしいですね。
要はエラーです。泣きました。
めげずに色々と調べてみると、どうやらbackendの設定を変えるといいそうです。
これは「設定ファイル(=matplotlibrc)」で変えるみたいです。
これはmpl-dataファイル内にあるそうなので、上のエラーを見ながら頑張ってそこまで辿りmatplotlibrcを開きます。
$ cd ~/hoge/lib/python3.6/site-packages/matplotlib/mpl-data/
$ open matplotlibrc
そうすると以下のようなテキストファイルが出てくると思います。
### MATPLOTLIBRC FORMAT

# This is a sample matplotlib configuration file - you can find a copy
# of it on your system in
# site-packages/matplotlib/mpl-data/matplotlibrc.  If you edit it
# there, please note that it will be overwritten in your next install.
# If you want to keep a permanent local copy that will not be
# overwritten, place it in the following location:
# unix/linux:
#     $HOME/.config/matplotlib/matplotlibrc or
#     $XDG_CONFIG_HOME/matplotlib/matplotlibrc (if $XDG_CONFIG_HOME is set)
# other platforms:
#     $HOME/.matplotlib/matplotlibrc
#
# See http://matplotlib.org/users/customizing.html#the-matplotlibrc-file for
# more details on the paths which are checked for the configuration file.
#
# This file is best viewed in a editor which supports python mode
# syntax highlighting. Blank lines, or lines starting with a comment
# symbol, are ignored, as are trailing comments.  Other lines must
# have the format
#    key : val # optional comment
#
# Colors: for the color values below, you can either use - a
# matplotlib color string, such as r, k, or b - an rgb tuple, such as
# (1.0, 0.5, 0.0) - a hex string, such as ff00ff - a scalar
# grayscale intensity such as 0.75 - a legal html color name, e.g., red,
# blue, darkslategray

#### CONFIGURATION BEGINS HERE

# The default backend; one of GTK GTKAgg GTKCairo GTK3Agg GTK3Cairo
# MacOSX Qt4Agg Qt5Agg TkAgg WX WXAgg Agg Cairo GDK PS PDF SVG
# Template.
# You can also deploy your own backend outside of matplotlib by
# referring to the module name (which must be in the PYTHONPATH) as
# 'module://my_backend'.
backend      : ほにゃらら
・
・
・
このbackendの部分を頑張って探して、backend : TkAgg に変えてあげます。
これで今度こそ準備OK!!実行します!!!
$ cd ~/tf-openpose
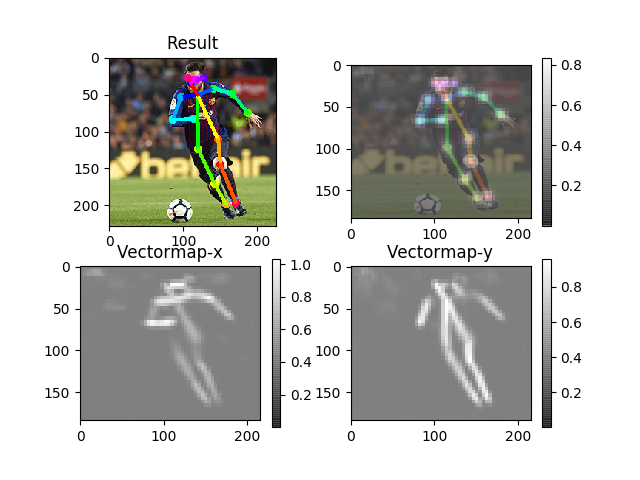
$ python run.py --model=mobilenet_thin --resize=432x368 --image=../Desktop/soccer.jpg
実行結果
あとで動画でもやってみようと思います。
