はじめに
前回 画像処理:ノイズ除去 の続きです。
前回はノイズが載っている画像をきれいにしよう、ということで オートエンコーダ を実装しました。
しかし、5の画像が2になってしまったりと、まだまだ改善の余地がありました。
さらに精度を上げるため、畳み込みニューラルネットワーク( CNN ) を用いたオートエンコーダを実装します。
実装
ライブラリの読み込み
import torch
import torch.nn as nn
import torch.nn.functional as F
import torch.optim as optim
import torch.utils.data
import torchvision.datasets
from torch.utils.data import DataLoader
import torchvision.transforms as transforms
import torchvision.utils as utils
import numpy as np
import matplotlib.pyplot as plt
CUDAの確認
if torch.cuda.is_available():
    device = "cuda"
else:
    device = "cpu"
データの準備
train_data = torchvision.datasets.MNIST(root="\data",
                                        download=True,
                                        train=True,
                                        transform=transforms.ToTensor())
test_data = torchvision.datasets.MNIST(root="\data",
                                       download=True,
                                       train=False,
                                       transform=transforms.ToTensor())
train_loader = torch.utils.data.DataLoader(dataset=train_data,
                                           batch_size=32,
                                           shuffle=True)
test_loader = torch.utils.data.DataLoader(dataset=test_data,
                                          batch_size=32,
                                          shuffle=False)
バッチサイズを32としました。それ以外の変更はありません。
オートエンコーダの定義
class Encoder(torch.nn.Module):
    def __init__(self):
        super().__init__()
        self.conv1 = nn.Conv2d(1, 16, 3)
        self.conv2 = nn.Conv2d(16, 32, 3)

        self.pool = nn.MaxPool2d(2, 2)

        self.fc1 = nn.Linear(32 * 5 * 5, 32)
        self.fc2 = nn.Linear(32, 16)
        self.fc3 = nn.Linear(16, 2)
    def forward(self, x):
        x = self.pool(F.relu(self.conv1(x)))
        x = self.pool(F.relu(self.conv2(x)))

        x = x.view(-1, 32 * 5 * 5)

        x = F.relu(self.fc1(x))
        x = F.relu(self.fc2(x))
        x = self.fc3(x)
        return x

class Decoder(torch.nn.Module):
    def __init__(self):
        super().__init__()
        self.fc1 = torch.nn.Linear(2, 16)
        self.fc2 = torch.nn.Linear(16, 64)
        self.fc3 = torch.nn.Linear(64, 512)
        self.fc4 = torch.nn.Linear(512, 28 * 28)
    def forward(self, x):
        x = torch.relu(self.fc1(x))
        x = torch.relu(self.fc2(x))
        x = torch.relu(self.fc3(x))
        x = torch.tanh(self.fc4(x))

        x = x.view(32, 1, 28, 28)
        return x

class AutoEncoder(torch.nn.Module):
    def __init__(self):
        super().__init__()
        self.enc = Encoder()
        self.dec = Decoder()
    def forward(self, x):
        x = self.enc(x)
        x = self.dec(x)
        return x

net = AutoEncoder()
net.to(device)

criterion = torch.nn.MSELoss()
optimizer = optim.SGD(net.parameters(), lr=0.1)
エンコーダとして、前々回のCNNをほぼそのまま使用します。
デコーダは前回とほぼ同じです。
前々回はこちらです。
学習
net.train()
for epoch in range(100):
    total_loss = 0
    for train_x, _ in train_loader:

        train_x = train_x.to(device)

        optimizer.zero_grad()
        loss = criterion(net(train_x), train_x)
        loss.backward()
        optimizer.step()
        total_loss += loss.data

        train_x = train_x.to("cpu")

    if(epoch + 1) % 1 == 0:
        print(epoch + 1, total_loss)
検証
準備
dataiter = iter(test_loader)
images, labels = next(dataiter)

def imshow(img):
    npimg = img.numpy()
    plt.imshow(np.transpose(npimg, (1, 2, 0)))
    plt.show()
dataiter = iter(test_loader)
1バッチ分のデータ( 32個 )を test_loader から取り出します。
images, labels = next(dataiter)
32個の画像、ラベルをそれぞれ images, labels とします。
imshow 関数を定義します。Tensor 型から numpy 配列に変換し、画像として表示しています。
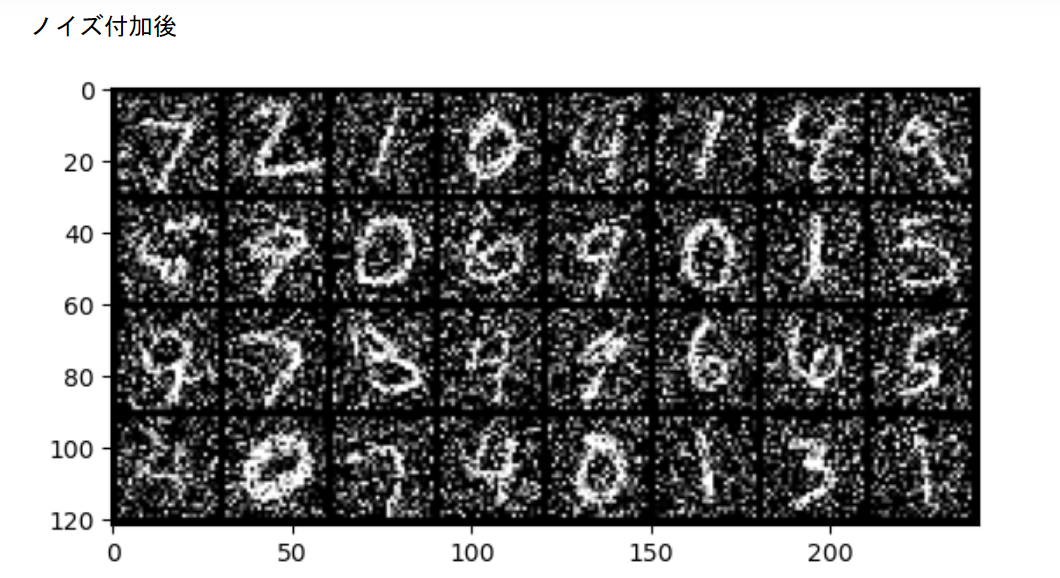
画像にノイズを載せる
def add_noise(img, noise_factor=0.3):
    img_flat = img.view(img.size(0), -1)
    noisy_img = img_flat + noise_factor * torch.randn_like(img_flat)
    noisy_img = torch.clamp(noisy_img, 0., 1.)
    noisy_img = noisy_img.view(img.size())

    return noisy_img

noisy_images = add_noise(images)

print("元画像")
imshow(torchvision.utils.make_grid(images))
print("ノイズ付加後")
imshow(torchvision.utils.make_grid(noisy_images))
noise_factor=0.3 として、少しノイズの量を抑えました。前回はノイズを載せすぎました。


ノイズ除去
net.to("cpu")
net.eval()

images_flat = images.view(images.size(0), 1, 28, 28)
out_images = net(images_flat)
out_images = out_images.view(images.size())

print("ノイズ除去後")
imshow(torchvision.utils.make_grid(out_images))
300エポック学習した結果です。

4, 5, 7, 9が少し怪しいですが、概ねノイズが除去されているようにみえます。
noise_factor=0.5 とした場合
前回と同じレベルまでノイズを強めました。

ノイズを強めた場合でも、除去できているようです。
おわりに
前回と比べ、はっきり見えるようになったかと思われます。また、計算時間も少し短くなりました。
やはり画像と畳み込み処理は相性がいいようです。
次回は、他のデータセットでも実装してみようと思います。