はじめに
ノイズが載ってしまった画像のノイズ除去をやってみます。
機械学習で実装するわけですが、オートエンコーダ という方法で実装します。
オートエンコーダ
画像の分類は、画像データとラベルデータのペアデータで学習を行っていました。ラベル(教師)があるため、教師あり学習 とよばれる方法です。
今回実装するオートエンコーダは、画像データと、教師として自己の画像データで学習します。つまり、同じデータを教師として学習します。
このような学習方法を 教師なし学習 といいます。
実装
実行環境
Google Colabでの実行を想定しています。詳しくはこちらを参照してください。
ライブラリの読み込み
import torch
import torch.nn as nn
import torch.nn.functional as F
import torch.optim as optim
import torch.utils.data
import torchvision.datasets
from torch.utils.data import DataLoader
import torchvision.transforms as transforms
import torchvision.utils as utils
import numpy as np
import matplotlib.pyplot as plt
CUDAの確認
if torch.cuda.is_available():
    device = "cuda"
else:
    device = "cpu"
データの準備
train_data = torchvision.datasets.MNIST(root="\data",
                                        download=True,
                                        train=True,
                                        transform=transforms.ToTensor())
test_data = torchvision.datasets.MNIST(root="\data",
                                       download=True,
                                       train=False,
                                       transform=transforms.ToTensor())
train_loader = torch.utils.data.DataLoader(dataset=train_data,
                                           batch_size=64,
                                           shuffle=True)
test_loader = torch.utils.data.DataLoader(dataset=test_data,
                                          batch_size=4,
                                          shuffle=False)
ここまでは前回と同じです。
オートエンコーダの定義
class Encoder(torch.nn.Module):
    def __init__(self):
        super().__init__()
        self.fc1 = torch.nn.Linear(28 * 28, 512)
        self.fc2 = torch.nn.Linear(512, 64)
        self.fc3 = torch.nn.Linear(64, 16)
        self.fc4 = torch.nn.Linear(16, 2)
    def forward(self, x):
        x = torch.relu(self.fc1(x))
        x = torch.relu(self.fc2(x))
        x = torch.relu(self.fc3(x))
        x = self.fc4(x)
        return x

class Decoder(torch.nn.Module):
    def __init__(self):
        super().__init__()
        self.fc1 = torch.nn.Linear(2, 16)
        self.fc2 = torch.nn.Linear(16, 64)
        self.fc3 = torch.nn.Linear(64, 512)
        self.fc4 = torch.nn.Linear(512, 28 * 28)
    def forward(self, x):
        x = torch.relu(self.fc1(x))
        x = torch.relu(self.fc2(x))
        x = torch.relu(self.fc3(x))
        x = torch.tanh(self.fc4(x))
        return x

class AutoEncoder(torch.nn.Module):
    def __init__(self):
        super().__init__()
        self.enc = Encoder()
        self.dec = Decoder()
    def forward(self, x):
        x = self.enc(x)
        x = self.dec(x)
        return x

net = AutoEncoder()
net.to(device)

criterion = torch.nn.MSELoss()
optimizer = optim.SGD(net.parameters(), lr=0.1)
オートエンコーダを定義するにあたって、エンコーダとデコーダを定義しています。
エンコーダとデコーダ
エンコーダ とは、次元を削減するものです。Encoder では $28 \times 28$ の画像データを最終的に2次元データに圧縮しています。ここで、画像の特徴を抽出します。
デコーダ とは、エンコーダで抽出された画像の特徴をもとに、画像を生成するものです。2次元データから最終的に $28 \times 28$ のデータとなっています。
誤差関数と最適化手法
criterion = torch.nn.MSELoss()
誤差関数は平均二乗誤差( MSE )を使用します。
optimizer = optim.SGD(net.parameters(), lr=0.1)
最適化手法は確率的勾配降下法( SGD )を使用します。
学習率は大きめの方がうまくいくかと思います。
学習
for epoch in range(100):
    total_loss = 0
    for train_x, _ in train_loader:

        train_x = train_x.reshape(-1, 28*28)
        train_x = train_x.to(device)

        optimizer.zero_grad()
        loss = criterion(net(train_x), train_x)
        loss.backward()
        optimizer.step()
        total_loss += loss.data

        train_x = train_x.to("cpu")

    if(epoch + 1) % 1 == 0:
        print(epoch + 1, total_loss)
loss = criterion(net(train_x), train_x)
自身の計算結果 net(train_x)、と自身 train_x で誤差計算をしています。
実験
テスト用データから1バッチ分を取り出す
dataiter = iter(test_loader)
images, labels = next(dataiter)
画像を出力する関数
def imshow(img):
    npimg = img.numpy()
    plt.imshow(np.transpose(npimg, (1, 2, 0)))
    plt.show()
ノイズを載せたテスト用データを用意
def add_noise(img, noise_factor=0.5):
    img_flat = img.view(img.size(0), -1)
    noisy_img = img_flat + noise_factor * torch.randn_like(img_flat)
    noisy_img = torch.clamp(noisy_img, 0., 1.)
    noisy_img = noisy_img.view(img.size())

    return noisy_img

noisy_images = add_noise(images)
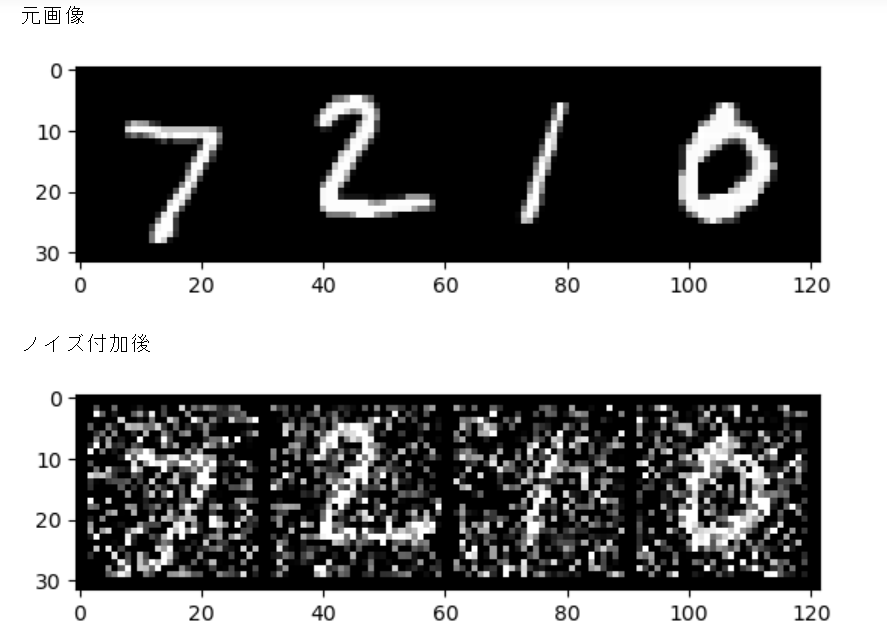
元画像とノイズ付加後画像の表示
print("元画像")
imshow(torchvision.utils.make_grid(images))
print("ノイズ付加後")
imshow(torchvision.utils.make_grid(noisy_images))
学習したモデルでノイズを除去
net.to("cpu")
net.eval()

images_flat = images.view(images.size(0), -1)
out_images = net(images_flat)
out_images = out_images.view(images.size())

print("ノイズ除去後")
imshow(torchvision.utils.make_grid(out_images))
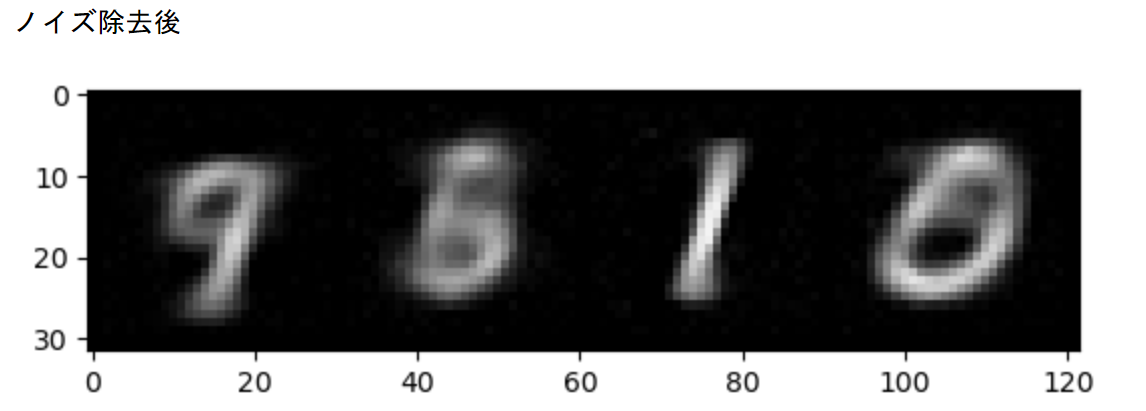
2と7がまだぼやけていますね。
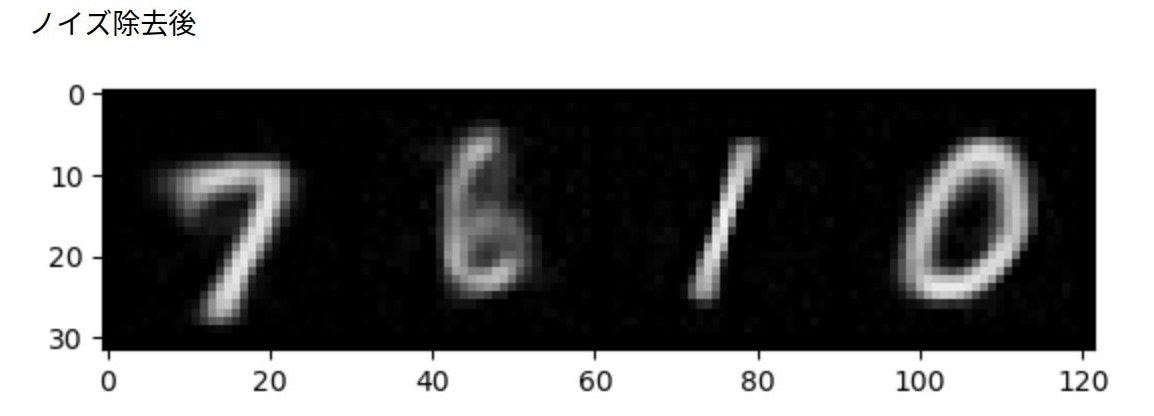
4/16追記
500エポックだとこんな感じです。
おわりに
まだまだ改善の余地がありそうです。
100エポックでは足りなさそうですね、寝てる間に計算するのも電気代が心配です。
大学行ったら大学の電力でやります。
次回