前回は、RaspberryPi Pico の開発環境を Ubuntu と RaspberryPi 4 で構築する方法を紹介しました。
RaspberryPi Pico の開発環境を Ubuntu と RaspberryPi 4 で構築する (Qiita@pipito-yuko)
今回は Raspberry Pi Pico W でサーミスタの出力電圧をA-D変換し気温を計算するプログラムを紹介いたします。
-
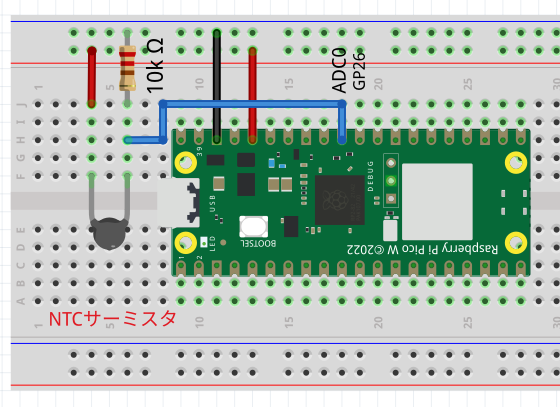
- サーミスタ仕様
- NTCサーミスタ
- 25℃時: 10KΩ
- 分圧抵抗: 10KΩ
- B定数: 3435
- 電源電圧: 3.3V
- Raspberry Pi Pico W
- A-D変換: ADC0 (GP26)
- サーミスタ仕様
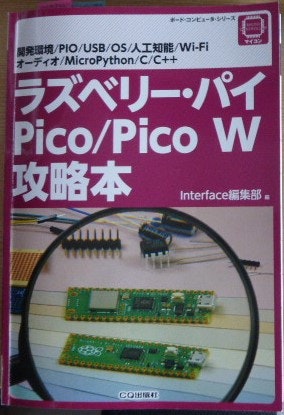
参考書籍
- ラズベリー・パイ Pico/Pico W 攻略本 [CQ出版株式会社]
ISBN978-4-7898-4477-2 (2023 年 6 月 1日 第2版発行)- 第1章 開発環境1 …ラズベリー・パイ4を使った公式推薦のプログラミング
-
サンプル・プログラム … A-D 変換
※1~/pico/pico-examples/adc/hello_adcそのままです
※2 minicom の使用方法
-
サンプル・プログラム … A-D 変換
- 第1章 開発環境1 …ラズベリー・パイ4を使った公式推薦のプログラミング
開発環境
- RaspberryPi 4 Model B
- OS: Raspberry Pi OS (Legacy, 64-bit) with desktop
- SSHサーバーが稼働しローカルPCからSSH接続できること
- Raspberry Pi Pico SDK がセットアップ済みであること
- ローカルPC: Ubuntu 22.04
- RaspberryPi 4 とはSSHで接続
- VSCode for Linux
※RaspberryPi 4で稼働するVSCodeをリモートから接続し、リモート側のソースコードを作成
以降 Raspberry Pi 4 はラズパイ4、Raspberry Pi Pico は ラズパイ Pico として説明します。
事前作業
ラズパイ Pico SDKセットアップ時にインストールされたサンプルのディレクトリ・ファイルツリーをテキストファイルとして取得します。
新たにRaspberry Pi Pico用のプロジェクトを作成するには、サンプルのディレクトリ・ファイルツリーが必要です。
ディレクトリ・ファイルツリーを見ることでどのようなファイルが必要かどうかわかります。
pi@raspi-4-dev:~ $ cd pico/pico-examples
pi@raspi-4-dev:~/pico/pico-examples $ tree -f > ~/work/tree_pico_examples.txt
ローカルPCにツリーファイルをコビー
$ scp pi@raspi-4-dev:~/work/tree_pico_examples.txt .
tree_pico_examples.txt   100% 1976KB  87.4MB/s   00:00
ローカルPCのエディタを開いてどのようなファイルが必要なのか確認します。
- pico_sdk_import.cmake (■)
- CMakeLists.txt (*) : トップレベル、サブディレクトリ、各ソースコードディレクトリ
- ソースファイル
以下は ~/pico/pico-examples 配下のファイルツリー
.
├── CMakeLists.txt (*)
├── CONTRIBUTING.md
├── LICENSE.TXT
├── README.md
├── adc
│   ├── CMakeLists.txt (*)
│   ├── adc_console
│   │   ├── CMakeLists.txt (*)
│   │   └── adc_console.c (ソースコード)
... 一部省略 ...
├── pico_extras_import_optional.cmake
├── pico_sdk_import.cmake (■)
├── pico_w
│   ├── CMakeLists.txt (*)
│   ├── bt
│   │   ├── CMakeLists.txt (*)
│   │   ├── FreeRTOS_Kernel_import.cmake
│   │   ├── a2dp_sink_demo
│   │   │   └── CMakeLists.txt (*)
... 一部省略 ...
└── watchdog
    ├── CMakeLists.txt (*)
    └── hello_watchdog
        ├── CMakeLists.いるので見txt (*)
        └── hello_watchdog.c (ソースコード)
プロジェクト構成
- raspi_pico: Pico用プロジェクトトップ
- build: Pico用プロジェクトのビルドルート
- pico_w: ラズパイPico W 用プロジェクト
- thermistor_temperature: サーミスタ温度測定プロジェクト
Pico用プロジェクト直下に必要なファイル
-
pico_sdk_import.cmake
~/pico/pico-examples/pico_sdk_import.cmake をコピーし、VSCodeのエディタで編集します。 - CMakeLists.txt
プロジェクトグループディレクトリ配下に必要なファイル
- CMakeLists.txt
ソースディレクトリ配下に必要なファイル
- CMakeLists.txt
- main.c ※ファイル名は任意
project/
└── raspi_pico
    ├── CMakeLists.txt
    ├── build
    ├── pico_sdk_import.cmake
    └── pico_w
        ├── CMakeLists.txt
        └── thermistor_temperature
            ├── CMakeLists.txt
            └── main.c
プロジェクト構成のディレクトリ(raspi_pico)と空のファイルを作成し、ラズパイPicoサンプルのトップレベルの pico_sdk_import.cmakeファイルをraspi_picoディレクトリ直下にコピーします
pi@raspi-4-dev:~/project/raspi_pico $ cp ~/pico/pico-examples/pico_sdk_import.cmake .
1. プロジェクトの構成ファイル編集
1-1. pico_sdk_import.cmake
最低限必要なものだけ残し、不要と思われる個所を削除しました。
if (DEFINED ENV{PICO_SDK_PATH} AND (NOT PICO_SDK_PATH))
    set(PICO_SDK_PATH $ENV{PICO_SDK_PATH})
    message("Using PICO_SDK_PATH from environment ('${PICO_SDK_PATH}')")
endif ()

set(PICO_SDK_PATH "${PICO_SDK_PATH}" CACHE PATH "Path to the Raspberry Pi Pico SDK")

get_filename_component(PICO_SDK_PATH "${PICO_SDK_PATH}" REALPATH BASE_DIR "${CMAKE_BINARY_DIR}")
if (NOT EXISTS ${PICO_SDK_PATH})
    message(FATAL_ERROR "Directory '${PICO_SDK_PATH}' not found")
endif ()

set(PICO_SDK_INIT_CMAKE_FILE ${PICO_SDK_PATH}/pico_sdk_init.cmake)
if (NOT EXISTS ${PICO_SDK_INIT_CMAKE_FILE})
    message(FATAL_ERROR "Directory '${PICO_SDK_PATH}' does not appear to contain the Raspberry Pi Pico SDK")
endif ()

set(PICO_SDK_PATH ${PICO_SDK_PATH} CACHE PATH "Path to the Raspberry Pi Pico SDK" FORCE)

include(${PICO_SDK_INIT_CMAKE_FILE})
1-2. CMakeLists.txt
(1) サンプルのトップレベルのCMakeLists.txtをコピーし、不要な設定を削除していきます。
cmake_minimum_required(VERSION 3.12)

# Pull in SDK (must be before project)
include(pico_sdk_import.cmake)

project(pico_project C CXX ASM)
set(CMAKE_C_STANDARD 11)
set(CMAKE_CXX_STANDARD 17)

# Initialize the SDK
pico_sdk_init()

add_compile_options(-Wall
        -Wno-format          # int != int32_t as far as the compiler is concerned because gcc has int32_t as long int
        -Wno-unused-function # we have some for the docs that aren't called
        )
if (CMAKE_C_COMPILER_ID STREQUAL "GNU")
    add_compile_options(-Wno-maybe-uninitialized)
endif()

# Add pico_w
add_subdirectory(pico_w)
(2) サブプロジェクト
サーミスタ温度測定プロジェクトを追加
add_subdirectory(thermistor_temperature)
(3) サーミスタ温度測定プロジェクト
-
~/pico/pico-examples/adc/adc_consle/CMakeLists.txtをコピーし編集 -
USB シリアル出力を有効にし、UARTシリアル出力を無効にします
※1 新規追加。設定内容は下記ファイル参照
※2~/pico/pico-examples/hello_world/usb/CMakeLists.txt
※3 標準出力をUSB経由でターミナルに出力 ※minocom コマンド実行
# From ~/pico/pico-examples/adc/hello_adc/CMakeLists.txt
add_executable(thermistor_temper
        main.c
        )

target_link_libraries(thermistor_temper pico_stdlib hardware_adc)

# From  ~/pico/pico-examples/hello_world/usb/CMakeLists.txt
# enable usb output, disable uart output
pico_enable_stdio_usb(thermistor_temper 1)
pico_enable_stdio_uart(thermistor_temper 0)

# create map/bin/hex file etc.
pico_add_extra_outputs(thermistor_temper)
2. サーミスタ温度測定プロジェクト
今回のプロジェクトの元ネタは下記Qiita投稿になります。サーミスタの温度の計算式の解説もしています。
ESP-WROOM-02 サーミスタの温度をアナログコンバーターで取得する (Qiita@pipito-yukio)
サンプルの hello_adc のソースをもとに作成していきます。
/**
 * Copyright (c) 2020 Raspberry Pi (Trading) Ltd.
 *
 * SPDX-License-Identifier: BSD-3-Clause
 */

#include <stdio.h>
#include "pico/stdlib.h"
#include "hardware/gpio.h"
#include "hardware/adc.h"

int main() {
    stdio_init_all();
    printf("ADC Example, measuring GPIO26\n");

    adc_init();

    // Make sure GPIO is high-impedance, no pullups etc
    adc_gpio_init(26);
    // Select ADC input 0 (GPIO26)
    adc_select_input(0);

    while (1) {
        // 12-bit conversion, assume max value == ADC_VREF == 3.3 V
        const float conversion_factor = 3.3f / (1 << 12);
        uint16_t result = adc_read();
        printf("Raw value: 0x%03x, voltage: %f V\n", result, result * conversion_factor);
        sleep_ms(500);
    }
}
2-1. インボート、定数定義
- math.h: round() 関数を使用するためにインクルード
#include <stdio.h>
#include <math.h>
#include "pico/stdlib.h"
#include "hardware/gpio.h"
#include "hardware/adc.h"

const uint8_t ADC_SAMPLES = 10;
const float ADC_VREF = 3.3;
// Thermister section
const float THERM_V = 3.3;
const float THERM_B = 3435.0;
const float THERM_R0 = 10000.0;
const float THERM_R1 = 10000.0; // Divide register 10k
const float THERM_READ_INVALID = -9999.0;
const unsigned long DELAY_TIME = 30000;
2-2. 関数定義
2-2-(1) A-D変換値から電圧を取得
float getVolt(uint16_t adcVal) {
   return ADC_VREF * adcVal / (1 << 12);
}
2-2-(2) サンプリング回数A-D変換から出力電圧を取得
- 30ミリ秒ごとに10回分 A-D変換値を集計: adc_read()
- A-D変換値の平均値をもとに出力電圧を計算
float getAdcVoltage() {
   uint16_t adcTotal = 0;
   for (int i = 0; i < ADC_SAMPLES; i++) {
      adcTotal += adc_read();
      sleep_ms(30);
   }
   uint16_t adcValue = round(1.0 * adcTotal / ADC_SAMPLES);
   printf("adcValue = %d\n", adcValue);
   return getVolt(adcValue);
}
2-2-(3) サーミスタ温度の計算
- 平均A-D変換値が極めて低いか、サーミスタの電源電圧以上ならエラー
- 平均A-D変換値から取得した電圧より気温を計算する
※ 計算式については上記 Qiita 投稿の [1-2. サーミスタの温度計算関数] をご覧ください。
float getThermTemp(float outVolt) {
   double rx, xa, temp;
   printf("Therm.outVolt = %.1f\n", outVolt);
   if (outVolt < 0.001 || outVolt >= THERM_V) {
      return THERM_READ_INVALID;
   }

   rx = THERM_R1 * ((THERM_V - outVolt) / outVolt);
   xa = log(rx / THERM_R0) / THERM_B;
   printf("rx: %.5f, xa: %.5f\n", rx, xa);
   temp = (1 / (xa + 0.00336)) - 273.0;
   return (float)temp;
}
2-3. メイン処理
- ADC0 (GPIOピン[26]) を初期設定 ※サンプルコードそのまま利用
- 平均 A-D 変換値取得
- 上記取得値から気温を計算
- 許容範囲以内なら温度を出力
- エラーメッセージを出力 ※接続誤りなど
int main() {
   stdio_init_all();
   printf("ADC Example, measuring GPIO26\n");

   adc_init();

   // Make sure GPIO is high-impedance, no pullups etc
   adc_gpio_init(26);
   // Select ADC input 0 (GPIO26)
   adc_select_input(0);

   while (1) {
      // Measure Thermister
      float outVolt = getAdcVoltage();
      float temper = getThermTemp(outVolt);
      if (temper != THERM_READ_INVALID) {
         printf("Temper: %.1f ℃\n", temper);
      } else {
         printf("Thermister read invalid!\n");
      }
      sleep_ms(DELAY_TIME);
   }
}
3. ビルド
3-1. プリプロセス
- プロジェクト直下のbuildディレクトに移動
- 下記オプションを指定して cmake コマンド実行
- PICO_BOARD="pico_w"
- CMAKE_BUILD_TYPE=Release
pi@raspi-4-dev:~/pico $ unset PICO_EXAMPLES_PATH
pi@raspi-4-dev:~/pico $ cd project/raspi_pico/build/
pi@raspi-4-dev:~/project/raspi_pico/build $ cmake .. -DPICO_BOARD="pico_w" -DCMAKE_BUILD_TYPE=Release
PICO_SDK_PATH is /home/pi/pico/pico-sdk
PICO platform is rp2040.
Build type is Release
PICO target board is pico_w.
Using CMake board configuration from /home/pi/pico/pico-sdk/src/boards/pico_w.cmake
Using board configuration from /home/pi/pico/pico-sdk/src/boards/include/boards/pico_w.h
TinyUSB available at /home/pi/pico/pico-sdk/lib/tinyusb/src/portable/raspberrypi/rp2040; enabling build support for USB.
BTstack available at /home/pi/pico/pico-sdk/lib/btstack
cyw43-driver available at /home/pi/pico/pico-sdk/lib/cyw43-driver
Pico W Bluetooth build support available.
lwIP available at /home/pi/pico/pico-sdk/lib/lwip
Pico W Wi-Fi build support available.
mbedtls available at /home/pi/pico/pico-sdk/lib/mbedtls
-- Configuring done
-- Generating done
-- Build files have been written to: /home/pi/project/raspi_pico/build
3-2. コンパイル
プログラムディレクトリに移動して make コマンド実行
pi@raspi-4-dev:~/project/raspi_pico/build $ cd pico_w/thermistor_temperature/
pi@raspi-4-dev:~/project/raspi_pico/build/pico_w/thermistor_temperature $ make -j4
[  1%] Building ASM object pico-sdk/src/rp2_common/boot_stage2/CMakeFiles/bs2_default.dir/compile_time_choice.S.obj
[  2%] Creating directories for 'ELF2UF2Build'
[  3%] Linking ASM executable bs2_default.elf
[  3%] Built target bs2_default
[  4%] Generating bs2_default.bin
[  6%] Generating bs2_default_padded_checksummed.S
[  7%] No download step for 'ELF2UF2Build'
[  8%] No update step for 'ELF2UF2Build'
[  8%] Built target bs2_default_padded_checksummed_asm
[  9%] No patch step for 'ELF2UF2Build'
[ 10%] Performing configure step for 'ELF2UF2Build'
# ... 省略 ...
[100%] Linking CXX executable thermistor_temper.elf
[100%] Built target thermistor_temper
ビルドファイルの確認: thermistor_temper.uf2
pi@raspi-4-dev:~/project/raspi_pico/build/pico_w/thermistor_temperature $ ls -lrt --time-style long-iso
合計 1348
drwxr-xr-x 4 pi pi   4096 2024-03-02 16:30 elf2uf2
-rw-r--r-- 1 pi pi 140778 2024-03-02 16:30 Makefile
-rwxr-xr-x 1 pi pi  79780 2024-03-02 16:32 thermistor_temper
-rw-r--r-- 1 pi pi   1152 2024-03-02 17:58 cmake_install.cmake
drwxr-xr-x 4 pi pi   4096 2024-03-02 18:04 CMakeFiles
-rw-r--r-- 1 pi pi 246669 2024-03-02 18:04 thermistor_temper.elf.map
-rwxr-xr-x 1 pi pi  79780 2024-03-02 18:04 thermistor_temper.elf
-rw-r--r-- 1 pi pi  92915 2024-03-02 18:04 thermistor_temper.hex
-rwxr-xr-x 1 pi pi  33016 2024-03-02 18:04 thermistor_temper.bin
-rw-r--r-- 1 pi pi 608832 2024-03-02 18:04 thermistor_temper.dis
-rw-r--r-- 1 pi pi  66048 2024-03-02 18:04 thermistor_temper.uf2
4. バイナリ実行
4-1. ラズパイPicoにバイナリをコピー
- [BOOTSEL] ボタンを押しながら USBケーブルでラズパイ4に接続
-
ラズパイPicoデバイス (/dev/sda1) をマウントポイント(/mnt/pico)にマウントする
※マウントポイントはPico用SDKを構築したときに作成 - バイナリ
thermistor_temper.uf2をマウントポイントにコピー - sync コマンド実行
- ラズパイPicoデバイスのマウント解除
pi@raspi-4-dev:~/project/raspi_pico/build/pico_w/thermistor_temperature $ sudo mount /dev/sda1 /mnt/pico
pi@raspi-4-dev:~/project/raspi_pico/build/pico_w/thermistor_temperature $ sudo cp thermistor_temper.uf2 /mnt/pico
pi@raspi-4-dev:~/project/raspi_pico/build/pico_w/thermistor_temperature $ sudo sync
pi@raspi-4-dev:~/project/raspi_pico/build/pico_w/thermistor_temperature $ sudo umount /mnt/pico
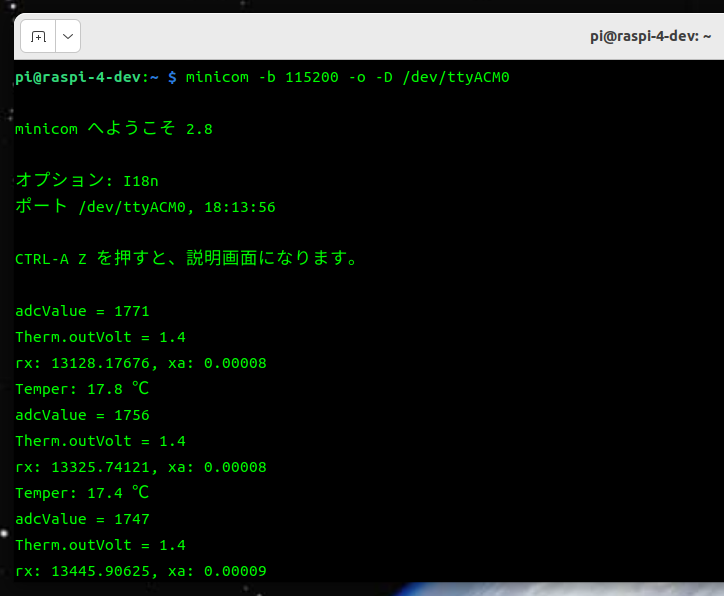
4-2. シリアルログのモニター
この画面は上記4-1実行前に開いておきます

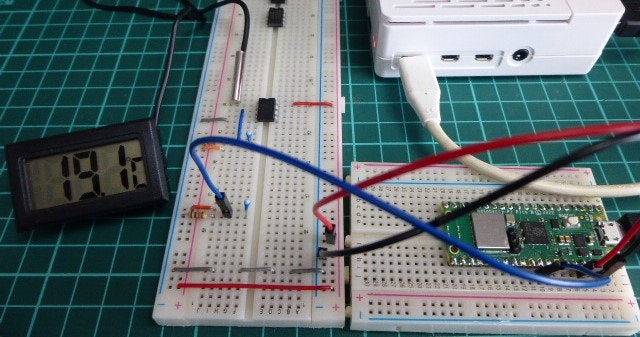
温度計(先端がサーミスタになっている)と比べると、± 0.5 ℃ 以内に収まっていました。
最後に
1からラズパイPico用のプロジェクトを作成するのは大変です。事前作業で紹介したようにサンプルプロジェクトのディレクトリ・ファイルツリーを取得すると、自分が作成するプロジェクトに何が必要なのかわかります。
ラズパイPicoサンプルは下記GitHubから取得できます。
$ https://github.com/raspberrypi/pico-examples.git
本格的にプロジェクトを作成するにはサンプルプロジェクト内のファイルを解析することも必要になります。


