ニッチ過ぎて誰の役にも立たないかもだが、情報がなかったができたので備忘録としてまとめる。
CognitoのUser Poolは認証フローのあらゆるタイミングや条件でLambdaを呼び出して任意の処理をさせることができる。(参考:Customizing User Pool Workflows with Lambda Triggers)
UserMigrationトリガはその一つで、ユーザがログインしようとしたときにユーザIDが存在しなかった場合に呼び出される。これは、LDAPなどユーザを管理する別システムと連携する場合など、ユーザを自動でCognitoに登録したいケースで有用になる。
UserMigrationトリガについてはCognitoのドキュメントである程度説明されている。(Amplifyの公式ドキュメントでは、言及されているもののAmplifyでの実装方法は全く説明されていない。)
前提
- 開発対象のプロジェクトには、AmlifyでCognito User Poolを使用するauthが設定済み。
- Amplify CLIでUser Poolの他のトリガが設定済み。
設定すべき内容
まず、Amplify抜きに、何の設定をするべきなのかを下記に示す。
- トリガで呼び出されるLambdaを作成する
- Lambdaのパーミッションを設定する
- Cognito User PoolでUserMigrationトリガにそのLambdaを設定する
- Cognitoで
ALLOW_USER_PASSWORD_AUTHを有効にする
実は、AWSマネージメントコンソールで手作業でやれば説明が不要なくらい簡単にできる。
Lambdaパーミッション
パーミッションはLambdaコンソールで、Configurationタブ → Permission → ページ下方のResource-based policyから設定できる。内容は、以下のようになる。
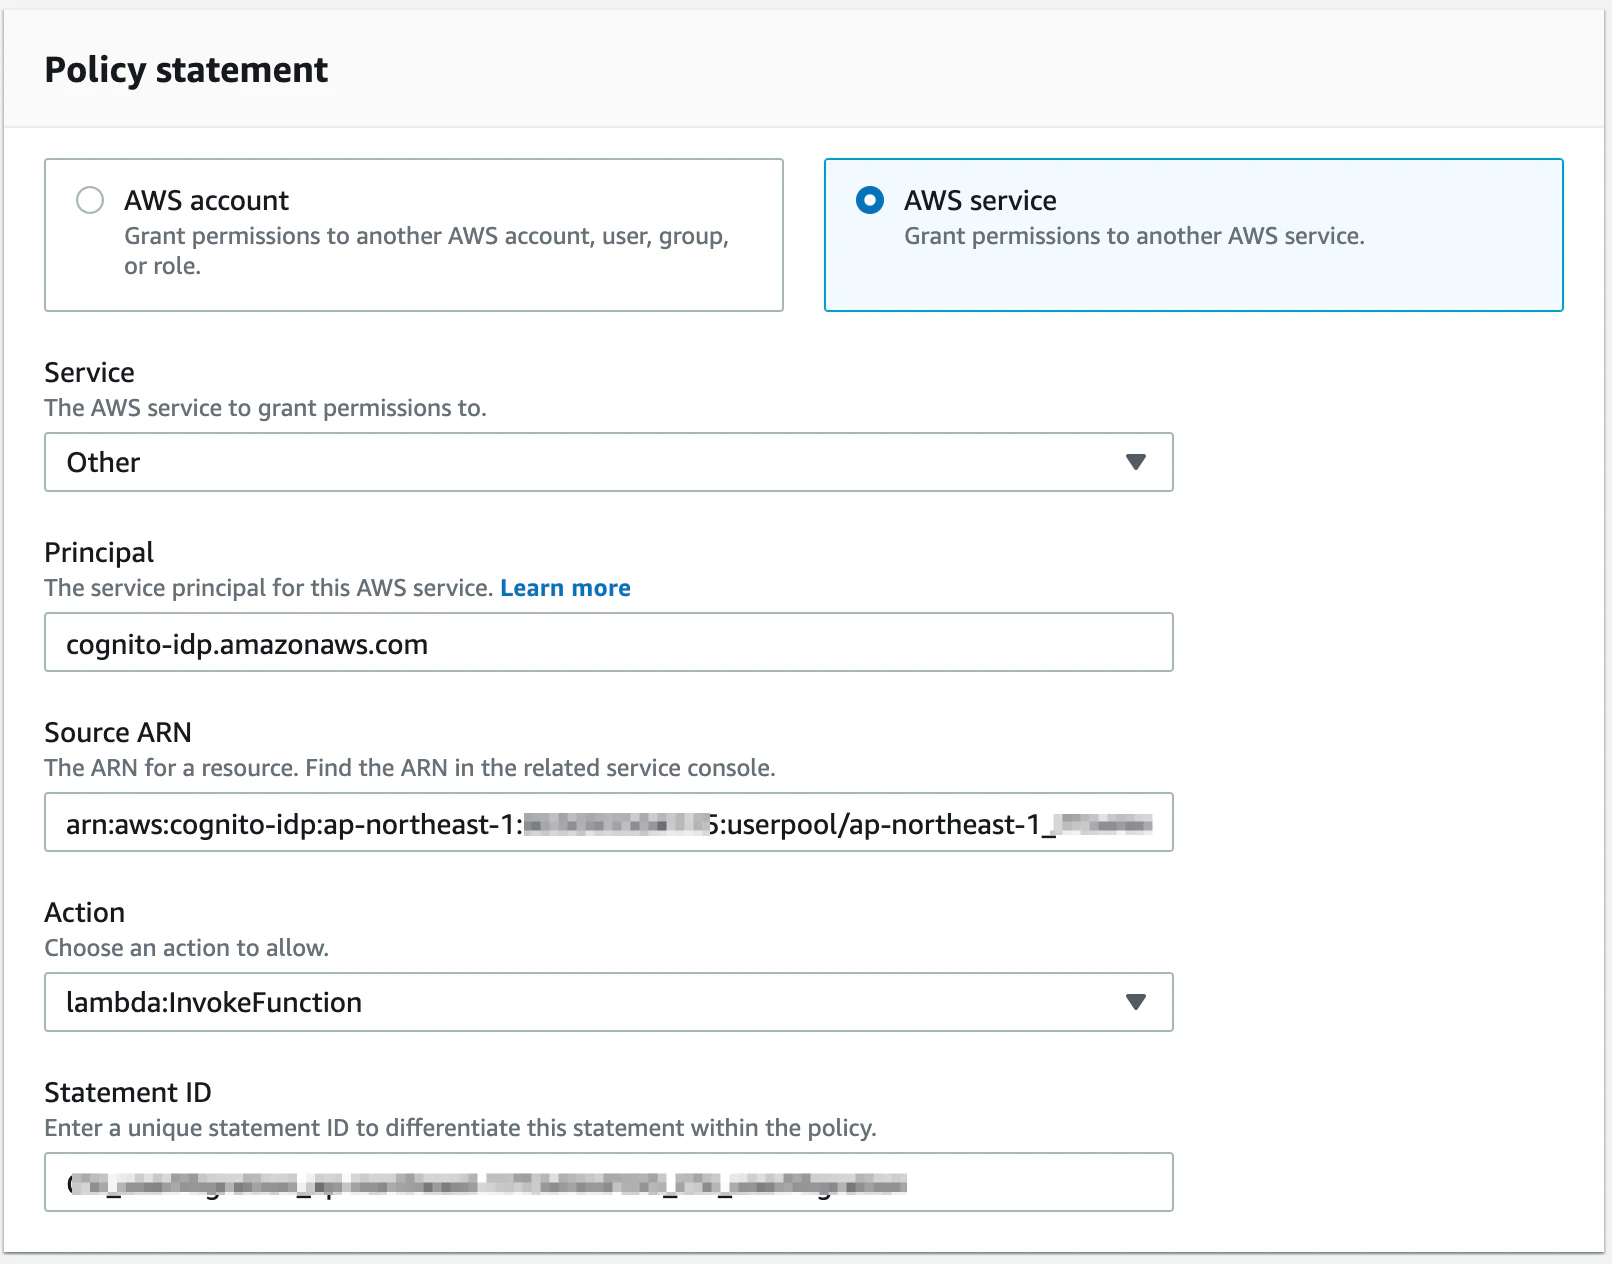
Source ARNはCognito User PoolのARNを入れる。
Statement IDはこの設定の名前のようなものだ。他と被らないような任意の名前を設定する。
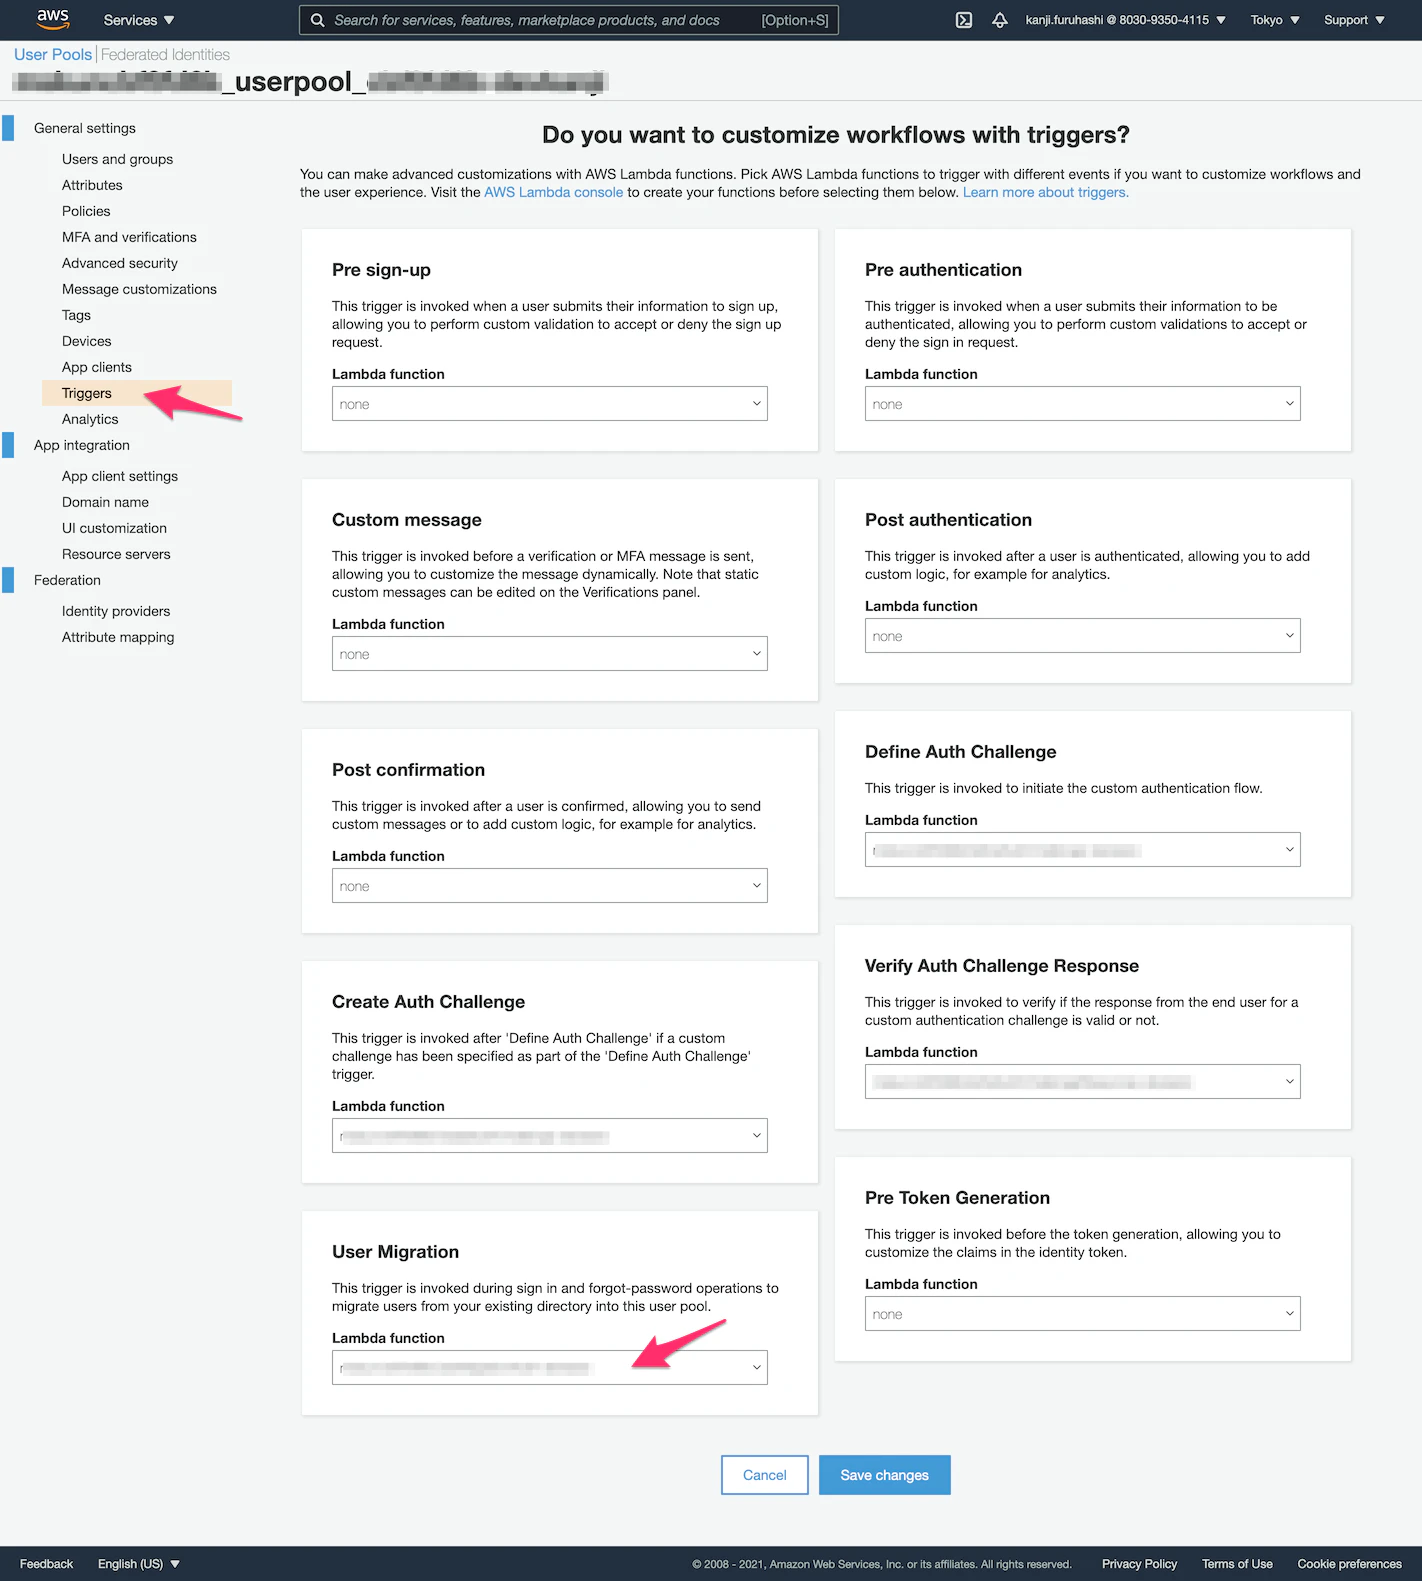
Congnitoのトリガ設定
Lambdaコンソールの方にもトリガという項目があるが、そこではなく、Cognitoコンソールのトリガの方で設定できる。
CongnitoでALLOW_USER_PASSWORD_AUTHを有効にする
Cognitoコンソールのサイドメニュー「App client」を開いてクライアントの「Show Details」を開く。
Auth Flows Configurationセクションで"Enable username password based authentication (ALLOW_USER_PASSWORD_AUTH)"にチェックを入れる。
Amplifyでの手順
Amplifyプロジェクトのauthで使用しているCognito User Poolに対して上記の設定をすれば、それでUserMigrationトリガをLambdaでさばけるようになるのだが、これだと環境毎に手動で設定することになるのでコードとしてAmplifyプロジェクトのソースツリーに含めたい。
幸い、Amplify CLIはCognito User PoolのCUSTOM_AUTH flowに対応しており、他のトリガをAmplify CLIのウィザードで設定することができる。Amplifyが自動生成するこの設定を手本に、UserMigrationトリガの設定を追加する。
UserMigrationトリガで実行するLambdaを作成
amplify add function コマンドで普通に"Hello world"のLambda関数を作成する。このウィザードで選択できるトリガではCognitoのトリガとは関係がないようなので選択しない。
必要だか不明だが、他のトリガのfunctionに習って、下記を追記する。
{
  "trigger": true,
  "parentResource": "myapp0000000",
  "functionName": "myapp0000000UserMigrationAuth",
  "resourceName": "myapp0000000UserMigrationAuth",
  "parentStack": "auth",
  ...
}
下記はAmplify CLIが自動的に追記しているかもしれない。
  ...
  "function": {
    ...
    "myapp0000000UserMigrationAuth": {
      "build": true,
      "providerPlugin": "awscloudformation",
      "service": "Lambda"
    }
  },
Authの諸々設定を追加
authのCloudFormationテンプレートに、上記スクショで設定したパーミッションのリソース UserPoolUserMigrationAuthLambdaInvokePermission を追加する。
CustomAuthTriggerResource リソースの lambdaConfig に "triggerType": "UserMigration" で先に設定したLambdaを設定する。(ちなみにこのtriggerTypeに設定すべき値がどこにもドキュメント化されていないので苦労した。UserMigrationは"UserMigration_Authentication"と"UserMigration_ForgotPassword"の2種類があるようだが、その区別をどこでするのかは未だにわからない。)
{
  ...
  "Parameters": {
    ...
    "functionmyapp0000000UserMigrationAuthName": {
      "Type": "String"
    },
    "functionmyapp0000000UserMigrationAuthArn": {
      "Type": "String"
    }
  },
  ...
  "Resources": {
    ...
    "UserPoolUserMigrationAuthLambdaInvokePermission": {
      "Type": "AWS::Lambda::Permission",
      "Properties": {
        "Action": "lambda:InvokeFunction",
        "FunctionName": {
          "Ref": "functionmyapp0000000UserMigrationAuthName"
        },
        "Principal": "cognito-idp.amazonaws.com",
        "SourceArn": {
          "Ref": "userpoolArn"
        }
      }
    },
    ...
    "CustomAuthTriggerResource": {
      "Type": "Custom::CustomAuthTriggerResourceOutputs",
      "Properties": {
        ...
        "lambdaConfig": [
          ...
          {
            "triggerType": "UserMigration",
            "lambdaFunctionName": "myapp0000000UserMigrationAuth",
            "lambdaFunctionArn": {
              "Ref": "functionmyapp0000000UserMigrationAuthArn"
            }
          }
        ]
      },
      ...
    }
  }
}
その他も、他のトリガの設定を真似て変更を追加する。
Parameters:
  ...
  functionmyapp0000000UserMigrationAuthArn:
    Type: String
    Default: functionmyapp0000000UserMigrationAuthArn

  functionmyapp0000000UserMigrationAuthName:
    Type: String
    Default: functionmyapp0000000UserMigrationAuthName
{
    ...
    "triggers": "{\n  \"DefineAuthChallenge\": [\n ...  ],\n ... \"UserMigration_Authentication\": []\n}",
    ...
    "authTriggerConnections": "[\n  {\n ...  },\n  {\n    \"triggerType\": \"UserMigration_Authentication\",\n    \"lambdaFunctionName\": \"myapp0000000UserMigrationAuth\"\n  }\n]",
    ...
    "dependsOn": [
        ...
        {
            "category": "function",
            "resourceName": "myapp0000000UserMigrationAuth",
            "triggerProvider": "Cognito",
            "attributes": [
                "Arn",
                "Name"
            ]
        }
    ]
}
  ...
  "auth": {
    "myapp0000000": {
      "service": "Cognito",
      "providerPlugin": "awscloudformation",
      "dependsOn": [
        ...
        {
          "category": "function",
          "resourceName": "myapp0000000UserMigrationAuth",
          "triggerProvider": "Cognito",
          "attributes": [
            "Arn",
            "Name"
          ]
        }
      ],
      ...
    }
  }
そして、amplify env checkout {現在のenv名}を実行して、amplify/backend/amplify-meta.jsonを更新する。
また、CognitoのクライアントアプリでALLOW_USER_PASSWORD_AUTHを有効にする必要があるが、下記のようにauthのCloudFormationテンプレートのyamlファイルのResources下のクライアント設定で、ExplicitAuthFlowsにALLOW_USER_PASSWORD_AUTHを追加する。
複数設定できるので必要なものを有効にすればよいが、ALLOW_REFRESH_TOKEN_AUTHは必ず入れないとエラーになる。
Resources:
  #...
  UserPoolClientWeb:
    #...
    Properties:
      #...
      ExplicitAuthFlows:
        - ALLOW_CUSTOM_AUTH
        - ALLOW_USER_PASSWORD_AUTH # UserMigrationトリガにはこれが必要
        - ALLOW_USER_SRP_AUTH
        - ALLOW_REFRESH_TOKEN_AUTH # これは常に必要
      #...
これで amplify push でできるはず。
この設定で、環境を新規作成する場合は全て自動で設定されることが確認できたが、環境に既にauthが設定してある場合は、もしかしたらCognitoのトリガに各トリガ用functionは自動では設定されないかもしれない。この場合、そこだけはCognitoコンソールから結局手動でやるしか無いかもしれない。
Lambdaのハンドラコード
公式ドキュメントのExample: Migrate a User with an Existing Passwordに習ってサンプル実装。
context.succeed(event)と呼ぶことで認証成功となってCognitoがユーザを作成するようだ。
// テストのためユーザ名に`fail`を入れると認証失敗、それ以外だとOKになるようにしている
const checkAuth = (userId, password) => {
  return (userId !== 'fail')
}

exports.handler = (event, context, callback) => {
  const username = event.userName
  const password = event.request.password
  console.log(`user: ${username}, pass: ${password}`) // TODO: Remove this

  // Check ID/PW with LDAP
  if (checkAuth(username, password)) {
    event.response.userAttributes = {
      email: '', // 使用しない場合でも無ければエラーになる。空文字列はOKだがnullはダメ
      // email_verified: 'true' // 使用しない場合はこちらは無くても良い
    }
    event.response.finalUserStatus = "CONFIRMED"; // 確認コードによる登録確認ステップを省く
    event.response.messageAction = "SUPPRESS"; // AWSがウェルカムメッセージを送るのをOFFにする
    context.succeed(event) // Cognitoに新規ユーザとして登録させる
  } else {
    callback("Bad password") // ユーザ登録せずに認証エラーにする
  }
};
event.responseに必要な項目が設定されていないと、そのまま認証エラーとなる。
特に、emailはCognitoで使用しない設定になっていても指定しないと認証エラーになる。使用しない場合は空文字列でよい。
クライアントアプリでの使用
UserMigrationトリガは USER_PASSWORD_AUTH フローでなければ利用できないようなので、Auth.configureでauthenticationFlowType: 'USER_PASSWORD_AUTH'を指定してログイン処理を実行する。
import { Auth } from 'aws-amplify'

async function logIn() {
  Auth.configure({
    authenticationFlowType: 'USER_PASSWORD_AUTH',
  })

  try {
    const user = await Auth.signIn('my_username', 'my_password')
    console.log('login successful!')
    console.log(user)
  } catch (error) {
    console.log('error logging in', error)
  }
}
冒頭で言及した他のトリガを設定できるCUSTOM_AUTHなどの認証フローも利用したい場合は、同時に使用することはができないので、他の認証フローでユーザが見つからなかった場合に、USER_PASSWORD_AUTHに切り替えて再度認証をかけるという実装になりそうだ。
以上。