はじめに
まれにアイコン、表示したくなりますよね?
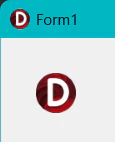
こういうのとかね!?

Delphi 13.1 Florence では「プロセスにアタッチ」ウィンドウにプロセスのアイコンが表示されるようになりました。
FMX における ico ファイルの表示
Image1.Bitmap.LoadFromFile('何らかのアイコン.ico');
これだけ!!
FMX の TBItmap は直接 ico ファイルが読めます!
例:ColorSelector のアイコンを読み込んだところ

※Windows Xp で導入された 32 bit αチャンネル付きアイコンは、普通の PNG 画像と同じように表示されます。
アプリのアイコンはどうか?
アプリケーションのアイコンは Win32 API の ExtractIcon を使ってこんな感じで取ります。
function GetAppIcon(
  const AExePath: String;
  const AIndex: Integer): HICON;
begin
  // 第2引数はアプリケーションの exe ファイルのパス
  // 第3引数は複数あるアイコンの中から何番目を取るか?(0 が MAINCION)
  Result := ExtractIcon(HInstance, PChar(AExePath), AIndex);
end;
でもぉ!これってえ!返ってくるのが HICON なんですよ!
当然、HICON はそのまま表示できません。
HICON から実体であるピクセル配列を取得して TBitmap に渡してやる必要があります。
HICON からピクセルデータを取得する
まず、GetIconInfo API を使って、Icon の情報を取得します。
取得した IconInfo の中に以下の2つの BITMAP のハンドルが定義されています。
- hbmColor アイコンのピクセルデータ
- hbmMask 1bit のマスクデータ
hbmColor から元の BITMAP を取りだします。
そこに定義されている bmBits がピクセルデータです。
if IconInfo.hbmColor <> 0 then
begin
  var IconBmp: BITMAP; // Windows.BITMAP 構造体
  if GetObject(IconInfo.hbmColor, SizeOf(IconBmp), @IconBmp) <> 0 then
  begin
    // IconBmp.bmBits にアイコンの画像データが入っている
  end;
end;
で、これを TBitmap にコピーすればいいのかと思いきや…!
そうは問屋が卸しません。
bmBits には、32bit・24bit・8bit・モノクロなど複数の形式のデータが格納される可能性があります。
そのため、データ形式を判別したうえで、それぞれに対応した処理に分岐する必要があります。
…めんどくさい!!!
Icon を BITMAP に描画する
Icon のデータ見分けて分岐するのは面倒なので、Icon を 32bit BITMAP に描画して、そのピクセルデータを取ることにします。
こうすれば、Icon の中にどんなデータ(例えば 24bit データなど)が入っていたとしても 32bit の ARGB データとして取れます。
実際のコードは↓こうなります。
var Info: TBitmapInfo;
ZeroMemory(@Info, SizeOf(Info));
Info.bmiHeader.biSize := SizeOf(Info.bmiHeader);
Info.bmiHeader.biWidth := W;
Info.bmiHeader.biHeight := -H; // top-down
Info.bmiHeader.biPlanes := 1;
Info.bmiHeader.biBitCount := 32;
Info.bmiHeader.biCompression := BI_RGB;

var Bits: Pointer := nil;
var DC := CreateCompatibleDC(0);
try
  if DC = 0 then
    Exit;

  var HBmp := CreateDIBSection(DC, Info, DIB_RGB_COLORS, Bits, 0, 0);
  try
    if HBmp = 0 then
      Exit;

    var Old := SelectObject(DC, HBmp);
    try
      if not DrawIconEx(DC, 0, 0, AIcon, W, H, 0, 0, DI_NORMAL) then
        Exit;

      // Bits にはピクセルデータが入っている
    finally
      SelectObject(DC, Old);
    end;
  finally
    DeleteObject(HBmp);
  end;
finally
  DeleteDC(DC);
end;
ここで、取った Bits がピクセルデータです。
これを TBitmap に渡せば終わりです。
if ABitmap.Map(TMapAccess.Write, Data) then
  try
    // TColorArray, PColorArray は先頭で定義済み
    // TColorArray = array [0.. $0f_ff_ff_ff] of UInt32;
    // PColorArray = ^TColorArray;

    for var Y := 0 to H - 1 do
      Move(
        PColorArray(Bits)[Y * W],
        Data.GetScanline(Y)^,
        W * SizeOf(UInt32)
      );
  finally
    ABitmap.Unmap(Data);
  end;
コード全文
ここでは僕が良く使っている TIconConveter というライブラリ全文を記載します。
このライブラリには BitmapToIcon という逆の仕組みも書いてあります!
FMX.Helpers.Win に BitmapToIcon が定義されており、TIconConverter では、それを呼んでいるだけです!
どうせなら IconToBitmap も作ってくれれば良かったのに!
TIconConverter ソース全文
(*
 * IconConverter
 *
 * PLATFORMS
 *   Windows
 *
 * LICENSE
 *   Copyright (c) 2024 HOSOKAWA Jun
 *   Released under the MIT license
 *   http://opensource.org/licenses/mit-license.php
 *
 * HISTORY
 *   2024/06/30  Ver 1.0.0  Release
 *
 * Programmed by HOSOKAWA Jun (twitter: @pik)
 *)

unit PK.Graphic.IconConverter.Win;

interface

uses
  Winapi.Windows
  , Winapi.GDIPAPI
  , Winapi.GDIPOBJ
  , FMX.Graphics
  ;

type
  TIconConverter = class
  public
    class function BitmapToIcon(const ABitmap: TBitmap): HICON;
    class procedure IconToBitmap(const AIcon: HICON; const ABitmap: TBitmap);
  end;

implementation

uses
  System.SysUtils
  , FMX.Helpers.Win
  ;

{ TIconConverter }

class function TIconConverter.BitmapToIcon(const ABitmap: TBitmap): HICON;
begin
  Result := FMX.Helpers.Win.BitmapToIcon(ABitmap);
end;

class procedure TIconConverter.IconToBitmap(
  const AIcon: HICON;
  const ABitmap: TBitmap);
type
  TColorArray = array [0.. $0f_ff_ff_ff] of UInt32;
  PColorArray = ^TColorArray;
begin
  ABitmap.Assign(nil);

  var W: Integer := 0;
  var H: Integer := 0;

  var IconInfo: TIconInfo;
  if GetIconInfo(AIcon, IconInfo) then
    try
      if IconInfo.hbmColor <> 0 then
      begin
        var IconBmp: BITMAP;
        if GetObject(IconInfo.hbmColor, SizeOf(IconBmp), @IconBmp) <> 0 then
        begin
          W := IconBmp.bmWidth;
          H := IconBmp.bmHeight;
        end;
      end;
    finally
      DeleteObject(IconInfo.hbmColor);
      DeleteObject(IconInfo.hbmMask);
    end;

  if (W < 1) or (H < 1) then
    Exit;

  var Info: TBitmapInfo;
  ZeroMemory(@Info, SizeOf(Info));
  Info.bmiHeader.biSize := SizeOf(Info.bmiHeader);
  Info.bmiHeader.biWidth := W;
  Info.bmiHeader.biHeight := -H;
  Info.bmiHeader.biPlanes := 1;
  Info.bmiHeader.biBitCount := 32;
  Info.bmiHeader.biCompression := BI_RGB;

  var Bits: Pointer := nil;
  var DC := CreateCompatibleDC(0);
  try
    if DC = 0 then
      Exit;

    var HBmp := CreateDIBSection(DC, Info, DIB_RGB_COLORS, Bits, 0, 0);
    try
      if HBmp = 0 then
        Exit;

      var Old := SelectObject(DC, HBmp);
      try
        if not DrawIconEx(DC, 0, 0, AIcon, W, H, 0, 0, DI_NORMAL) then
          Exit;

        ABitmap.SetSize(W, H);

        var Data: TBitmapData;
        if ABitmap.Map(TMapAccess.Write, Data) then
          try
            for var Y := 0 to H - 1 do
              Move(
                PColorArray(Bits)[Y * W],
                Data.GetScanline(Y)^,
                W * SizeOf(UInt32)
              );
          finally
            ABitmap.Unmap(Data);
          end;
      finally
        SelectObject(DC, Old);
      end;
    finally
      DeleteObject(HBmp);
    end;
  finally
    DeleteDC(DC);
  end;
end;

end.
実行結果
まとめ
単なる ico ファイルだったら TBitmap でそのまま表示できます。
HICON を描画する場合は、自分でピクセルデータを TBitmap に流し込む必要があります。
FireMonkey なのに Win32 API バリバリなので、あんまり FireMonkey の意味が無いかも!