だいぶ間が開いてしまいましたが。。。
※本記事は下記のエントリから始まる連載記事となります。
.NET5.0/C#9.0でオートシェイプ風図形描画ライブラリを作ろう!(Chapter0)
Chapter4 図形を配置するためのクラスShapePenを作ろう!
ソースコード
Capter4の内容は下記ブランチにて実装されています。実装の詳細はこちらをご確認ください。
https://github.com/pierre3/CoreShape/tree/blog/capter4
図形を配置する仕組みを用意する
下図のように、ドラッグ操作で新しい図形を配置することを考えます。

- ドラッグ操作で図形の位置とサイズを指定する
- ドラッグ中は配置する図形の輪郭のみが表示される
- マウスボタンを離した時点での図形の位置・サイズで図形を配置する
- 図形の外観は、あらかじめ指定しておいたテンプレートに従って作成される
IShapePenインターフェース
図形を配置するツールをShapePenと名付けることとします。ShapePenのインターフェースIShapePenを定義します。
public interface IShapePen : IDraggable, IDrawable, ILocatable
{
    IShape Template { get; set; }
    IShape CreateShape();
}
- 作成する図形の外観等の定義を
Templateプロパティで指定します。 - 図形を生成するメソッド
CreateShape()を実装します。 - ドラッグ操作と輪郭の描画機能を持つので、
IDraggable及びIDrawableインターフェースを実装します。 - また、特定の座表に図形を配置する機能として
ILoscatableインターフェースを定義し、こちらも実装します。
public interface ILocatable
{
    void Locate(Point location);
}
IShapeインターフェースの変更
IShape インターフェースはIsSelectedプロパティのみでしたが、 (RectangleShapeなどの具象クラスで定義していた)外観やサイズを扱う各種プロパティもIShape側で定義するように変更します。
public interface IShape : IDrawable, IDraggable, IHitTest, ILocatable
{
    Rectangle Bounds { get; }
    Stroke? Stroke { get; set; }
    Fill? Fill { get; set; }
    bool IsSelected { get; set; }
    IHitTestStrategy HitTestStrategy { get; set; }
    void SetBounds(Rectangle bounds);
}
ShapePen の実装
それでは、ShapePenの具体的な実装を考えてみたいと思います。
ShapePenをクラス図にすると下記のようになります。
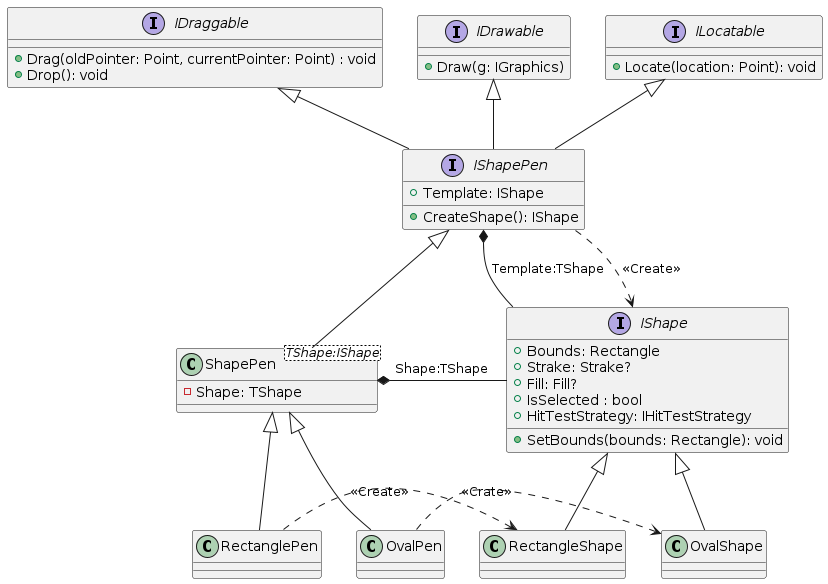
ジェネリッククラス ShapePen<TShape>
ShapePenはジェネリッククラスとして、IShape を実装するすべての図形で利用できるようにします。
-
ShapePen<TShape>とし、型引数TShapeにはIShapeとnew()の制約を付けます。
new()制約を付けた場合、引数なしのコンストラクタを持つことが必須となります。この制約によりクラス内部でnew TShape()のようにインスタンスが生成できるようになります。
public class ShapePen<TShape> : IShapePen where TShape : IShape, new()
{
}
Shape プロパティとTemplateプロパティ
-
Shapeプロパティを使って、図形の位置決めのためのドラッグ処理や、輪郭の描画等を行います。- コンストラクタで図形(型引数で指定した型)のインスタンスを生成してShapeプロパティに設定します。
- その際、図形の外観は輪郭(幅1、黒のStroke固定)のみ設定します。
- 作成する図形の外観等は
Templateプロパティで指定します。-
Templateプロパティは、コンストラクタに渡された値によって初期化されます。
-
public class ShapePen<TShape> : IShapePen where TShape : IShape, new()
{
    private TShape Shape { get; set; }
    public IShape Template { get; set; }

    public ShapePen(TShape template)
    {
        Shape = new TShape()
        {
            Stroke = new Stroke(Color.Black, 1f)
        };
        Template = template;
    }

    public ShapePen(Stroke? stroke, Fill? fill, IHitTestStrategy? hitTestStragegy = null)
    {
        Shape = new TShape()
        {
            Stroke = new Stroke(Color.Black, 1f)
        };
        Template = new TShape()
        {
            Stroke = stroke,
            Fill = fill
        };
        if (hitTestStragegy is not null)
        {
            Template.HitTestStrategy = hitTestStragegy;
        }
    }
}
ShapePenのメソッド
ShapePenクラスに図形配置のためのメソッドを定義します
-
Locate()
ShapeプロパティのLocate()メソッドを実行。クリックした位置に図形を配置する -
Drag()
ShapeプロパティのDrag()メソッドを実行。ドラッグによる図形サイズの調整する -
Drop()
ShapeプロパティのDrag()メソッドを実行。ドラッグ終了時の処理(幅、高さがマイナスになるような場合の補正処理など)を実施する -
Draw()
ドラッグ中のみ、ShapeプロパティのDraw()メソッドを実行。配置前のプレビュー状態を表示する -
CreateShape()
Shapeプロパティの座標(Bounds)とTemplateプロパティのスタイル情報を基に図形オブジェクトを作成して、返却
public class ShapePen<TShape> : IShapePen where TShape : IShape, new()
{
    public void Locate(Point location)
    {
        Shape.Locate(location);
        IsDragging = true;
    }

    public void Drag(Point oldPointer, Point currentPointer)
    {
        Shape.Drag(oldPointer, currentPointer);
    }

    public void Drop()
    {
        Shape.Drop();
        IsDragging = false;
    }

    public void Draw(IGraphics g)
    {
        if (IsDragging)
        {
            Shape.Draw(g);
        }
    }

    public IShape? CreateShape()
    {
        if (Shape.Bounds.Size == default)
        {
            //サイズが0の場合は図形を作らない
            return null;
        }
        //Templateから図形を作成
        var shape = new TShape()
        {
            Stroke = Template.Stroke,
            Fill = Template.Fill,
            HitTestStrategy = Template.HitTestStrategy,
            IsSelected = true
        };
        //座標はShapeプロパティと同じ
        shape.SetBounds(Shape.Bounds);
        return shape;
    }
}
SampleWPF側の実装
ライブラリ側の仕組みは完成しましたので、それを利用する側の実装例を見てみましょう。
切り替えボタンの実装
まず、MainWindowにツールバーを追加し、下記3つのボタンを配置します。
ボタンはどれか1つを選択可能で、選択したボタンによってShapePenを切り替えます。
- [↖]:配置する図形なし。図形の選択のみ行うカーソル (
ShapePenなし) - [□]:矩形(四角形)を配置する(
ShapePen<RectangleShape>) - [○]:楕円を配置する(
ShapePen<OvalShape>)
<Window x:Class="SampleWPF.MainWindow"
        xmlns="http://schemas.microsoft.com/winfx/2006/xaml/presentation"
        xmlns:x="http://schemas.microsoft.com/winfx/2006/xaml"
        xmlns:d="http://schemas.microsoft.com/expression/blend/2008"
        xmlns:mc="http://schemas.openxmlformats.org/markup-compatibility/2006"
        xmlns:skiaSharp="clr-namespace:SkiaSharp.Views.WPF;assembly=SkiaSharp.Views.WPF"
        xmlns:local="clr-namespace:SampleWPF"
        mc:Ignorable="d"
        Title="MainWindow" Height="450" Width="800">
    <Grid>
        <Grid.RowDefinitions>
            <RowDefinition Height="Auto"/>
            <RowDefinition/>
        </Grid.RowDefinitions>
        <ToolBar VerticalAlignment="Top">
            <RadioButton x:Name="DefaultButton" Width="32" Height="32"
                Content="↖" IsChecked="True" Checked="DefaultButton_Checked" />
            <RadioButton x:Name="RectButton" Width="32" Height="32" Checked="RectButton_Checked">
                <Rectangle Width="24" Height="16" Stroke="Black"/>
            </RadioButton>
            <RadioButton x:Name="OvalButton" Width="32" Height="32" Checked="OvalButton_Checked">
                <Ellipse Width="24" Height="16" Stroke="Black"/>
            </RadioButton>
        </ToolBar>
        <skiaSharp:SKElement Grid.Row="1"
                             x:Name="skElement"
                             PaintSurface="sKElement_PaintSurface"
                             MouseMove="sKElement_MouseMove"
                             MouseDown="skElement_MouseDown"
                             MouseUp="skElement_MouseUp"/>

    </Grid>
</Window>
次にコードビハインド MainWindow.xaml.cs を開き、下記の内容を追加します。
- MainWindow に
IShapePen型のShapePenプロパティを追加
先ほど追加したツールバーの各ボタンのCheckedイベントでPenプロパティを切り替える処理を追加します。
//...(省略)...

private IShapePen? ShapePen;

//...(省略)...

private void DefaultButton_Checked(object sender, RoutedEventArgs e)
{
    ShapePen = null;
}

private void RectButton_Checked(object sender, RoutedEventArgs e)
{
    ShapePen = new ShapePen<RectangleShape>(
        new Stroke(CoreShape.Color.Red, 2.0f),
        new Fill(CoreShape.Color.LightSeaGreen));
}

private void OvalButton_Checked(object sender, RoutedEventArgs e)
{
    ShapePen = new ShapePen<OvalShape>(
        new Stroke(CoreShape.Color.Green, 1.0f),
        new Fill(CoreShape.Color.LightYellow));
}
ShapePenによる図形の配置
マウス操作のイベントにShapePenを使った図形の配置処理を記述します。
カーソル移動時 (Mouse Moveイベント(ボタンを押さずに移動))
Mouse Move イベントでカーソル移動時(マウスボタンが押されていない場合)の処理を下記の様に実装します。
- マウスカーソルが設置済みの図形の上にあるか確認し、カーソルの下にある図形を
activeShapeに設定する - カーソルの下に設置済みの図形がない場合は
activeShapeにShapePenを設定する
private void SKElement_MouseMove(object sender, MouseEventArgs e)
{
    var currentPoint = GetMousePoint(e);
    if (e.LeftButton == MouseButtonState.Pressed)
    {
        //マウスドラッグ時処理 ...
    }
    else
    {
        //カーソル移動時(カーソルが図形の上にある場合はその図形を、図形の上にない場合はShapePenをアクティブにする)
        activeShape = ShapePen;
        foreach (var shape in shapes.Reverse())
        {
            var hitResult = shape.HitTest(currentPoint);
            Cursor = SwitchCursor(hitResult);
            if (hitResult is not HitResult.None)
            {
                activeShape = shape;
                break;
            }
        }
    }
    oldPoint = currentPoint;
}
ShapePenの位置決め(Mouse Down イベント)
ShapePenがアクティブの状態でマウスの左ボタンがクリックされた場合に、ShapePenのLocate()メソッドを実行して、作成する図形の位置を設定します。
private void SkElement_MouseDown(object sender, MouseButtonEventArgs e)
{
    if (e.LeftButton != MouseButtonState.Pressed)
    {
        return;
    }
    //ShapePenがアクティブの場合
    if (activeShape is IShapePen shapePen)
    {
        //ShapePenの位置決め
        var location = GetMousePoint(e);
        shapePen.Locate(location);
    }
    //選択状態をリセット(アクティブな図形のみ選択状態にする)
    foreach (var shape in shapes)
    {
        shape.IsSelected = shape == activeShape;
    }
    skElement.InvalidateVisual();
}
ドラッグによるサイズ調整(Mouse Move イベント(左ボタン押下中))
マウスの左ボタンを押したままカーソルを移動した場合の処理を追加。
ここでは、アクティブな図形のDrag()メソッドを実行します。ShapePenがアクティブの場合、Shapeプロパティの幅、高さが変更されます。
private void SKElement_MouseMove(object sender, MouseEventArgs e)
{
    var currentPoint = GetMousePoint(e);
    if (e.LeftButton == MouseButtonState.Pressed)
    {
        //ドラッグ中。activeShapeのDrag()メソッドを実行
        if (activeShape is null)
        { return; }
        activeShape.Drag(oldPoint, currentPoint);
        skElement.InvalidateVisual();
    }
    else
    {
        //カーソル移動中...
    }
    oldPoint = currentPoint;
}
Mouse Up イベント
ドラッグ後、マウスボタンを離したタイミングで、ShapePenから図形を配置する処理を記述します。
ShapePenがアクティブの場合、CreateShape()メソッドを実行して新しい図形を作成します。作成した図形は配置済みの図形を格納する MainWindowの shapes フィールドに追加します。
private void SkElement_MouseUp(object sender, MouseButtonEventArgs e)
{
    if (e.LeftButton != MouseButtonState.Released)
    {
        return;
    }
    if (activeShape is null)
    {
        return;
    }
    activeShape.Drop();
    if (activeShape is IShapePen shapePen)
    {
        var shape = shapePen.CreateShape();
        if (shape is null)
        {
            return;
        }
        shapes.Add(shape);
        activeShape = shape;
    }
    skElement.InvalidateVisual();
}
次回
ここまで来てようやくオートシェイプっぽくなってきましたが、処理も複雑になりGUI側(WPFアプリ)の管理が難しくなってきましたね。
ということで次回は、(ちょっと本筋とは離れますが)WPFアプリのソースコードを少し整理しようと思います。
余談
前回の記事から1年以上たってしまい、その間に.NET6.0がリリースされ、C#も10になってしまいました....
そこで、今回のサンプルコードから、ターゲットを.NET6.0に変更しました。
ソースコードも、できるだけC#10で追加された機能を取り入れていきたいと思います。
この連載のタイトルも、「.NET6.0/C#10でオートシェイプ風図形描画ライブラリを作ろう!」に変えるべきか。。。