(この記事は「量子コンピュータ Advent Calendar 2018」の24日目です)
Merry Xmas! ![]()
fukuoka.exのpiacereです
ご覧いただいて、ありがとうございます ![]()
いつもこの時期は、なんかワクワクして、筆と口が滑りやすいAdvent Calendar終盤ですが、今回は、ElixirによるTDD(Test Driven Development)で、量子コンピュータシミュレータを作ってみます
実は、約1年前に、量子コンピュータシミュレータの先行実装である「quantex」をリリース済で、量子コンピュータ関連の登壇でぶっ込んでたので、それを見てElixirやそのdoctestに興味を持つ方もチラホラいたのですが、量子コンピュータネタをコラムとして書くのは、実は初めてです
先行実装時は、複素数を扱えなかったので、今回、複素数を使うYゲートを追加してみました
最終的に、ここで作るシミュレータを使って、このアルゴリズムを作ってみたいと思います

量子コンピュータとは?
このコラムは、量子コンピュータと各種ゲートについての基礎知識を持っている方向けに、Elixirでの実装手順について解説しようと思いますので、量子コンピュータをよくご存知で無い方は、以下資料をご覧ください
ちなみに、上2つのスライドは、@YuichiroMinato さんと、福岡で共同開催した勉強会の登壇スライドです
プログラマのための量子コンピュータ入門 by @bond_kaneko さん
「分かりそう」で「分からない」でも「分かった」気になれる量子アニーリング
量子コンピュータと量子ゲートと私 by @eccyan さん
Quantum Katas で始める量子コンピュータ入門 |0⟩ by @stwhabout さん
シミュレータと実機の違いについて
IBM Qで、「量子コンピュータシミュレータ」と「実際の量子コンピュータ」を使い分ける下記コラムが、その違いを、とても分かりやすく解説しています
IBM Quantum Computing で計算してみよう
https://www.ibm.com/developerworks/jp/cloud/library/cl-quantum-computing/index.html
Elixirでシミュレータを作るための必須装備
実際にPJを作りながら説明します
こちらのチュートリアルを参考に、予めElixirはインストールしておいてください
適当なフォルダ配下で、Elixir PJを作成します
mix new q
cd q
mix.exsのdepsに、必要なライブラリをリストします
defmodule Q.Mixfile do
…
	defp deps do
		[
			{ :mix_test_watch, "~> 0.9",  only: :dev, runtime: false },
			{ :math,           "~> 0.3" },
			{ :complex_num,    "~> 1.1" },
			{ :numexy,         "~> 0.1" },
			{ :ex_doc,         "~> 0.19", only: :dev, runtime: false },
			{ :earmark,        "~> 1.3" },
		]
	end
…
以下でライブラリ取得します
mix deps.get
mix test.watchは、私のElixirズンドコキヨシでも解説している通り、ElixirでTDDをやるためには必須と言って良いくらいの、ファイル更新を補足して、テストを自動実行する、mixのプラグインです
Mathは、様々な数学関数を用意したライブラリです
ComplexNumは、Elixirで複素数を扱うためのライブラリです
Numexyは、ElixirでPythonの「NumPy」ライクな行列演算を行うためのライブラリで、fukuoka.exキャストの @yujikawa さんが開発しています
ExDocとEarmarkは、Elixirズンドコキヨシで解説している通り、関数リファレンスをWebページ生成し、HexおよびHexDocに公開するのに使われます
ElixirでTDDするなら「mix test.watch」を起動
ElixirでTDDをするなら、なにはともあれ、mix test.watchを起動します
mix test.watch
これだけで、ファイル更新するたびに、テストが自動実行されるようになります
なお、PJのデフォルトモジュールである「Q」に対するテストが、以下ファイルに既に書かれていますが、hello関数は不要なので、下記の通り、コメントアウトするか、削除してください
defmodule QTest do
  use ExUnit.Case
  doctest Q

#  test "greets the world" do
#    assert Q.hello() == :world
#  end
end
さぁ、これで常に自動テストが走る状態になり、いつでもTDD可能になりました
量子コンピュータシミュレータを実装する
それでは早速、TDDしながら、実装していきます
量子ビットを実装する
量子ビット$|\psi⟩$ は、$|0⟩$ と $|1⟩$ の重ね合わせで表現されます
|\psi\rangle = \alpha | 0 \rangle + \beta | 1 \rangle
そして、ベクトルで記述可能です
\begin{aligned}
  | 0 \rangle = \begin{pmatrix} 1 \\ 0 \end{pmatrix}
  \\
  | 1 \rangle = \begin{pmatrix} 0 \\ 1 \end{pmatrix}
\end{aligned}
$|0⟩$ を「q0」、$|1⟩$ を「q1」として実装します…が、このレベルからTDDしていくので、doctestは正しい呼出をし、関数内実装はダミー実装(≒空文字返却)します
行列は、Elixirのリストで表現するため、$|0⟩$ は [ 1, 0 ]、$|1⟩$ は [ 0, 1 ] とします
defmodule Q do
	@doc """
	|0> qubit = ( 1, 0 )

	## Examples
		iex> Q.q0
		[ 1, 0 ]
	"""
	def q0(), do: ""

	@doc """
	|1> qubit = ( 0, 1 )

	## Examples
		iex> Q.q1
		[ 0, 1 ]
	"""
	def q1(), do: ""
end
当然、mix test.watchは、テスト失敗を返します(Redパターン)
Running tests...
Compiling 1 file (.ex)

  1) doctest Q.q0/0 (1) (QDocTest)
     test/q_doc_test.exs:3
     Doctest failed
     code:  Q.q0 === [ 1, 0 ]
     left:  ""
     right: [1, 0]
     stacktrace:
       lib/q.ex:10: Q (module)

  2) doctest Q.q1/0 (2) (QDocTest)
     test/q_doc_test.exs:3
     Doctest failed
     code:  Q.q1 === [ 0, 1 ]
     left:  ""
     right: [0, 1]
     stacktrace:
       lib/q.ex:19: Q (module)

.

Finished in 0.1 seconds
2 doctests, 1 test, 2 failures
関数内を正しく実装しましょう
defmodule Q do
	@doc """
	|0> qubit = ( 1, 0 )

	## Examples
		iex> Q.q0
		[ 1, 0 ]
	"""
	def q0(), do: [ 1, 0 ]

	@doc """
	|1> qubit = ( 0, 1 )

	## Examples
		iex> Q.q1
		[ 0, 1 ]
	"""
	def q1(), do: [ 0, 1 ]
end
テスト成功しました(Greenパターン)
Running tests...
Compiling 1 file (.ex)
...

Finished in 0.1 seconds
2 doctests, 1 test, 0 failures
量子ビットは、これ以上、行うことが無いため、Refactoringパターンは存在しません
Xゲートを実装する
Xゲートの定義は以下の通りです
X=
  \begin{bmatrix}
    0 & 1
    \\
    1 & 0
  \end{bmatrix}
$|0⟩$ と $|1⟩$ を入れ替える動作を持つため、NOTゲートとも呼ばれます
\begin{align}
  X \begin{pmatrix} 1\\0 \end{pmatrix} &= \begin{pmatrix} 0\\1 \end{pmatrix}
  \\
  X \begin{pmatrix} 0\\1 \end{pmatrix} &= \begin{pmatrix} 1\\0 \end{pmatrix}
\end{align}
それでは、ElixirでTDDしていきましょう
…
	@doc """
	X gate.

	## Examples
		iex> Q.x( Q.q0 )
		[ 0, 1 ]
		iex> Q.x( Q.q1 )
		[ 1, 0 ]
	"""
	def x( qubit ), do: ""
…
もちろん、テスト失敗します
Running tests...
Compiling 1 file (.ex)
warning: variable "qubit" is unused
  lib/q.ex:33

  1) doctest Q.x/1 (3) (QDocTest)
     test/q_doc_test.exs:3
     Doctest failed
     code:  Q.x( Q.q0 ) === [ 0, 1 ]
     left:  ""
     right: [0, 1]
     stacktrace:
       lib/q.ex:28: Q (module)

..

Finished in 0.1 seconds
3 doctests, 1 test, 1 failure
テスト成功する、最低限の実装は、どうなるでしょう?
…
	@doc """
	X gate.

	## Examples
		iex> Q.x( Q.q0 )
		[ 0, 1 ]
		iex> Q.x( Q.q1 )
		[ 1, 0 ]
	"""
	def x( [ 1, 0 ] ), do: [ 0, 1 ]
	def x( [ 0, 1 ] ), do: [ 1, 0 ]
…
ナント、こんなショボい実装でも、テストは通ります
「X行列の内積、取って無いジャン」って言われちゃいますが、上記の期待値を叶えるだけであれば、これで充分なのです
なお、地味にElixirのパターンマッチを活用しており、スマートな実装になっていることが確認できます
Zゲートを実装する
Zゲートの定義は以下の通りです
Z =
  \begin{bmatrix}
    1 & 0
    \\
    0 & -1
  \end{bmatrix}
$|0⟩$ は変化させず、$|1⟩$ は、$|-1⟩$ に変換します
\begin{align}
  Z \begin{pmatrix} 1 \\ 0 \end{pmatrix} &= \begin{pmatrix} 1 \\ 0 \end{pmatrix}
  \\
  Z \begin{pmatrix} 0 \\ 1 \end{pmatrix} &= \begin{pmatrix} 0 \\ -1 \end{pmatrix}
\end{align}
それでは、ElixirでTDDしていきましょう
…
	@doc """
	Z gate.

	## Examples
		iex> Q.z( Q.q0 )
		[ 1, 0 ]
		iex> Q.z( Q.q1 )
		[ 0, -1 ]
	"""
	def z( qubit ), do: ""
…
今回も、テスト失敗します(失敗ログは省略します)ので、テスト成功する、最低限の実装をします
…
	@doc """
	Z gate.

	## Examples
		iex> Q.z( Q.q0 )
		[ 1, 0 ]
		iex> Q.z( Q.q1 )
		[ 0, -1 ]
	"""
	def z( [ 1, 0 ] ), do: [ 1, 0 ]
	def z( [ 0, 1 ] ), do: [ 0, -1 ]
…
Z行列も内積は取らず、Elixirのパターンマッチで最低限の実装をしています
Zゲートにより、返却パターンが1つ増えた…
Zゲートが返却する、[ 0, -1 ]により、Xゲートが返さなければならないパターンが1つ、増えました
しかし、Xゲートは対応していないため、エラーとなります
iex> Q.z( Q.q1 ) |> Q.x
** (FunctionClauseError) no function clause matching in Q.x/1

    The following arguments were given to Q.x/1:

        # 1
        [0, -1]

    Attempted function clauses (showing 2 out of 2):

        def x(-[1, 0]-)
        def x(-[0, 1]-)

    (quantex) lib/q.ex:33: Q.x/1
まず、Xゲートのテストを2件、追加します
…
	@doc """
	X gate.

	## Examples
		iex> Q.x( Q.q0 )
		[ 0, 1 ]
		iex> Q.x( Q.q1 )
		[ 1, 0 ]

		iex> Q.z( Q.q1 ) |> Q.x
		[ -1, 0 ]
		iex> Q.z( Q.q1 ) |> Q.x |> Q.x
		[ 0, -1 ]
	"""
	def x( [ 1, 0 ] ), do: [ 0, 1 ]
	def x( [ 0, 1 ] ), do: [ 1, 0 ]
…
テストは当然、失敗しますが、次に、Xゲートをリファクタリングします
…
	@doc """
	X gate.

	## Examples
		iex> Q.x( Q.q0 )
		[ 0, 1 ]
		iex> Q.x( Q.q1 )
		[ 1, 0 ]

		iex> Q.z( Q.q1 ) |> Q.x
		[ -1, 0 ]
		iex> Q.z( Q.q1 ) |> Q.x |> Q.x
		[ 0, -1 ]
	"""
	def x( [  1,  0 ] ), do: [  0,  1 ]
	def x( [  0,  1 ] ), do: [  1,  0 ]
	def x( [  0, -1 ] ), do: [ -1,  0 ]
	def x( [ -1,  0 ] ), do: [  0, -1 ]
…
テスト成功します
Hゲートを実装する
Hゲートの定義は以下の通りです
H =
  \dfrac{1}{\sqrt{2}}
  \begin{bmatrix}
    1 & 1
    \\
    1 & -1
  \end{bmatrix}
以下のような変換を行います
\begin{align}
  H \begin{pmatrix} 1 \\ 0 \end{pmatrix} &= \dfrac{1}{\sqrt{2}} \begin{pmatrix} 1 \\ 1 \end{pmatrix}
  \\
  H \begin{pmatrix} 0 \\ 1 \end{pmatrix} &= \dfrac{1}{\sqrt{2}} \begin{pmatrix} 1 \\ -1 \end{pmatrix}
\end{align}
それでは、ElixirでTDDしていきましょう
…
	@doc """
	Hadamard gate.

	## Examples
		iex> Q.h( Q.q0 )
		[ 1 / Math.sqrt( 2 ) * 1, 1 / Math.sqrt( 2 ) * 1 ]
		iex> Q.h( Q.q1 )
		[ 1 / Math.sqrt( 2 ) * 1, 1 / Math.sqrt( 2 ) * -1 ]
	"""
	def h( qubit ), do: ""
…
テスト失敗しますので、テスト成功する、最低限の実装をします
…
	@doc """
	Hadamard gate.

	## Examples
		iex> Q.h( Q.q0 )
		[ 1 / Math.sqrt( 2 ) * 1, 1 / Math.sqrt( 2 ) * 1 ]
		iex> Q.h( Q.q1 )
		[ 1 / Math.sqrt( 2 ) * 1, 1 / Math.sqrt( 2 ) * -1 ]
	"""
	def h( [ 1, 0 ] ), do: [ 1 / Math.sqrt( 2 ) * 1, 1 / Math.sqrt( 2 ) * 1 ]
	def h( [ 0, 1 ] ), do: [ 1 / Math.sqrt( 2 ) * 1, 1 / Math.sqrt( 2 ) * -1 ]
…
Hゲートにより、返却パターンが色々増えた…
Hゲートの返却により、XゲートやZゲートが返さなければならないパターンが、色々増えました(当然、対応していないためエラーとなります)
テストを追加していきます
…
	@doc """
	X gate.

	## Examples
		iex> Q.x( Q.q0 )
		[ 0, 1 ]
		iex> Q.x( Q.q1 )
		[ 1, 0 ]

		iex> Q.z( Q.q1 ) |> Q.x
		[ -1, 0 ]
		iex> Q.z( Q.q1 ) |> Q.x |> Q.x
		[ 0, -1 ]

		iex> Q.h( Q.q0() ) |> Q.x
		[ 1 / Math.sqrt( 2 ) * 1, 1 / Math.sqrt( 2 ) * 1 ]
		iex> Q.h( Q.q1 ) |> Q.x
		[ 1 / Math.sqrt( 2 ) * -1, 1 / Math.sqrt( 2 ) * 1 ]
	"""
	def x( [  1,  0 ] ), do: [  0,  1 ]
	def x( [  0,  1 ] ), do: [  1,  0 ]
	def x( [  0, -1 ] ), do: [ -1,  0 ]
	def x( [ -1,  0 ] ), do: [  0, -1 ]

	@doc """
	Z gate.

	## Examples
		iex> Q.z( Q.q0 )
		[ 1, 0 ]
		iex> Q.z( Q.q1 )
		[ 0, -1 ]

		iex> ( Q.h( Q.q0 ) |> Q.z ).array
		[ 1 / Math.sqrt( 2 ) * 1, 1 / Math.sqrt( 2 ) * -1 ]
		iex> ( Q.h( Q.q1 ) |> Q.z ).array
		[ 1 / Math.sqrt( 2 ) * 1, 1 / Math.sqrt( 2 ) * 1 ]
	"""
	def z( [ 1, 0 ] ), do: [ 1, 0 ]
	def z( [ 0, 1 ] ), do: [ 0, -1 ]
…
そろそろ、しんどくなってきたので、ロジックに行列演算を導入していきましょう
…
	def x( qbit ),  do: Numexy.dot( x_matrix(), qbit )
	def x_matrix(), do: Numexy.new( [ [ 0, 1 ], [ 1, 0 ] ] )
…
	def z( qbit ),  do: Numexy.dot( z_matrix(), qbit )
	def z_matrix(), do: Numexy.new( [ [ 1, 0 ], [ 0, -1 ] ] )
…
	def h( qbit ),  do: Numexy.dot( h_matrix(), qbit )
	def h_matrix(), do: 1 / Math.sqrt( 2 ) |> Numexy.mul( Numexy.new( [ [ 1, 1 ], [ 1, -1 ] ] ) )
…
これらを実装した全体は、こんな感じになります
テストは、末尾に.arrayを付けた以外、変更はありません
defmodule Q do
	@doc """
	|0> qubit = ( 1, 0 )

	## Examples
		iex> Q.q0.array
		[ 1, 0 ]
	"""
	def q0, do: Numexy.new( [ 1, 0 ] )

	@doc """
	|1> qubit = ( 0, 1 )

	## Examples
		iex> Q.q1.array
		[ 0, 1 ]
	"""
	def q1, do: Numexy.new( [ 0, 1 ] )

	@doc """
	X gate.

	## Examples
		iex> Q.x( Q.q0 ).array
		[ 0, 1 ]
		iex> Q.x( Q.q1 ).array
		[ 1, 0 ]

		iex> ( Q.z( Q.q1 ) |> Q.x ).array
		[ -1, 0 ]
		iex> ( Q.z( Q.q1 ) |> Q.x |> Q.x ).array
		[ 0, -1 ]

		iex> ( Q.h( Q.q0 ) |> Q.x ).array
		[ 1 / Math.sqrt( 2 ) * 1, 1 / Math.sqrt( 2 ) * 1 ]
		iex> ( Q.h( Q.q1 ) |> Q.x ).array
		[ 1 / Math.sqrt( 2 ) * -1, 1 / Math.sqrt( 2 ) * 1 ]
	"""
	def x( qbit ),  do: Numexy.dot( x_matrix(), qbit )
	def x_matrix(), do: Numexy.new( [ [ 0, 1 ], [ 1, 0 ] ] )

	@doc """
	Z gate.

	## Examples
		iex> Q.z( Q.q0 ).array
		[ 1, 0 ]
		iex> Q.z( Q.q1 ).array
		[ 0, -1 ]

		iex> ( Q.h( Q.q0 ) |> Q.z ).array
		[ 1 / Math.sqrt( 2 ) * 1, 1 / Math.sqrt( 2 ) * -1 ]
		iex> ( Q.h( Q.q1 ) |> Q.z ).array
		[ 1 / Math.sqrt( 2 ) * 1, 1 / Math.sqrt( 2 ) * 1 ]
	"""
	def z( qbit ),  do: Numexy.dot( z_matrix(), qbit )
	def z_matrix(), do: Numexy.new( [ [ 1, 0 ], [ 0, -1 ] ] )

	@doc """
	Hadamard gate.

	## Examples
		iex> Q.h( Q.q0 ).array
		[ 1 / Math.sqrt( 2 ) * 1, 1 / Math.sqrt( 2 ) * 1 ]
		iex> Q.h( Q.q1 ).array
		[ 1 / Math.sqrt( 2 ) * 1, 1 / Math.sqrt( 2 ) * -1 ]
	"""
	def h( qbit ),  do: Numexy.dot( h_matrix(), qbit )
	def h_matrix(), do: 1 / Math.sqrt( 2 ) |> Numexy.mul( Numexy.new( [ [ 1, 1 ], [ 1, -1 ] ] ) )
end
テスト結果は、全てのテストが成功しました
Hゲートを2回、適用した場合のテストを追加
Hゲートを2回、適用すると、元の行列に戻るため、これをテスト追加します
…
	@doc """
	Hadamard gate.

	## Examples
		iex> Q.h( Q.q0 ).array
		[ 1 / Math.sqrt( 2 ) * 1, 1 / Math.sqrt( 2 ) * 1 ]
		iex> Q.h( Q.q1 ).array
		[ 1 / Math.sqrt( 2 ) * 1, 1 / Math.sqrt( 2 ) * -1 ]

		iex> ( Q.h( Q.q0 ) |> Q.h ).array
		[ 1, 0 ]
		iex> ( Q.h( Q.q1 ) |> Q.h ).array
		[ 0, 1 ]
	"""
	def h( qbit ),  do: Numexy.dot( h_matrix(), qbit )
	def h_matrix(), do: 1 / Math.sqrt( 2 ) |> Numexy.mul( Numexy.new( [ [ 1, 1 ], [ 1, -1 ] ] ) )
…
すると、テスト失敗しました
Running tests...
Compiling 1 file (.ex)

  1) doctest Q.h/1 (2) (QDocTest)
     test/q_doc_test.exs:3
     Doctest failed
     code:  ( Q.h( Q.q0 ) |> Q.h ).array === [ 1, 0 ]
     left:  [0.9999999999999998, 0.0]
     right: [1, 0]
     stacktrace:
       lib/q.ex:72: Q (module)

.........

Finished in 0.1 seconds
9 doctests, 1 test, 1 failure
中身を見てみると、値が近似していますが、微妙にズレています
これを補正するために、以下の修正を追加します
…
	@doc """
	Hadamard gate.

	## Examples
		iex> Q.h( Q.q0 ).array
		[ 1 / Math.sqrt( 2 ) * 1, 1 / Math.sqrt( 2 ) * 1 ]
		iex> Q.h( Q.q1 ).array
		[ 1 / Math.sqrt( 2 ) * 1, 1 / Math.sqrt( 2 ) * -1 ]

		iex> ( Q.h( Q.q0 ) |> Q.h ).array
		[ 1, 0 ]
		iex> ( Q.h( Q.q1 ) |> Q.h ).array
		[ 0, 1 ]
	"""
	def h( qbit ),  do: Numexy.dot( h_matrix(), qbit ) |> to_bit
	def h_matrix(), do: 1 / Math.sqrt( 2 ) |> Numexy.mul( Numexy.new( [ [ 1, 1 ], [ 1, -1 ] ] ) )
	def to_bit(  0.9999999999999998 ), do:  1
	def to_bit( -0.9999999999999998 ), do: -1
	def to_bit(  0.0 ), do: 0
	def to_bit( value ) when is_list( value ) do
		case value |> List.first |> is_list do
			true  -> value |> Enum.map( &( &1 |> Enum.map( fn n -> to_bit( n ) end ) ) )
			false -> value |> Enum.map( &( to_bit( &1 ) ) )
		end
	end
	def to_bit( %Array{ array: list, shape: _ } ), do: list |> to_bit |> Numexy.new
	def to_bit( others ), do: others
…
これで、微妙なズレも吸収できるようになりました
CNOTゲートを実装する
CNOTゲートの定義は以下の通りです
CNOT =
  \begin{bmatrix}
    1 & 0 & 0 & 0
    \\
    0 & 1 & 0 & 0
    \\
    0 & 0 & 0 & 1
    \\
    0 & 0 & 1 & 0
  \end{bmatrix}
これまでのゲートは、1つの量子ビットを対象としていましたが、CNOTは、2つの量子ビットを対象として、以下のような変換を行います
第1ビットが1のとき、第2ビットを反転させ、第1ビットが0のときは変化させないゲートです
なお、$\otimes$ はテンソル積を表します
\begin{align}
  CNOT | 0 0 \rangle =
  CNOT \begin{pmatrix}
    \begin{pmatrix} 0 \\ 1 \end{pmatrix}
    \otimes
    \begin{pmatrix} 0 \\ 1 \end{pmatrix}
  \end{pmatrix}
  =
  CNOT \begin{pmatrix} 1 \\ 0 \\ 0 \\ 0 \end{pmatrix}
  =
  \begin{pmatrix} 1 \\ 0 \\ 0 \\ 0 \end{pmatrix} =
  | 0 0 \rangle
\end{align}
\begin{align}
  CNOT | 0 1 \rangle =
  CNOT \begin{pmatrix}
    \begin{pmatrix} 0 \\ 1 \end{pmatrix}
    \otimes
    \begin{pmatrix} 1 \\ 0 \end{pmatrix}
  \end{pmatrix}
  =
  CNOT \begin{pmatrix} 0 \\ 1 \\ 0 \\ 0 \end{pmatrix}
  =
  \begin{pmatrix} 0 \\ 1 \\ 0 \\ 0 \end{pmatrix} =
  | 0 1 \rangle
\end{align}
\begin{align}
  CNOT | 1 0 \rangle =
  CNOT \begin{pmatrix}
    \begin{pmatrix} 1 \\ 0 \end{pmatrix}
    \otimes
    \begin{pmatrix} 0 \\ 1 \end{pmatrix}
  \end{pmatrix}
  =
  CNOT \begin{pmatrix} 0 \\ 0 \\ 1 \\ 0 \end{pmatrix}
  =
  \begin{pmatrix} 0 \\ 0 \\ 0 \\ 1 \end{pmatrix} =
  | 1 1 \rangle
\end{align}
\begin{align}
  CNOT | 1 1 \rangle =
  CNOT \begin{pmatrix}
    \begin{pmatrix} 1 \\ 0 \end{pmatrix}
    \otimes
    \begin{pmatrix} 1 \\ 0 \end{pmatrix}
  \end{pmatrix}
  =
  CNOT \begin{pmatrix} 0 \\ 0 \\ 0 \\ 1 \end{pmatrix}
  =
  \begin{pmatrix} 0 \\ 0 \\ 1 \\ 0 \end{pmatrix} =
  | 1 0 \rangle
\end{align}
それでは、ElixirでTDDしていきましょう
…
	@doc """
	Controlled NOT gate.

	## Examples
		iex> Q.cnot( Q.q0, Q.q0 ).array	# |00>
		[ [ 1, 0 ], [ 0, 0 ] ]
		iex> Q.cnot( Q.q0, Q.q1 ).array	# |01>
		[ [ 0, 1 ], [ 0, 0 ] ]
		iex> Q.cnot( Q.q1, Q.q0 ).array	# |11>
		[ [ 0, 0 ], [ 0, 1 ] ]
		iex> Q.cnot( Q.q1, Q.q1 ).array	# |10>
		[ [ 0, 0 ], [ 1, 0 ] ]
	"""
	def cnot( qbit1, qbit2 ), do: ""
…
テスト失敗しますので、テスト成功する実装をします
CNOTは、最初から、行列計算で実装していきましょう
…
	@doc """
	Controlled NOT gate.

	## Examples
		iex> Q.cnot( Q.q0, Q.q0 ).array	# |00>
		[ [ 1, 0 ], [ 0, 0 ] ]
		iex> Q.cnot( Q.q0, Q.q1 ).array	# |01>
		[ [ 0, 1 ], [ 0, 0 ] ]
		iex> Q.cnot( Q.q1, Q.q0 ).array	# |11>
		[ [ 0, 0 ], [ 0, 1 ] ]
		iex> Q.cnot( Q.q1, Q.q1 ).array	# |10>
		[ [ 0, 0 ], [ 1, 0 ] ]
	"""
	def cnot( qbit1, qbit2 ), do: ( Numexy.dot( cnot_matrix(), tensordot( qbit1, qbit2 ) ) ).array |> Numexy.reshape( 2 )
	def cnot_matrix() do
		Numexy.new(
			[
				[ 1, 0, 0, 0 ],
				[ 0, 1, 0, 0 ],
				[ 0, 0, 0, 1 ],
				[ 0, 0, 1, 0 ],
			]
		)
	end
	def tensordot( %Array{ array: xm, shape: _xm_shape }, %Array{ array: ym, shape: _ym_shape } ) do
		xv = List.flatten( xm )
		yv = List.flatten( ym )
		xv
		|> Enum.map( fn x -> yv |> Enum.map( fn y -> x * y end ) end )
		|> List.flatten
		|> Numexy.new
	end
…
テンソル積が、Numexyに実装されていないため、ここでローカル実装しました
Yゲートを実装する
Yゲートの定義は以下の通りです
Xゲートと異なり、複素数が出てきます
Y= \begin{bmatrix} 0 & -i \\ i & 0 \end{bmatrix}
以下のような変換を行います
\begin{align}
  Y \begin{pmatrix} 1 \\ 0 \end{pmatrix} & = \begin{pmatrix} 0 \\ i \end{pmatrix}
  \\
  Y \begin{pmatrix} 0 \\ 1 \end{pmatrix} & = \begin{pmatrix} -i \\ 0 \end{pmatrix}
\end{align}
次に実装ですが、まずComplexNumを使った複素数は、ComplexNum.newの第一引数に実数、第二引数に虚数という構成となります
また、ComplexNum.newで生成された、実数+虚数は、.realで実数、.imaginaryで虚数が取得できます
iex> a = ComplexNum.new( 1, 2 )
# ComplexNum (Cartesian) <1 + 2·𝑖>
iex> a.real
1
iex> a.a.imaginary
2
また、虚数を2乗すると、ちゃんと実数の-1になります
iex> b = ComplexNum.new( 0, 1 )
# ComplexNum (Cartesian) <1·𝑖>
iex> ComplexNum.mult( b, b )
# ComplexNum (Cartesian) <-1>
さて複素数の説明は、これくらいにして、ElixirでTDDしていきましょう
…
	@doc """
	Y gate.

	## Examples
		iex> Q.y( Q.q0 ).array
		[ 0, ComplexNum.new( 0, 1 ) ]
		iex> Q.y( Q.q1 ).array
		[ ComplexNum.new( 0, -1 ), 0 ]
	"""
	def y( qubit ), do: ""
…
テスト失敗しますので、テスト成功する実装をします
…
	@doc """
	Y gate.

	## Examples
		iex> Q.y( Q.q0 ).array
		[ 0, ComplexNum.new( 0, 1 ) ]
		iex> Q.y( Q.q1 ).array
		[ ComplexNum.new( 0, -1 ), 0 ]
	"""
	def y( qbit ),  do: complex_dot( y_matrix(), qbit )
	def y_matrix(), do: Numexy.new( [ [ 0, ComplexNum.new( 0, -1 ) ], [ ComplexNum.new( 0, 1 ), 0 ] ] )
	def complex_dot( %Array{ array: xm, shape: { xm_row, nil } }, %Array{ array: ym, shape: { ym_row, nil } } ) when xm_row == ym_row do
		complex_dot_vector( xm, ym ) |> Numexy.new
	end
	def complex_dot( %Array{ array: xm, shape: { _, xm_col } }, %Array{ array: ym, shape: { ym_row, nil } } ) when xm_col == ym_row do
		( for x <- xm, y <- [ ym ], do: [ x, y ] )
		|> Enum.map( fn [ x, y ] -> complex_dot_vector( x, y ) end )
		|> Numexy.new
	end
	def complex_dot_vector( xm, ym ) do
		result = Enum.zip( xm, ym )
		|> Enum.reduce( 0, fn { a, b }, acc -> complex_mult( a, b ) |> complex_add( acc ) end )
		if result == ComplexNum.new( 0, 0 ), do: 0, else: result
	end
	def complex_mult( a, b ) when is_map( a ) or is_map( b ), do: ComplexNum.mult( a, b )
	def complex_mult( a, b ),                                 do: a * b
	def complex_add(  a, b ) when is_map( a ) or is_map( b ), do: ComplexNum.add(  a, b )
	def complex_add(  a, b ),                                 do: a + b
…
複素数に対応した内積が、Numexyに実装されていないため、ここでローカル実装しました
ComplexNum.multとComplexNum.addが、実数同士の演算に対応していなかったので、これらも関数パターンマッチで切り替わるようラップしました
複素数0+0$i$は、実数0に変換する対応も入れました
更に、Yゲートも2回、適用するテストを追加します(こちらは1発でテスト成功します)
defmodule Q do
…
	@doc """
	Y gate.

	## Examples
		iex> Q.y( Q.q0 ).array
		[ 0, ComplexNum.new( 0, 1 ) ]
		iex> Q.y( Q.q1 ).array
		[ ComplexNum.new( 0, -1 ), 0 ]

		iex> ( Q.y( Q.q0 ) |> Q.y ).array
		[ 1, 0 ]
		iex> ( Q.y( Q.q1 ) |> Q.y ).array
		[ 0, 1 ]
	"""
	def y( qbit ),  do: complex_dot( y_matrix(), qbit )
…
最終的なテスト結果は、このようになりました
Running tests...
Compiling 1 file (.ex)
..............

Finished in 0.2 seconds
13 doctests, 1 test, 0 failures
下記コマンドで、ここまでのdoctestからリファレンスを生成できます
mix hex.publish
リファレンスは、下記URLとなります
https://hexdocs.pm/quantex/Q.html
量子ゲートを組み合わせる
さて、量子ゲートが一通り揃ったので、ゲートを組み合わせて、何らかのアルゴリズムを作れるようになっています
最もお手軽な、グローバーのアルゴリズムを作ってみましょう
グローバーのアルゴリズムの解説は、一緒にOpenQLを主催する、@kyamaz さんの下記コラムが、分かりやすいです
Grover アルゴリズムについて
https://qiita.com/kyamaz/items/37973effe783197291bc
グローバーのアルゴリズムを作ってみる
Ctrl+Cを2回押して、mix test.watchを終了した後、iexを起動します
iex -S mix
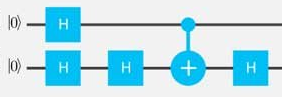
この部分を書きます
CNOTした後の、上の線/下の線だけを取り出せるよう、以下関数を追加します
…
	@doc """
	Cut qbit.

	## Examples
		iex> Q.cut( Numexy.new( [ Q.q0.array, Q.q1.array ] ), 0 ).array
		[ 1, 0 ]
		iex> Q.cut( Numexy.new( [ Q.q0.array, Q.q1.array ] ), 1 ).array
		[ 0, 1 ]
	"""
	def cut( qbit, no ), do: qbit.array |> Enum.at( no ) |> Numexy.new
…
上の線をq0a、下の線をq1aとします
iex> q0a = Q.q0 |> Q.h
iex> q1a = Q.q0 |> Q.h |> Q.h |> Q.cnot( q0a ) |> Q.cut( 1 ) |> Q.h
次に、この部分です
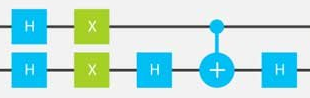
上の線をq0b、下の線をq1bとします
iex> q0b = q0a |> Q.h |> Q.x
iex> q1b = q1a |> Q.h |> Q.x |> Q.h |> Q.cnot( q0b ) |> Q.cut( 1 ) |> Q.h
最後に、この部分です
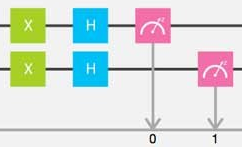
上の線をq0c、下の線をq1cとします
iex> q0c = q0b |> Q.x |> Q.h
iex> q1c = q1b |> Q.x |> Q.h
終わり
Elixir+TDDで、非常にシンプルな、量子コンピュータシミュレータを作ってみました
量子コンピュータに慣れていない方からすると、「なんじゃこりゃ?」という感じかも知れませんが、シミュレータの開発が、思ったよりも身近に感じていただけたら幸いです
今回は、実機では存在する「観測」や「量子テレポーテーション」が未実装ですが、確率的回答もシミュレートできるようにしていきたいと思います
そうそう、昨年から、Advent Calendarも設けられていますので、以下も読んでいくと、更にディープな量子コンピュータの世界を楽しめると思います
https://qiita.com/advent-calendar/2018/quantum
https://qiita.com/advent-calendar/2018/quantum2
https://qiita.com/advent-calendar/2017/quantum
p.s.「いいね」よろしくお願いします
ページ左上の  や
や  のクリックを、どうぞよろしくお願いします
![]()
ここの数字が増えると、書き手としては「ウケている」という感覚が得られ、連載を更に進化させていくモチベーションになりますので、もっとElixirネタを見たいというあなた、私達と一緒に盛り上げてください!![]()