three.jsをインストールして、立方体を表示することを目標にします。
アプリケーションフレームワークには、Svelteを使用します!
特徴
WebGL APIをラッピングしているので、簡単な設定で3D体験が可能になります。
プリミティブ図形の表示や、DCCツール(BlenderやMaya)で制作した3DCGを読み込ませて表示できます。
準備するもの
- MacOS
- Nodeの最新バージョン
- VSCode
- Svelte(インストール方法はこちらにまとめています)
Nodeの最新バージョン
※以前の記事でNodeのバージョン管理ツールからインストールする方法を記載しています!
three.jsをインストール
# three.jsインストール
npm install three

# TypeScript用の型定義(ts使うなら必須)
npm install -D @types/three
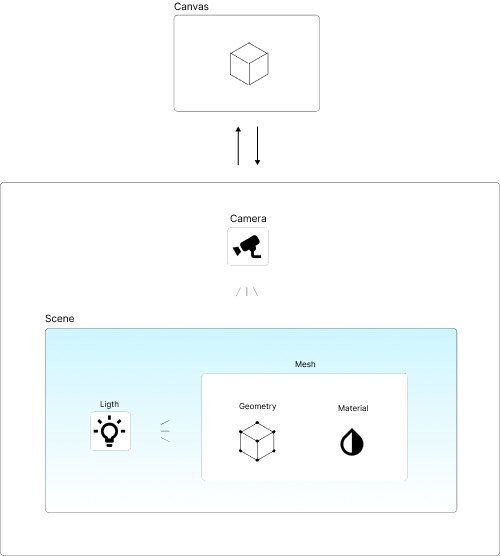
3DCGの構成
大きく分けて、カメラ、シーン、ライト、メッシュ、ジオメトリ、マテリアルで構成されています。
最終的に、キャンバスにレンダリングされて、Webブラウザで見れるようになります。
メッシュにジオメトリ、マテリアルを入れて、ライトで照らす。それをシーンとしてグループ化します。
カメラでシーンを撮影し、キャンバスに描画(レンダリング)する流れとなります。
フォルダ構成
svelteのフォルダ構成になります。lib配下にthree用のクラスを作成し、+page.svelteでimportします。
フォルダ構成
svelte-app
└── src
    ├── app.d.ts
    ├── app.html
    ├── index.test.ts
    ├── lib
    │   ├── index.ts
    │   └── three
    │       └── App.js
    └── routes
        ├── +page.svelte
        └── three
            └── +page.svelte
three/+page.svelte
<script lang="ts">
	import { onMount } from 'svelte';
	import { App } from '$lib/three/App';

	let threeApp: App;

	// https://svelte.jp/tutorial/onmount
	onMount(async () => {
		threeApp = new App();
	});
</script>

<div>
	<canvas id="canvas" />
</div>
注意としては、サーバーサイド処理では、Windowオブジェクトが参照できないため、画面描画後に3DCGを描画するようonMount内に記述します。
App.js
import * as THREE from 'three';

class App {
	constructor() {
		// 縦横のサイズをウィンドウから取得
		const width = window.innerWidth / 2;
		const height = window.innerHeight / 1.5;
		// キャンバスを指定
		const canvas = document.getElementById('canvas') || undefined;
		const renderer = new THREE.WebGLRenderer({
			canvas,
			antialias: true
		});
		renderer.setSize(width, height);
		renderer.setPixelRatio(window.devicePixelRatio);
		renderer.setClearColor('#000'); // 背景黒

		// カメラを作成
		const fov = 45; // カメラの垂直視野角
		const aspect = width / height;
		const camera = new THREE.PerspectiveCamera(fov, aspect, 1, 1000);
		camera.position.z = 3;

		// メッシュを作成
		const geometry = new THREE.BoxGeometry(1, 1, 1);
		const material = new THREE.MeshPhongMaterial({
			color: '#fff' // オブジェクト白
		});
		const mesh = new THREE.Mesh(geometry, material);
		mesh.rotation.x = Math.PI * 0.15; // x軸の回転角(ラジアン)
		mesh.rotation.y = Math.PI * 0.25; // y軸の回転角(ラジアン)

		// ライトを作成
		const light = new THREE.PointLight();
		// ライトを手前右上に移動
		light.position.x = 0.5;
		light.position.y = 0.5;
		light.position.z = 3.5;

		// シーンを作成
		const scene = new THREE.Scene();
		// メッシュとライトを追加
		scene.add(mesh);
		scene.add(light);
		// カメラで撮影したシーンをcanvas要素に描画
		renderer.render(scene, camera);
	}
}
export { App };
描画するcanvasを指定し、3DCGの構成通りに設定していきます。
結果
localhost:5173/threeにアクセスして、立方体が表示されたら完成です!
