1. はじめに
Pythonはライブラリが充実していて、使いやすくてパワフルなテストツールをお手軽に作れます。本稿ではMenu Based CLI(メニュー形式のコマンドラインインターフェース)で操作するテストツールの基本形とそのカスタマイズ例をご紹介します。
例1: 数値計算
例2: 画像の一部を切り出して保存
PythonやOpenCVのインストール方法は付録Aを、動作確認環境は付録Bをご覧ください。
2. 基本形
カスタマイズのベースとなるプログラムを以下に示します。
# myTools.py by ka's(https://qiita.com/pbjpkas) 2021
# python 3.x
import sys


def function_a():
    print("Hello, World.")


def main():
    while True:
        print("== myTools ==")
        print("a: function_a")
        print("x: exit")

        s = input(">")

        if s == "a":
            function_a()

        if s == "x":
            print("Bye.")
            sys.exit()


main()
step.1
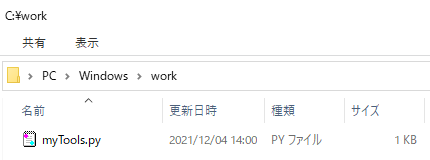
Cドライブの直下にworkというフォルダを作成し上記プログラムをmyTools.pyという名前で保存します。
NOTE:
ソースコードのウィンドウにマウスポインタを乗せると右上にアイコンが出現します。
これをクリックするとソースコードがクリップボードへコピーされます。
step.2
次に、コマンドプロンプトを起動しpythonで実行します。
cd c:\work
python myTools.py
step.3
以下のようにメニューとプロンプト(>)が表示されればOKです。
== myTools ==
a: function_a
x: exit
>
- aを入力してEnterするとfunction_a()が実行され、メニューに戻ります。
- xを入力してEnterするとBye.と表示され終了します。
- それ以外は無視され、メニューが再度表示されます。
c:\work>python myTools.py
== myTools ==
a: function_a
x: exit
>a
Hello, World.
== myTools ==
a: function_a
x: exit
>b
== myTools ==
a: function_a
x: exit
>x
Bye.

c:\work>
3. 数値計算
一つ目の例として「先月と今月のメトリクス」のような2つの数値の比較を想定します。OSに標準でインストールされている電卓でも計算できますが、「差」と「何倍か」の両方を知りたいといった、計算する項目が複数あるとちょっと手間です。そこでテストツールに組み込みます。
要件
- 新旧の値を入力すると「差」および「何倍か」を計算すること
- 旧の値が0の場合は「何倍か」は0とすること
- 何倍かは小数点二けたで表示すること
実装
- input()の戻り値は文字列(str型)のためfloat型にキャストして計算します。
# myTools.py by ka's(https://qiita.com/pbjpkas) 2021
# python 3.x
import sys


def comparison_value():
    try:
        old_value = float(input("old>"))
        new_value = float(input("new>"))
    except:
        print(sys.exc_info())
        return False

    delta = new_value - old_value
    if old_value != 0:
        times = new_value / old_value
    else:
        times = 0

    print("delta:%f, times:%.2f" % (delta, times))
    return True


def main():
    while True:
        print("== myTools ==")
        print("a: comparison of old and new value")
        print("x: exit")

        s = input(">")

        if s == "a":
            comparison_value()

        if s == "x":
            print("Bye.")
            sys.exit()


main()
実行例
oldに256、newに384を入力した例と、oldに384、newに256を入力した例を以下に示します。電卓では手間だけどExcelを使うほどでもないような計算が手軽にできるようになりました。
c:\work>python myTools.py
== myTools ==
a: comparison of old and new value
x: exit
>a
old>256
new>384
delta:128.000000, times:1.50
== myTools ==
a: comparison of old and new value
x: exit
>a
old>384
new>256
delta:-128.000000, times:0.67
== myTools ==
a: comparison of old and new value
x: exit
>
補足
float型(浮動小数点数)の演算については「15. 浮動小数点演算、その問題と制限(docs.python.org)」もご参考ください。
4. 画像の一部を切り出して保存
Pythonでテストツールを製作する一番のメリットは様々なライブラリの恩恵を受けられることです。そこで、本節ではスクリーンショットの一部を切り出してバグ票に貼り付ける作業を想定し、OpenCVで画像を切り出してファイルに保存する機能を実装します。
要件
- 以下のパラメータを入力できること
- 加工元の画像ファイル名
- 切り出す座標(x0, y0, x1, y1)の値
- 保存するファイル名
- 以下の場合はエラーメッセージを表示してメニューに戻ること
- 加工元ファイルの読み込みに失敗した場合
- 切り出す座標の値が加工元ファイルの範囲外、x0>x1、y0>y1の場合
- 切り出した画像の保存に失敗した場合
実装
- cv2をimportします。
- パラメータの入力を受け持つcrop_image_menu()と画像を切り出すcrop_image()を実装しmenu()から呼べるようにします。
参考
# myTools.py by ka's(https://qiita.com/pbjpkas) 2021
# python 3.x
import sys
import cv2


def comparison_value():
    try:
        old_value = float(input("old>"))
        new_value = float(input("new>"))
    except:
        print(sys.exc_info())
        return False

    delta = new_value - old_value
    if old_value != 0:
        times = new_value / old_value
    else:
        times = 0

    print("delta:%f, times:%.2f" % (delta, times))
    return True


def crop_image(filename_in, x0, y0, x1, y1, filename_out):
    img = cv2.imread(filename_in, cv2.IMREAD_COLOR)
    # 加工元ファイルを開けることの確認
    if img is None:
        print("Input File Error.")
        return False

    # 座標がint型にキャストできることを確認
    try:
        v0 = int(y0)
        v1 = int(y1)
        h0 = int(x0)
        h1 = int(x1)
    except:
        print("Coordinate Value Error(1).")
        print(sys.exc_info())
        return False

    # 座標が加工元画像の範囲内、かつ、v0<v1、h0<h1であることの確認
    # print("original image size v:%d, h:%d" % (img.shape[0],img.shape[1]))
    if 0<=v0 and v0<=img.shape[0] and \
       0<=v1 and v1<=img.shape[0] and \
       0<=h0 and h0<=img.shape[1] and \
       0<=h1 and h1<=img.shape[1] and \
       v0<v1 and h0<h1 :
        img2 = img[v0:v1, h0:h1]
    else:
        print("Coordinate Value Error(2).")
        return False

    try:
        ret = cv2.imwrite(filename_out, img2)
        if ret != True:
            print("Output File Error.")
            return False
    except:
        print("Output File Error.")
        print(sys.exc_info())
        return False

    return True


def crop_image_menu():
    filename_in = input("input file>")
    x0 = input("x0>")
    y0 = input("y0>")
    x1 = input("x1>")
    y1 = input("y1>")
    filename_out = input("output file>")
    s = input("OK? y/n>")
    if s == "y":
        ret = crop_image(filename_in, x0, y0, x1, y1, filename_out)
        return ret
    else:
        return False


def main():
    while True:
        print("== myTools ==")
        print("a: comparison of old and new value")
        print("b: crop image")
        print("x: exit")

        s = input(">")

        if s == "a":
            comparison_value()

        if s == "b":
            crop_image_menu()

        if s == "x":
            print("Bye.")
            sys.exit()


main()
実行例
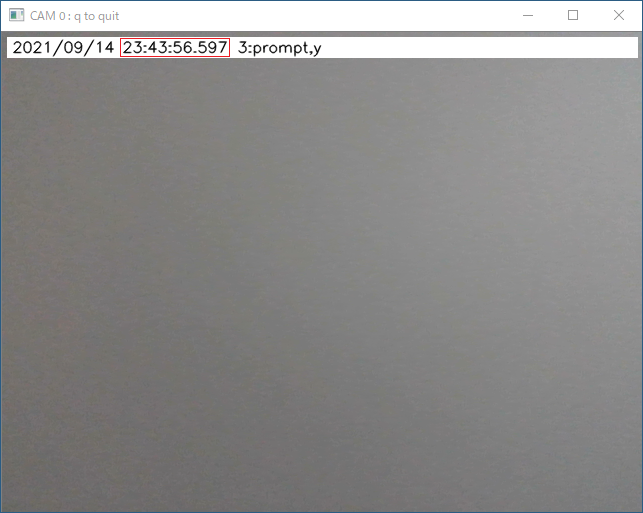
以下のサンプル画像(sample.png1)をC:\workに配置し、赤枠部分(x0:120、y0:38、x1:230、y1:57)を切り出してout.pngに保存します。
c:\work>python myTools.py
== myTools ==
a: comparison of old and new value
b: crop image
x: exit
>b
input file>sample.png
x0>120
y0>38
x1>230
y1>57
output file>out.png
OK? y/n>y
== myTools ==
a: comparison of old and new value
b: crop image
x: exit
>
5. おわりに
テストツール製作の一歩目として、基本形のプログラムをカスタマイズしながら数値計算のプログラムと画像を切り出して保存するプログラムを実装しました。Pythonとライブラリを組み合わせることでメニュー形式ならではの操作性、取っつきやすさとライブラリのパワー2を兼ね備えたテストツールを作れます。
筆者の考えるPythonでテストツールを作るメリットを以下に挙げます。
- ライブラリが豊富
- UART(RS-232C)通信(PySerial)
- 計測器の制御(PyVISA)
- 画像処理(OpenCV、pyocr)
- シェルコマンドの実行(subprocess)
- マルチスレッドの処理(threading)
- たいていのことはググると見つかる
- Raspberry Piのようなシングルボードコンピュータを治具として利用できる
- UIをメニュー形式からコマンドライン形式にすることで自動化ツールに流用できる
- 構造化プログラミング、オブジェクト指向プログラミングのどちらもOK
- returnで複数のパラメータを返すのが簡単にできる
デメリットとしてPythonやライブラリのバージョン依存問題(はまるとちょっと面倒…)がありますがこれはPythonに限ったことでもないと思います。
Pythonで始めるテストツール製作、おススメです。
付録A. 環境構築
A.1 Pythonのインストール
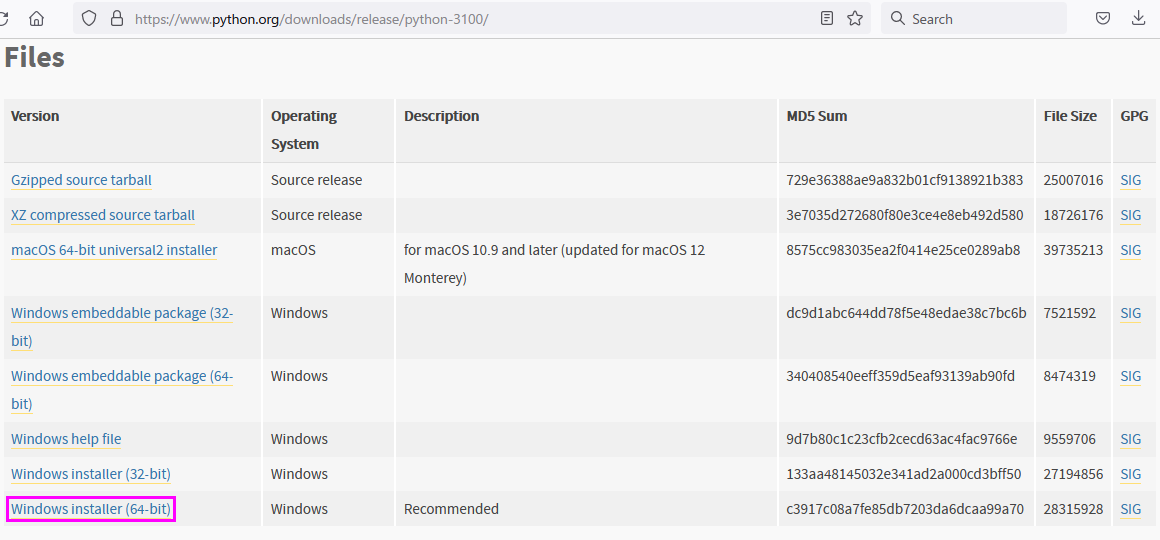
- Python.org → Download
- Latest Version(2021/12/4時点では3.10.0)
- 一番下の、RecommendedとなっているWindows Installer(64-bit)をダウンロードする
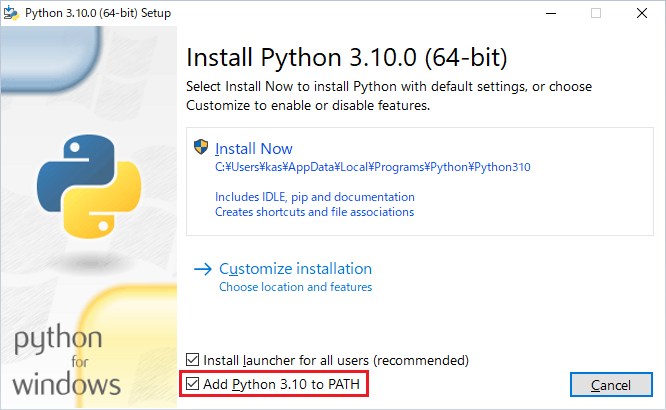
- Add Python 3.10 to PATHにチェックを入れてからInstall Now
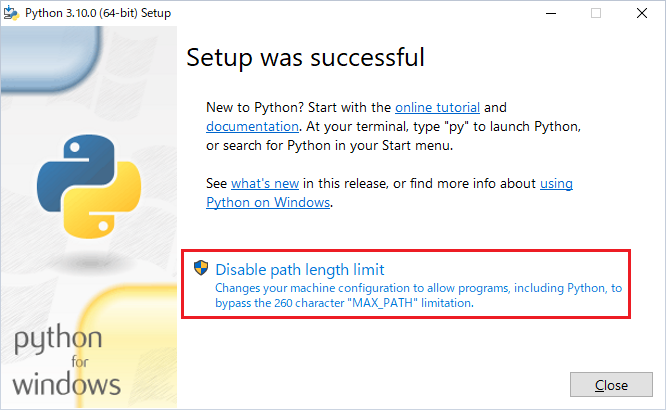
- Disable path length limitを押下してからClose(お好みで)
A.2 OpenCVのインストール
コマンドプロンプトで以下のpipコマンドを実行します。
pip install opencv-python
pip install opencv-contrib-python
付録B. 動作確認環境
Windows10 64bit バージョン21H1です。Pythonやライブラリのバージョンを以下に示します。
>python --version
Python 3.10.0

>pip list
Package               Version
--------------------- --------
numpy                 1.21.4
opencv-contrib-python 4.5.4.60
opencv-python         4.5.4.60
pip                   21.2.3
setuptools            57.4.0
付録C. 画像切り出しプログラムの動作確認内容
sample.pngは横643ピクセルx縦513ピクセルの画像です。
正常系
1x1ピクセル(切り出しサイズの最小値)、任意のサイズ、全体(切り出しサイズの最大値)の3パターン+αを確認しています。
| No. | 切り出す箇所 | input file | x0 | y0 | x1 | y1 | output file | 期待結果 | 実行結果 |
|---|---|---|---|---|---|---|---|---|---|
| 1 | 赤枠部分 | sample.png | 120 | 38 | 230 | 57 | out.png | 赤枠部分がout.pngに保存される | OK |
| 2 | 1x1 pixel | sample.png | 0 | 0 | 1 | 1 | 1x1-1.png | 元画像左上1x1 pixelが1x1-1.pngに保存される | OK |
| 3 | 1x1 pixel | sample.png | 642 | 512 | 643 | 513 | 1x1-2.png | 元画像右下1x1 pixelが1x1-2.pngに保存される | OK |
| 4 | 全体 | sample.png | 0 | 0 | 643 | 513 | 643x513.png | 元画像の全体が643x513.pngに保存される | OK |
| 5 | 左上 | sample.png | 0 | 0 | 20 | 20 | corner-ul.png | 元画像左上20x20 pixelがcorner-ul.pngに保存される | OK |
| 6 | 左下 | sample.png | 0 | 493 | 20 | 513 | corner-bl.png | 元画像左下20x20 pixelがcorner-bl.pngに保存される | OK |
| 7 | 右上 | sample.png | 623 | 0 | 643 | 20 | corner-ur.png | 元画像右上20x20 pixelがcorner-ur.pngに保存される | OK |
| 8 | 右下 | sample.png | 623 | 493 | 643 | 513 | corner-br.png | 元画像右下20x20 pixelがcorner-br.pngに保存される | OK |
エラー処理
Input File Error
| No. | エラー発生条件 | input file | x0 | y0 | x1 | y1 | output file | 期待結果 | 実行結果 |
|---|---|---|---|---|---|---|---|---|---|
| 1 | 存在しないファイルをinput fileに指定する | aaa.png | 10 | 10 | 20 | 20 | bbb.png | Input File Error.が返ってくる | OK |
| 2 | input fileを空欄にする | (空欄) | 10 | 10 | 20 | 20 | bbb.png | Input File Error.が返ってくる | OK |
Output File Error
| No. | エラー発生条件 | input file | x0 | y0 | x1 | y1 | output file | 期待結果 | 実行結果 |
|---|---|---|---|---|---|---|---|---|---|
| 1 | output fileのパスに存在しないディレクトリを含める | sample.png | 10 | 10 | 20 | 20 | foo\bbb.png | Output File Error.が返ってくる | OK |
| 2 | output fileを空欄にする | sample.png | 10 | 10 | 20 | 20 | (空欄) | Output File Error.が返ってくる | OK |
| 3 | output fileの拡張子を画像以外のものにする | sample.png | 10 | 10 | 20 | 20 | bbb.exe | Output File Error.が返ってくる | OK |
Coordinate Value Error(1)
| No. | 確認方法 | input file | x0 | y0 | x1 | y1 | output file | 期待結果 | 実行結果 |
|---|---|---|---|---|---|---|---|---|---|
| 1 | 切り出す座標の値にアルファベットを与える | sample.png | a | 10 | 20 | 20 | bbb.png | Coordinate Value Error(1).が返ってくる | OK |
| 2 | 切り出す座標の値に小数を含む数値を与える | sample.png | 10 | 10 | 20 | 20.5 | bbb.png | Coordinate Value Error(1).が返ってくる | OK |
Coordinate Value Error(2)
| No. | 確認方法 | input file | x0 | y0 | x1 | y1 | output file | 期待結果 | 実行結果 |
|---|---|---|---|---|---|---|---|---|---|
| 1 | 切り出す座標の値に負の整数を与える | sample.png | -10 | 10 | 20 | 20 | bbb.png | Coordinate Value Error(2).が返ってくる | OK |
| 2 | 切り出す座標の値に元画像の範囲外の数値を与える | sample.png | 10 | 10 | 20 | 514 | bbb.png | Coordinate Value Error(2).が返ってくる | OK |
| 3 | 切り出す座標の値にx0>x1となる数値を与える | sample.png | 20 | 10 | 10 | 20 | bbb.png | Coordinate Value Error(2).が返ってくる | OK |
| 4 | 切り出す座標の値にy0>y1となる数値を与える | sample.png | 10 | 20 | 20 | 10 | bbb.png | Coordinate Value Error(2).が返ってくる | OK |
付録D. ソフトウェアテストのアドベントカレンダー参加記事
- M5StackとPythonで受入テスト自動化の要素技術を試す (ソフトウェアテスト #2 Advent Calendar 2018 | 13日目)
- ストップウォッチを使う性能テストを実ステップ300行に満たない自動テストシステムで自動化する (ソフトウェアテストの小ネタ Advent Calendar 2019 | 13日目)
- 自作の自動テストツールをJenkinsで実行する (ソフトウェアテストの小ネタ Advent Calendar 2020 | 3日目)
-
例えばsample.pngのタイムスタンプ部分はOpenCVで矩形の白背景や文字列を描画しています。OpenCVを組み込むとWebカメラの映像を動画で撮影したり、フレームを指定して動画から静止画像を切り出したり、画像に図形や文字列を重畳したりといったことも容易にできます。 ↩

