はじめに
Twitch APIを利用してみようでAPIを使えるようになったと思います。
しかしTwitch APIにはクライアントIDではなく、ユーザ認証によるアクセストークンが必要なものがあります。1
この記事ではアクセストークンを得るための解説を行います。
対象読者
- Getting Tokens: OAuthを読むのがめんどくさい人
事前に必要なもの
Twitch APIを利用してみようで取得したClient-ID
トークンの取得手順
公式の手順にもあるように、3通りの取得方法があります。
1. The OAuth implicit code flow gets user access tokens.
- ブラウザでのユーザ認証を通して、トークンを得る方法。
2. The OAuth authorization code flow gets user access tokens.
- ブラウザでのユーザ認証を通して、トークンを得る方法。
- 1.との違いは、ユーザ認証後のリダイレクトで得られるのが、
トークンを得るためのコードという点。 - 最終的に得られるトークンは有効期限が設定されている。
- ざっくり手順は以下の通り。
- ユーザ認証で、トークンを得るためのコードを取得
- コードを使って、トークン要求のPOST
- POSTのレスポンスでトークンが返ってくる。
3. The OAuth client credentials flow gets app access tokens.
- クライアントの秘密鍵を使った認証方法。
- 認証タイプが
App access tokenのAPIが利用できるようになる。 - ユーザ認証は不要で、CLIで完結する。
- この手順で得られるトークンも有効期限が設定されている。
トークンを取得してみる
公式の手順に従って認証してみましょう。
1. The OAuth implicit code flow
パラメータ
アクセスするためのURIとパラメータは以下の通り。
https://id.twitch.tv/oauth2/authorize?[クエリパラメータ]
| key名 | Type | 説明 |
|---|---|---|
| client_id | string | アプリケーション登録で取得したclient ID |
| redirect_uri | URI | アプリケーション登録で入力したOAuthのリダイレクトURL |
| response_type | string | token という文字で固定 |
| scope | string | scope(権限)をスペース区切りで指定。 |
トークンを取得してみる
認証後のリダイレクト先のWebサーバとHTMLを用意しておく必要があります。
お試しで動かすならnginxがお手軽です。
Windows版ならzipを解凍してnginx.exeを起動するだけでサーバが起動できます。
以下を、nginxのhtml/index.htmlに置き換えてください。
<!DOCTYPE html>
<html>
  <head>
    <meta charset="UTF-8" />
  </head>
  <script>
    if (location.hash) {
      alert(`トークン情報は${location.hash}だよ!`);
    }
  </script>
  <body>
    <a href="https://id.twitch.tv/oauth2/authorize?client_id=クライアントIDをここに&redirect_uri=http://localhost&response_type=token&scope=bits:read">Twitch認証</a>
  </body>
</html>
サーバを起動した状態で、ブラウザからhttp://localhostにアクセスします。
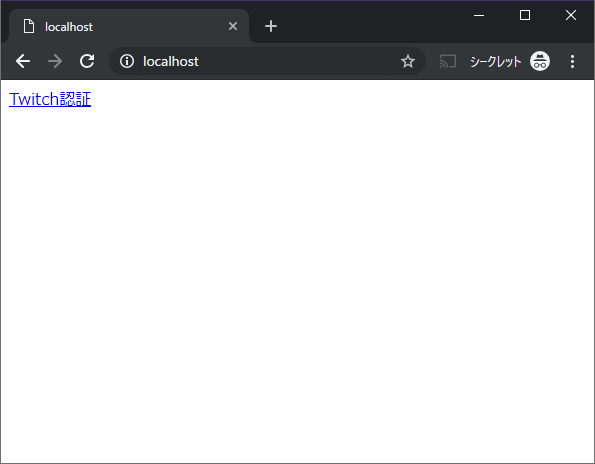
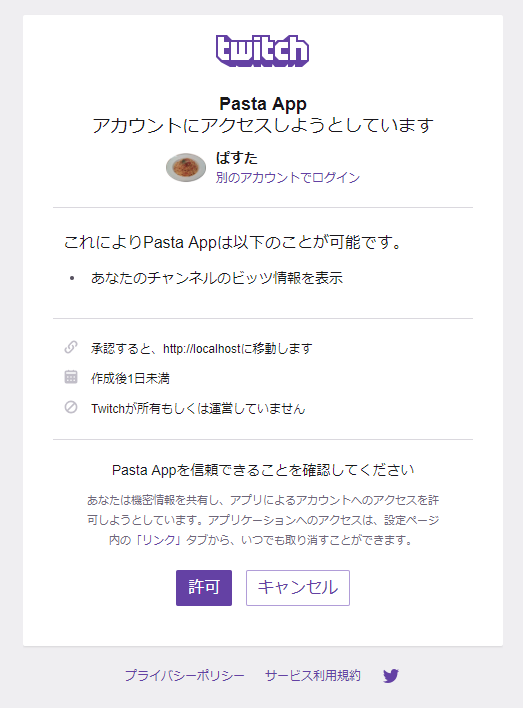
リンクをクリックするとログイン画面が表示されるので、ログインします。
以下のように権限を確認し、許可します。
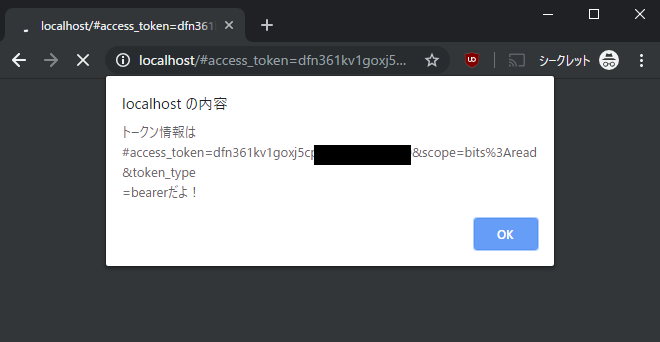
トークン情報と一緒にリダイレクト先に返ってきました。ここではリダイレクトURLをhttp://localhostに設定しているので、元のindex.htmlが表示されます。
画像の通り、ページ表示時にhash情報が指定されていればalertを表示するというスクリプトが起動しています。
実際のアプリケーションでは、トークン情報をWebStorageへ保存したり、NodeCG等へ渡したりするコードを書くことになると思います。各々の利用目的に合わせて書いてみてください。
2. The OAuth authorization code flow
(キモの部分はだいたい同じなので省略)
3. The OAuth client credentials flow
アプリケーション用の鍵取得
Twitchのコンソールから、アプリケーションの管理を開きます。

新しい秘密ボタンをクリックします。
以下の確認ダイアログが表示されるので、OKをクリック。
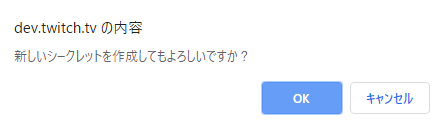
トークンが表示されます。このトークンはページを離れると参照できなくなるので注意。

パラメータ
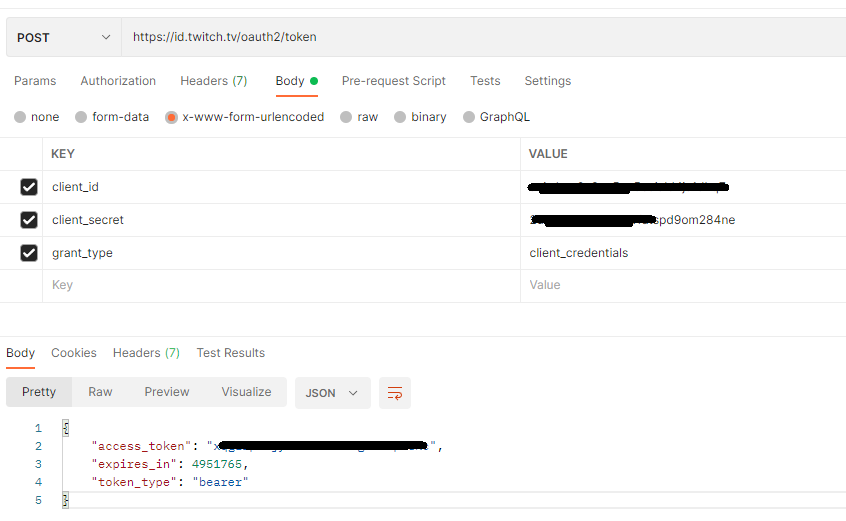
POSTですが、パラメータはリクエストボディではなく、クエリパラメータで指定します。意味わかんねぇ
| key名 | Type | 説明 |
|---|---|---|
| client_id | string | client ID |
| client_secret | string | クライアントの秘密のやつ |
| grant_type | string | client_credentials という文字で固定 |
以下はオプション。指定してもしなくてもよい。
| key名 | Type | 説明 |
|---|---|---|
| scope | string | scope(権限)をスペース区切りで指定。 |
トークンを取得してみる(Node.js)
Node.jsでのサンプルです。
const rp = require('request-promise');
const options = {
  method: 'POST',
  uri: 'https://id.twitch.tv/oauth2/token',
  form: {
    client_id: 'Client-IDをここに',
    client_secret: '秘密の方のトークンをここに',
    grant_type: 'client_credentials',
    scope: 'user:edit clips:edit' // 必要な権限をここに
  }
};

rp(options)
  .then(body => {
    const parsed = JSON.parse(body);
    console.log(JSON.stringify(parsed, null, '  '));
  })
  .catch(err => {
    console.log(err);
  });
{
  "name": "twitch",
  "version": "1.0.0",
  "description": "",
  "main": "index.js",
  "scripts": {},
  "author": "",
  "license": "ISC",
  "dependencies": {
    "request": "^2.88.0",
    "request-promise": "^4.2.4"
  }
}
実行すると以下のように結果が表示されます。
PS C:\test\twitch> node .\index.js
{
  "access_token": "ここにトークンが入ってる",
  "expires_in": 5537097,
  "scope": [
    "user:edit",
    "clips:edit"
  ],
  "token_type": "bearer"
}
トークンを取得してみる(curl)
curlでのサンプルです。レスポンスは省略。
curl -X POST 'https://id.twitch.tv/oauth2/token' \
-H 'Content-Type: application/x-www-form-urlencoded' \
-d 'client_id=Client-IDをここに&client_secret=秘密の方のトークンをここに&grant_type=client_credentials'
トークンを取得してみる(Postman)
取得したトークンを使ってAPIを利用してみる
OAuthのアクセストークンが必要なAPIを使ってみましょう。
New Twitch APIの例(ユーザ情報取得)
Get Usersを使ってみましょう。
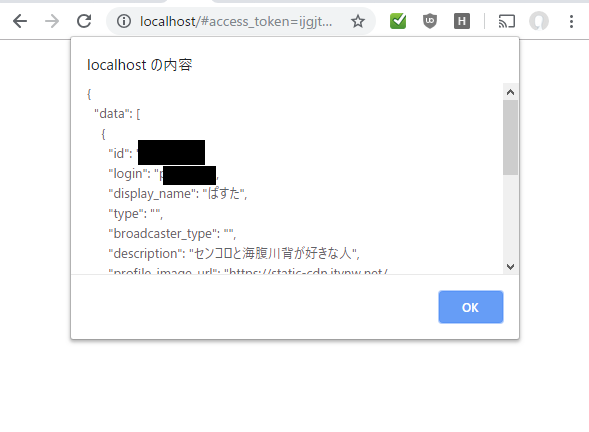
認証~API利用までを1個のhtmlで完結させる例です。
<!DOCTYPE html>
<html>
  <head>
    <meta charset="UTF-8" />
  </head>
  <script>
    if (location.hash) {
      const token = location.hash.match(/access_token=(.*)&scope/)[1]; // 雑にトークンを切り出す

      const method = 'GET';
      const headers = {
        Authorization: `Bearer ${token}`
      };
      fetch('https://api.twitch.tv/helix/users', { method, headers })
        .then(res => res.json())
        .then(res => {
          alert(JSON.stringify(res, null, '  '));
        })
        .catch(console.error);
    }
  </script>
  <body>
    <a href="https://id.twitch.tv/oauth2/authorize?client_id=クライアントIDをここに&redirect_uri=http://localhost&response_type=token&scope=user:read:email">Twitch認証</a>
  </body>
</html>
認証してリダイレクトすると、以下のように表示されます。
あとは取得したトークンを使って、自由にAPIを使いましょう。
Twitch API v5の例(チャンネル情報更新)
OAuthの認証方法はNew Twitch APIと同じです。scopeにv5のものを指定しておけば実行可能です。
今度はNode.jsから実行してみましょう。
配信タイトルとゲーム情報を同時に更新してみます。
const rp = require('request-promise');

// アプリケーションのクライアントID
const clientId = 'cccccccccccccccccccccc';
// OAuthトークン
const token = 'ooooooooooooooooooooo';
// 操作対象のチャンネルID
const channelId = '43594253';

/** チャンネル情報を更新 */
const execChannelUpdate = async () => {
  // まずはGETしてみる
  const getChOpt = {
    method: 'GET',
    uri: 'https://api.twitch.tv/kraken/channel',
    headers: {
      Accept: 'application/vnd.twitchtv.v5+json',
      'Client-ID': clientId,
      Authorization: `OAuth ${token}`
    },
    json: true
  };
  const getResponse = await rp(getChOpt);
  console.log(JSON.stringify(getResponse, null, '  '));

  // 更新してみる
  const updateOpt = {
    method: 'PUT',
    uri: `https://api.twitch.tv/kraken/channels/${channelId}`,
    headers: {
      Accept: 'application/vnd.twitchtv.v5+json',
      'Client-ID': clientId,
      Authorization: `OAuth ${token}`
    },
    json: true,
    body: {
      channel: {
        status: '海腹川背をやるよ',
        game: 'Umihara Kawase'
      }
    }
  };
  const putResponse = await rp(updateOpt);
  console.log(JSON.stringify(putResponse, null, '  '));
};

execChannelUpdate();
PS C:\test\twitch> node .\channelUpdate.js
{
  "mature": false,
  "status": "センコロ2",
  "broadcaster_language": "ja",
  "broadcaster_software": "unknown_rtmp",
  "display_name": "ぱすた",
  "game": "Senko no Ronde 2",
  "language": "ja",
  "_id": "43594253",
中略
{
  "mature": false,
  "status": "海腹川背をやるよ",
  "broadcaster_language": "ja",
  "broadcaster_software": "unknown_rtmp",
  "display_name": "ぱすた",
  "game": "Umihara Kawase",
  "language": "ja",
  "_id": "43594253",
後略
操作したチャンネルを見てみると、APIで更新した内容が反映されています。

おまけ
Scopeについて
ScopeはNew Twitch APIとTwitch API v5で分かれていますが、トークン要求時に混在指定することが可能です。
例えば以下のURLにアクセスすると、APIに必要な権限を片っ端から要求することができます。
https://id.twitch.tv/oauth2/authorize?client_id=クライアントIDをここに&redirect_uri=http://localhost&response_type=token&scope=analytics:read:extensions analytics:read:games bits:read channel:read:subscriptions clips:edit user:edit user:edit:broadcast user:read:email channel_check_subscription channel_commercial channel_editor channel_feed_edit channel_feed_read channel_read channel_stream channel_subscriptions collections_edit communities_edit communities_moderate user_blocks_edit user_blocks_read user_follows_edit user_read user_subscriptions viewing_activity_read

-
どのAPIで何の認証、および権限が必要かはNew Twitch API ReferenceでAuthenticationの項を参照してください。 ↩